


Beginning with NSX Intelligence 4.0.1, you can create labels in the NSX Intelligence visualization canvas.
These visualization labels are only used within the context of NSX Intelligence to help you organize and manage multiple related compute entities while working with the NSX Intelligence visualization and recommendation features.
You can create up to 200 labels. You can rename a label, delete it, sort it alphabetically by name or based on the number of compute members that are assigned to the label, and filter the labels by the names that are displayed in the Labels panel.
A label assignment is retained until the label or the assignment gets deleted, or for up to 30 days after an associated compute entity gets deleted. Up to 200 labels can be visible and persisted for all users. The Labels panel can be displayed in any clustering mode. You can export to a CSV file information about user-defined labels that have at least one compute entity assigned.
You can assign only one label to a compute entity. If you assign a label to a compute entity that already has a label assigned, the most recent label assignment takes effect.
Creating a label
Before you can assign a label to a cluster of compute entities, you must create the label first.
- Click the label icon
 located to the left of the Flows section.
 - Click the + icon.
- In the text box, enter a name for the new label.
- Press Enter.
The new label gets added to the Label panel and can now be assigned to a compute entity in your NSX inventory. The following image shows the Label panel with two labels listed.
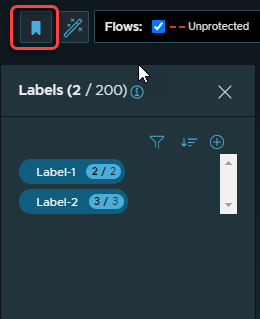
There are two numbers that appear to the right of a label name displayed in the panel. The first number represents the number of compute entities that have been assigned the label and that are still NSX inventory. The second number indicates the total number of compute entities that have been assigned the label, including those deleted from the NSX inventory.
Assigning a label
You can assign a label to a single compute entity, to a cluster of compute entities, or to multiple compute entities in one or more clusters. After selecting the compute entities that you want to label, you can assign one of the existing labels to your selection using one of the following methods.
Method 1: Assigning a label to a single compute entity
Right-click a compute entity node and selectVM Information from the contextual menu.
In the VM Information dialog box, locate the Label property.
If no label has been assigned yet, the value displayed is Unassigned.
Click Assign a Label and select the label you want to use from the Select a label drop-down menu.
If a label is already assigned, you can remove the assigned label or reassign a new one.
Click Delete to remove the currently assigned label for the compute entity.
Click Reassign and select a new label from the label drop-down menu to assign a different label to the compute entity.
Method 2: Assigning a label to multiple compute entities
-
Using the
 icon in the visualization canvas, select the compute nodes that you want to organize into a cluster.
 Right-click any of the selected nodes and select Assign a Label. Alternatively, you can use the Selected panel.
Click the Select a Label drop-down menu and select one of the existing labels to assign to your selected compute entities.
Alternatively, click the label icon
in the Selected panel, click Select a Label, and select a label from the drop-down menu.The following image illustrates one of the ways to assign a label to the selected compute entity nodes.
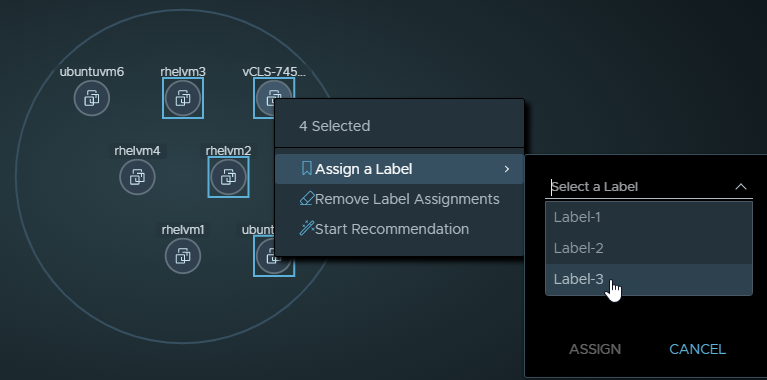
Click Assign.
The system updates the Labels panel and shows the number of compute entities that are assigned to the label.
Clustering by labels
When visualization labels are assigned to existing compute entities, you can set the visualization graph to display the clustering of the compute nodes by their label assignments.
Click the clustering control icon
 located at the bottom right of the visualization graph.
Select Labels.
The visualization graph gets updated immediately and displays the clustering by label assignments, as illustrated in the following image.
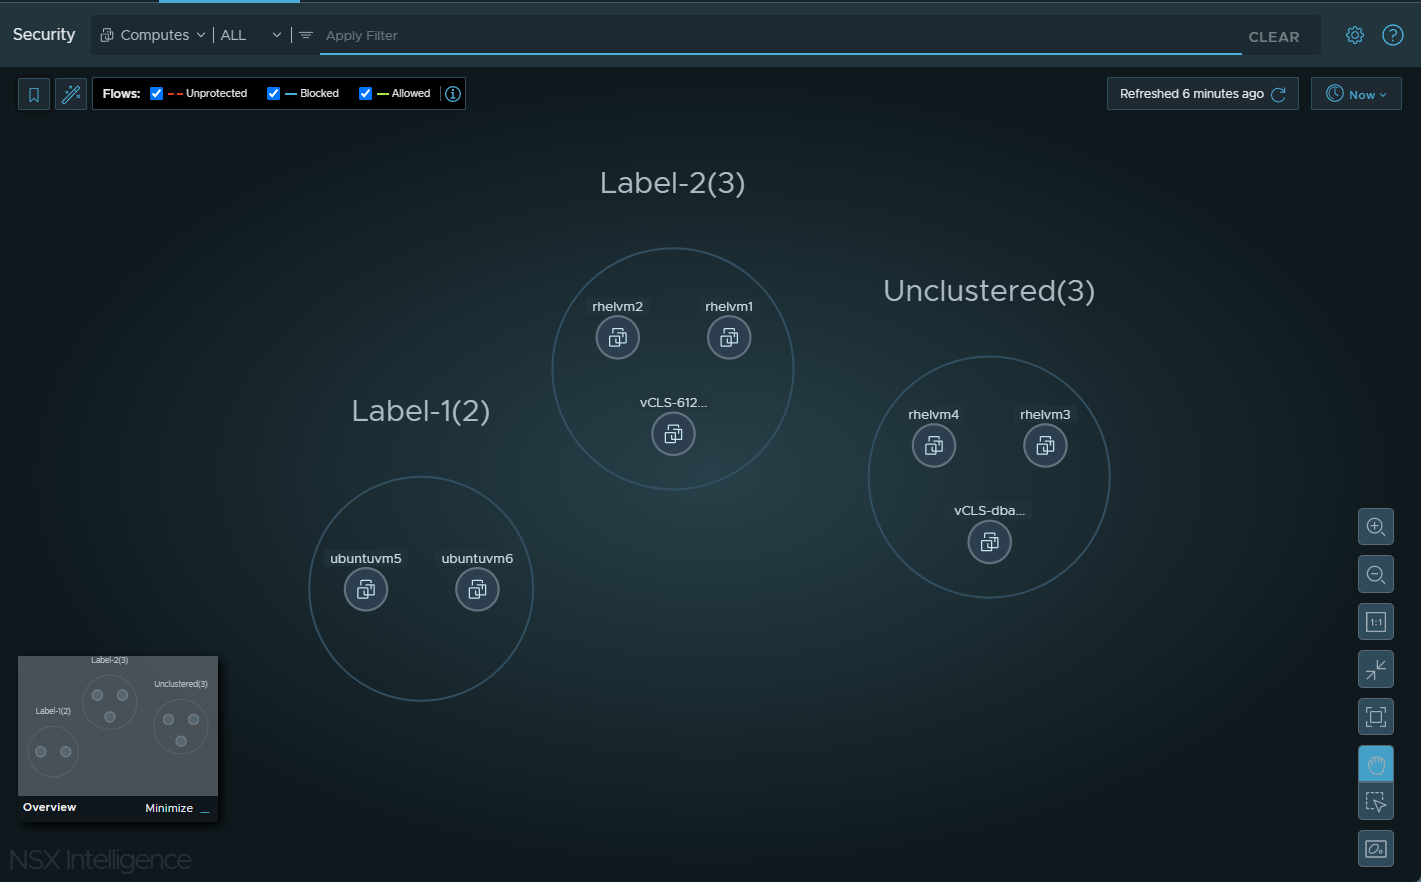
The image shows three clusters of compute entities. The compute entities that are assigned to the Label-1 label are shown in the Label-1 (2) cluster and those assigned with Label-2 label are shown in the Label-2 cluster. Compute entities that have not been assigned a label are grouped under the Unclustered cluster.
Filter the labels
If you have many labels to work with, you can manage the labels by using the filter function on the existing label names.
-
Click the label icon
located to the left of the Flows section. -
In the Labels panel, select the filter icon
 .
. In the Filter labels text box, enter the filter criteria.
The system automatically display an updated labels list based on how the filter criteria matched with the existing label names.
Sort the labels
You can sort the list of labels by the name or by the number of compute entities that are assigned to a label.
-
Click the label icon
located to the left of the Flows section. -
In the Labels panel, click the sort icon
 .
. Choose one of the following sorting methods.
To sort by the number of members that are assigned to a label, select Sort By Members and select either Ascending or Descending.
To sort the labels list using the label names, select Sort By Name and select either Ascending or Descending.
The system updates the labels list according to the sort method you selected.
Delete a label
When you delete a label, you also clear all of the associated label assignments to the compute entities in your NSX Intelligence visualization.
-
Click the label icon
located to the left of the Flows section. To delete a label, select the name of the label in the Labels panel, and click Delete.
To confirm the deletion, click Delete. To stop the deletion process, click Cancel.
Exporting a CSV labels list
You can export a CSV file containing the list of the existing labels and information about the compute members assigned to each label.
-
Click the label icon
located to the left of the Flows section. At the bottom section of the Labels panel, click Actions.
Select Export as CSV.
A CSV file named nsx_intelligence_vis_labels.csv is downloaded to your local system. It contains the list of the compute entities assigned to the existing labels, along with information about the compute entities, such as their object ID, name, compute type, and IP address.
