


The NSX Intelligence application provides a mechanism that allows you to use filters to display specific security posture information about your NSX environment for the selected time period.
Filters can be optionally applied in either the Groups view or Computes view of the NSX Intelligence visualization canvas.
Procedure
- Select , click anywhere in the Apply Filter text box, and select a filter from the drop-down menu.
-
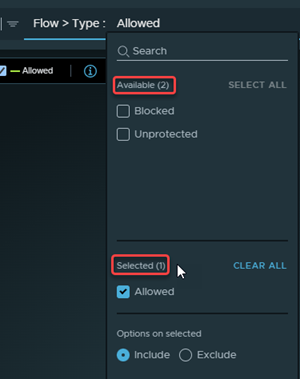
After you select a filter, you can refine your selection by selecting items in the Available section or by typing in the Search text box in the filter drop-down menu. If you used the Search text box, to select all of the search results, click Select All. All selected items are displayed in the Selected section, as illustrated in the following image.
-
To remove a previously selected item, click the check box for that specific item. Click Clear All to deselect all selected items.
-
In the Options on selected section, keep Include selected (the default) to include the items that matched the selected filters when displaying the security posture visualization. For example, in the above image, the Allowed flow types are included in the displayed visualization when the filter is applied.
-
Select Exclude to exclude the items that matched the selected filters when displaying the NSX Intelligence visualization canvas. For example, using the above image again, if Exclude is selected in the Options on selected section, the Allowed flow types are not displayed in the security posture visualization.
-
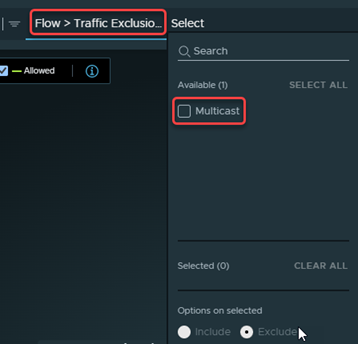
Note that when you select the filter, you can choose Multicast, Unicast, or Broadcast to specify that the selected types of traffic flows are to be excluded from getting displayed in the NSX Intelligence visualization canvas. A flow type is listed in the Available section only if that type of traffic flow occurred during the selected time period. In the Options on selected section, the Exclude option is selected by default and the Include option is unavailable for selection. In the following image, only Multicast traffic flows occurred during the selected time period and can be selected for exclusion.
-
Results
The filters that you have applied during the current NSX Manager session remain in effect even when you navigate to another UI page and come back to the UI page.
