


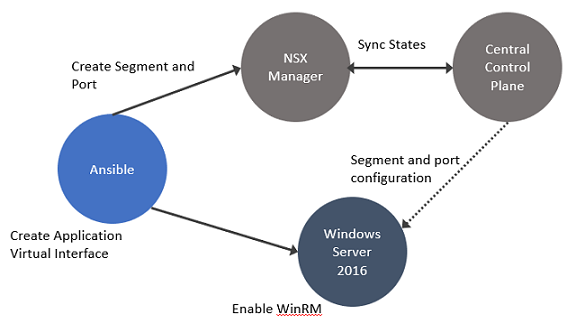
Use Ansible to configure an application VIF on Windows Server 2016 and integrate it with NSX-T. The NSX-T agent installed on the servers provides connectivity and security to the bare metal workloads.
In this procedure, establish connectivity between the workloads and NSX Manager. Then, configure DFW rules to secure ingress and egress traffic running between virtual or physical and Windows Server 2016 bare metal workloads.
Procedure
- Enable Windows Remote Management (WinRM) on Windows Server 2016 to allow the Windows server to interoperate with third-party software and hardware. To enable the WinRM service with a self-signed certificate.
- Run PS$ wget -o ConfigureWinRMService.ps1 https://github.com/vmware/bare-metal-server-integration-with-nsxt/blob/master/bms-ansible-nsx/windows/ConfigureWinRMService.ps1.
- Run PS$ powershell.exe -ExecutionPolicy ByPass -File ConfigureWinRMService.ps1.
- Configure WinRM to use HTTPS. The default port used for HTTPS is 5986.
- Run Powershell as an administrator.
- Run winrm quickconfig.
- Run winrm set winrm/config/service/auth @{Basic="true"}.
- Run winrm set winrm/config/service @{AllowUnencrypted="true"}.
- Run winrm create winrm/config/Listener?Address=*+Transport=HTTPS @{Hostname="win16-colib-001";CertificateThumbprint="cd 65 61 d8 b2 25 a7 ca 99 f8 1f a5 0c 55 8b f1 38 0d 06 26"}.
- Verify configuration of WinRM. Run winrm e winrm/config/listener.
- Using Ansible, create an application interface for the Windows server.
- Using Ansible, create a segment and segment ports on NSX Manager over the WinRM channel.
The application virtual interface, NSX Manager, and Windows Remote Management are synchronized with the segment and ports created for the application virtual interface.
- In Windows, customize OVSIM driver for the Windows server to create two new network adapters - application virtual interfaces and virtual tunnel endpoint (VTEP) for overlay-backed workload.
$:> Get-NetAdaptervEthernet1-VTEP: Used for overlay-backed VTEP interface. Not needed for a VLAN-backed workload.vEthernet1-VIF1: Used for virtual interface or application interface of the bare metal Windows server.
- To verify network adapters, go to the Windows server and run Get-NetAdapter.
- Add the bare metal server as a standalone transport node. In the NSX Manager, go to System → Fabric → Nodes → Host Transport Nodes.
- In the Managed by drop-down menu, select Standalone Hosts and click + Add.
- During transport node creation, ensure the following conditions are met:
- In the Uplink field, map an uplink to an available IP address on the Windows server. Run Get-NetAdapter on the Windows Server to know which ethernet address to configure as uplinks for the bare metal transport node.
- On overlay-backed workloads, select among IP Pool, Static IP, or DHCP as the mode for assigning a VTEP address to the host.
- On VLAN-backed workloads, there is not IP assignment required for the host.
Note: NSX-T does not support NIC teaming or OVS bond configurations on Windows Server 2016 servers.
- Alternatively, you can manually prepare the bare metal server as a transport node or follow the interactive mode to prepare the server as a transport node.
- Download and install the NSX-T LCP Windows bundle using the wget command.
- To silently install NSX-T, run \\install_helper.ps1 -operation install -setupFile VMware-NSX-<version>_baremetal-server_setup.exe -installPath <path>.
- To interactively install NSX-T, double click the setup.exe file and follow the wizard to complete installation.
- Run the nsxcli command to join the Windows Server to the NSX Manager.
- Configure the host as a transport node either from the NSX Manager UI or REST APIs. For more details, see Create a Standalone Host or Bare Metal Server Transport Node.
- Verify whether OVS bridges are created on the Windows server. The OVS bridge connects the application virtual interface to the nsx switch on the transport node.
ovs-vsctl showThe output must show the bridges created from nsxswitch and nsx managed host component. The nsxswitch bridge is for the transport node that was created. The nsx managed bridge is created for the application virtual interface on the Windows host. These bridge entries indicate that communication channel is established between the nsx switch and Windows remote listener.
- Using the Ansible client, configure a static IP address for the overlay or VLAN-backed segment.
Run vi win_hosts
- Launch Ansible playbook for the service to configure Windows bare metal server.
Run ansible-playbook -i win_hosts win_static_config.yml
- On the overlay-backed transport node, verify:
- The static IP address is reflected as the IP address of the overlay segment to which the Windows Server workload is connected.
- The GENEVE tunnels are created between the nsx switch and the nsx managed host component on the Windows host.
Note: Likewise, on a VLAN-backed transport node, verify that the static IP address is reflected as the IP address of the VLAN segment to which the Windows Server workload is connected. - Verify connectivity between the application, Windows bare metal server, and NSX Manager .
- Add and publish L2 or L3 DFW rules for the overlay or VLAN-backed bare metal workload.
- Verify ingress and egress traffic between virtual or physical workloads and bare metal workloads is flowing as per the DFW rules published.
