


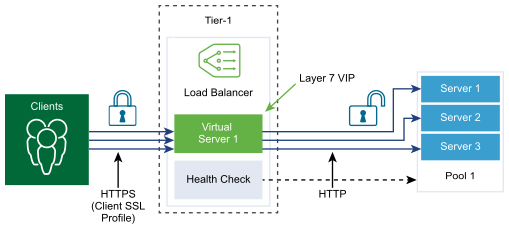
SSL profiles configure application-independent SSL properties such as, cipher lists and reuse these lists across multiple applications. SSL properties are different when the load balancer is acting as a client and as a server, as a result separate SSL profiles for client-side and server-side are supported.
Client-side SSL profile refers to the load balancer acting as an SSL server and terminating the client SSL connection. Server-side SSL profile refers to the load balancer acting as a client and establishing a connection to the server.
You can specify a cipher list on both the client-side and server-side SSL profiles.
SSL session caching allows the SSL client and server to reuse previously negotiated security parameters avoiding the expensive public key operation during the SSL handshake. SSL session caching is disabled by default on both the client-side and server-side.
SSL session tickets are an alternate mechanism that allow the SSL client and server to reuse previously negotiated session parameters. In SSL session tickets, the client and server negotiate whether they support SSL session tickets during the handshake exchange. If supported by both, server can send an SSL ticket, which includes encrypted SSL session parameters to the client. The client can use that ticket in subsequent connections to reuse the session. SSL session tickets are enabled on the client-side and disabled on the server-side.

Prerequisites
Verify that Manager mode is selected in the NSX Manager user interface. See NSX Manager. If you do not see the Policy and Manager mode buttons, see Configure the User Interface Settings.
Procedure
- With admin privileges, log in to NSX Manager.
- Select .
- Create a Client SSL profile.
- Select from the drop-down menu.
- Enter a name and a description for the Client SSL profile.
- Assign the SSL Ciphers to be included in the Client SSL profile.
You can also create custom SSL Ciphers.
- Click the arrow to move the ciphers to the Selected section.
- Click the Protocols and Sessions tab.
- Select the SSL protocols to be included in the Client SSL profile.
SSL protocol versions TLS1.1 and TLS1.2 are enabled by default. TLS1.0 is also supported, but disabled by default.
- Click the arrow to move the protocol to the Selected section.
- Complete the SSL protocol details.
You can also accept the default SSL profile settings.
Option Description Session Caching SSL session caching allows the SSL client and server to reuse previously negotiated security parameters avoiding the expensive public key operation during an SSL handshake. Session Cache Entry Timeout Enter the cache timeout in seconds to specify how long the SSL session parameters must be kept and can be reused. Prefer Server Cipher Toggle the button so that the server can select the first supported cipher from the list it can support. During an SSL handshake, the client sends an ordered list of supported ciphers to the server.
- Click OK.
- Create a Server SSL profile.
- Select from the drop-down menu.
- Enter a name and a description for the Server SSL profile.
- Select the SSL Ciphers to be included in the Server SSL profile.
You can also create custom SSL Ciphers.
- Click the arrow to move the ciphers to the Selected section.
- Click the Protocols and Sessions tab.
- Select the SSL protocols to be included in the Server SSL profile.
SSL protocol versions TLS1.1 and TLS1.2 are enabled by default. TLS1.0 is also supported, but disabled by default.
- Click the arrow to move the protocol to the Selected section.
- Accept the default session caching setting.
SSL session caching allows the SSL client and server to reuse previously negotiated security parameters avoiding the expensive public key operation during an SSL handshake.
- Click OK.
