


In a DHCP Relay configuration, the DHCP messages are forwarded to the external DHCP servers. The external DHCP servers can be in any subnet, outside the SDDC, or in the physical network.
DHCP Relay configuration is supported in the following scenarios:
- When an overlay segment is connected to the downlink interface of a tier-0 or tier-1 gateway. In this case, the DHCP messages can be relayed either to DHCPv4 servers or DHCPv6 servers. Step 2 in the Procedure section of this topic explains the workflow for this scenario.
- When an overlay or VLAN segment is connected to the service interface of a tier-0 or tier-1 gateway that is configured in an active-standby mode. In this case, the DHCP messages are relayed only to DHCPv4 servers. Step 3 in the Procedure section of this topic explains the workflow for this scenario.
Note: When you use a DHCP Relay on a segment, you cannot configure DHCP settings, DHCP options, and static bindings on the segment.
The following figure shows a sample network topology that has a DHCP Relay configured on three networks.
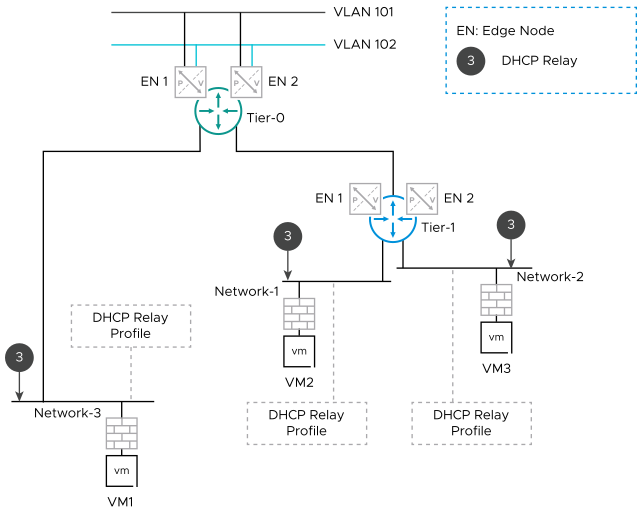
In this network topology, a DHCP Relay is configured on the following networks:
- Network-1 is connected to the service interface of the tier-1 gateway.
- Network-2 is connected to the downlink interface of the tier-1 gateway.
- Network-3 is connected either to the downlink or service interface of the tier-0 gateway.
Procedure
- From your browser, log in with admin privileges to an NSX Manager at https://nsx-manager-ip-address.
- Configure a DHCP Relay on an overlay segment that is connected to the downlink interface of a tier-0 or tier-1 gateway.
- Navigate to .
- Find the overlay segment where you want to configure the DHCP Relay. Next to the segment name, click
 , and then click Edit.
 - Click Set DHCP Config.
- From the DHCP Type drop-down menu, select DHCP Relay.
- From the DHCP Profile drop-down menu, select a DHCP relay profile. If no profile is available in the drop-down menu, click and then click Create New to add a DHCP relay profile. After the profile is created, it is automatically attached to the segment.
- Click Apply.
- Configure a DHCP Relay on a segment that is connected to the service interface of a tier-0 or tier-1 gateway, which is configured in an active-standby mode.
- Navigate to .
- Add a segment in either a VLAN or an overlay transport zone. Do not connect this segment to any gateway. Also, do not set any DHCP configuration on this segment, such as DHCP server address, DHCP ranges, and static bindings.
For example, assume that you have added a segment in the VLAN transport zone with name as My-VLAN-Segment.
- Navigate to or .
- Find the gateway where you want to connect this VLAN segment to the service interface. Click , and then click Edit.
- Expand the Interfaces or Service Interfaces section, and click the link to open the Set Interfaces page.
- Click Add Interface.
- In the Name text box, enter a name for this interface.
For example, specify the name as Connect-to-VLAN.
- (Only for tier-0 gateway): From the Type drop-down menu, select Service.
This step is not applicable to a tier-1 gateway.
- Enter the IP Address/Mask in a CIDR format.
For example, enter 172.16.10.1/24.
- From the Connect To (Segment) drop-down menu, select the My-VLAN-Segment, which you created earlier.
- From the DHCP Profile drop-down menu, select a DHCP relay profile.
- Click Close.
