Use the Quick Start wizard to prepare ESXi clusters for networking and security using NSX recommended host configurations.

The Quick Start wizard gives you two options to prepare ESXi clusters: Networking and Security or Security Only. With either of these options, the wizard helps you finish installation with minimum user input, thus, simplifying the installation process. By default, VLAN networking is the default selection in the wizard.

Based on the type of host, the quick start wizard considers the following default configurations:
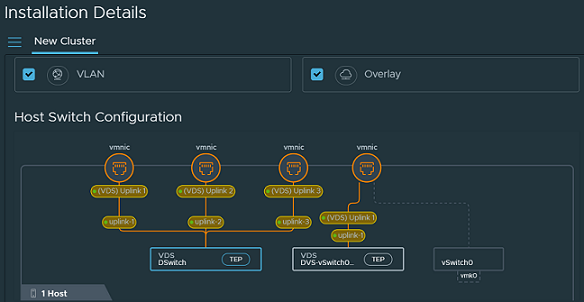
  • ESXi hosts running 7.0 and later are prepared on the VDS switch. Configure the desired number of uplinks on the VDS switch in vCenter Server and set the MTU to 1700.

Each host switch is assigned an auto-created transport zone, uplink profile and transport node profile.

Prerequisites

  • Register vCenter Server as a compute manager in NSX.
  • ESXi cluster hosts member of VDS in vCenter Server with correct uplinks.
  • (Optional) If you are using VLAN for VTEP pool, configue IP Pool for Host VTEP assignment and Uplink Profile using the TEP VLAN.

Procedure

  1. From a browser, log in with admin privileges to an NSX Manager at https://<nsx-manager-ip-address> or https://<nsx-manager-fqdn>.
  2. Navigate to System > Quick Start.
  3. On the Prepare Clusters for Networking and Security card, click Get Started.
  4. Select the clusters you want to prepare for NSX networking.
  5. Click Install NSX and then select Networking and Security.
  6. Depending on your requirement, you can prepare the same cluster for both VLAN and Overlay networking or for one type of networking. With Overlay networking, each host switch is added with a TEP IP address, which is required for overlay networking.
    Prepare cluster for VLAN and Overlay networking
  7. View the Host Switch Configuration switch to know the target switches where the physical NICs and VMkernel adapters (if any) will be migrated to.
    This is the NSX recommended configuration. However, you can customize the settings for the cluster, even though it is an optional step.
    Note: A dotted line originating from a switch to a physical NIC indicates that it is an existing configuration on the host switch, which will be replaced by a firm line going to the same physical NIC.
  8. Even though NSX provides recommendations, you can still customize the configuration. To customize the host switch, select the switch and change the recommended configuration.
    1. VDS: Select the VDS switch as the host switch.
    2. Transport Zone: Select a different transport zone that you want the host to be associated with.
    3. Uplink Profile: If needed, select a different uplink profile in place of the recommended uplink profile.
      Note: If you configure two VDS switches with the same configuration, the wizard recommends the same uplink profile for both the switches.
    4. Uplink to Physical NIC mapping: On a VDS switch, all uplinks configured on the VDS switch are mapped to the uplinks in NSX.
      A change to host switch type or uplink to vmnic mapping is reflected in the Host Switch Configuration network representation.
  9. Click Install.

    View the progress of installation on the Prepare Clusters for Networking and Security card. If installation on any of the host fails, retry installation by resolving the error.

  10. To view successfully prepared hosts, go to System → Fabric → Nodes → Host Transport Node.

Results

The transport nodes are ready for VLAN and Overlay networking.