If you have a standalone ESXi host, you cannot access the host VMs through the web-based vSphere Web Client. In this case, you can use this procedure to attach VMs to NSX logical switches.
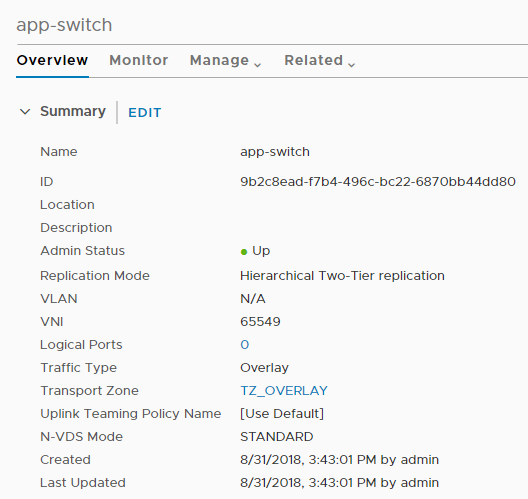
The example shown in this procedure shows how to attach a VM called app-vm to a logical switch called app-switch.

Prerequisites
- The VM must be hosted on hypervisors that have been added to the NSX fabric.
- The fabric nodes must have NSX management plane (MPA) and NSX control plane (LCP) connectivity.
- The fabric nodes must be added to a transport zone.
- A logical switch must be created.
- You must have access to the NSX Manager API.
- You must have write access to the VM's VMX file.
Procedure
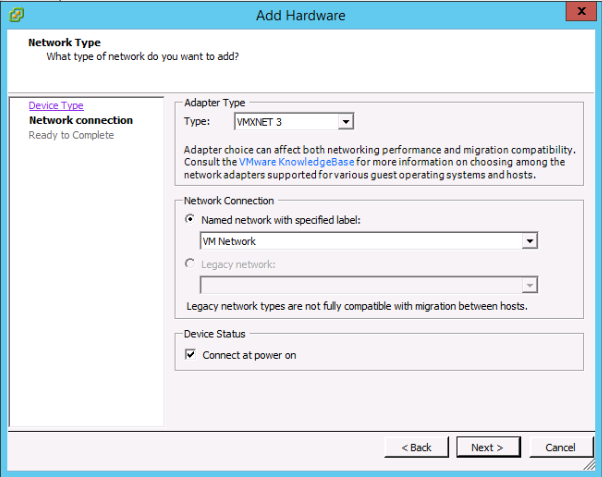
- Using the (install-based) vSphere Client application or some other VM management tool, edit the VM and add a VMXNET 3 Ethernet adapter.
Select any named network. You will change the network connection in a later step.
- Use the NSX API to issue the GET https://<nsx-mgr>/api/v1/fabric/virtual-machines/<VM-ID> API call.
In the results, find the VM's externalId.
For example:
GET https://<nsx-mgr>/api/v1/fabric/virtual-machines/60a5a5d5-ea2b-407e-a806-4fdc8468f735

{
  "resource_type": "VirtualMachine",
  "id": "60a5a5d5-ea2b-407e-a806-4fdc8468f735",
  "display_name": "app-vm",
  "compute_ids": [
    "instanceUuid:50066bae-0f8a-386b-e62e-b0b9c6013a51",
    "moIdOnHost:5",
    "externalId:50066bae-0f8a-386b-e62e-b0b9c6013a51",
    "hostLocalId:5",
    "locationId:564dc020-1565-e3f4-f591-ee3953eef3ff",
    "biosUuid:4206f47d-fef7-08c5-5bf7-ea26a4c6b18d"
  ],
  "external_id": "50066bae-0f8a-386b-e62e-b0b9c6013a51",
  "type": "REGULAR",
  "host_id": "cb82b0fa-a8f1-11e5-92a9-6b7d1f8661fa",
  "local_id_on_host": "5"
}
- Power off and unregister the VM from the host.
You can use your VM management tool or the ESXi CLI, as shown here.
[user@host:~] vim-cmd /vmsvc/getallvms
Vmid    Name             File               Guest OS      Version   Annotation
5      app-vm   [ds2] app-vm/app-vm.vmx   ubuntuGuest     vmx-08
8      web-vm   [ds2] web-vm/web-vm.vmx   ubuntu64Guest   vmx-08

[user@host:~] vim-cmd /vmsvc/power.off 5
Powering off VM:

[user@host:~] vim-cmd /vmsvc/unregister 5
- From the NSX Manager UI, get the logical switch ID.
For example:

- Modify the VM's VMX file.
Delete the
ethernet1.networkName = "<name>" field and add the following fields:
- ethernet1.opaqueNetwork.id = "<logical switch's ID>"
- ethernet1.opaqueNetwork.type = "nsx.LogicalSwitch"
- ethernet1.externalId = "<VM's externalId>"
- ethernet1.connected = "TRUE"
- ethernet1.startConnected = "TRUE"
For example:
OLD
ethernet1.pciSlotNumber = "224"
ethernet1.virtualDev = "vmxnet3"
ethernet1.networkName = "VM Network"
ethernet1.addressType = "vpx"
ethernet1.generatedAddress = "00:50:56:86:7b:d7"
ethernet1.uptCompatibility = "true"
ethernet1.present = "TRUE"
NEW
ethernet1.pciSlotNumber = "224"
ethernet1.virtualDev = "vmxnet3"
ethernet1.addressType = "vpx"
ethernet1.generatedAddress = "00:50:56:86:7b:d7"
ethernet1.uptCompatibility = "true"
ethernet1.present = "TRUE"
ethernet1.opaqueNetwork.id = "22b22448-38bc-419b-bea8-b51126bec7ad"
ethernet1.opaqueNetwork.type = "nsx.LogicalSwitch"
ethernet1.externalId = "50066bae-0f8a-386b-e62e-b0b9c6013a51"
ethernet1.connected = "TRUE"
ethernet1.startConnected = "TRUE"
- In the NSX Manager UI, add a logical switch port, and use the VM's externalId for the VIF attachment.
- Reregister the VM and power it on.
You can use your VM management tool or the ESXi CLI, as shown here.
[user@host:~] vim-cmd /solo/register /path/to/file.vmx

For example:
[user@host:~] vim-cmd solo/registervm /vmfs/volumes/355f2049-6c704347/app-vm/app-vm.vmx
9

[user@host:~] vim-cmd /vmsvc/power.on 9
Powering on VM:
Results
In the
NSX Manager UI in
Manager mode, select
. Find the VIF attachment ID matching the VM's externalId and make sure that the Admin and Operational status are Up/Up.
If two VMs are attached to the same logical switch and have IP addresses configured in the same subnet, they should be able to ping each other.
What to do next
Add a logical router.
You can monitor the activity on the logical switch port to troubleshoot problems. See "Monitor a Logical Switch Port Activity" in the NSX Administration Guide.


