As a VI admin working in the vSphere environment, you can use the simplified workflow to prepare ESXi clusters for NSX security.

Use the vSphere Client to prepare ESXi clusters for NSX security. On such clusters, you can enable micro-segmentation, URL filtering and distributed IDS on application workloads. These clusters are not prepared for NSX virtual networking.

Workflow to configure NSX security from the vSphere Client.

High-level tasks:
  • Prepare Host Cluster.
  • Create Firewall Rules
    • Create Groups for infrastructure services (Active Directory, DNS, and so on), environment groups (production or testing), and application groups (web, database, application).
    • Define communication strategy. Some of the actions you can take are:
      • Define communication between any workload and infrastrcture services.
      • Define communication so that no environment can talk to each other.
      • Limit communication to a specific port or protocol.
      • Specifiy source workloads.
      • Set up exeptions after setting up communication strategies for workloads.
    • Define Action for Default Firewall Rule (to process traffic that does not match firewall rules defined in Communication section).
    • Review and publish firewall rules.

Prepare Clusters for NSX Security

Select a host cluster to prepare it for NSX security.

The Getting Started section gives you the option to select between Security Only or Virtual Networking. When you choose to enable clusters only for security, the wizard asks you to define security rules and uses those rules to automatically configure NSX security on the distributed virtual port groups of the selected clusters.

Prerequisites

  • Ensure that ESXi hosts are compatible with VMware vCenter version v7.0.3 or later.
  • Ensure that VMware vCenter version is v7.0.3 or later.
  • Configure a vSphere Distributed Switch (VDS) switch on hosts. Only VDS 6.6 or later is supported.
  • On a vSphere Lifecycle Manager enabled cluster, edit the VMware vCenter from the NSX Manager UI to:

Procedure

  1. From a browser, log in with admin privileges to a VMware vCenter at https://<vcenter-server-ip-address>.
  2. On the vSphere Client UI, select the vSphere Client menu and click NSX.
  3. On the Welcome to NSX screen, on the Security Only card, click Getting Started.
  4. On the Host Cluster Preparation section, select the clusters that you want to prepare for security only and click Install NSX.
  5. On the Install Security pop-up window, confirm you want to process by clicking Install.
    Note: Any cluster with an incompatible ESXi host is not allowed for host preparation.
  6. Click Next to define firewall rules.

Results

NSX is installed on the host cluster.

What to do next

To avoid any loss of connectiviy, add VMware vCenter and NSX Manager to the DFW Exclusion list.
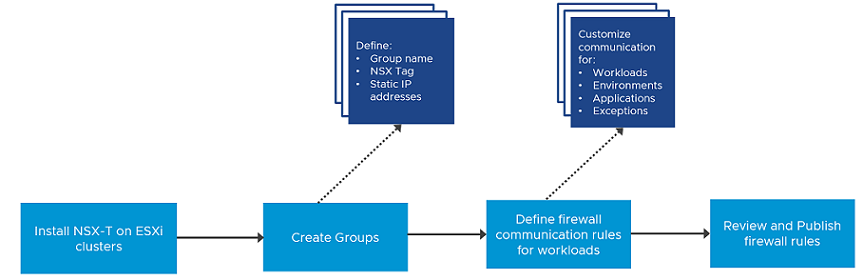
Create Groups

As part of firewall creation, define infrastructure group that run selected services, such as DHCP, define environment groups, such as production, testing, or so on, comprising of selected group members and define application groups with selected group members.

Prerequisites

  • Install NSX on the host cluster.

Procedure

  1. In the Create Firewalls Rules tab, select Create Groups.
  2. In the Create Groups page, expand Create Infrastructure Groups.
  3. Click Add Group.
  4. From the Infrastructure Service drop-down menu, select a service, such as Active Directory. In the next step, you assign this service to a group comprising of members that form the infrastructure group. You can create an infrastructure service only once in a workflow. It cannot be edited once you create it.
  5. To define an infrastructure group, click [Define Group].

    An infrastructure can be a combination of VMs, IP address range, or distributed virtual port groups.

    1. (Optional) In the Group Name field, modify the default group name.
    2. (Optional) In the NSX Tag field, modify the default tag name. The defined tag is applied to all VMs and distributed virtual port groups selected for the group. You can edit the default tag name.
    3. Expand the Select VMs to add NSX Tag section and select VMs that must be part of the infrastructure group.
    4. Expand the IP Address section and enter an IP address, IP addresses in CIDR format, or an IP range. Both IPv4 and IPv6 formats are supported.
    5. Expand the Select DVPGs to add NSX Tag section and select the distributed virtual port groups that must be part of the infrastructure group.
    6. Click Save.
      The wizard automatically creates the group and applies the NSX tag on all the selected members of the group. For example, if the defined group includes one VM, one distributed virtual port group, and 1 IP address, and DHCP is the selected infrastructure service, then wizard tags all group members with the defined tag.
  6. Click Next.
  7. In the Create Groups page, expand Create Environment Group.
  8. Click Add Group.
  9. From the Environment drop-down menu, select the environment for the group. For example, an environment can be a production, testing, partner or a custom environment that you want to define in your topology.
  10. To define an environment group, click [Define Group].
    1. (Optional) In the Group Name field, modify the default group name.
    2. (Optional) In the NSX Tag field, modify the default NSX tag name. This tag name is applied to all VMs and distributed virtual port group selected for the environment group.
    3. Expand the Select VMs to add NSX Tag section and select VMs that must be part of the environment group.
    4. Expand the IP Address section and enter an IP address, IP addresses in CIDR format, or an IP range. Both IPv4 and IPv6 formats are supported.
    5. Expand the Select DVPGs to add NSX Tag section and select the distributed virtual port groups that must be part of the environment group.
    6. Click Save.
  11. Click Next.
  12. In the Create Groups page, expand Create Application Group.
  13. Click Add Group.
  14. From the Application Group Name drop-down menu, select the type of application group you want to create.
  15. To define an application group, click [Define Group].
    1. (Optional) In the Group Name field, modify the default group name for the application group.
    2. (Optional) In the NSX Tag field, modify the default tag name. This tag name is applied to all VMs and distributed virtual port group selected for the application group, enter a NSX tag.
    3. Expand the Select VMs to add NSX Tag section and select VMs that must be part of the application group.
    4. Expand the IP Address section and enter an IP address, IP addresses in CIDR format, or an IP range. Both IPv4 and IPv6 formats are supported.
    5. Expand the Select DVPGs to add NSX Tag section and select the distributed virtual port groups that must be part of the application group.
    6. Click Save.
  16. Click Next.

Results

You created infrastructure groups, environment groups and application groups.

What to do next

After creating groups, define firewall rules that govern communication among workloads and these different groups.

Define and Publish Communication Strategies for Groups

After creating groups, define firewall rules to govern communication between groups, define exceptions and ports or protocols for communication.

Prerequisites

  • Install NSX on the host cluster.
  • Create Infrastructure groups, Environment groups, and Application groups.

Procedure

  1. Expand the Access to infrastructure services section and define specific workloads that can access shared infrastructure services.
    Field Description
    Source

    In the Source column, select the workloads that can access the target infrastructure service.

    Target

    Is the defined infrastructure service that is accessed by source workloads.

    (NSX3.2.2) Service Entry

    Click the Edit icon to add or edit service entries.

    In the Service Entry window, select a service type and properties for the service type.

    Note: In NSX 3.2.1 and previous versions, the field name was L4.
  2. Click Next.
  3. Expand the Define communication between environments (Optional) section and define communication between groups.
    Field Description
    Source

    Expand the section to define which source environment must communicate with a target environment.

    (NSX 3.2.2): For each source group listed, select a communication method: Unprotected, Allowed or Blocked.

    Note: To allow all communication between all source groups and the target group, select Allow All Communication.

    (NSX 3.2.1 and previous versions): To allow communication between a Development environment and a Production environment, click the red dotted line between Development and Production. The enabled state is displayed when a green line is established between groups.

    Environment Is the target environment selected by the system.
    (NSX3.2.2) Service Entry Select the service type, ports and properties over which the workloads in source and target environments communicate with each other.

    Click Apply.

    Note: In NSX 3.2.1 and previous versions, the field name was L4.
  4. Click Next.
  5. Expand the Define communication strategies for applications (Optional) section and define communication for application groups.
    Field Description
    Source Select an application group for which you can select communication rules to manage incoming or outgoing traffic.
    Strategy

    Select a firewall strategy to apply to an application group.

    Supported firewall rules are:
    • Allow all external traffic.
    • Deny incoming and allow outgoing traffic.
    • Allow incoming and deny outgoing traffic.
    • Deny all external traffic.
    Note: If you want to apply one firewall rule to all application groups, click Select Strategy, select the rule and click Apply.
    Exception

    Based on how you want to configure firewall rule, you might want to add exceptions.

    By default, no exceptions are added. To add an exception, click the No Exceptions link. Edit these fields to add exceptions:
    • Source: Select the source.
    • Service Entry: Select the service, port and properties.
    • L7 App ID: Select the App ID.
    • FQDN: Select FQDN of the application.
    .Click Apply.
  6. Click Next.
  7. Expand the Define Action for Default Firewall Rules (Optional) section and define an action that is applied to traffic that does not match the defined criteria.
  8. In the Default rule action, select from one of the following:
    • Allow: Is the default rule set. Allows all traffic that does not match the defined criteria.
    • Drop or Reject: To enforce firewall rules insider your network, you might choose to drop traffic that does not match the defined criteria.
  9. Click Next.
  10. In the Review and Publish page, review the communication strategies and firewall rules that you applied to the groups.
    Review the communication strategies and firewall rules applied to the groups.

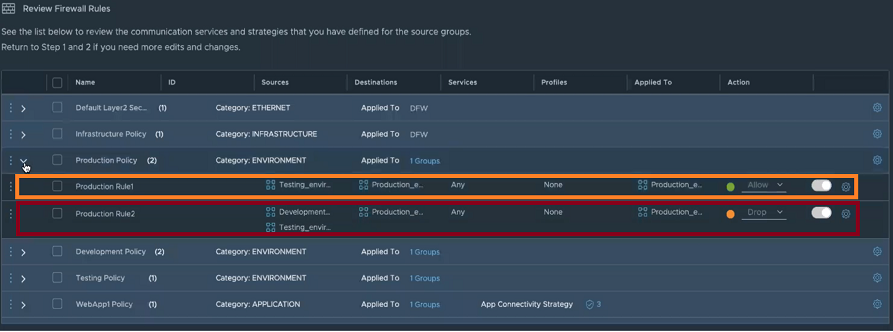
    In the screenshot, Production Rule 1 is a user-defined rule and Production Rule 2 is system-defined default rule, where the default action is set to Drop.

  11. Click Publish Policies.

Results

The wizard ends and firewall policies you defined are applied to the groups. The NSX UI is available in VMware vCenter.

What to do next

To verify the firewall rules published from vSphere Client are realized on NSX Manager UI.
  1. In the NSX Manager UI, go to Inventory → Groups.
  2. On the Groups page, verify whether the workload groups you defined in vSphere Client are realized in NSX Manager.
  3. Go to Security → Distributed Firewall page.
  4. On the Distributed Firewall page, verify whether the firewall rules you applied in vSphere Client are realized in NSX Manager.