


When Security Policies in your NSX-V environment use only a Network Introspection service that is provided by a partner, two approaches are available to migrate the NSX-V prepared hosts to NSX.
Both the approaches discussed in this topic assume that the partner service virtual machines (SVMs) in your NSX-V environment are not deleted before starting the migration coordinator. Depending on how much security protection downtime you are willing to accept during host migration, choose the host migration approach that best suits your needs.
When only Network Introspection service is running on your NSX-V hosts, In-Place host migration mode is not supported. Only Maintenance migration mode is supported. However, Automated Maintenance migration mode is recommended.
- Approach 1: Involves more security protection downtime
-
This approach is the simpler of the two host migration approaches. However, it involves more security protection downtime compared to Approach 2. Let us say that you have three clusters in your NSX-V environment: Cluster 1, Cluster 2, and Cluster 3.
In this approach, enable the Pause between groups migration setting and migrate Cluster 1 by using the standard host migration procedure that is explained in Migrate NSX-V Hosts. After Cluster 1 is migrated to NSX, the migration pauses. Deploy the partner service in Cluster 1 by doing either a host-based or a clustered service deployment. Now, disable the Pause between groups migration setting, and continue migrating Clusters 2 and 3. After the workload VMs in Clusters 2 and 3 are migrated to NSX, these workloads can start redirecting packets to the partner service virtual machines (SVM) in Cluster 1.
In this approach, security protection downtime is expected during migration of Cluster 1.
When workload VMs migrate to an NSX host, existing data traffic during a host migration is expected to have a security protection downtime. However, new data traffic does not have a security protection downtime.
- Approach 2: Involves minimal security protection downtime
-
This approach requires some manual intervention with an NSX API to create a temporary host group. Enable the Pause between groups migration setting and migrate any one host from Cluster 1. After this host in Cluster 1 is migrated to NSX, the migration coordinator pauses. Deploy a partner service on this migrated host by doing a clustered service deployment. Continue migrating the remaining hosts in Cluster 1. After all the hosts in Cluster 1 are migrated to NSX, you can optionally deploy additional partner SVMs in Cluster 1 by doing either a host-based or a clustered service deployment.
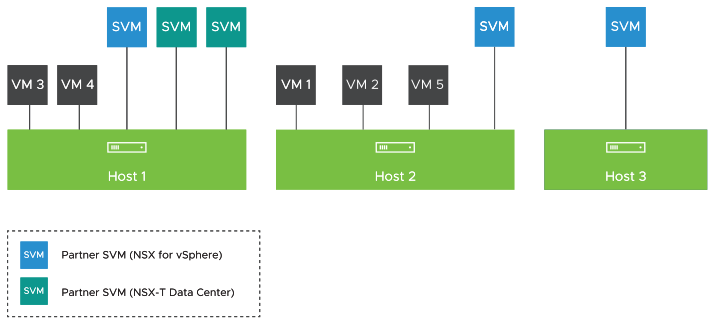
The detailed procedure in this topic explains the host migration workflow for a single NSX-V prepared cluster, which has three hosts, as shown in the following figure. The procedure uses Approach 2 to migrate this Cluster 1 to NSX.
Example:

All hosts in this cluster are ESXi hosts. The Security Policies in your NSX-V environment redirect data traffic to partner service virtual appliances that provide a network introspection service to workloads. As NSX-V supports only a host-based service deployment, each host has a single partner service VM.
- Host migration mode is set to Automated Maintenance.
- Pause between groups is enabled.
- Migration order across groups is set to serial.
Prerequisites
- Verify that Edge migration has finished and all routing and services are working correctly.
- In the VMware vCenter UI, go to the Hosts and Clusters page, and verify that all ESXi hosts are in an operational state. Address any problems with hosts including disconnected states. There must be no pending reboots or pending tasks for entering and exiting maintenance mode.
- Enable vSphere DRS on the cluster that is being migrated.
- Enable vMotion on the VMkernel adapter of each host in the cluster.
- Ensure that adequate spare capacity is available in the NSX-V cluster so that the migrating hosts can enter into a maintenance mode. If enough spare capacity is unavailable to migrate NSX-V workload VMs to other hosts in the cluster, additional security protection downtime is expected.
Procedure
- Migrate host 1 to NSX.
- Click Start to start the host migration.
Workload VMs 1 and 2 are migrated to other hosts so that host 1 can enter into a maintenance mode. NSX-V partner SVM on host 1 is powered off before host 1 enters into a maintenance mode.
Assume that VMs 1 and 2 are migrated to host 3 that is prepared with NSX-V. After the migration of host 1 is successful, the migration coordinator pauses for your next input.
- (Required) Deploy a partner service on host 1 by using the clustered deployment approach.
At this stage, host-based service deployment is not supported. Deploying a partner service on host 1 is necessary to minimize security protection downtime. Remember, the security protection for NSX-V workloads that are running on hosts 2 and 3 is still intact. The partner must ensure that the migrated partner-specific Security Policies are available on the newly deployed partner SVMs on host 1.
For detailed steps on deploying a partner service in NSX, see Deploy a Partner Service for Network Introspection. For example, specify the following configuration settings to deploy two partner service virtual machines (SVMs) on host 1:Configuration Value Deployment Type Clustered Host Host 1 Clustered Deployment Count 2 The value that you enter in the Clustered Deployment Count text box depends on the resource capacity that is available on the host. This scenario assumes that two partner SVMs can be deployed on Host 1. This value can be different in your environment.
After this step, the cluster looks as shown in the following figure. The green colored host represents the migrated host.Figure 2. Host 1 is Migrated to NSX

- Click Start to start the host migration.
- Migrate host 2 and host 3 to NSX.
- Move host 2 and host 3 from the temporary host group to the original host group 1 by running the following POST API request:
POST https://{nsxt-mgr-ip}/api/v1/migration/migration-unit-groups/{group-id}?action=add_migration_units
Where: group-id is the ID of the destination host group (host group 1). In the POST API request body, specify the ID of hosts 2 and 3 that you want to add to the original host group 1.
For a detailed information about this POST API and an example POST API request, see the NSX API Guide.
Now, the original host group 1 contains hosts 1, 2 and 3 (in the given order), and the temporary host group is deleted. - Select the check box next to the original host group 1, and then click . Verify that the migration order within the group is set to Serial.
If necessary, you can set the migration order in the original host group 1 to Parallel.
- Click Continue to resume the host migration.
Host 2 is first migrated to NSX, and then host 3 is migrated. To put each migrating host into a maintenance mode, workload VMs on the migrating host are moved to either NSX-V hosts or NSX hosts. NSX-V partner SVM on the migrating host is also powered off before the host enters into a maintenance mode.
After this step, all the hosts in host group 1 (cluster 1) are prepared with NSX. The cluster looks as shown in the following figure.Figure 3. All Hosts are Migrated to NSX
- Move host 2 and host 3 from the temporary host group to the original host group 1 by running the following POST API request:
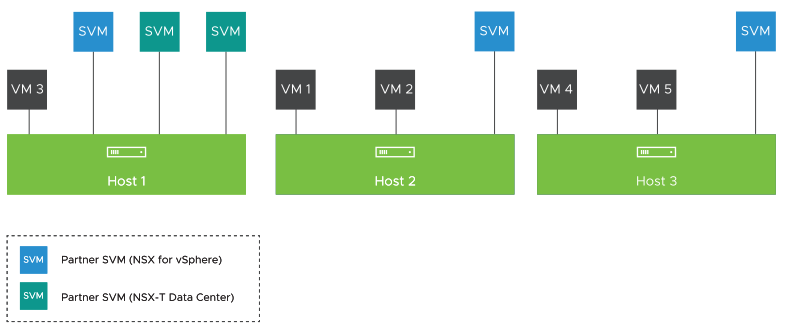
- (Optional) Migrate some workload VMs from hosts 1 and 2 to host 3.
For example, migrate VMs 4 and 5 to host 3, as shown in the following figure.
Figure 4. Final Cluster 1 After Migration
What to do next
- Log in to the vSphere Client and navigate to .
- Select the deployed partner service, and click Delete.
