If you plan to install Harbor with a self-signed certificate and IP address, follow the procedures.
Prerequisites
Verify that the OpenSSL tool is installed.
Procedure
- Generate a self-signed certificate with Harbor IP address.
root@nappa [ /opt/napp ]# mkdir harbor-certs
root@nappa [ /opt/napp/harbor-certs ]# openssl genrsa -out ca.key 4096
root@nappa [ /opt/napp/harbor-certs ]# openssl req -x509 -new -nodes -sha512 -days 3650 -subj
"/C=CN/ST=Beijing/L=Beijing/O=example/OU=Personal/CN=harbor-ip.corp.local" -key ca.key -out ca.crt
root@nappa [ /opt/napp/harbor-certs ]# openssl genrsa -out harbor-ip.corp.local.key 4096
root@nappa [ /opt/napp/harbor-certs ]# openssl req -sha512 -new -subj
"/C=CN/ST=Beijing/L=Beijing/O=example/OU=Personal/CN=harbor-ip.corp.local" -key harbor-ip.corp.local.key -out
harbor-ip.corp.local.csr
root@nappa [ /opt/napp/harbor-certs ]# cat > v3.ext <<-EOF
authorityKeyIdentifier=keyid,issuer
basicConstraints=CA:FALSE
keyUsage = digitalSignature, nonRepudiation, keyEncipherment, dataEncipherment
extendedKeyUsage = serverAuth
subjectAltName = @alt_names
[alt_names]
DNS.1=harbor-ip.corp.local
DNS.2=harbor-ip
IP.1=10.174.113.188
EOF
root@nappa [ /opt/napp/harbor-certs ]# openssl x509 -req -sha512 -days 3650 -extfile v3.ext -CA ca.crt -CAkey
ca.key -CAcreateserial -in harbor-ip.corp.local.csr -out harbor-ip.corp.local.crt
root@nappa [ /opt/napp/harbor-certs ]# ls -al *.crt *.key
-rw-r--r-- 1 root root 2069 Jan 29 12:59 ca.crt
-rw------- 1 root root 3272 Jan 29 12:59 ca.key
-rw-r--r-- 1 root root 2179 Jan 29 13:03 harbor-ip.corp.local.crt
-rw------- 1 root root 3272 Jan 29 13:00 harbor-ip.corp.local.key
- Log in to the vSphere Client with admin privileges.
- Navigate to the vSphere host cluster on which to install Harbor.
- Right-click the vSphere host cluster and select Deploy OVF template to start the installation wizard.
- Select Local file.
- Enter your Broadcom support portal login credentials and click the
 (HTTPS Download) icon to access the Harbor OVA file.
For more information on downloading software from the Broadcom support portal, see the
Knowledge Base article.
- Click Next.
- Enter a name, specify a data center folder location for the Harbor VM and click Next.
- Select a compute resource for the Harbor VM and click Next.
The compute resource cluster is usually the Management cluster.
- Review the Harbor appliance details and click Next.
- Accept the appliance EULA agreement and click Next.
- Select the data store storage configuration and disk file and click Next.
Ensure that the selected storage has enough capacity to store all NSX Application Platform containers and charts.
- Select a Harbor destination network to map the appliance vNICs to a destination port group and click Next.
Note:
The selected network must have connectivity on the required ports and protocols from Tanzu Kubernetes Grid and NSX Application Platform workload networks. See https://ports.esp.vmware.com/home/NSX.
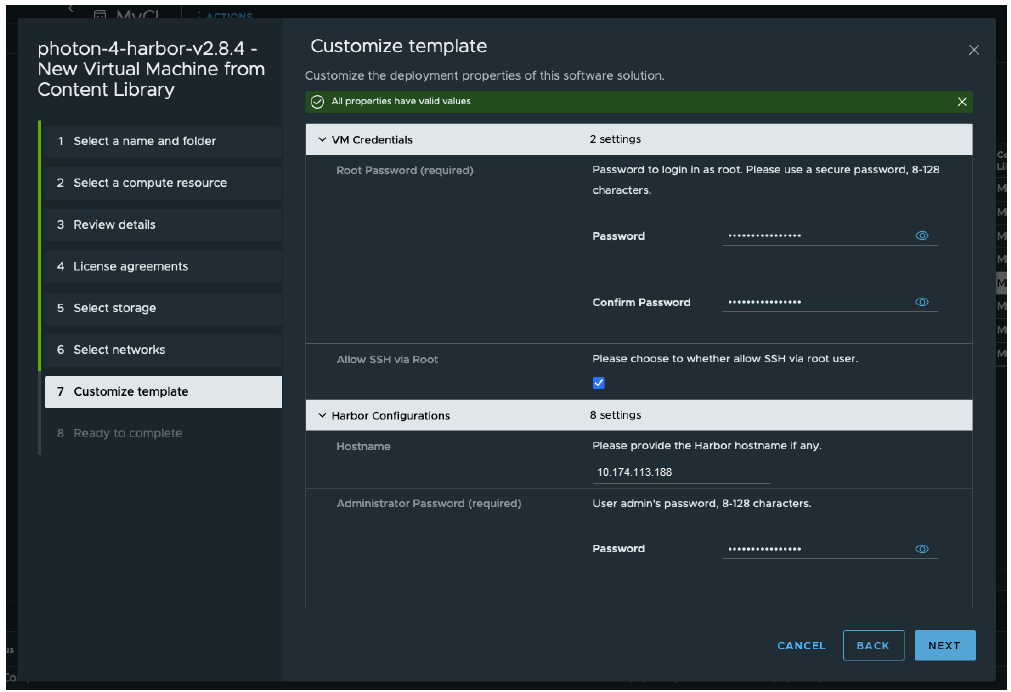
- In the Customize template step, complete the following steps.
- Enter the root password and administrator password.
- Optionally, allow SSH login for the root user.
- For hostname, provide the Harbor IP address.
- Specify the certificate information.
In our example, for
CA Certificate, copy and paste the content of
ca.crt. For
Server Certificate, copy and paste the content of
harbor-ip.corp.local.crt. For
Server Key, copy and paste the content of
harbor-ip.corp.local.key.
- Provide the network configuration information and accept the default Docker configurations.
- Click Finish to begin the installation.
Depending on your environmental resources, the installation might take 4-5 minutes to complete.
After the deployment is successfully complete, the newly created VM appears under the cluster and VMs section.
- Power on the VM and wait a few minutes for services to start.
- From your browser, navigate to
https://<FQDN of Harbor>.
The browser displays a warning because Harbor does not have a trusted certificate. Ignore the warning and proceed.
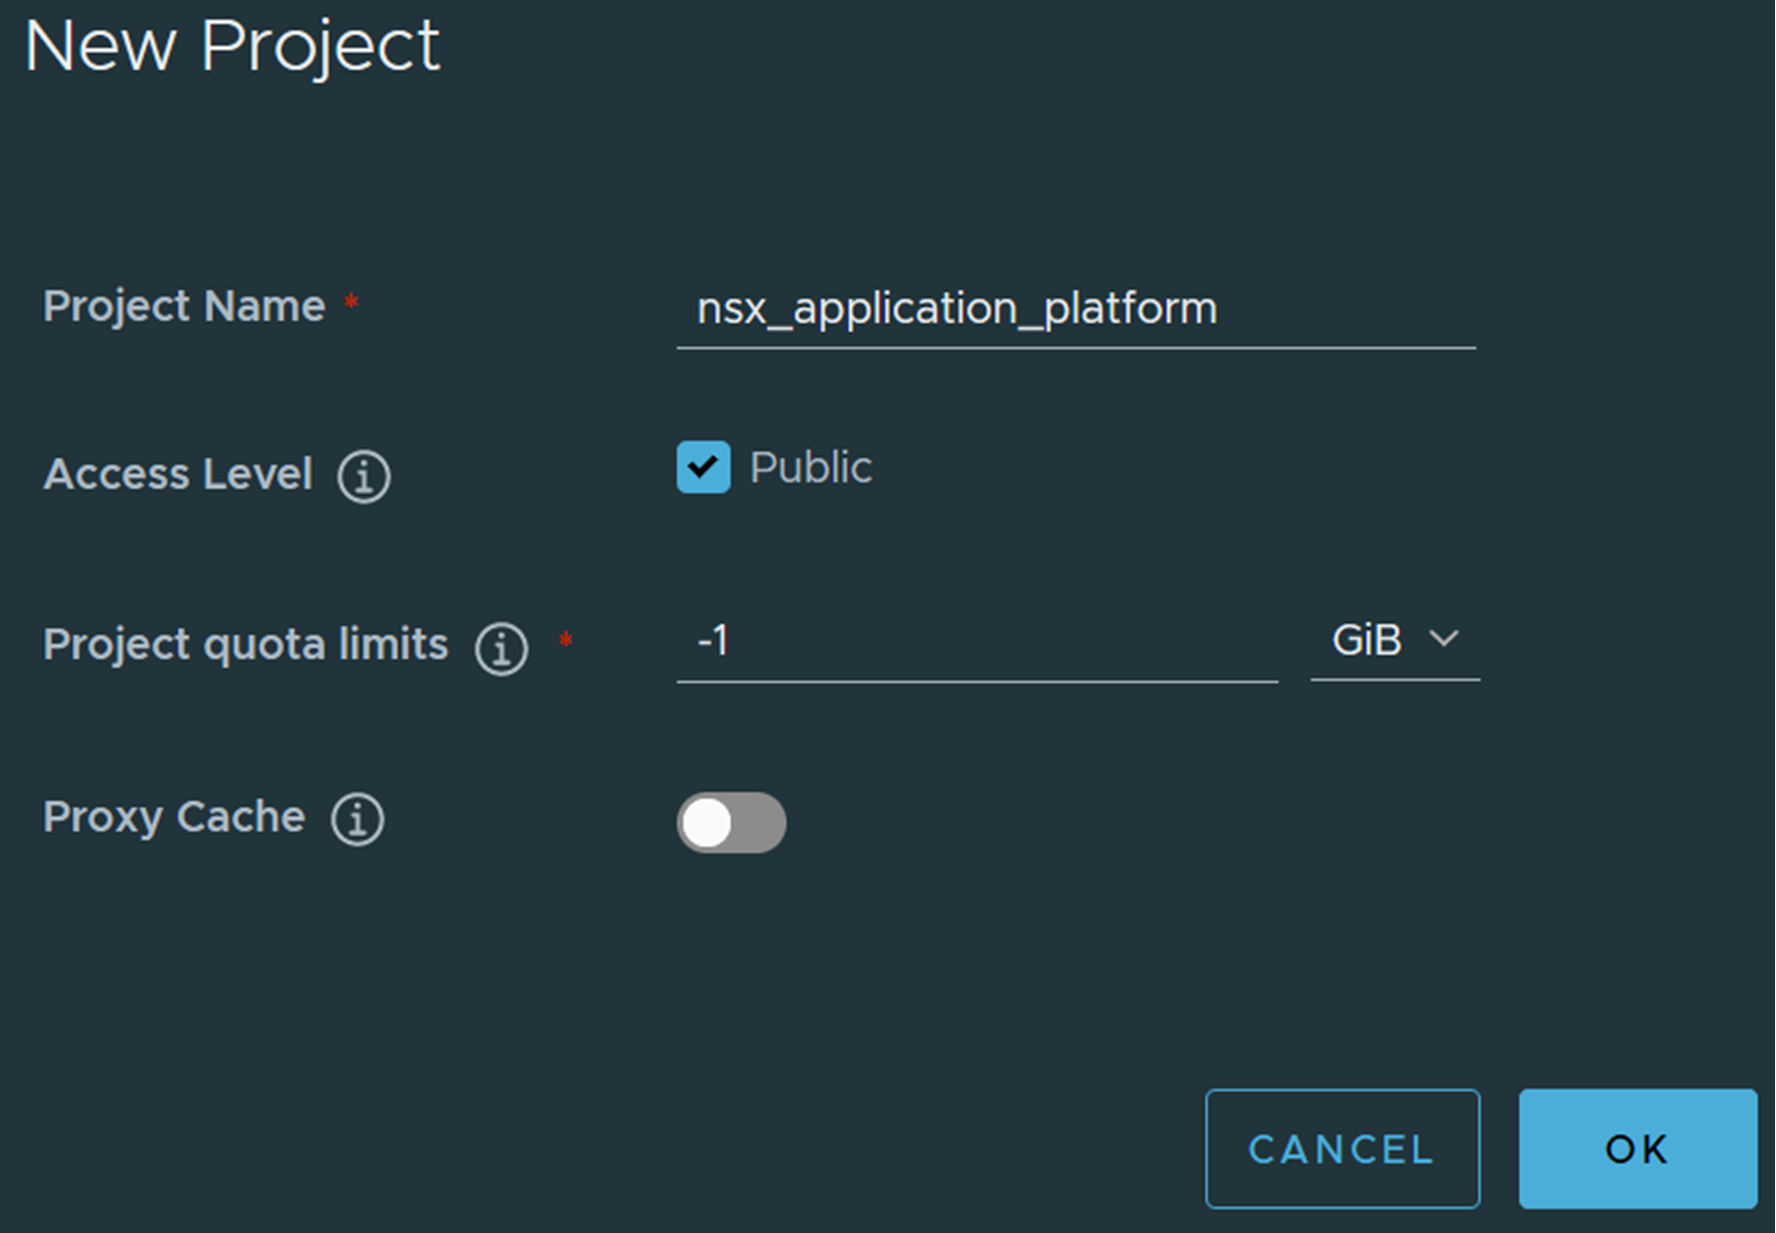
- Log in to Harbor and create a project called nsx_application_platform.
Select the Public check box for Access Level.
- SSH to Harbor and retrieve the certificate, which is named harbor_ca.crt in the /storage/certs directory.
##########################################################################
## SSH access to the Harbor Cloud Native Registry Appliance can be ##
## used in exceptional cases that cannot be handled through standard ##
## remote management or CLI tools. This is primarily intended for use ##
## in break-fix scenarios, under the guidance of VMware GSS. ##
##########################################################################
([email protected]) Password:
##########################################################################
## SSH access to the Harbor Cloud Native Registry Appliance can be ##
## used in exceptional cases that cannot be handled through standard ##
## remote management or CLI tools. This is primarily intended for use ##
## in break-fix scenarios, under the guidance of VMware GSS. ##
##########################################################################
07:06:36 up 15:46, 0 users, load average: 0.42, 0.15, 0.05
9 Security notice(s)
Run 'tdnf updateinfo info' to see the details.
root@harborselfsigned [ ~ ]# cd /storage/certs/
root@harborselfsigned [ /storage/certs ]# ls -al
total 36
drwxr-xr-x 2 root root 4096 Oct 19 15:21 .
drwxr-xr-x 6 root root 4096 Oct 19 15:21 ..
-rw-r--r-- 1 root root 50 Oct 19 15:21 extfile.cnf
-rw-r--r-- 1 root root 1972 Oct 19 15:21 harbor_ca.crt
-rw------- 1 root root 3272 Oct 19 15:21 harbor_ca.key
-rw-r--r-- 1 root root 41 Oct 19 15:21 harbor_ca.srl
-rw-r--r-- 1 root root 1691 Oct 19 15:21 harbor.corp.info.csr
-rw-r--r-- 1 root root 2025 Oct 19 15:21 server.crt
-rw------- 1 root root 3272 Oct 19 15:21 server.key
root@harborselfsigned [ /storage/certs ]# cat harbor_ca.crt
-----BEGIN CERTIFICATE-----
MIIFgzCCA2ugAwIBAgIUfbhTlPlUwXe164EtphW9cCL4sCIwDQYJKoZIhvcNAQEL
BQAwUTELMAkGA1UEBhMCQ04xDDAKBgNVBAgMA1BFSzEQMA4GA1UEBwwHQmVpSmlu
ZzEPMA0GA1UECgwGVk13YXJlMREwDwYDVQQDDAhIYXJib3JDQTAeFw0yMzEwMTkx
NTIxMzZaFw0zMzEwMTYxNTIxMzZaMFExCzAJBgNVBAYTAkNOMQwwCgYDVQQIDANQ
RUsxEDAOBgNVBAcMB0JlaUppbmcxDzANBgNVBAoMBlZNd2FyZTERMA8GA1UEAwwI
SGFyYm9yQ0EwggIiMA0GCSqGSIb3DQEBAQUAA4ICDwAwggIKAoICAQDbQsrPbARW
rKHkf3DApwXbeYHVDI5rakKtVWZ3+czmHTB8AFflJxLFsetL84dztffX82sxbM9x
d2ZgDrtVF225joj8Mu9qYrvQ9DaWDqP+lbsCG8EGuNkdRA6Ej8EuhoV0F34NjV84
8pxreKLxmkXHWWoW+C46G2VJVcgC3G9FxCYRcFD8OKwQ0IzpzH2scMt8ysvFY0gw
uEqqMTuHejqK82bBROYbDdHgR3IWHG+Oa1pdT9yn7E/OEYAdW2oRZiWAh9/J/3FX
hFiUBY7Y0z1v0pEA5UE4pOe/Pf7Hr12P9djzVMFHg5FQJs9cWwOUlezXGxN749mz
6jTX+kmP0O0/sBi2bSNhPC1d10rHy3Ca/VTlkCsSjC7WMSrQYiz8/2AJTTnD5ms2
TVYGq+LdyVipLz4D9IhU9FAPOxFDJWVzYYvOyy8GMe7f5JLH5fZNBFHV2XrjG8wy
Zkfll7CUfaxOd6HrSXZo+dIqqz5dIVAZpO7yCyFpVo3Tiuesm4FCvHMPZoG/Rqtu
1fB6fbfPnWSPzOeukgIr5sEkymQpwoMTBYhhafILkFy1/AugcNZ2VCm1jYPpqYep
xmACRJS5GY6DPWaVo5dbDwL8qbpzrVPLHAKn53cc93Yr59QQqy04pBLGDzx3+mw6
qMw7gNoz8dRkDV+KrQPyPDNJlXqrFdngOQIDAQABo1MwUTAdBgNVHQ4EFgQUfbSr
ZF7Y5HaCDq4I4BAVV052ORswHwYDVR0jBBgwFoAUfbSrZF7Y5HaCDq4I4BAVV052
ORswDwYDVR0TAQH/BAUwAwEB/zANBgkqhkiG9w0BAQsFAAOCAgEASko5WCdzAH0r
He69dxozShlZmswj+ofmTr/hj87WHFtk/KtaZP2VlkAdS4It3GcmGuaX5zogUzmf
DskuaILzhe99ZZTuIcqIoIpxjiW7Dl3RFuLqX5qtivASMAyEh1D8iUFT0hieNvDo
/RyqB1yPbOrLB47j4aXeB5yyjJ3ezwBJ5kUVv8QVCrb0veFp5IJbo9htW4O43gH6
JQ2LZ4nmCOKSKEoaI8TV29hcH1ItMKy4diYJ4F5UjzdUf64JoE5V+RcagDdsvx5s
SVoYkdTt2T00kky/1eOQKAyFF4/5dTq4OOt+LKQSWkq6vZUwP/mdQBZqc3jcJYqf
HBsJ/WfOtbW2skvjdLqjKgHfZEp2wjzdh/+z8IDv43cy1r4DQeQ1D7578i12Qi2P
IhmcWtf1WOmSHNp39yjoNXYyEs0qk01/zoERVhEuhclmvLDLDuqSi0Tm++7iqMxz
D+d+9TkUveWkrwMsWNrBQEXSACTPnafWaHHL80Y+krsAIiNHGzEGdzSnbmfI+jnO
sxb371SM0tlSsCi/L5+GKWTirGAo30yNvC86JEeZrCucveiAPBHEpWdFhi7BDXaA
d3nMwuZ1Pjin/F1q1tXbf97hpqMxHg4or1MPF+gD1pB6HbxQeayGJU5rLxmotL+G
S8VZrSeY2dsa5elCcdL9r4WfLFkBeks=
-----END CERTIFICATE-----