If you plan to install Harbor with a certificate from a public trusted CA, follow the procedures.

These steps install the Harbor appliance and use the NSX Application Platform Automation Appliance to upload NSX Application Platform components to Harbor.

Procedure

  1. Obtain a CA certificate from your certificate vendor.
    You need the SSL .pem files and the Server Key, which should match the Harbor server name.
  2. Log in to the vSphere Client with admin privileges.
  3. Navigate to the vSphere host cluster on which to install Harbor.
  4. Right-click the vSphere host cluster and select Deploy OVF template to start the installation wizard.
  5. Select Local file.
  6. Enter your Broadcom support portal login credentials and click the Download product bits from the support portal icon. (HTTPS Download) icon to access the Harbor OVA file.
    For more information on downloading software from the Broadcom support portal, see the Knowledge Base article.
  7. Click Next.
  8. Enter a name, specify a data center folder location for the Harbor VM and click Next.
  9. Select a compute resource for the Harbor VM and click Next.
    The compute resource cluster is usually the Management cluster.
  10. Review the Harbor appliance details and click Next.
  11. Accept the appliance EULA agreement and click Next.
  12. Select the data store storage configuration and disk file and click Next.

    Ensure that the selected storage has enough capacity to store all NSX Application Platform containers and charts.

  13. Select a Harbor destination network to map the appliance vNICs to a destination port group and click Next.
    Note:

    The selected network must have connectivity on the required ports and protocols from Tanzu Kubernetes Grid and NSX Application Platform workload networks. See https://ports.esp.vmware.com/home/NSX.

  14. In the Customize template step, complete the following steps.
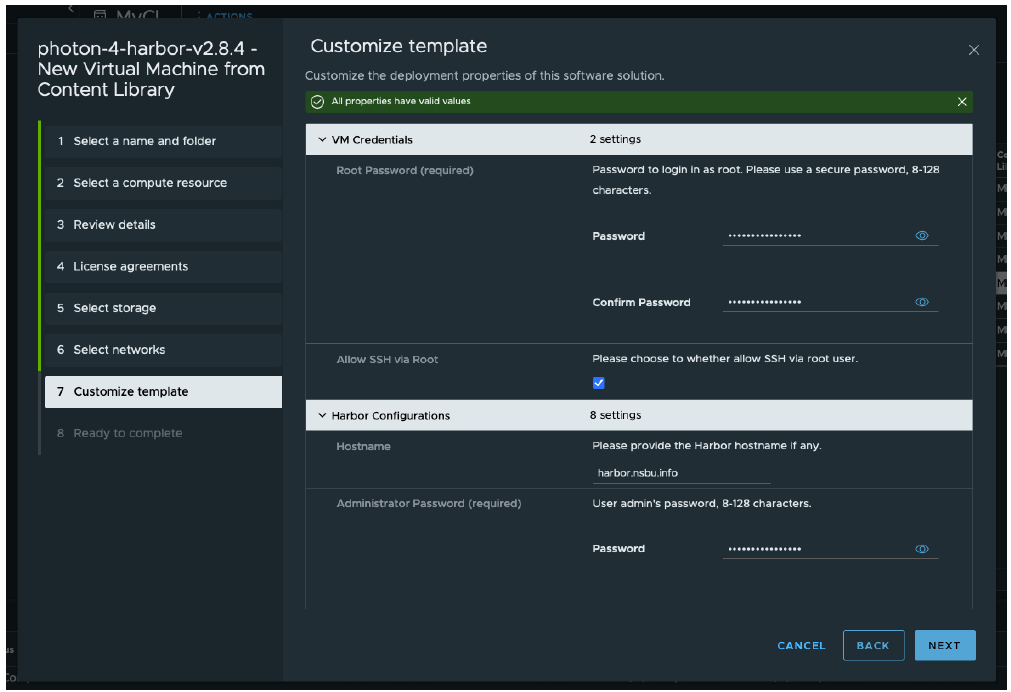
    1. Enter the root password and administrator password.
    2. Optionally, allow SSH login for the root user.
    3. For the hostname, provide the correct FQDN (fully qualified domain name).
      The hostname has a public top-level domain (such as .com or .info) and not a private top-level domain (such as .lab or .local).
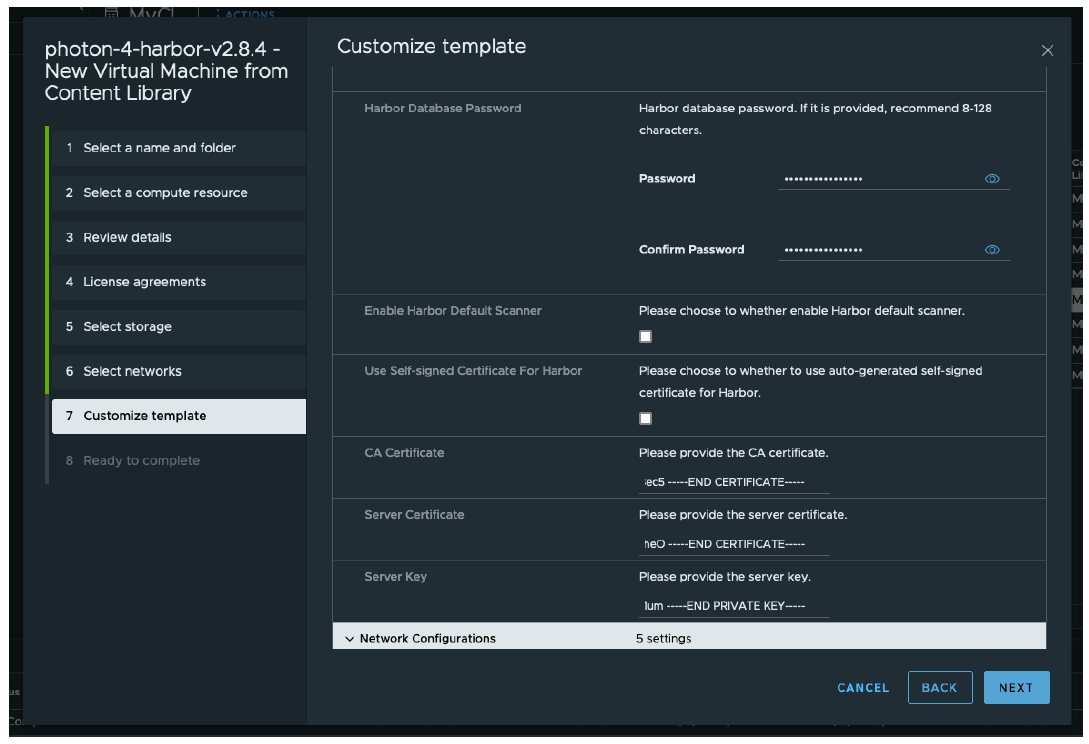
  15. Enter the CA and server certificates and the private key in PEM format.
    The CA and Server certificates are the chain and full chain files from your Certificate Authority, while the Server Key is your private key file.
  16. Provide the network configuration information and accept the default Docker configurations.
  17. Click Finish to begin the installation.
    Depending on your environmental resources, the installation might take 4-5 minutes to complete.

    After the deployment is successfully complete, the newly created VM appears under the cluster and VMs section.

  18. Power on the VM and wait a few minutes for services to start.
  19. From your browser, go to https://<FQDN of Harbor>.
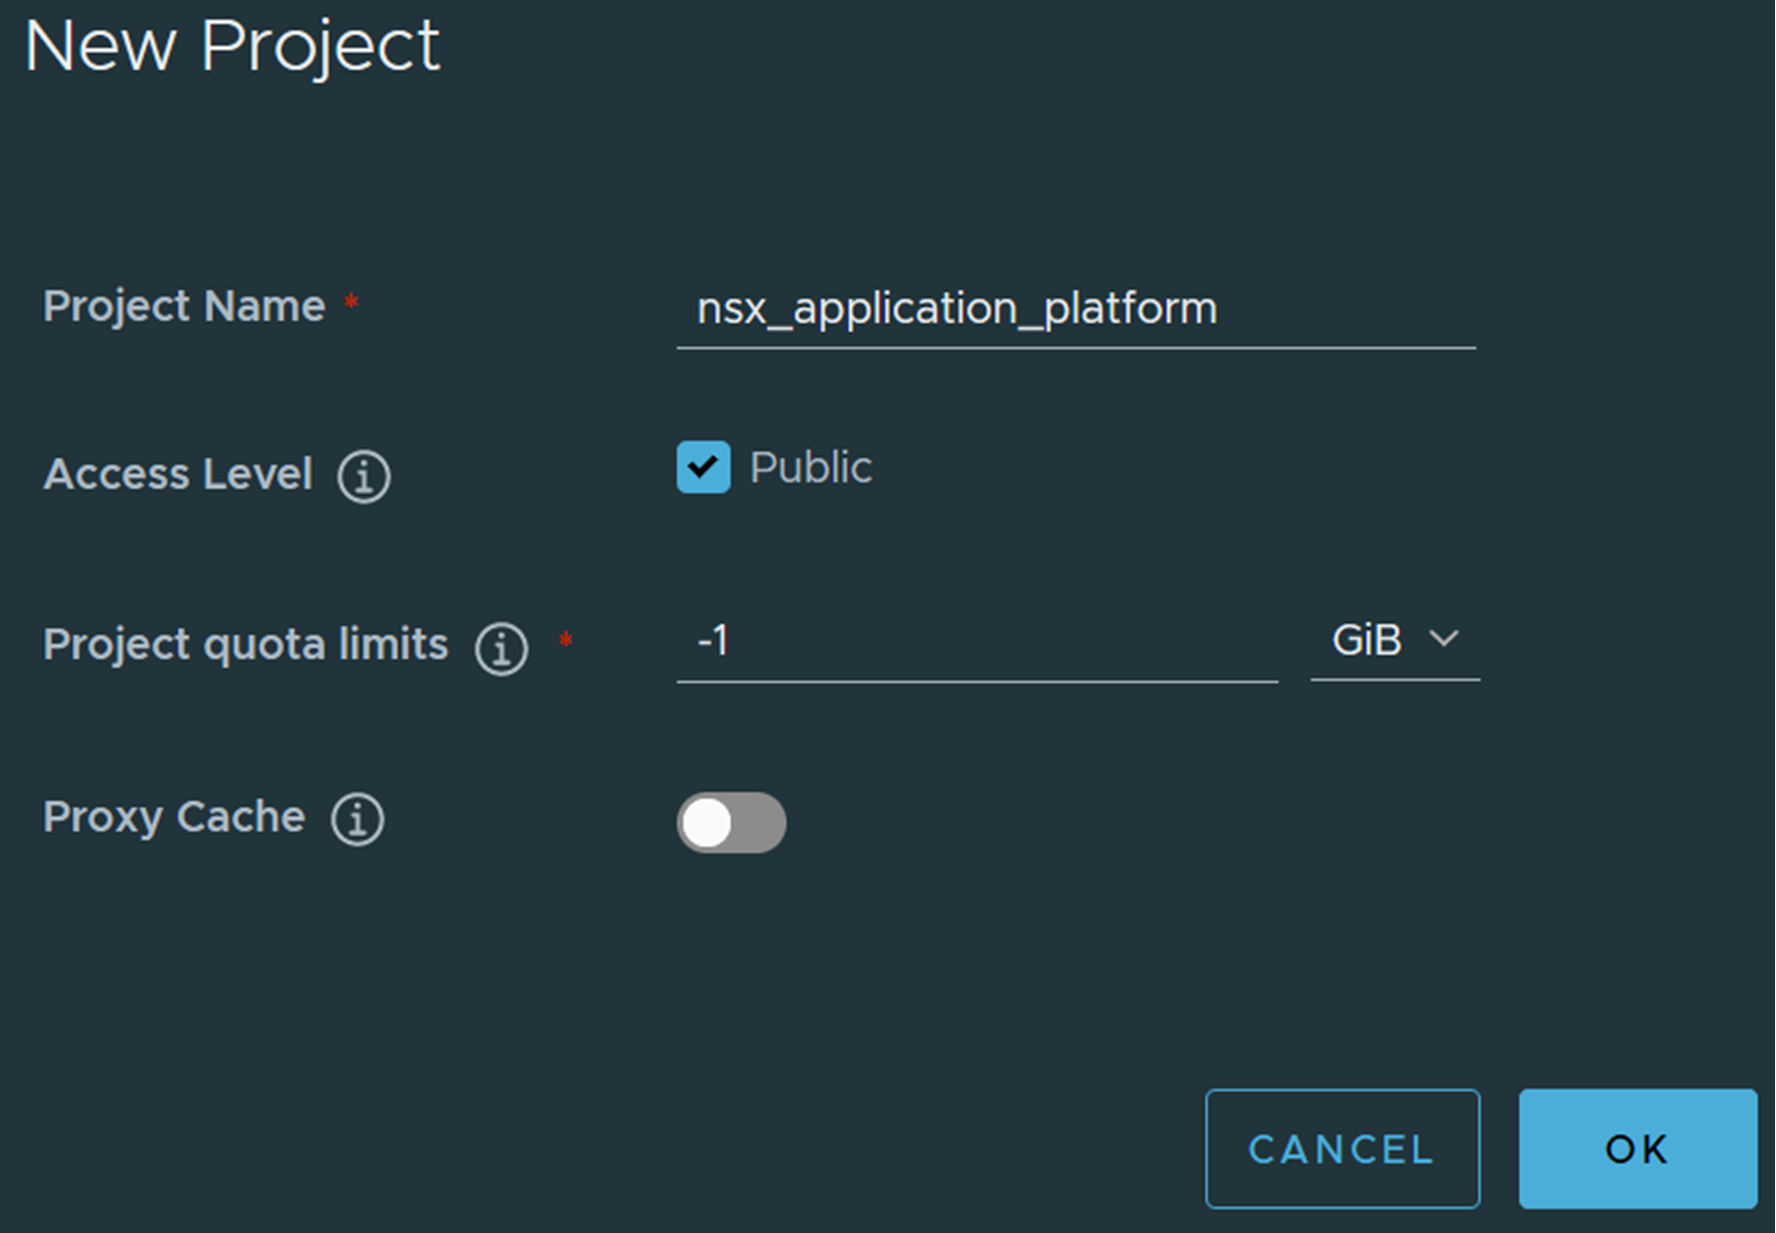
  20. Log in to Harbor and create a project called nsx_application_platform.

    Select the Public check box for Access Level.

  21. Use the NSX Application Platform Automation Appliance, to upload the NSX Application Platform components to Harbor.
    NSX Application Platform Automation Appliance is included with the necessary Helm client.
  22. Power off the NSX Application Platform Automation Appliance.
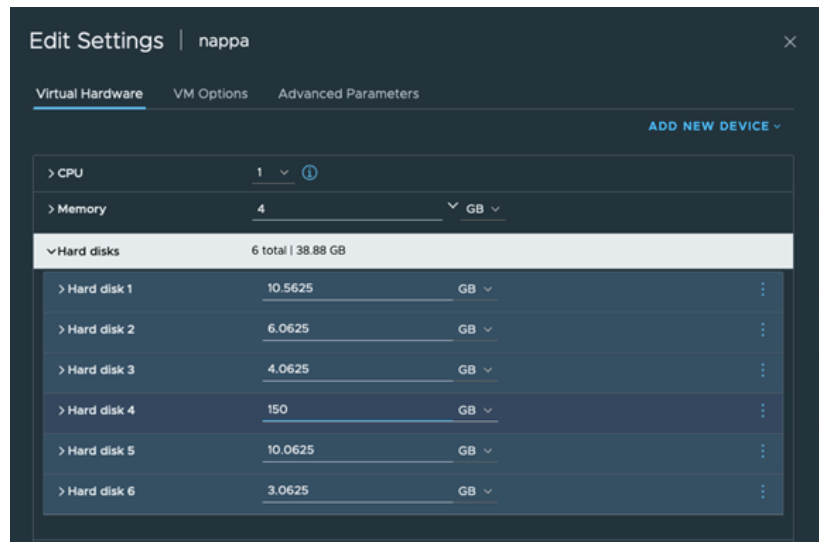
  23. Edit the VM settings, set Hard disk 4 to 150 GB, and power on the VM.
  24. After the NSX Application Platform Automation Appliance VM is completely powered on, log in and verify that the /dev/mapper/vg_docker-lv_docker logical volume size is approximately 150 GB.
    root@nappa [ ~ ]# df -h
    Filesystem Size Used Avail Use% Mounted on
    devtmpfs 2.0G 0 2.0G 0% /dev
    tmpfs 2.0G 0 2.0G 0% /dev/shm
    tmpfs 2.0G 760K 2.0G 1% /run
    tmpfs 2.0G 0 2.0G 0% /sys/fs/cgroup
    /dev/mapper/vg_system-lv_root 9.8G 2.7G 6.6G 30% /
    tmpfs 2.0G 948K 2.0G 1% /tmp
    /dev/sda3 488M 40M 412M 9% /boot
    /dev/mapper/vg_napp-lv_napp 5.9G 2.5G 3.1G 45% /opt/napp
    /dev/mapper/vg_alt_root-lv_alt_root 9.8G 24K 9.3G 1% /storage/alt_root
    /dev/mapper/vg_docker-lv_docker 148G 24K 142G 1% /var/lib/docker
    /dev/mapper/vg_lvm_snapshot-lv_lvm_snapshot 2.9G 24K 2.8G 1% /storage/lvm_snapshot
    /dev/sda2 10M 2.0M 8.1M 20% /boot/efi
    If the size of /dev/mapper/vg_docker-lv_docker is not approximately 150 GB, run the following commands:
    root@nappa [ ~ ]# cd /opt/napp
    root@nappa [ /opt/napp ]# chmod +x resize.sh
    root@nappa [ /opt/napp ]# ./resize.sh
    root@nappa [ /opt/napp ]# reboot
  25. Enter your Broadcom support portal login credentials and click the Download product bits from the support portal icon. (HTTPS Download) icon to access the NSX Application Platform OVA file.
    Select the NSX Application Platform offline bundle file.
  26. Select the most current release compatible with your NSX Manager.
  27. Transfer the downloaded tgz file to the /var/lib/docker directory using SCP or SFTP.
    To verify that file was transferred, run the following command from NSX Application Platform Automation Appliance command prompt:
    root@nappa [ /var/lib/docker]# ls -al
    total 36269024
    -rw-r--r-- 1 root root 32669969859 Jun  5 10:57 VMware-NSX-Application-Platform-4.2.0.0.0.24009548.tgz
    drwxr-xr-x 3 root root        4096 Jun  5 11:09 ..
    -rwxrwxrwx 1  201  201       69657 Jun  5 11:47 upload_oci_artifacts_to_artifactory.sh
    drwxr-xr-x 2 root root       16384 Jun  5 12:05 .
  28. Extract the tgz file.
    root@nappa [ /var/lib/docker]# tar xvf VMware-NSX-Application-Platform-4.2.0.0.0.24009548.tgz
    cert-manager-4.2.0.0.0.24009548.tgz
    cert-manager-4.2.0.0.0.24009548.tgz.prov
    ...omitted...
    upload_artifacts_to_private_harbor.sh
    upload_oci_artifacts_to_private_harbor.sh
  29. Edit the upload_oci_artifacts_to_private_harbor.sh script to update the values for DOCKER_REPO, DOCKER_USERNAME, DOCKER_PASSWORD, and LOCAL_HOST_IP.
    You must specify DOCKER_REPO with the FQDN of your Harbor instance. Set the NSX Application Platform Automation Appliance VM IP address used to run the upload script for LOCAL_HOST_IP.
    For example,
    root@nappa [ /var/lib/docker]# vim upload_oci_artifacts_to_private_harbor.sh
    DOCKER_REPO=<harbor_ip>/<project_name>
    DOCKER_USERNAME=admin
    DOCKER_PASSWORD=<password>
    LOCAL_HOST_IP=<ip_of_vm_used_to_run_the_script>
  30. Start the Docker service, set the script to executable, and run the upload_oci_artifacts_to_private_harbor.sh script.
    root@nappa [ /var/lib/docker ]# systemctl start docker
    root@nappa [ /var/lib/docker]# chmod +x upload_oci_artifacts_to_private_harbor.sh
    root@nappa [ /var/lib/docker]# ./upload_oci_artifacts_to_private_harbor.sh
    WARNING! Using --password via the CLI is insecure. Use --password-stdin.
    WARNING! Your password will be stored unencrypted in /root/.docker/config.json.
    Configure a credential helper to remove this warning. See
    https://docs.docker.com/engine/reference/commandline/login/#credentials-store
    Login Succeeded
    Login Succeeded
    The push refers to repository [harbor.corp.info/nsx_application_platform/clustering/authserver]
    fa58efb92ddd: Pushed
    ad55a372f12d: Pushed
    0ac9a10d729b: Pushed
    b5be59dad32c: Pushed
    f5bb4f853c84: Pushed
    22213786: digest: sha256:5389928227a4249231a9c0e02ffae8d60d0233f033847218156c1d8ec2a2e0be size: 1367
    The push refers to repository [harbor.corp.info/nsx_application_platform/clustering/context_correlator]
    62dcc5989d67: Pushing [===========================> ] 64.03MB/115.8MB
    253ad025466f: Pushed
    d157ab654901: Pushed
    61d21522b94c: Pushing [==> ] 35.74MB/760.5MB
    a6c1f73d4bb7: Pushed
    c5efdd805219: Pushing [=> ] 9.439MB/321.9MB
    0ef79e996a32: Pushing [> ] 1.649MB/438.6MB
    51d221927681: Pushing [==================================================>] 7.168kB
    7e799685387d: Waiting
    ...

    Note that this operation might take some time depending on your environment.

What to do next

You can set up your NSX Application Platform environment for installation. See Deployment Requirements for NSX Application Platform and Deploying Tanzu Kubernetes Grid and NSX Application Platform.

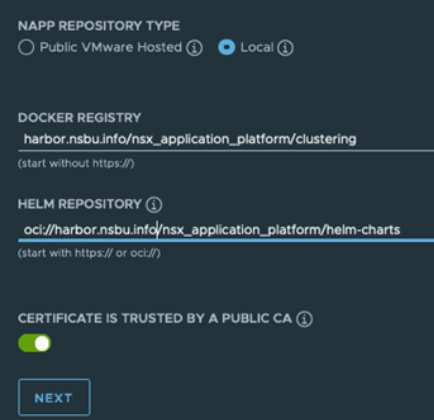
Note that when you run the NSX Application Platform Automation Appliance deployment wizard, set NAPP REPOSITORY TYPE to Local.