


VMware Postgres includes Patroni. Patroni is a cluster manager tool that facilitates the creation of a High Availability (HA) configuration.
This topic contains an architecture overview, and describes how to install, and configure a VMware Postgres Patroni cluster with three data nodes.
Patroni Components
The main components of a Patroni cluster are:
-
Patroni - the template for setting up the HA cluster.
-
A Distributed Configuration Store (DCS) - required to achieve maximum accessibility. VMware Postgres supports etcd as the DCS. Patroni leverages the RAFT algorithm of the etcd cluster to determine the availability of the Postgres node associated with the etcd node.
-
A load balancer - simplifies the access between the applications and the Patroni cluster, by providing a single endpoint for the applications. This topic does not cover setting up a load balancer; it is assumed HAProxy is already in the environment.
-
VMware Postgres nodes.
Architecture Overview
An example architecture is shown below:
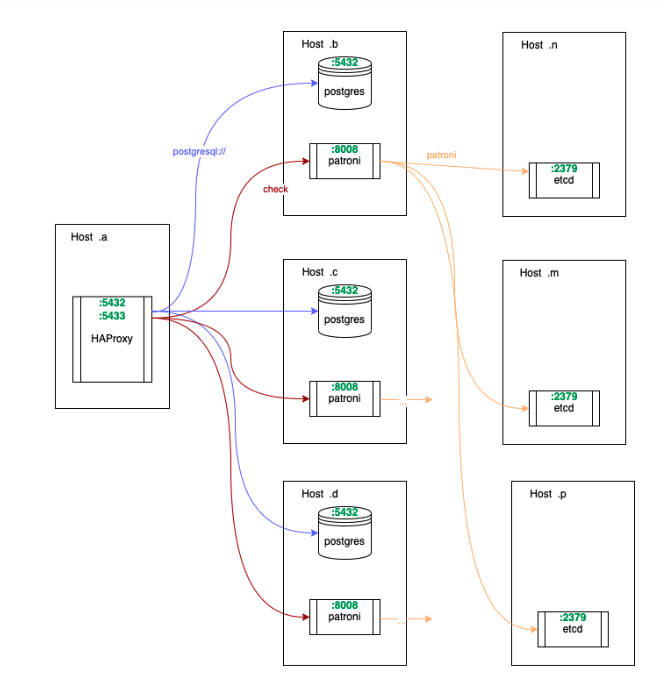
VMware recommends a three data node cluster as a minimum configuration. The three-node setup requires a total of seven nodes: three for the Postgres database, three for etcd, and one for a load balancer. etcd should mirror the topology of the database cluster for highest durability. The load balancer can be on more than one host, to alleviate Single Point of Failure (SPOF) concerns.
etcd Topology
The network topology for the etcd nodes should mirror the topology for the data nodes; for example, three data nodes would need three etcd nodes. If that is not possible, Postgres and etcd should be on separate disks.
The VMware recommended topology has these benefits:
- In the event of a network partition, each data node would still be able to communicate with its own etcd node. This prevents a situation when Postgres nodes are capable of replication, but Patroni cannot administer the instances because it cannot write to etcd.
- etcd has stringent requirements for disk I/O throughput. If etcd and Postgres are collocated on the same physical host, it is possible for them to starve each other for disk I/O, which can lead to cascading failures.
- When the data host needs to be restarted (e.g., for security updates), and etcd runs on the same host, the resiliency of both etcd and Postgres is decreased simultaneously. This makes the system more fragile for the duration of the restart.
Prerequisites
- Ensure your environment has a load balancer, similar to HAProxy.
- Ensure your environment’s firewall rules allow communication between all 7 hosts of the Patroni cluster.
- Request and note three static IP addresses for the three etcd nodes.
- Note the host port communication default requirements:
- The etcd hosts communicate with each other on ports 2379 (etcd client) and 2380 (etcd peer).
- The data hosts communicate with each other on port 8008 for Patroni’s API, and 5432 for Postgres replication.
- The data hosts communicate with the etcd hosts on port 2379.
- The load balancer communicates with the data nodes on ports 8008 and 5432, since it queries Patroni for health checks and balances traffic to the Postgres instances.
Install Patroni
Patroni is a separate RPM to VMware Postgres, and is included in the VMware Postgres server .zip.
Review the VMware Postgres prerequisites, and install the Patroni binaries on all data node hosts using:
cd ~/Downloads/vmware-postgres-16.*
yum install ./vmware-postgres16-patroni-2.1.4-1.el8.x86_64.rpm
Setup and Run etcd
These instructions use the static bootstrapping method for setting up etcd. For more information, see the etcd documentation.
-
On each etcd host, install etcd.
yum install -y etcd -
On each etcd host, create the etcd configuration file. Substitute or set the variables on each host for the hostname and IP addresses from the prerequisites, for example:
su - postgresinstance_hostname=etcdhost1.example.net instance_address=10.0.0.1 etcd_hostname_a=etcdhost2.example.net etcd_address_a=10.0.0.2 etcd_hostname_b=etcdhost3.example.net etcd_address_b=10.0.0.3where 10.0.0.1, 10.0.02, and 10.0.0.3 are the example IP addresses used in this topic. Then create the configuration file:
cat - <<HEREDOC > ~/etcd.yml
name: '$instance_hostname'
listen-peer-urls: 'http://$instance_address:2380'
listen-client-urls: 'http://$instance_address:2379,http://127.0.0.1:2379'
initial-advertise-peer-urls: 'http://$instance_address:2380'
advertise-client-urls: 'http://$instance_address:2379'

initial-cluster: '$instance_hostname=http://$instance_address:2380,$etcd_hostname_a=http://$etcd_address_a:2380,$etcd_hostname_b=http://$etcd_address_b:2380'
initial-cluster-state: 'new'
initial-cluster-token: 'etcd-cluster'
HEREDOC
On each host, modify the variables so each host refers to the other two. For example, when on the second host:
instance_hostname=etcdhost2.example.net instance_address=10.0.0.2 etcd_hostname_a=etcdhost1.example.net etcd_address_a=10.0.0.1 etcd_hostname_b=etcdhost3.example.net etcd_address_b=10.0.0.3 -
Run etcd with systemd, or use the following command:
etcd --config-file ~/etcd.yml > etcd.log 2>&1 &The background process will start running. Check
etcd.logfor any errors. Ensure you check the correctness of the configuration file, and the availability of the2379or2380ports.
Monitor and Manage etcd
Use the etcdctl command-line utility to manage the etcd cluster. View the command help by entering the command with no arguments.
View etcd Cluster Health
etcdctl cluster-health
member 3172be2b05108291 is healthy: got healthy result from http://10.0.0.1:2379
member bf2f62dbbe5028b6 is healthy: got healthy result from http://10.0.0.2:2379
member e03eb2acfb7726f9 is healthy: got healthy result from http://10.0.0.3:2379
cluster is healthy
List and View etcd Cluster Leader
etcdctl member list
3172be2b05108291: name=etcdhost1.example.net peerURLs=http://10.0.0.1:2380 clientURLs=http://10.0.0.1:2379 isLeader=false
bf2f62dbbe5028b6: name=etcdhost2.example.net peerURLs=http:/10.0.0.2:2380 clientURLs=http://10.0.0.2:2379 isLeader=true
e03eb2acfb7726f9: name=etcdhost3.example.net peerURLs=http://10.0.0.3:2380 clientURLs=http://10.0.0.3:2379 isLeader=false
Configure and Run Patroni
-
On each data host, install python3 for patroni. Patroni supports the system default python3 version or python3.11. If you are willing to run patroni with python3.11, please make sure the correspoding patroni package is installed and
/usr/bin/pythonpointed to thepython3.11.yum install -y python3 -
Ensure that the hostname, and IP address variables on each host are set, and the
pg_hbasetting allows access between the data nodes (this example uses Classless Inter-Domain Routing (CIDR)). -
On each host’s terminal, set the following system variables, using your custom values. These variables are used to create the patroni.yml configuration file. The following example sets the variables for the primary which is 10.0.1.1.
su - postgresetcd_hosts=10.0.0.1:2379,10.0.0.2:2379,10.0.0.3:2379data_host_CIDR=10.0.1.0/24instance_hostname=postgreshost1.example.netinstance_address=10.0.1.1instance_name=postgreshost1where:
instance_hostnameis the host IP address, or the fully qualified host nameinstance_namematches the host name
-
As the postgres user, create the Patroni configuration file.
cat - <<HEREDOC > patroni.yml
scope: patroni_cluster
name: $instance_name
restapi:
  listen: '$instance_address:8008'
  connect_address: '$instance_address:8008'
etcd:
  hosts: '$etcd_hosts'
bootstrap:
  dcs:
    ttl: 30
    loop_wait: 10
    retry_timeout: 10
    maximum_lag_on_failover: 1048576
    postgresql:
      use_pg_rewind: true
      use_slots: true
      parameters:
        hot_standby: 'on'
        wal_keep_segments: 20
        max_wal_senders: 8
        max_replication_slots: 8
    slots:
      patroni_standby_leader:
        type: physical
  initdb:
    - encoding: UTF8
    - data-checksums
  pg_hba:
    - host replication replicator $data_host_CIDR md5
    - host all all 0.0.0.0/0 md5
  users:
    admin:
      password: admin
      options:
        - createrole
        - createdb
postgresql:
  listen: '$instance_address:5432'
  connect_address: '$instance_address:5432'
  data_dir: /var/lib/pgsql/data
  pgpass: /tmp/pgpass0
  authentication:
    replication:
      username: replicator
      password: rep-pass
    superuser:
      username: postgres
      password: postgres
    rewind:
      username: rewind_user
      password: rewind_password
tags:
  nofailover: false
  noloadbalance: false
  clonefrom: false
  nosync: false
HEREDOC
For more information on the Patroni configuration file, refer to the Patroni documentation.
-
As the postgres user, run Patroni with systemd, or use the following command:
patroni patroni.yml > patroni.log 2>&1 &Check the
patroni.loglog file for errors. A successful startup message is similar to this:2022-03-17 23:32:58.648 UTC [10491] LOG: database system is ready to accept connections 10.0.1.1:5432 - accepting connections 10.0.1.1:5432 - accepting connections 2022-03-17 23:32:59,608 INFO: establishing a new patroni connection to the postgres cluster 2022-03-17 23:32:59,631 INFO: running post_bootstrap 2022-03-17 23:32:59,665 INFO: initialized a new cluster 2022-03-17 23:33:09,645 INFO: Lock owner: postgreshost1; I am postgreshost1 2022-03-17 23:33:09,668 INFO: Lock owner: postgreshost1; I am postgreshost1 2022-03-17 23:33:09,684 INFO: no action. i am the leader with the lock -
Repeat steps 2, and 3 for each standby node. Ensure you use the correct hostname and IP address variables for each host.
-
As the postgres user, verify that Patroni is up and running, and that the cluster is replicating:
patronictl -c patroni.yml list+-----------------------------------+-----------+---------+---------+----+-----------+ | Member | Host | Role | State | TL | Lag in MB | + Cluster: patroni_cluster (7093641312106653939) ---------+---------+----+-----------+ | postgreshost1 | 10.10.1.1 | Leader | running | 1 | | | postgreshost2 | 10.10.1.2 | Replica | running | 1 | 0 | | postgreshost3 | 10.10.1.3 | Replica | running | 1 | 0 | +-----------------------------------+-----------+---------+---------+----+-----------+
Using Patroni
Validate WAL Replication
To check that WAL replication is working, create a table on the leader and insert data into it. Verify that the table appears on each of the standby hosts.
Manual Switchover
Manually switch the leader to another node using this command.
patronictl -c patroni.yml switchover
Manual Failover
Simulate an unplanned failover by rebooting the primary host.
