From the VMware Pulse IoT Center UI, go to Updates > Campaigns.
The Campaigns page is displayed.
Click CREATE.
The
Create Campaign wizard is displayed.
In the Details step:
Enter a name and an optional description for your campaign.
Optionally, select Launch after creation if you want to start the campaign immediately. This option is not available if Campaign Approval is enabled.
If you do not enable approvals from the Settings > Updates page, the campaign wizard allows you to schedule a start date and time for your campaign.
If you enable approvals and after the campaign is approved, you can set the scheduled start date and time for the campaign from the Campaign Details page.
Click Next.
In the Distribution Select Query step:
To run the campaign on all registered gateways, select All registered gateways.
To run the campaign on a gateway or a Thing device, select GATEWAY or THING from the Update device template type: drop-down menu.
Note: If you select
THING, add the
parentGatewayId property in the columns when creating the distribution query.
Select the distribution query for the campaign. Distribution queries are search filter definitions whose results are the devices on which the campaign runs. You can create distribution queries from the Advanced Search option. Alternatively, you can create a distribution query by selecting + Create New from the Distribution Select Query drop-down menu:
In the Device Template drop-down menu, select the type of device template to filter.
In the Key drop-down menu, select metric that you want to filter the devices by.
In the Operator drop-down menu, select from Contains, Equal to, and Not equal to operators.
In the Value text box, enter the metric values.
Enter a name for the distribution list and click SAVE AS. The query is saved as a new Advanced Search query. You can select this query the next time you want to create a campaign that requires similar devices to be included.
Click NEXT.
In the Select Package step, select the update package that you want to associate your campaign with. You can select multiple packages of the same type. Click Next.
Note: You can edit packages and distribution lists for the campaigns that are created, but you cannot edit them for those campaigns that are in the
Approved or
Started state. To edit these packages and distribution lists, you must delete the campaign first.
In the Scheduling step, select Enable schedule start to select a time window for campaign to start and end. This step is enabled if the campaign does not require an approval.
In the Review step, review your campaign information and click CREATE.
Results
You have successfully created a campaign.
Note: After you start a campaign, the distribution list is evaluated and the resulting devices are added to the campaign. It takes 30 minutes for the newly enrolled devices that match the distribution list's criteria to be added to the campaign. You cannot edit the filter definition list after the campaign starts. You cannot start a scheduled campaign manually.
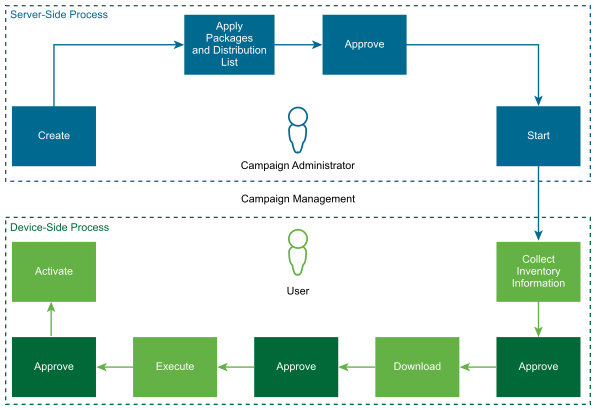
Example: Campaign State Transition Scheme
The following diagram illustrates the different states of a campaign.
Note: For a headless campaign execution, approvals for downloading, executing, and activating packages are not required.