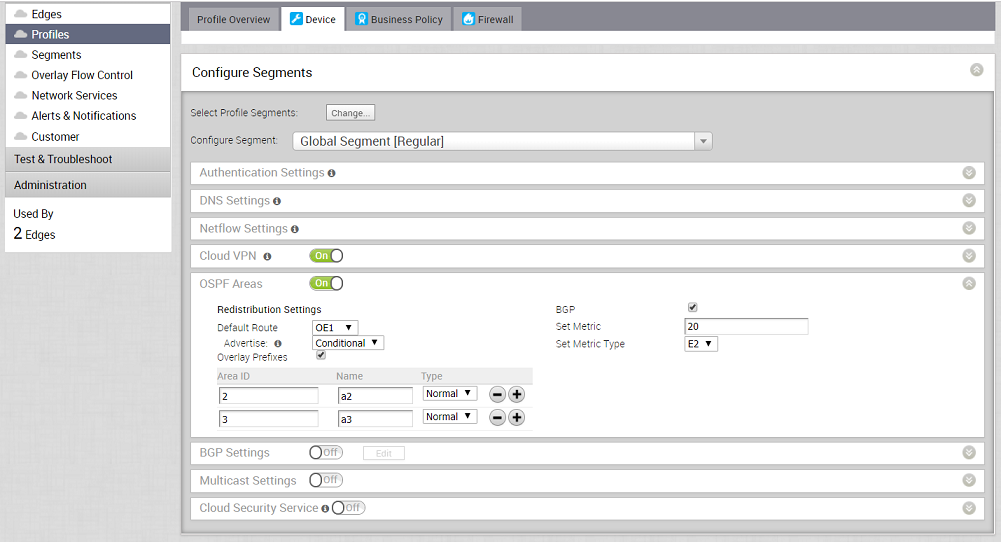
Open Shortest Path First (OSPF) can be enabled only on a LAN interface as a passive interface. The Edge will only advertise the prefix associated with that LAN switch port. To get full OSPF functionality, you must use it in routed interfaces.
To enable OSPF, perform the steps on this procedure:
- Configure OSPF for VPN profiles.
- Go to Configure > Profile.
- Click the Device icon corresponding to the VPN profile for which you want to configure OSPF.
The Configure Segments screen appears.

- In the OSPF Areas section, turn ON the OSPF Areas toggle button.
- Configure the redistribution settings for OSPF areas.
- From the Default Route drop-down menu, choose an OSPF route type (E1 or E2) to be used for default route.
- From the Advertise drop-down menu, choose either Always or Conditional. (Choosing Always means to Advertise the default route always. Choosing Conditional means to redistribute default route only when Edge learns via overlay or underlay). The “Overlay Prefixes” option must be checked to use the Conditional default route.
- If applicable, check the Overlay Prefixes checkbox.
- Optionally, to enable injection of BGP routes into OSPF, select the BGP checkbox. BGP routes can be redistributed into OSPF, so if this is applicable, enter or choose the configuration options as follows:
- In the Set Metric textbox, enter the metric. (This is the metric that OSPF would put in its external LSAs that it generates from the redistributed routes). The default metric is 20.
- From the Set Metric Type drop-down menu, choose a metric type. (This is either type E1 or E2 (OSPF External-LSA type)); the default type is E2).
- In the ID text box,enter an OSPF Area ID.
- In the Name textbox, enter a descriptive name for your area.
- By default,the Normal type is selected. Only Normal type is supported at this time.
- Add additional areas, if necessary, by clicking
 .
.
- Configure routed interface settings for the OSPF-enabled Edge device.
Note: For the 3.3.1 release, the VeloCloud Orchestrator (VCO) supports OSPF Point to Point network mode at the Edge and Profile level.
- In the Configure Segments screen, scroll down to the Device Settings area of the Edge device for which you want to configure interface and OSPF settings.
- Click the expand icon corresponding to the Edge.
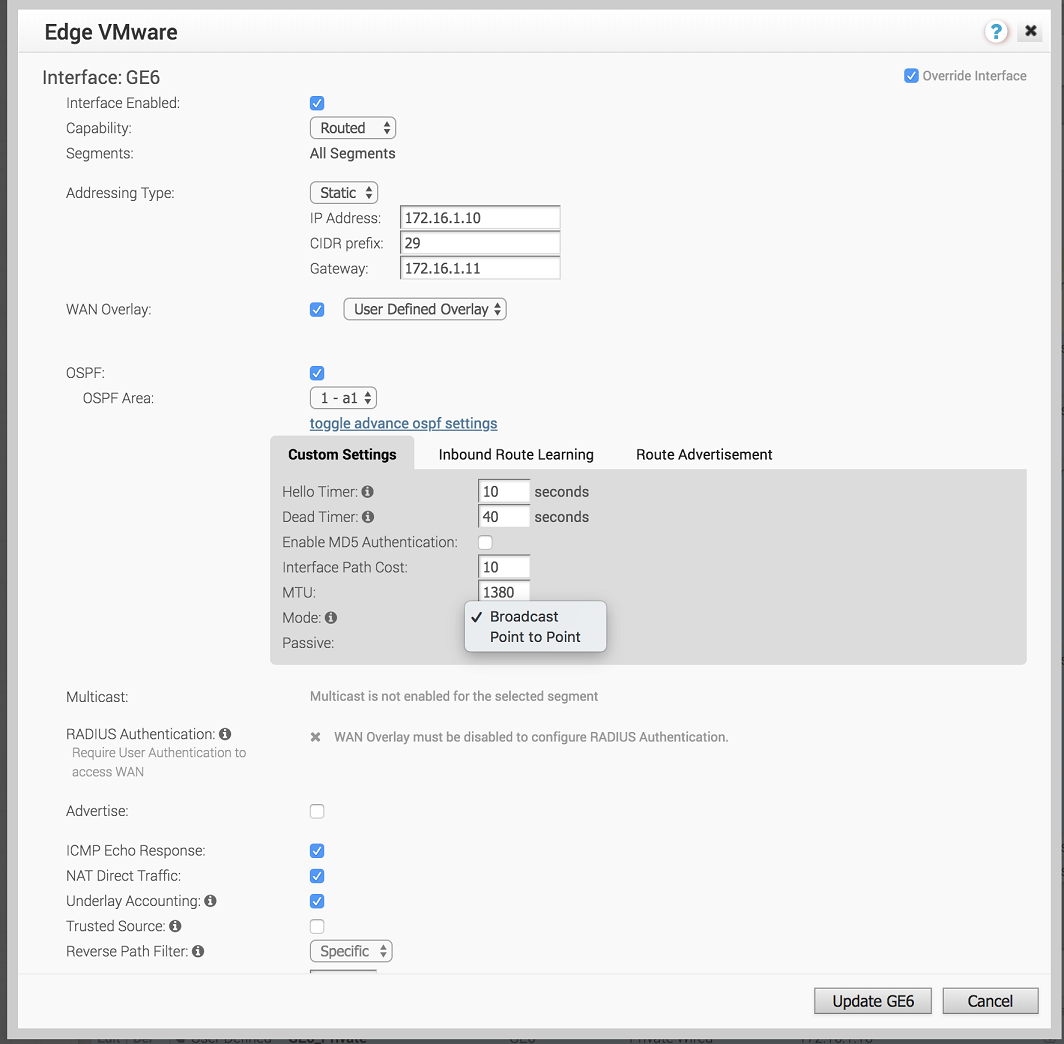
- In the Interface Settings area, click the Edit link of your interface. The Interface Setting screen for the Edge device appears.

- Select the OSPF checkbox.
- From the OSPF Area drop-down menu, select an OSPF area.
- Click the toggle advance ospf settings link to configure advanced OSPF settings.
- Create filters for Inbound Route Learning and Route Advertisement. For more information, see Route Filters.
- Click the Customs Settings tab and configure the following OSPF settings.
- In the Hello Timer text box, enter the OSPF Hello time interval in seconds. The allowable range is 1 through 255.
- In the Dead Timer text box, enter the OSPF Dead time interval in seconds. The allowable range is 1 through 65535.
- Select the Enable MD5 Authentication checkbox to enable MD5 authentication.
- In the Interface Path Cost text box, enter the OSPF cost for the interface path.
- In the MTU text box, enter the Maximum Transmission Unit (MTU) value of the interface.
- From the Mode drop-down menu, select Broadcast or Point to Point as the OSPF network type mode. The default OSPF mode is Broadcast.
- Select the Passive checkbox to enable OSPF Passive mode.
- Click the Update button.
- Click Save Changes.
The Confirm Changes dialog box appears requesting you to confirm the OSPF areas you want to enable. It also displays how many Edges are affected.
Note: If you have Edges that are not associated with the OSPF configuration at the Profile level, then you must configure at the Edge level from Configure > Edges > Device > Interface Settings area.