Firewall rules are used to configure Allow or Deny Access Control List (ACL) rules. The rules are used to determine what traffic is allowed between VLANs or out from the LAN to the Internet. The rules can be based on applications, application categories, source IP address/port, destination IP address/port, DSCP tags or protocol.
Network traffic is managed by identifying its characteristics then matching the characteristics to the rule with the highest precedence. The following screen capture shows the initial definition of firewall rules. Note that Firewall function can be disabled using the Firewall Status switch.
Firewall Profiles are Segment aware. All Segments available for configuration are listed in the Configure Segment drop-down menu.
When you choose a Segment to configure from the Configure Segment drop-down menu, the settings and options associated with that Segment appear in the Configure Segments area. Global Segment [Regular] is the default Segment.

For more information about Segmentation, see Configure Segments and Configure a Profile Device.
The Firewall Logging feature must be enabled to log individual firewall logging events.

For the 3.3.1 release, there are three new IP Address options available: CIDR Prefix, Wildcard Mask, and Subnet Mask.
- Click the New Rule button to create a new Firewall rule.
The Configure Rule dialog box appears. From this dialog box, you can select Source, Destination, and Application characteristics to match. Given a match, the Firewall action defined in the rule will be applied.
- In the Match area of the Configure Rule dialog box, there are three sections to configure the traffic: Source, Destination, and Application. See the steps below to configure the Source section of the Match area.
- In the Source section, click the Define button if you want to narrow the source traffic to a specific VLAN, an IP Address, or MAC Address, as described in the steps that follow.
- By default, the Any button is selected. If you click the Define button, complete the appropriate options in the sub steps below.
- None: Selected by default.
- VLAN: Click the VLAN radio button and choose the appropriate VLAN from the drop-down menu.
- IP Address: Click the IP Address radio button and type in the IP Address and choose one of the three options from the drop-down menu.
Note: Wildcard Mask and Subnet Mask are new for the 3.3.1 release.
Option Description CIDR prefix Choose this option if you want the network defined as a CIDR value (for example: 172.10.0.0 /16).Subnet mask Choose this option if you want the network defined based on a Subnet mask (for example, 172.10.0.0 255.255.0.0).Wildcard Mask Choose the Wildcard mask option if you want the ability to narrow the enforcement of a policy to a set of devices across different IP subnets that share a matching host IP address value. The Wildcard mask matches an IP or a set of IP addresses based on the inverted Subnet mask. A '0' within the binary value of the mask means the value is fixed and a 1 within the binary value of the mask means the value is wild (can be 1 or 0). For example, a Wildcard mask of 0.0.0.255 (binary equivalent = 00000000.00000000.00000000.11111111) with an IP Address of 172.0.0, the first three octets are fixed values and the last octet is a variable value. Note: After you set up this rule using a Wildcard mask, you are narrowing the number of clients this rule applies to. - MAC Address: Type in the MAC Address in the appropriate text box.
- Ports: Type in the ports in the appropriate text box.
- In the Destination section, you can assign additional parameters to identify the traffic destination, as described in the following sub-steps:
- Define your traffic destination by clicking one of the following radio buttons (Any, Internet, VeloCloud Edge, or Non-VeloCloud Site).
- Type in the IP Address in the appropriate text box and specify an IP Address option: CIDR Prefix, Wildcard Mask, and Subnet Mask.
Note: Wildcard Mask and Subnet Mask are new for the 3.3.1 release.
Option Description CIDR prefix Choose this option if you want the network defined as a CIDR value (for example: 172.10.0.0 /16).Subnet mask Choose this option if you want the network defined based on a Subnet mask (for example, 172.10.0.0 255.255.0.0).Wildcard Mask Choose the Wildcard mask option if you want the ability to narrow the enforcement of a policy to a set of devices across different IP subnets that share a matching host IP address value. The Wildcard mask matches an IP or a set of IP addresses based on the inverted Subnet mask. A '0' within the binary value of the mask means the value is fixed and a 1 within the binary value of the mask means the value is wild (can be 1 or 0). For example, a Wildcard mask of 0.0.0.255 (binary equivalent = 00000000.00000000.00000000.11111111) with an IP Address of 172.0.0, the first three octets are fixed values and the last octet is a variable value. Note: After you set up this rule using a Wildcard mask, you are narrowing the number of clients this rule applies to. - Protocol: Type in the Protocol in the appropriate text box.
- Ports: Type in the ports in the appropriate text box.
- Choose the applications to apply the Firewall rule in Application section:
- Click the Define button if you want to choose specific applications. By default, the Any button is selected.
- From the Browse List, select an application category. A list of specific applications display on the right side of the Browse list. Scroll down the list and select the specific application you want to define.
- Choose a DSCP from the drop-down menu.
- In the Actions area, click Allow or Deny the firewall rule.
- Click OK to create the Firewall rule.
The Profile Firewall page allows you to define Outbound Firewall Rules and Edge Access. Inbound rules must be defined at each Edge.
Outbound Firewall Rules
Click New Rule to add a new Firewall rule. The following dialog box appears. Using the dialog box, you can select Source, Destination, and Application characteristics to match. Given a match, the Firewall action defined in the rule will be applied.

The following screen capture shows expanded options for Source, Destination, and Application. You can use the parameters to finely select where you want the Firewall rule to be applied.

Mac Address Filtering
Mac Address Filtering is another Source option available in the Match area of the dialog box shown below. You can use the Mac Address feature when you want a filtering rule to apply to a specific client no matter what subnet the client is associated with. (The filtering rule is independent of the client's subnet).
To enable this filter, choose the Mac Address radio button, type in the Mac address, and click the OK button.
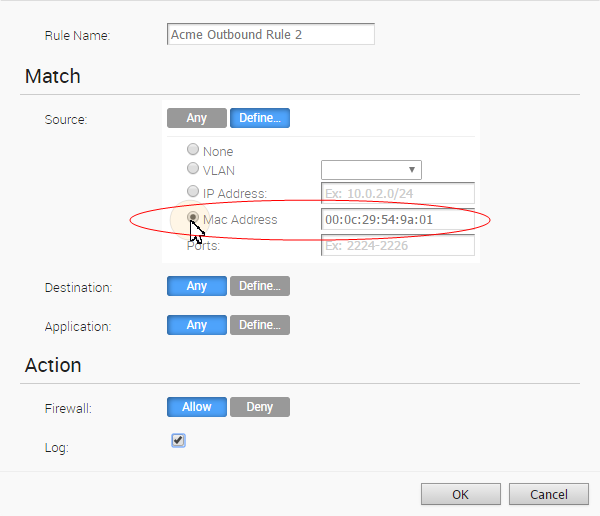
The Outbound Firewall Rules area updates as shown below.

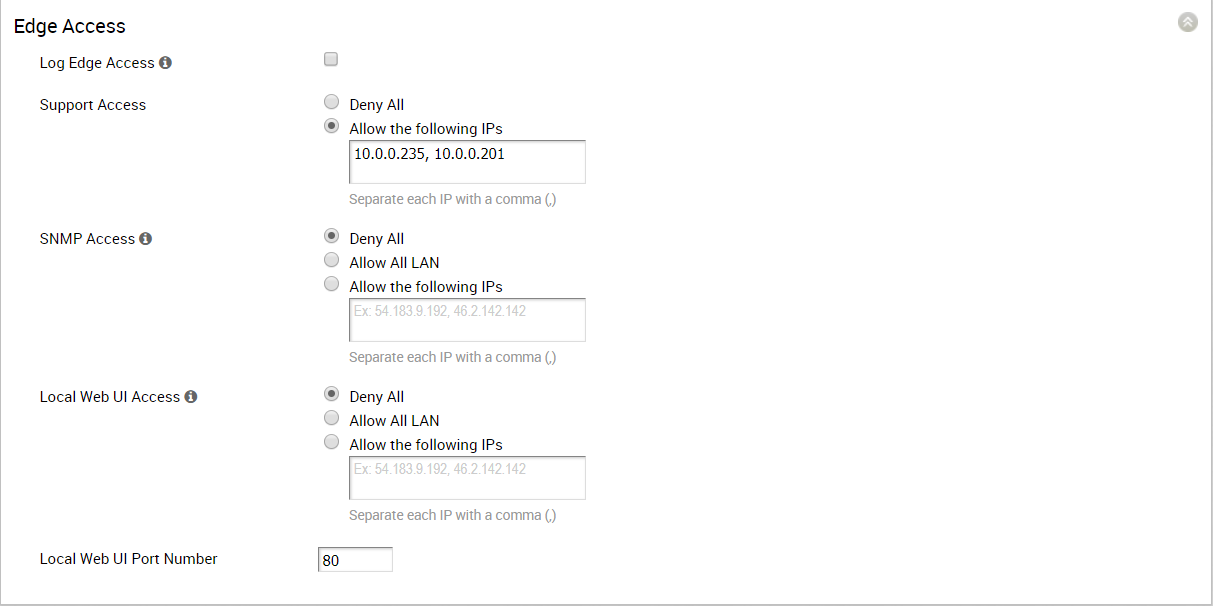
Edge Access
Edge Access behavior can be defined on the Firewall page. Accessing an Edge by remotely accessing the Edge Local UI or accessing the Edge via SNMP can be set to Deny All, Allow All, or Allow for specific IP addresses. Accessing an Edge by Support Access can be set to Deny All or Allow for specific IP addresses. A Local Web UI Port Number can also be specified.
For security reasons, please keep Support Access and the Local Web UI disabled.