While configuring Firewall rules, you can select the existing object groups to match the source or destination. This includes the range of IP addresses or port numbers available in the object groups in the rules.
For more information on Firewall Rules, see
Configure Firewall Rules.
Procedure
- In the Enterprise portal, click
- Select a profile from the list and click the Firewall tab.
- Click New Rule or .
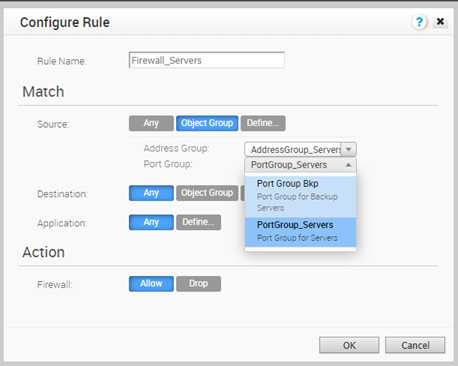
- Enter a name for the Firewall rule.
- In the Match area, click Object Group for the source.
- Select the relevant Address Group and Port Group from the drop-down list.
If the selected address group contains any domain names, then they would be ignored when matching for the source.
- If required, you can select the Address and Port Groups for the destination as well.
- Choose required Action and click OK.
Results
The Firewall rules that you create for a profile are automatically applied to all the Edges associated with the profile. If required, you can create additional rules specific to the Edges.
- Navigate to , select an Edge, and click the Firewall tab.
- Click New Rule or .
- Define the rule with relevant object groups and other actions.
The Firewall tab of the Edge displays the Firewall rules from the associated profile along with the rules specific to the Edge.
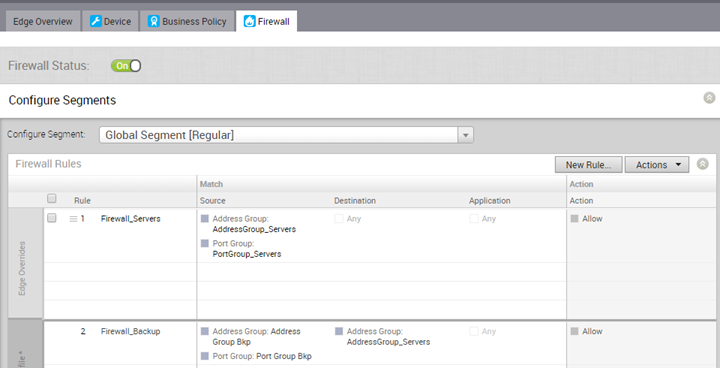
Note: By default, the firewall rules are assigned to the global segment. If required, you can choose a segment from the
Select Segment drop-down and create firewall rules specific to the selected segment.
What to do next
You can modify the object groups with additional IP addresses and port numbers. The changes are automatically included in the Firewall rules that use the object groups.