


This document provides instructions on how to upgrade the VMware Partner Gateway from the 3.3.2 or 3.4 release to the 4.0 release.
The VMware SD-WAN Gateway appliance includes the following changes in the 4.0 release:
- A new system disk layout based on LVM to allow more flexibility in volume management
- A new kernel version
- New and upgraded base OS packages
- Improved security hardening based on Center for Internet Security benchmarks
- ifupdown has been deprecated in favor of https://netplan.io/
- ifup and ifdown are no longer available
- Network configuration is now in /etc/netplan vs /etc/network/
- etc/network/ifup.d and /etc/network/ifdown.d no longer work. Network-dispatcher locations should be used /usr/lib/networkd-dispatcher (dormant.d, no-carrier.d, off.d, routable.d)
- Substantial changes to cloud-init. Cloud-init deployment scripts must be reviewed and tested for compatibility
- net-tools (ifconfig, netstat, etc) are considered “deprecated” and may be removed in the future versions
Network Configuration
ifupdown has been deprecated in favor of https://netplan.io/. Network configuration has moved from /etc/network to /etc/netplan.
network:
  version: 2
  ethernets:
    eth0:
      addresses:
        - 192.168.151.253/24
      gateway4: 192.168.151.1
      nameservers:
        addresses:
          - 8.8.8.8
          - 8.8.4.4
        search: []
      routes:
        - to: 192.168.0.0/16
          via: 192.168.151.254
          metric: 100

     eth1:
      addresses:
        - 192.168.152.251/24
      gateway4: 192.168.152.1
      nameservers:
        addresses:
          - 8.8.8.8
        search: []
echo 'network: {config: disabled}' > /etc/cloud/cloud.cfg.d/99-disable-network-config.cfg
Cloud-init
Cloud-init was upgraded to version 20.2. More information on Cloud-init can be found here: https://cloudinit.readthedocs.io/en/stable/index.html
Example 1: Simple
meta-data:
instance-id: vcg1
local-hostname: vcg1
#cloud-config
hostname: vcg1
password: Velocloud123
chpasswd: {expire: False}
ssh_pwauth: True
Example 2: New-style network configuration (network-config file)
instance-id: vcg1
local-hostname: vcg1
#cloud-config
hostname: vcg1
password: Velocloud123
chpasswd: {expire: False}
ssh_pwauth: True
ssh_authorized_keys:
  - ssh-rsa  …  rsa-key

velocloud:
  vcg:
    vco: demo.velocloud.net
    activation_code: F54F-GG4S-XGFI
    vco_ignore_cert_errors: false

runcmd:
  - 'echo “Welcome to VeloCloud”'
network-config Example 1:
version: 2
ethernets:
  eth0:
    addresses:
      - 192.168.152.55/24
    gateway4: 192.168.152.1
    nameservers:
      addresses:
        - 192.168.152.1
  eth1:
    addresses:
      - 192.168.151.55/24
    gateway4: 192.168.151.1
    nameservers:
      addresses:
        - 192.168.151.1
network-config Example 2:
NOTE: If multiple interfaces are present on the Gateway and need an interface to be selected as a preferred interface for the default gateway, the below configuration (with the metric value) can be used to select the correct interface.
version: 2
ethernets:
eth0:
  addresses: [192.168.82.1/24]
eth1:
  addresses: [70.150.1.1/24]
  routes:
  - {metric: 1, to: 0.0.0.0/0, via: 70.150.1.254}
eth2:
  addresses: [70.155.1.1/24]
  routes:
  - {metric: 2, to: 0.0.0.0/0, via: 70.155.1.254}
Net-tools
Net-tools utilities like ifconfig, netstat, route, etc. are considered “deprecated.” Net-tools suggested replacements are shown in the table below. These commands only display information for the Linux Host and not for the SD-WAN Overlay Network. NOTE: For more information, type: man ip.
| Old Net-tool Utilities | New Corresponding Net-tool Utilities |
|---|---|
| arp | ip n (ip neighbor) |
| ifconfig | ip a (ip addr), ip link, ip -s (ip -stats) |
| nameif | ip link, ifrename |
| netstat | ss, ip route (for netstat-r), ip -s link (for netstat -i), ip maddr (for netstat-g) |
| route | ip r (ip route) |
Sample Command Output for Net-tool Utilities
The sample output is confirmation that the command is successful. Sample command outputs for ip n (ip neighbor), ip a (ipaddr), and ip link are shown below.
root@SS-gateway-1:~# ip n
192.168.0.100 dev eth2 lladdr 00:50:56:84:85:d4 REACHABLE
192.168.0.250 dev eth2 lladdr 00:50:56:84:97:66 REACHABLE
13.1.1.2 dev eth0 lladdr 00:50:56:84:e7:fa REACHABLE
root@SS-gateway-1:~#
root@SS-gateway-1:~# ip a
1: lo: <LOOPBACK,UP,LOWER_UP> mtu 65536 qdisc noqueue state UNKNOWN group default qlen 1000
    link/loopback 00:00:00:00:00:00 brd 00:00:00:00:00:00
    inet 127.0.0.1/8 scope host lo
       valid_lft forever preferred_lft forever
    inet6 ::1/128 scope host
       valid_lft forever preferred_lft forever
2: eth0: <BROADCAST,MULTICAST,UP,LOWER_UP> mtu 1500 qdisc mq state UP group default qlen 4096
    link/ether 00:50:56:84:a0:09 brd ff:ff:ff:ff:ff:ff
    inet 13.1.1.1/24 brd 13.1.1.255 scope global eth0
       valid_lft forever preferred_lft forever
    inet6 fe80::250:56ff:fe84:a009/64 scope link
       valid_lft forever preferred_lft forever
3: eth1: <BROADCAST,MULTICAST,UP,LOWER_UP> mtu 1500 qdisc mq state UP group default qlen 1000
    link/ether 00:50:56:84:a6:ab brd ff:ff:ff:ff:ff:ff
    inet 101.101.101.1/24 brd 101.101.101.255 scope global eth1
       valid_lft forever preferred_lft forever
    inet6 fe80::250:56ff:fe84:a6ab/64 scope link
       valid_lft forever preferred_lft forever
4: eth2: <BROADCAST,MULTICAST,UP,LOWER_UP> mtu 1500 qdisc mq state UP group default qlen 1000
    link/ether 00:50:56:84:bc:75 brd ff:ff:ff:ff:ff:ff
    inet 192.168.0.201/24 brd 192.168.0.255 scope global eth2
       valid_lft forever preferred_lft forever
    inet6 fe80::250:56ff:fe84:bc75/64 scope link
       valid_lft forever preferred_lft forever
6: gwd1: <POINTOPOINT,MULTICAST,NOARP,UP,LOWER_UP> mtu 1500 qdisc fq_codel state UNKNOWN group default qlen 4096
    link/none
    inet 169.254.129.1/32 scope global gwd1
       valid_lft forever preferred_lft forever
    inet6 fe80::27d5:9e46:e7f7:7198/64 scope link stable-privacy
       valid_lft forever preferred_lft forever
root@SS-gateway-1:~#
root@SS-gateway-1:~# ip link
1: lo: <LOOPBACK,UP,LOWER_UP> mtu 65536 qdisc noqueue state UNKNOWN mode DEFAULT group default qlen 1000
    link/loopback 00:00:00:00:00:00 brd 00:00:00:00:00:00
2: eth0: <BROADCAST,MULTICAST,UP,LOWER_UP> mtu 1500 qdisc mq state UP mode DEFAULT group default qlen 4096
    link/ether 00:50:56:84:a0:09 brd ff:ff:ff:ff:ff:ff
3: eth1: <BROADCAST,MULTICAST,UP,LOWER_UP> mtu 1500 qdisc mq state UP mode DEFAULT group default qlen 1000
    link/ether 00:50:56:84:a6:ab brd ff:ff:ff:ff:ff:ff
4: eth2: <BROADCAST,MULTICAST,UP,LOWER_UP> mtu 1500 qdisc mq state UP mode DEFAULT group default qlen 1000
    link/ether 00:50:56:84:bc:75 brd ff:ff:ff:ff:ff:ff
6: gwd1: <POINTOPOINT,MULTICAST,NOARP,UP,LOWER_UP> mtu 1500 qdisc fq_codel state UNKNOWN mode DEFAULT group default qlen 4096
    link/none
root@SS-gateway-1:~#
Upgrade Considerations
Due to substantial changes to the disk layout and system files, an in-place upgrade is not possible from older releases to the 4.0 release. The migration will require deploying new 4.0 VMware SD-WAN Gateway systems and decommissioning systems running older code.
For VPN VMware SD-WAN Gateways or NAT SD-WAN Gateways with well-known public IP addresses, adhere to the following procedure below if the public IP of the VMware SD-WAN Gateway must be preserved.
- Launch the new VMware SD-WAN Gateway system based on the 4.0 release image. Refer to the deployment guide for your platform for more information (Gateway Installation Procedures).
- Shutdown the old VMware SD-WAN Gateway system. (Bring down the old VMware SD-WAN Gateway VM (either by running the
“sudo poweroff”command on the CLI console, or by powering off from the available Hypervisor options). - Migrate the public IP to the new system: update the NAT record to point to the new VMware SD-WAN Gateway system, or configure the public IP on the new VMware SD-WAN Gateway network interface. Deploy the new Gateway with the Cloud-int examples given above using the same IP address as the previous VMware SD-WAN Gateway.
- Obtain the activation key from the existing VMware SD-WAN Gateway record in the SD-WAN Orchestrator (as described in the steps below).
- From the SD-WAN Orchestrator, select Gateways from the left navigation panel.
- From the Gateways screen, click a VMware SD-WAN Gateway to select it.
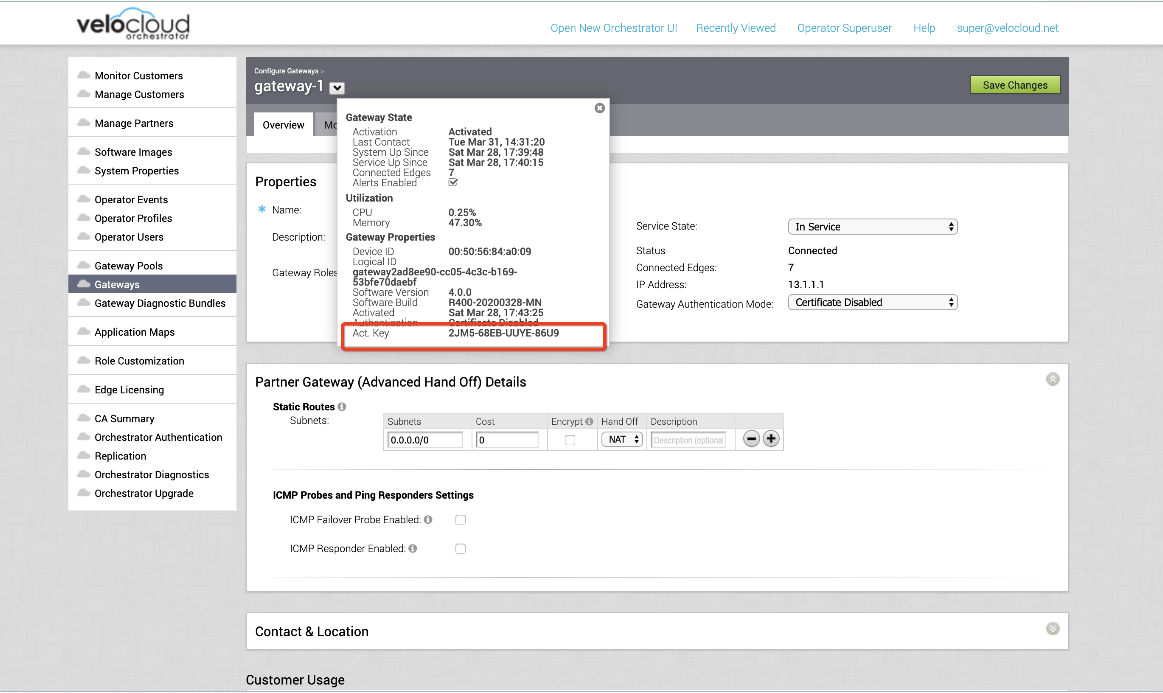
- From the screen of the chosen VMware SD-WAN Gateway, click the down arrow next to the VMware SD-WAN Gateway name to open the information box.
- The Activation Key is located at the bottom of the information box, as shown in the image below.
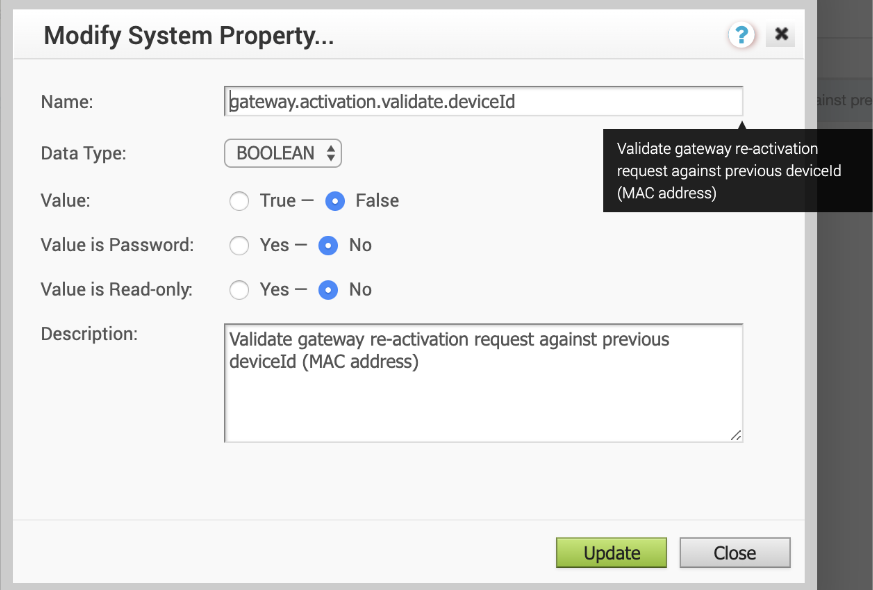
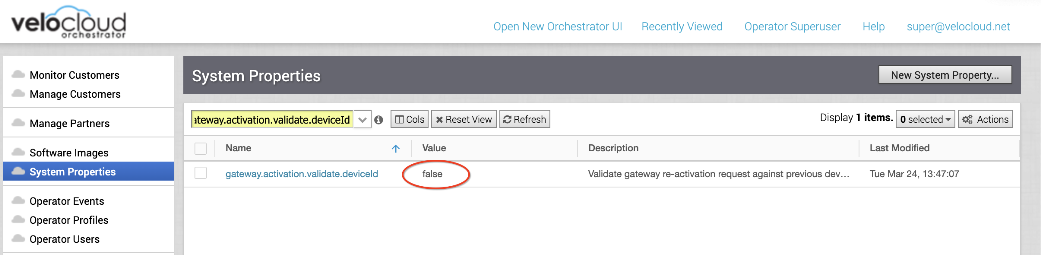
- Set the following system property “gateway.activation.validate.deviceId” to False, as shown in the image below. Refer to the System Properties section in the VMware SD-WAN Operator Guide, if necessary for more information.
- Re-activate the new VMware SD-WAN Gateway system: from the CLI console run:
“sudo /opt/vc/bin/activate.py -s <vco_address> <activation_code>” - Restore the following system property “gateway.activation.validate.deviceId” to the original value (if necessary).
The VMware SD-WAN Gateway is now registered and ready to receive a connection from the Edges.
Activation Example Output
root@gateway/opt/vc# /opt/vc/bin/activate.py FLM6-CSV6-REJS-XFR5 -i -s 169.254.8.2
Activation successful, VCO overridden back to 169.254.8.2 root@SS1-gateway-2:/opt/vc#
SD-WAN Gateways Without Well-known Public IPs
This section is only for SD-WAN Gateways without a well-known public IP, such as, VPN SD-WAN Gateways. If this scenario applies, follow the procedure below.
- Launch a new VMware SD-WAN Gateway system. Refer to the deployment guide for your platform if necessary (Gateway Installation Procedures).
- Activate a new VMware SD-WAN Gateway system.
- Add new VMware SD-WAN Gateway to the SD-WAN Orchestrator VMware SD-WAN Gateway pool. Refer to "Gateway Management" section in the VMware SD-WAN Operator Guide for more details.
- The VMware SD-WAN Gateway is now registered and ready to receive a connection from the Edges.
- Remove the old VMware SD-WAN Gateway from SD-WAN Orchestrator VMware SD-WAN Gateway pool. Refer to the "Gateway Management" section in VMware SD-WAN Operator Guide for more information.
- Decommission the old VMware SD-WAN Gateway VM. (Remove the VMware SD-WAN Gateway record from the SD-WAN Orchestrator and decommission the VM instance).
Obtaining Gateway Activation Key Via API
To deploy using the API Method, use the following: “network/getNetworkGateways”
Sample response:
{"jsonrpc":"2.0","result":[{"id":1, "activationKey":"69PX-YHY2-N5PZ-G3UW … 