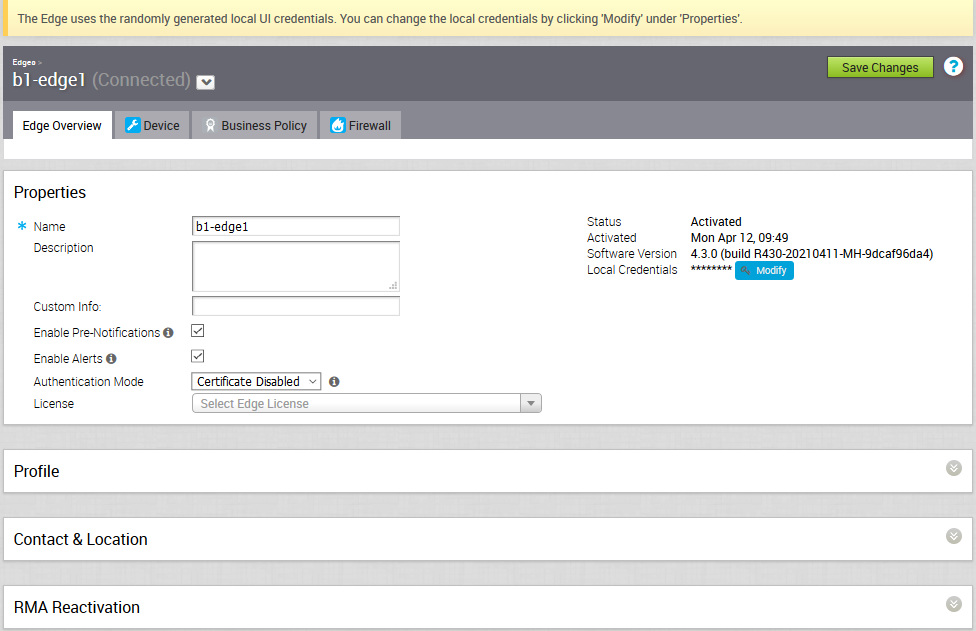
The Edge Overview tab displays Edge-specific information. You can update the information like name, description, contact information, associated profile, and other details. In addition, you can perform other activities like sending Email to activate the Edge, requesting RMA Reactivation, and so on.
In the Enterprise portal, click . The page displays the existing Edges. Click the link to an Edge. In the Edge Overview tab, you can view or modify the following Edge information:

Edge Properties
The existing details of the selected Edge are displayed. If required, you can modify the information.
| Option | Description |
|---|---|
| Name | Displays the existing name of the Edge. |
| Description | Displays the existing description of the Edge. |
| Custom Info | Displays the custom information associated with the Edge. |
| Enable Pre-Notifications checkbox | By default, this option is enabled, which sends alert notifications for the Edge, to the Operators. The Operators can receive the alerts through Email, SMS, or SNMP traps. To configure the alerts, see Configure Alerts. You can also view the alerts by clicking . |
| Enable Alerts checkbox | By default, this option is enabled, which sends alert notifications for the Edge, to the Customers. The Customers can receive the alerts through Email, SMS, or SNMP traps. To configure the alerts, see Configure Alerts. You can also view the alerts by clicking . |
| Authentication Mode | Choose the mode of authentication from the following available list:
|
| License | Choose an Edge License from the available list. The list displays the licenses assigned to the Enterprise, by the Operator. |
| View Certificate | This option is displayed when the Edge has a valid certificate. Click the View link to view, export, or revoke the certificate. |
| Status | Displays the status of the Edge:
|
| Activated | Displays the date and time the Edge got activated. |
| Software Version | Displays the software version and build number of the Edge. |
| Local Credentials | Displays the credentials for the local UI. The local credentials include a default username, 'admin' and a randomly generated password. Click Modify to update the credentials at the Edge level. |
| Serial Number | This option is available when the Edge is in Pending state. You can enter the serial number of the Edge, which is optional. If entered, then the number must match the serial number of the Edge when activated. |
| Activation Key | This option is available when the Edge is in Pending state. The activation key is valid for one month. After one month, the key expires and a warning message is displayed. You can generate a new key by clicking Generate New Activation Key in the warning message. |
Assigned Profile and Edge-Specific Overrides
The profile assigned to the Edge and the Edge Specific Overrides & Additions are displayed. Edge overrides are the changes to the inherited profile configurations at the Edge level. Edge additions are configurations that are not included in the profile, but added to the selected Edge. A summary of all Edge overrides and additions are displayed in this section.
You can modify the assigned profile by selecting a profile from the drop-down list.
While switching the profiles, check the compatibility between a customer-assigned Operator Profile and an Edge-assigned Enterprise Profile. The following table provides the compatibility matrix:
| Customer Operator Profile Type | Current Edge Enterprise Profile | Selected Edge Enterprise Profile | Result |
|---|---|---|---|
| Segment-based | Segment-based | Segment-based | No Change |
| Network-based | Network-based | Network-based | No Change |
| Segment-based | Network-based | Segment-based | The Edge configuration is converted to a Segment-based configuration. However, it is not delivered to the Edge until the Edge software image is updated to version 3.0 or later. |
| Network-based | Network-based | Segment-based | The Edge configuration is converted to a Segment-based configuration. However, it is not delivered to the Edge until the Edge software image is updated to version 3.0 or later. |
| Segment-based | Network-based | Network-based | The Edge does not receive the image update. |
| Network-based | Segment-based | Segment-based | The Edge does not receive the image update. |
Edge Contact and Location
The existing contact and location details of the Edge are displayed. You can modify the contact details. To update the location details, click Set Location.
In the Set Edge Location window, update the location by either searching for the address or entering the address manually.
If the shipping address is different from the Edge location, clear the Same as above checkbox next to the shipping address, then enter the shipping contact. To update the Shipping Location, click Set Location. In the Edge Shipping Location window, update the location by either searching for the address or entering the address manually.
RMA Reactivation
- Replace an Edge due to a malfunction
- Upgrade an Edge hardware model

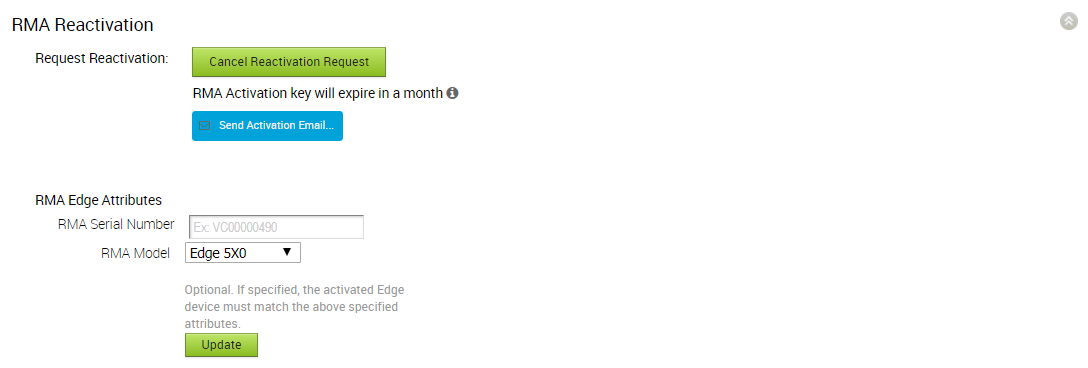
The following table provides the details of the RMA Reactivation options:
| Option | Description |
|---|---|
| Request Reactivation | Generates a new activation key. The status of the Edge changes to Reactivation Pending mode.
Note: The reactivation key is valid for one month only.
|
| Cancel Reactivation Request | Cancels the RMA reactivation request. When you cancel the request, the status of the Edge changes to Activated mode. |
| Send Activation Email | Sends an email with activation instructions to the Site Contact. This option does not activate the Edge, but initiates the activation process. When you click this option, a pop-up window appears with the Email details. You can modify the instructions and send the Email. The Email consists of the instructions along with the activation URL. The URL displays the Activation key and the IP address of the SD-WAN Orchestrator. |
| RMA Serial Number | The serial number of the Edge to be activated. This Edge replaces your current Edge for which you have requested the RMA reactivation.
Note: If the Serial Number and the Edge model do not match the Edge to be activated, then the activation fails.
|
| RMA Model | The model number of the Edge to be activated. This Edge replaces your current Edge for which you have requested the RMA reactivation.
Note: If the Serial Number and the Edge model do not match the Edge to be activated, then the activation fails.
|
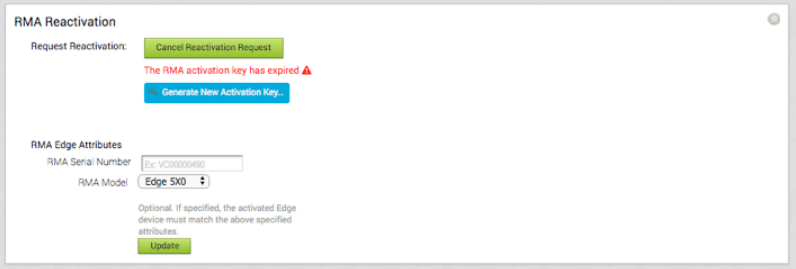
The RMA Activation Key is valid for one month. When the key expires, a warning message is displayed. To generate a new key, click Generate New Activation Key.

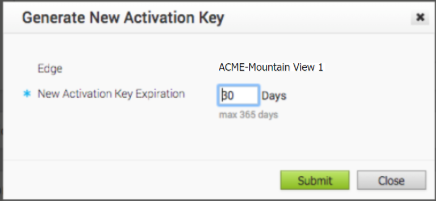
In the Generate New Activation Key window, specify the number of days for key to be active, and click Submit.

After generating the key, reactivate the Edge with the new key.
After making changes to the Edge details, click Save Changes.