


As an Enterprise Administrator, you can configure a VLAN for a profile.
- In the Enterprise portal, click .
- Select a Profile to configure a VLAN and either click the Device icon or click the Profile and click the Device tab. In the Device page, scroll down to the Configure VLAN section.

- Click Add VLAN.
- In the VLAN window, configure the following details:
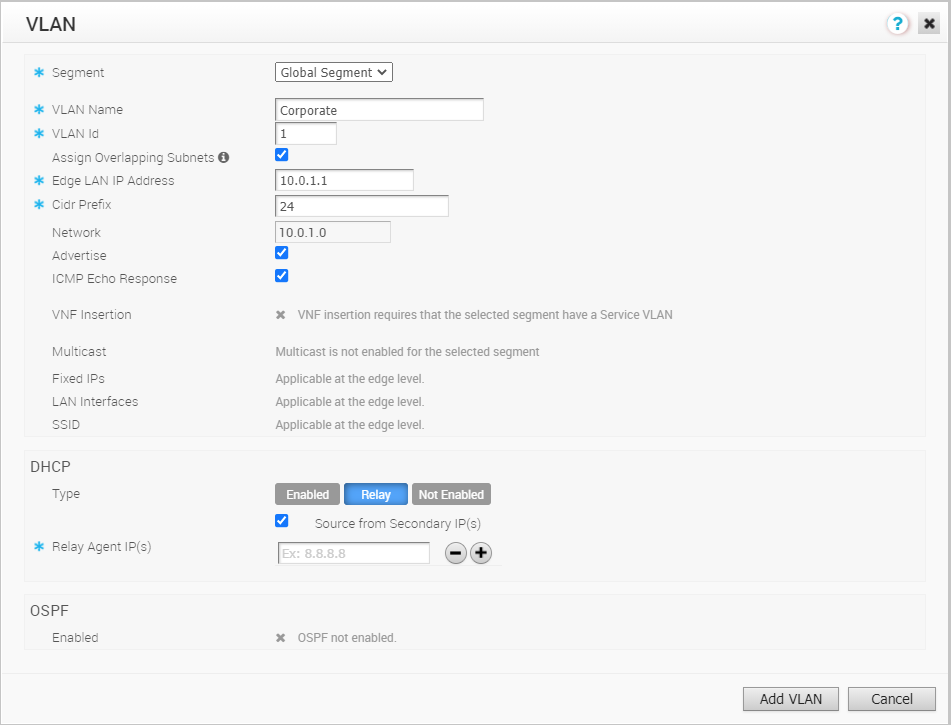
Table 1. Option Description Segment Select a segment from the drop-down list. The VLAN belongs to the selected segment. VLAN Name Enter a unique name for the VLAN VLAN Id Enter the VLAN ID. Assign Overlapping Subnets Select the checkbox if you want to assign the same subnet for the VLAN to every Edge in the Profile and define the subnet in the Edge LAN IP Address. If you want to assign different subnets to every Edge, do not select the checkbox and configure the subnets on each Edge individually. Note: Overlapping subnets for the VLAN are supported only for SD-WAN to SD-WAN traffic and SD-WAN to Internet traffic. Overlapping subnets are not supported for SD-WAN to Cloud Web Security traffic.Edge LAN IP Address Enter the LAN IP address of the Edge. Cidr Prefix Enter the CIDR prefix for the LAN IP address. Network Enter the IP address of the Network. Advertise Select the checkbox to advertise the VLAN to other branches in the network. ICMP Echo Response Select the checkbox to enable the VLAN to respond to ICMP echo messages. VNF Insertion Select the checkbox to insert a VNF to the VLAN, which redirects traffic from the VLAN to the VNF. To enable VNF Insertion, ensure that the selected segment is mapped with a service VLAN. For more information about VNF, see Security VNFs Multicast This option is enabled only when you have configured multicast settings for the Edge. You can configure the following multicast settings for the VLAN. - IGMP
- PIM
Click toggle advanced multicast settings to set the following timers:- PIM Hello Timer
- IGMP Host Query Interval
- IGMP Max Query Response Value
Fixed IPs You can configure the fixed IP only at the Edge level. LAN Interfaces You can configure the LAN Interfaces only at the Edge level. SSID You can configure the Wi-Fi SSID details for the VLAN only at the Edge level. DHCP Type Choose one of the following DHCP settings: Enabled – Enables DHCP with the Edge as the DHCP server. Configure the following details:- DHCP Start – Enter a valid IP address available within the subnet.
- Num. Addresses – Enter the number of IP addresses available on a subnet in the DHCP Server.
- Lease Time – Select the period of time from the drop-down list. This is the duration the VLAN is allowed to use an IP address dynamically assigned by the DHCP Server.
- Options – Add pre-defined or custom DHCP options from the drop-down list. The DHCP option is a network service passed to the clients from the DHCP server. For a custom option, enter the code, data type, and value.
Relay – Enables DHCP with the DHCP Relay Agent installed at a remote location. If you choose this option, configure the following:- Source from Secondary IP(s) – When you select this checkbox, the DHCP discover/Request packets from the client will be relayed to the DHCP Relay servers sourced from the primary IP address and all the secondary IP addresses configured for the VLAN. The reply from the DHCP Relay servers will be sent back to the client after rewriting the source and destination. The DHCP server will receive the request from both the primary and secondary IP addresses and the DHCP client can get multiple offers from primary subnet and secondary subnets.
When this option is not selected, the DHCP discover/Request packets from the client will be relayed to the DHCP Relay servers sourced only from the primary IP address.
- Relay Agent IP(s) – Specify the IP address of Relay Agent. Click the Plus(+) Icon to add more IP addresses.
Not Enabled – Deactivates DHCP.
OSPF This option is enabled only when you have configured OSPF for the Edge. Select the checkbox and choose an OSPF from the drop-down list. - Click Add VLAN. The VLAN is configured for the Profile. You can change the VLAN settings by clicking the Edit link under Actions column.
To configure VLANs for Edges, see Configure VLAN for Edges.
