


This document provides instructions on how to upgrade the VMware Partner Gateway from the 3.3.2 or 3.4 release to the 4.0 release.
The SD-WAN Gateway appliance includes the following changes in the 4.0 release:
- A new system disk layout based on LVM to allow more flexibility in volume management
- A new kernel version
- New and upgraded base OS packages
- Improved security hardening based on Center for Internet Security benchmarks
- ifupdown has been deprecated in favor of https://netplan.io/
- ifup and ifdown are no longer available
- Network configuration is now in /etc/netplan vs /etc/network/
- etc/network/ifup.d and /etc/network/ifdown.d no longer work. Network-dispatcher locations should be used /usr/lib/networkd-dispatcher (dormant.d, no-carrier.d, off.d, routable.d)
- Substantial changes to cloud-init. Cloud-init deployment scripts must be reviewed and tested for compatibility
- net-tools (ifconfig, netstat, etc) are considered “deprecated” and may be removed in the future versions
Network Configuration
ifupdown has been deprecated in favor of https://netplan.io/. Network configuration has moved from /etc/network to /etc/netplan.
network:
  version: 2
  ethernets:
    eth0:
      addresses:
        - 192.168.151.253/24
      gateway4: 192.168.151.1
      nameservers:
        addresses:
          - 8.8.8.8
          - 8.8.4.4
        search: []
      routes:
        - to: 192.168.0.0/16
          via: 192.168.151.254
          metric: 100

     eth1:
      addresses:
        - 192.168.152.251/24
      gateway4: 192.168.152.1
      nameservers:
        addresses:
          - 8.8.8.8
        search: []
echo 'network: {config: disabled}' > /etc/cloud/cloud.cfg.d/99-disable-network-config.cfg
Cloud-init
Cloud-init was upgraded to version 20.2. More information on Cloud-init can be found here: https://cloudinit.readthedocs.io/en/stable/index.html
Example 1: Simple
meta-data:
instance-id: vcg1
local-hostname: vcg1
#cloud-config
hostname: vcg1
password: Velocloud123
chpasswd: {expire: False}
ssh_pwauth: True
Example 2: New-style network configuration (network-config file)
instance-id: vcg1
local-hostname: vcg1
#cloud-config
hostname: vcg1
password: Velocloud123
chpasswd: {expire: False}
ssh_pwauth: True
ssh_authorized_keys:
  - ssh-rsa  …  rsa-key

velocloud:
  vcg:
    vco: demo.velocloud.net
    activation_code: F54F-GG4S-XGFI
    vco_ignore_cert_errors: false

runcmd:
  - 'echo “Welcome to VeloCloud”'
network-config Example 1:
version: 2
ethernets:
  eth0:
    addresses:
      - 192.168.152.55/24
    gateway4: 192.168.152.1
    nameservers:
      addresses:
        - 192.168.152.1
  eth1:
    addresses:
      - 192.168.151.55/24
    gateway4: 192.168.151.1
    nameservers:
      addresses:
        - 192.168.151.1
network-config Example 2:
NOTE: If multiple interfaces are present on the Gateway and need an interface to be selected as a preferred interface for the default gateway, the below configuration (with the metric value) can be used to select the correct interface.
version: 2
ethernets:
eth0:
  addresses: [192.168.82.1/24]
eth1:
  addresses: [70.150.1.1/24]
  routes:
  - {metric: 1, to: 0.0.0.0/0, via: 70.150.1.254}
eth2:
  addresses: [70.155.1.1/24]
  routes:
  - {metric: 2, to: 0.0.0.0/0, via: 70.155.1.254}
Net-tools
Net-tools utilities like ifconfig, netstat, route, etc. are considered “deprecated.” Net-tools suggested replacements are shown in the table below. These commands only display information for the Linux Host and not for the SD-WAN Overlay Network. NOTE: For more information, type: man ip.
| Old Net-tool Utilities | New Corresponding Net-tool Utilities |
|---|---|
| arp | ip n (ip neighbor) |
| ifconfig | ip a (ip addr), ip link, ip -s (ip -stats) |
| nameif | ip link, ifrename |
| netstat | ss, ip route (for netstat-r), ip -s link (for netstat -i), ip maddr (for netstat-g) |
| route | ip r (ip route) |
Sample Command Output for Net-tool Utilities
The sample output is confirmation that the command is successful. Sample command outputs for ip n (ip neighbor), ip a (ipaddr), and ip link are shown below.
root@SS-gateway-1:~# ip n
192.168.0.100 dev eth2 lladdr 00:50:56:84:85:d4 REACHABLE
192.168.0.250 dev eth2 lladdr 00:50:56:84:97:66 REACHABLE
13.1.1.2 dev eth0 lladdr 00:50:56:84:e7:fa REACHABLE
root@SS-gateway-1:~#
root@SS-gateway-1:~# ip a
1: lo: <LOOPBACK,UP,LOWER_UP> mtu 65536 qdisc noqueue state UNKNOWN group default qlen 1000
    link/loopback 00:00:00:00:00:00 brd 00:00:00:00:00:00
    inet 127.0.0.1/8 scope host lo
       valid_lft forever preferred_lft forever
    inet6 ::1/128 scope host
       valid_lft forever preferred_lft forever
2: eth0: <BROADCAST,MULTICAST,UP,LOWER_UP> mtu 1500 qdisc mq state UP group default qlen 4096
    link/ether 00:50:56:84:a0:09 brd ff:ff:ff:ff:ff:ff
    inet 13.1.1.1/24 brd 13.1.1.255 scope global eth0
       valid_lft forever preferred_lft forever
    inet6 fe80::250:56ff:fe84:a009/64 scope link
       valid_lft forever preferred_lft forever
3: eth1: <BROADCAST,MULTICAST,UP,LOWER_UP> mtu 1500 qdisc mq state UP group default qlen 1000
    link/ether 00:50:56:84:a6:ab brd ff:ff:ff:ff:ff:ff
    inet 101.101.101.1/24 brd 101.101.101.255 scope global eth1
       valid_lft forever preferred_lft forever
    inet6 fe80::250:56ff:fe84:a6ab/64 scope link
       valid_lft forever preferred_lft forever
4: eth2: <BROADCAST,MULTICAST,UP,LOWER_UP> mtu 1500 qdisc mq state UP group default qlen 1000
    link/ether 00:50:56:84:bc:75 brd ff:ff:ff:ff:ff:ff
    inet 192.168.0.201/24 brd 192.168.0.255 scope global eth2
       valid_lft forever preferred_lft forever
    inet6 fe80::250:56ff:fe84:bc75/64 scope link
       valid_lft forever preferred_lft forever
6: gwd1: <POINTOPOINT,MULTICAST,NOARP,UP,LOWER_UP> mtu 1500 qdisc fq_codel state UNKNOWN group default qlen 4096
    link/none
    inet 169.254.129.1/32 scope global gwd1
       valid_lft forever preferred_lft forever
    inet6 fe80::27d5:9e46:e7f7:7198/64 scope link stable-privacy
       valid_lft forever preferred_lft forever
root@SS-gateway-1:~#
root@SS-gateway-1:~# ip link
1: lo: <LOOPBACK,UP,LOWER_UP> mtu 65536 qdisc noqueue state UNKNOWN mode DEFAULT group default qlen 1000
    link/loopback 00:00:00:00:00:00 brd 00:00:00:00:00:00
2: eth0: <BROADCAST,MULTICAST,UP,LOWER_UP> mtu 1500 qdisc mq state UP mode DEFAULT group default qlen 4096
    link/ether 00:50:56:84:a0:09 brd ff:ff:ff:ff:ff:ff
3: eth1: <BROADCAST,MULTICAST,UP,LOWER_UP> mtu 1500 qdisc mq state UP mode DEFAULT group default qlen 1000
    link/ether 00:50:56:84:a6:ab brd ff:ff:ff:ff:ff:ff
4: eth2: <BROADCAST,MULTICAST,UP,LOWER_UP> mtu 1500 qdisc mq state UP mode DEFAULT group default qlen 1000
    link/ether 00:50:56:84:bc:75 brd ff:ff:ff:ff:ff:ff
6: gwd1: <POINTOPOINT,MULTICAST,NOARP,UP,LOWER_UP> mtu 1500 qdisc fq_codel state UNKNOWN mode DEFAULT group default qlen 4096
    link/none
root@SS-gateway-1:~#
Upgrade Considerations
Due to substantial changes to the disk layout and system files, an in-place upgrade is not possible from older releases to the 4.0 release. The migration will require deploying new 4.0 SD-WAN Gateway systems and decommissioning systems running older code.
For VPN SD-WAN Gateways or NAT SD-WAN Gateways with well-known public IP addresses, adhere to the following procedure below if the public IP of the SD-WAN Gateway must be preserved.
- Launch the new SD-WAN Gateway system based on the 4.0 release image. Refer to the deployment guide for your platform for more information (Gateway Installation Procedures).
- Shutdown the old SD-WAN Gateway system. (Bring down the old SD-WAN Gateway VM (either by running the
“sudo poweroff”command on the CLI console, or by powering off from the available Hypervisor options). - Migrate the public IP to the new system: update the NAT record to point to the new SD-WAN Gateway system, or configure the public IP on the new SD-WAN Gateway network interface. Deploy the new Gateway with the Cloud-int examples given above using the same IP address as the previous SD-WAN Gateway.
- Obtain the activation key from the existing SD-WAN Gateway record in the SD-WAN Orchestrator (as described in the steps below).
- From the SD-WAN Orchestrator, select Gateways from the left navigation panel.
- From the Gateways screen, click a SD-WAN Gateway to select it.
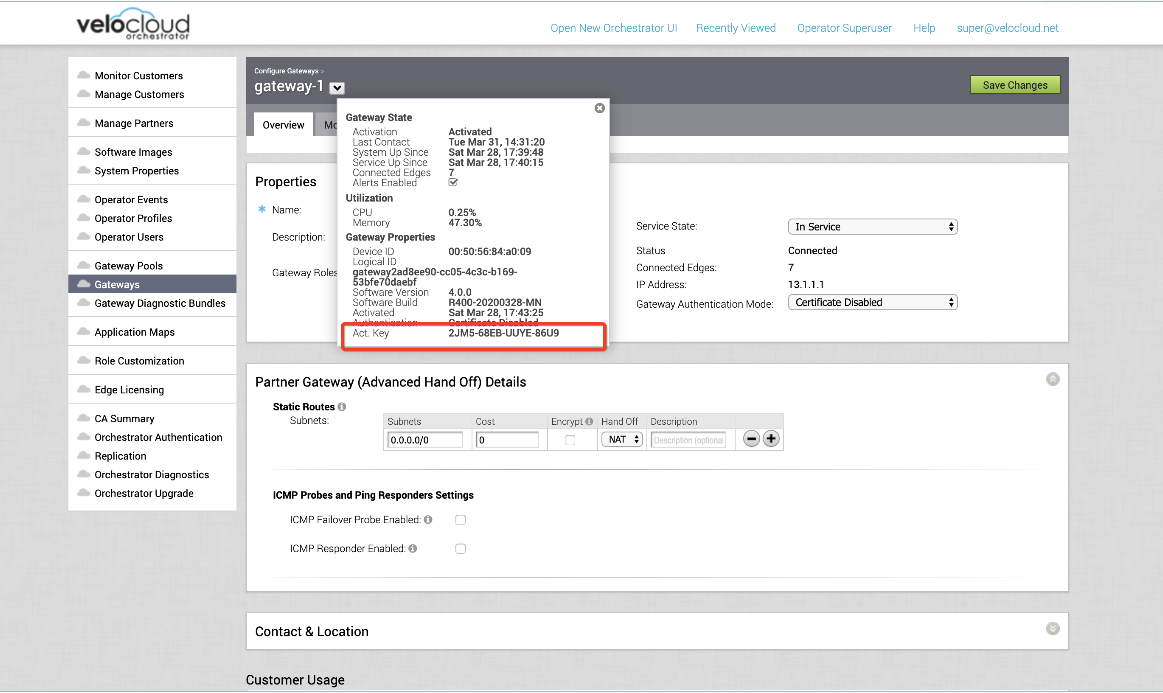
- From the screen of the chosen SD-WAN Gateway, click the down arrow next to the SD-WAN Gateway name to open the information box.
- The Activation Key is located at the bottom of the information box, as shown in the image below.
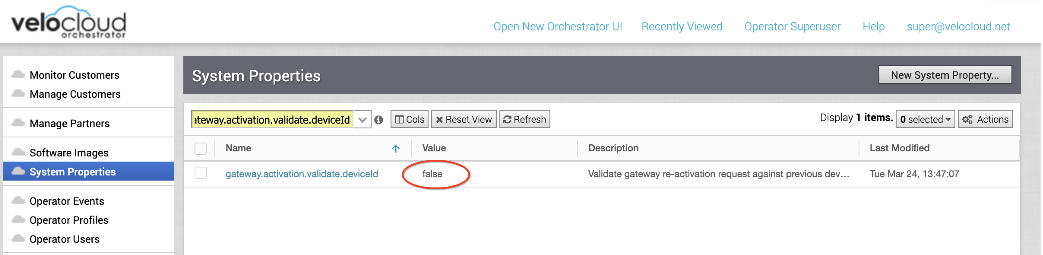
- Set the following system property “gateway.activation.validate.deviceId” to False, as shown in the image below. Refer to the System Properties section in the VMware SD-WAN Operator Guide, if necessary for more information.

- Re-activate the new SD-WAN Gateway system: from the CLI console run:
“sudo /opt/vc/bin/activate.py -s <vco_address> <activation_code>” - Restore the following system property “gateway.activation.validate.deviceId” to the original value (if necessary).
The SD-WAN Gateway is now registered and ready to receive a connection from the Edges.
Activation Example Output
root@gateway/opt/vc# /opt/vc/bin/activate.py FLM6-CSV6-REJS-XFR5 -i -s 169.254.8.2
Activation successful, VCO overridden back to 169.254.8.2 root@SS1-gateway-2:/opt/vc#
SD-WAN Gateways Without Well-known Public IPs
This section is only for SD-WAN Gateways without a well-known public IP, such as, VPN SD-WAN Gateways. If this scenario applies, follow the procedure below.
- Launch a new SD-WAN Gateway system. Refer to the deployment guide for your platform if necessary (Gateway Installation Procedures).
- Activate a new SD-WAN Gateway system.
- Add new SD-WAN Gateway to the SD-WAN Orchestrator SD-WAN Gateway pool. Refer to "Gateway Management" section in the VMware SD-WAN Operator Guide for more details.
- The SD-WAN Gateway is now registered and ready to receive a connection from the Edges.
- Remove the old SD-WAN Gateway from SD-WAN Orchestrator SD-WAN Gateway pool. Refer to the "Gateway Management" section in VMware SD-WAN Operator Guide for more information.
- Decommission the old SD-WAN Gateway VM. (Remove the SD-WAN Gateway record from the SD-WAN Orchestrator and decommission the VM instance).
Obtaining Gateway Activation Key Via API
To deploy using the API Method, use the following: “network/getNetworkGateways”
Sample response:
{"jsonrpc":"2.0","result":[{"id":1, "activationKey":"69PX-YHY2-N5PZ-G3UW … Configure Handoff Interface in Dataplane
VMware SD-WAN Gateway Network Configuration
In the example featuring figure below (VRF/VLAN Hand Off to PE), we assume eth0 is the interface facing the public network (Internet) and eth1 is the interface facing the internal network (customer VRF through the PE). BGP peering configuration is managed on the VCO on a per customer/VRF basis under “Configure > Customer”. Note that the IP address of each VRF is configurable per customer. The IP address of the management VRF inherits the IP address configured on the SD-WAN Gateway interface in Linux.

A management VRFis created on the SD-WAN Gateway and is used to send periodic ARP refresh to the default Gateway IP to determine the next-hop MAC. It is recommended that a dedicated VRF is set up on the PE router for this purpose. The same management VRF can also be used by the PE router to send IP SLA probe to the SD-WAN Gateway to check for SD-WAN Gateway status (SD-WAN Gateway has stateful ICMP responder that will respond to ping only when its service is up). BGP Peering is not required on the Management VRF. If a Management VRF is not set up, then you can use one of the customer VRFs as Management VRF, although this is not recommended.
      "vcmp.interfaces":[
                   "eth0"
               ],
         (..snip..)

               "wan": [
                   "eth1"
               ],
Step 2: Configure the Management VRF. This VRF is used by the SD-WAN Gateway to ARP for next-hop MAC (PE router). The same next-hop MAC will be used by all the VRFs created by the SD-WAN Gateway. You need to configure the Management VRFparameter in /etc/config/gatewayd.
The Management VRF is the same VRF used by the PE router to send IP SLA probe to. The SD-WAN Gateway only responds to the ICMP probe if the service is up and if there are edges connected to it. Below table explains each parameter that needs to be defined. This example has Management VRF on the 802.1q VLAN ID of 1000.
| mode | QinQ (0x8100), QinQ (0x9100), none, 802.1Q, 802.1ad |
| c_tag | C-Tag value for QinQ encapsulation or 802.1Q VLAN ID for802.1Q encapsulation |
| s_tag | S-Tag value for QinQ encapsulation |
| interface | Handoff interface, typically eth1 |
      "vrf_vlan": {
          "tag_info": [
             {
                 "resp_mode": 0,
                 "proxy_arp": 0,
                 "c_tag": 1000,
                 "mode": "802.1Q",
                 "interface": "eth1",
                 "s_tag": 0
             }
          ]
      },
Step 3: Edit the /etc/config/gatewayd-tunnel to include both interfaces in the wan parameter. Save the change.
wan="eth0 eth1"
Remove Blocked Subnets
By default, the SD-WAN Gateway blocks traffic to 10.0.0.0/8 and 172.16.0.0/14. We will need to remove them before using this SD-WAN Gateway because we expect SD-WAN Gateway to be sending traffic to private subnets as well. If you do not edit this file, when you try to send traffic to blocked subnets, you will find the following messages in /var/log/gwd.log
2015-12-18T12:49:55.639  ERR     [NET] proto_ip_recv_handler:494 Dropping packet destined for
10.10.150.254, which is a blocked subnet.
2015-12-18T12:52:27.764  ERR     [NET] proto_ip_recv_handler:494 Dropping packet destined for
10.10.150.254, which is a blocked subnet. [message repeated 48 times]
2015-12-18T12:52:27.764  ERR     [NET] proto_ip_recv_handler:494 Dropping packet destined for
10.10.150.10, which is a blocked subnet.
[
            {
                        "network_addr": "10.0.0.0",
                        "subnet_mask": "255.0.0.0"
            },
            {
            "network_addr": "172.16.0.0",
            "subnet_mask": "255.255.0.0"
            }
]
[
]
Step 3: Restart the SD-WAN Gateway process by sudo /opt/vc/bin/vc_procmon restart.
