The VMware Partner Gateway provides different configuration options. A worksheet should be prepared before the installation of the Gateway.
Worksheet
| SD-WAN Gateway |
|
| Hypervisor | Address/Cluster name |
| Storage | Root volume datastore (>40GB recommended) |
| CPU Allocation | CPU Allocation for KVM/VMware. |
| Installation Selections | DPDK—This is optional and enabled by default for higher throughput. If you choose to deactivate DPDK, contact VMware Customer Support. |
| OAM Network |
|
| ETH0 – Internet Facing Network |
|
| Handoff (ETH1) - Network |
|
| Console access |
|
| NTP |
|
SD-WAN Gateway Section
Most of the SD-WAN Gateway section is self-explanatory.
| SD-WAN Gateway |
|
Creating a Gateway and Getting the Activation Key
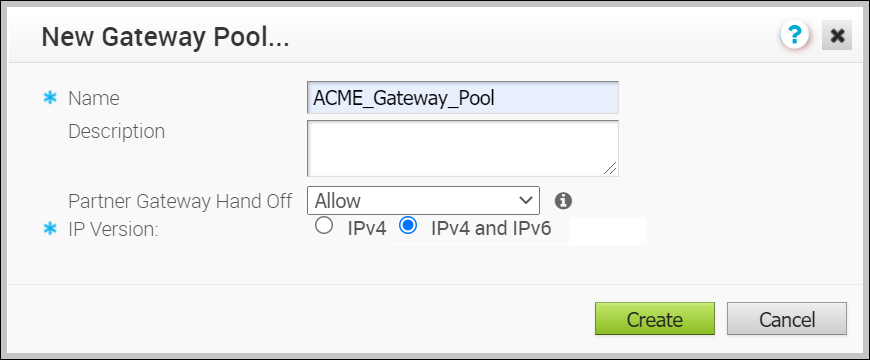
- Go to Operator > Gateway Pool and create a new SD-WAN Gateway pool. For running SD-WAN Gateway in the Service Provider network, check the Allow Partner Gateway checkbox. This will enable the option to include the partner gateway in this gateway pool.

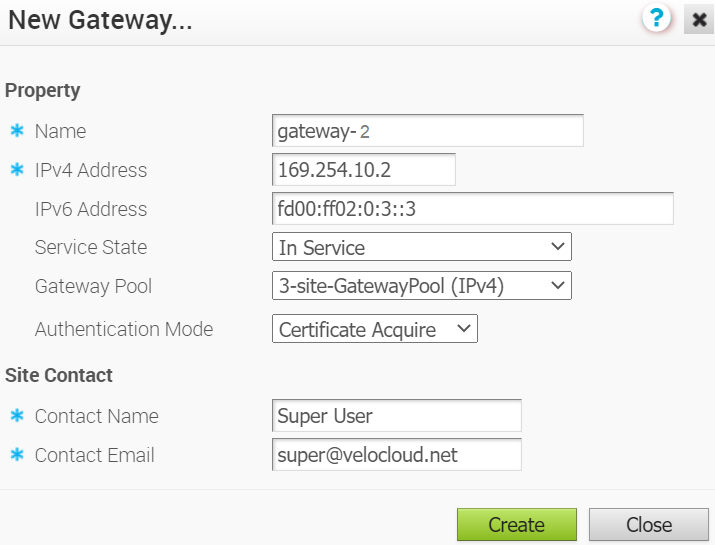
- Go to Operator > Gateway and create a new gateway and assign it to the pool. The IP address of the gateway entered here must match the public IP address of the gateway. If unsure, you can run
curl ipinfo.io/ipfrom the SD-WAN Gateway which will return the public IP of the SD-WAN Gateway.
- Make a note of the activation key and add it to the worksheet.

Enable Partner Gateway Mode
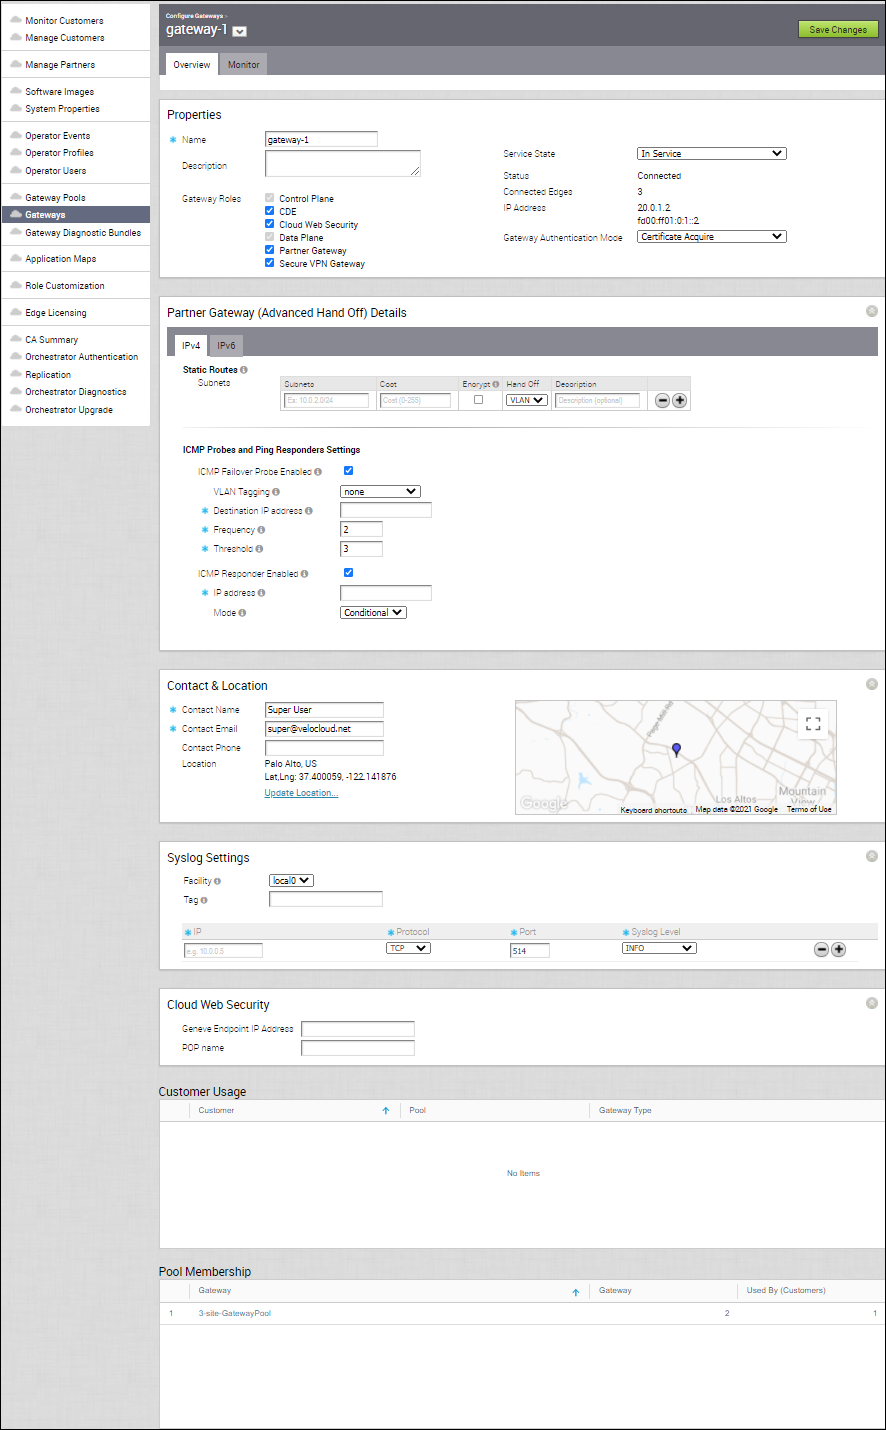
- Go to Operator > Gateways and select the SD-WAN Gateway. Check the Partner Gateway checkbox to enable the Partner Gateway.
 There are additional parameters that can be configured. The most common are the following:
- Advertise 0.0.0.0/0 with no encrypt – This option will enable the Partner Gateway to advertise a path to Cloud traffic for the SAAS Application. Since the Encrypt Flag is off, it will be up to the customer configuration on the business policy to use this path or not.
-
The second recommend option is to advertise the SD-WAN Orchestrator IP as a /32 with encrypt.
This will force the traffic that is sent from the Edge to the SD-WAN Orchestrator to take the Gateway Path. This is recommended since it introduces predictability to the behavior that the SD-WAN Edge takes to reach the SD-WAN Orchestrator.
Networking

The diagram above is a representation of the SD-WAN Gateway in a 2-ARM deployment. In this example, we assume eth0 is the interface facing the public network (Internet) and eth1 is the interface facing the internal network (handoff or VRF interface).
For the Internet Facing network, you only need the basic network configuration.
| ETH0 – Internet Facing Network |
|
For the Handoff interface, you must know which type of handoff you want to configure and the Handoff configuration for the Management VRF.
| ETH1 – HANDOFF Network |
|
Console Access
| Console access |
|
In order to access the Gateway, a console password and/or an SSH public key must be created.
Cloud-Init Creation
The configuration options for the gateway that we defined in the worksheet are used in the cloud-init configuration. The cloud-init config is composed of two main configuration files, the metadata file and the user-data file. The meta-data contains the network configuration for the Gateway, and the user-data contains the Gateway Software configuration. This file provides information that identifies the instance of the SD-WAN Gateway being installed.
Below are the templates for both meta_data and user_data files. Network-config can be omitted and network interfaces will be configured via DHCP by default.
Fill the templates with the information in the worksheet. All #_VARIABLE_# must be replaced, and check any #ACTION#
instance-id: #_Hostname_#
local-hostname: #_Hostname_#
version: 2
ethernets:
   eth0:
      addresses:
         - #_IPv4_Address_/mask#
      gateway4: #_IPv4_Gateway_#
      nameservers:
         addresses:
            - #_DNS_server_primary_#
            - #_DNS_server_secondary_#
         search: []
      routes:
         - to: 0.0.0.0/0
           via: #_IPv4_Gateway_#
           metric: 1
   eth1:
      addresses:
         - #_MGMT_IPv4_Address_/Mask#
      gateway4: 192.168.152.1
      nameservers:
         addresses:
            - #_DNS_server_primary_#
            - #_DNS_server_secondary_#
         search: []
      routes:
         - to: 0.0.0.0/0
           via: #_MGMT_IPv4_Gateway_#
           metric: 13
#cloud-config
hostname: #_Hostname_#
password: #_Console_Password_#
chpasswd: {expire: False}
ssh_pwauth: True
ssh_authorized_keys:
  - #_SSH_public_Key_#
velocloud:
  vcg:
    vco: #_VCO_#
    activation_code: #_Activation_Key#
    vco_ignore_cert_errors: false
The default username for the password that is configured in the user-data file is 'vcadmin'. Use this default username to login to the SD-WAN Gateway for the first time.
sed s/[”“]/'"'/g /tmp/user-data > /tmp/user-data_new
Create ISO File
Once you have completed your files, they need to be packaged into an ISO image. This ISO image is used as a virtual configuration CD with the virtual machine. This ISO image, called vcg01-cidata.iso, is created with the following command on a Linux system:
genisoimage -output vcg01-cidata.iso -volid cidata -joliet -rock user-data meta-data network-config
If you are on a MAC OSX, use the command below instead:
mkisofs -output vcg01-cidata.iso -volid cidata -joliet -rock {user-data,meta-data,network-config}
This ISO file which we will call #CLOUD_INIT_ISO_FILE# is going to be used in both OVA and VMware installations.