SD-WAN Orchestrator allows you to configure Firewall rules at the Profile and Edge levels to allow, drop, reject, or skip inbound and outbound traffic. If stateful firewall feature is enabled, the firewall rule will be validated to filter both inbound and outbound traffic. With stateless firewall, you can control to filter only outbound traffic. The firewall rule matches parameters such as IP addresses, ports, VLAN IDs, Interfaces, MAC addresses, domain names, protocols, object groups, applications, and DSCP tags. When a data packet matches the match conditions, the associated action or actions are taken. If a packet matches no parameters, then a default action is taken on the packet.
To configure a firewall rule with stateful firewall-enabled at the profile level, perform the following steps.
Procedure
- From the SD-WAN Orchestrator, go to Configure > Profiles > Firewall.
- Enable Stateful Firewall for the selected profile.
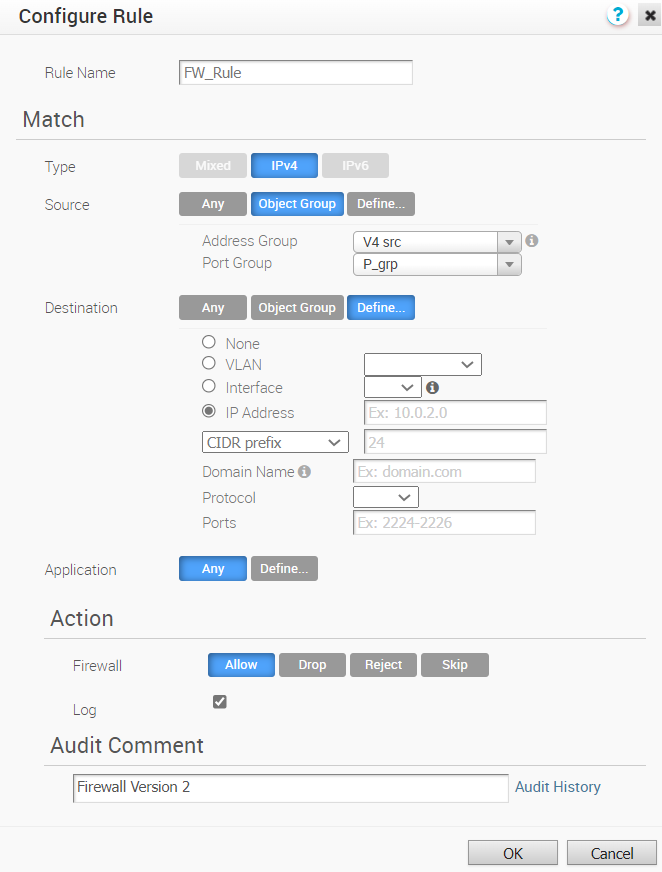
- Under Firewall Rules area, click New Rule. The Configure Rule dialog box appears.
- In the Rule Name box, enter a unique name for the rule.
- Under the Match area, configure the match conditions for the rule:
| Settings |
Description |
| Type |
By default, IPv4 address type is selected. You can configure the Source and Destination IP addresses according to the selected Type, as follows:
- Mixed – Allows to configure both IPv4 and IPv6 addresses in the matching criteria. If you choose this mode, you cannot configure Source or Destination IP address.
- IPv4 – Allows to configure only IPv4 addresses as Source and Destination.
- IPv6 – Allows to configure only IPv6 addresses as Source and Destination.
Note: When you upgrade, the firewall rules from previous versions are moved to IPv4 mode.
|
| Source |
Allows to specify the source for packets. Select any of the following options:
- Any - Allows all source addresses by default.
- Object Group - Allows you to select a combination of address group and port group. For more information, see Object Groups and Configure Firewall Rules with Object Groups.
Note: If the selected address group contains any domain names, then they would be ignored when matching for the source.
- Define - Allows you to define the source traffic to a specific VLAN, Interface, IPv4 or IPv6 Address, MAC Address, or Port.
For IP Address, choose one of the three options:
- CIDR prefix - Choose this option if you want the network defined as a CIDR value (for example:
172.10.0.0 /16).
- Subnet mask - Choose this option if you want the network defined based on a Subnet mask (for example,
172.10.0.0 255.255.0.0).
- Wildcard mask - Choose this option if you want the ability to narrow the enforcement of a policy to a set of devices across different IP subnets that share a matching host IP address value. The Wildcard mask matches an IP or a set of IP addresses based on the inverted Subnet mask. A '0' within the binary value of the mask means the value is fixed and a '1' within the binary value of the mask means the value is wild (can be 1 or 0). For example, a Wildcard mask of 0.0.0.255 (binary equivalent = 00000000.00000000.00000000.11111111) with an IP Address of 172.0.0, the first three octets are fixed values and the last octet is a variable value. This option is available only for IPv4 address.
Note: If an interface cannot be selected, then the interface is either not enabled or not assigned to this segment.
|
| Destination |
Allows to specify the destination for packets. Select any of the following options:
- Any - Allows all destination addresses by default.
- Object Group - Allows you to select a combination of address group and port group. For more information, see Object Groups and Configure Firewall Rules with Object Groups.
- Define - Allows you to define the destination traffic to a specific VLAN, Interface, IPv4 or IPv6 Address, Domain Name, Protocol, or Port. For IP address, choose one of the three options: CIDR prefix, Subnet mask, or Wildcard mask.
If an interface cannot be selected, then the interface is either not enabled or not assigned to this segment. Use the Domain Name field to match the entire domain name or a portion of the domain name. For example, \"salesforce\" will match traffic to \"mixe\".
|
| Application |
Select any of the following options:
- Any - Applies the firewall rule to any application by default.
- Define - Allows to select an application and Differentiated Services Code Point (DSCP) flag to apply a specific firewall rule.
Note: When creating firewall rules matching an application, the firewall depends on the DPI (Deep Packet Inspection) Engine to identify the application to which a particular flow belongs. Generally the DPI will not be able to determine the application based on the first packet. The DPI Engine usually needs the first 5-10 packets in the flow to identify the application, but the firewall needs to classify and forward the flow from the very first packet. This may cause the first flow to match a more generalized rule in the firewall list. Once the application has been correctly identified, any future flows matching the same tuples will be reclassified automatically and hit the correct rule.
|
- Under the Action area, configure the actions for the rule:
| Settings |
Description |
| Firewall |
Select any of the following action the firewall should perform on packets, when the conditions of the rule are met:
- Allow - Allows the data packets by default.
- Drop - Drops the data packets silently without sending any notification to the source.
- Reject - Drops the packets and notifies the source by sending an explicit reset message.
- Skip - Skips the rule during lookups and processes the next rule. However, this rule will be used at the time of deploying SD-WAN.
|
| Log |
Select this checkbox if you want a log entry to be created when this rule is triggered. |
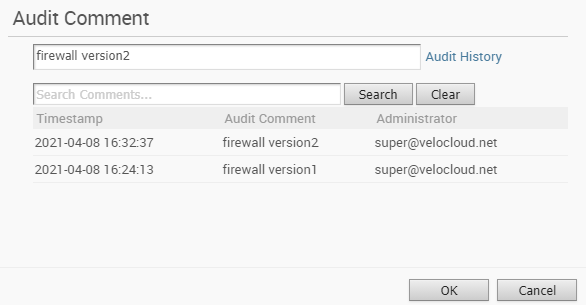
- While creating or updating a Firewall rule, you can add audit comments using the Audit Comment textbox. A maximum of 50 characters is allowed and you can add any number of comments for the same rule.
- Click the Audit History button to view all the audit comments added for the rule. You can search for a specific comment by entering the search text in the Search field.
- Click OK.
Results
A firewall rule is created for the selected profile and it appears under the Firewall Rules area of the Profile Firewall page.