


Describes how to install the SD-WAN Gateway qcow on KVM.
Pre-Installation Considerations
KVM provides multiple ways to provide networking to virtual machines. The networking in libvirt should be provisioned before the VM configuration. There are multiple ways to configure networking in KVM. For a full configuration of options on how to configure Networks on libvirt, see the following link:
https://libvirt.org/formatnetwork.html
From the full list of options, VMware recommends the following modes:
- SR-IOV (This mode is required for the SD-WAN Gateway to deliver the maximum throughput specified by VMware)
- OpenVSwitch Bridge
If you decide to use SR-IOV mode, enable SR-IOV on KVM. To enable the SR-IOV on KVM, see Activate SR-IOV on KVM.
SD-WAN Gateway Installation Steps on KVM
- Copy the QCOW and the Cloud-init files created in the Cloud-Init Creation section to a new empty directory.
- Create the Network interfaces that you are going to use for the device.
Using SR-IOV: The following is a sample network interface template specific to Intel X710/XL710 NIC cards using SR-IOV.
    <interface type='hostdev' managed='yes'>
        <mac address='52:54:00:79:19:3d'/>
        <driver name='vfio'/>
        <source>
            <address type='pci' domain='0x0000' bus='0x83' slot='0x0a' function='0x0'/>
        </source>
        <model type='virtio'/>
    </interface>
Using OpenVSwitch: The following are the sample templates of a network interface using OpenVSwitch.git ./vcg/templates/KVM_NETWORKING_SAMPLES/template_outside_openvswitch.xml
<?xml version="1.0" encoding="UTF-8"?>
<network>
   <name>public_interface</name>
   <!--This is the network name-->
   <model type="virtio" />
   <forward mode="bridge" />
   <bridge name="publicinterface" />
   <virtualport type="openvswitch" />
   <vlan trunk="yes">
      <tag id="50" />
      <!--Define all the VLANS for this Bridge -->
      <tag id="51" />
      <!--Define all the VLANS for this Bridge -->
   </vlan>
</network>
Create a network for
inside_interface:git ./vcg/templates/KVM_NETWORKING_SAMPLES/template_inside_openvswitch.xml
<network>
  <name>inside_interface</name> <!--This is the network name-->
  <model type='virtio'/>
  <forward mode="bridge"/>
  <bridge name="insideinterface"/>
  <virtualport type='openvswitch'></virtualport>
  <vlan trunk='yes'></vlan>
  <tag id='200'/> <!—Define all the VLANS for this Bridge -->
  <tag id='201'/> <!—Define all the VLANS for this Bridge -->
  <tag id='202'/> <!—Define all the VLANS for this Bridge -->
</network>
If you are using OpenVSwitch mode, then you have to verify if the basic networks are created and active before launching the VM.Note: This validation step is not applicable for SR-IOV mode as you do not create any network before the VM is launched.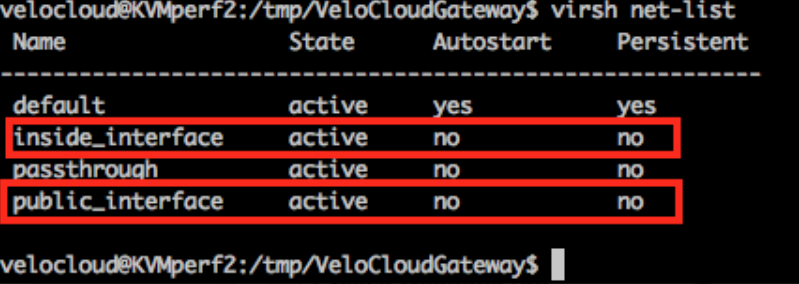
- Edit the VM XML file. There are multiple ways to create a Virtual Machine in KVM. You can define the VM in an XML file and create it using libvirt, using the sample VM XML template specific to OpenVSwitch mode and SR-IOV mode.
vi my_vm.xml
The following is a sample template of a VM which uses OpenVSwitch interfaces. Use this template by making edits, wherever applicable.<?xml version="1.0" encoding="UTF-8"?> <domain type="kvm"> <name>#domain_name#</name> <memory unit="KiB">8388608</memory> <currentMemory unit="KiB">8388608</currentMemory> <vcpu>8</vcpu> <cputune> <vcpupin vcpu="0" cpuset="0" /> <vcpupin vcpu="1" cpuset="1" /> <vcpupin vcpu="2" cpuset="2" /> <vcpupin vcpu="3" cpuset="3" /> <vcpupin vcpu="4" cpuset="4" /> <vcpupin vcpu="5" cpuset="5" /> <vcpupin vcpu="6" cpuset="6" /> <vcpupin vcpu="7" cpuset="7" /> </cputune> <resource> <partition>/machine</partition> </resource> <os> <type>hvm</type> </os> <features> <acpi /> <apic /> <pae /> </features> <cpu mode="host-passthrough" /> <clock offset="utc" /> <on_poweroff>destroy</on_poweroff> <on_reboot>restart</on_reboot> <on_crash>restart</on_crash> <devices> <emulator>/usr/bin/kvm-spice</emulator> <disk type="file" device="disk"> <driver name="qemu" type="qcow2" /> <source file="#folder#/#qcow_root#" /> <target dev="hda" bus="ide" /> <alias name="ide0-0-0" /> <address type="drive" controller="0" bus="0" target="0" unit="0" /> </disk> <disk type="file" device="cdrom"> <driver name="qemu" type="raw" /> <source file="#folder#/#Cloud_ INIT_ ISO#" /> <target dev="sdb" bus="sata" /> <readonly /> <alias name="sata1-0-0" /> <address type="drive" controller="1" bus="0" target="0" unit="0" /> </disk> <controller type="usb" index="0"> <alias name="usb0" /> <address type="pci" domain="0x0000" bus="0x00" slot="0x01" function="0x2" /> </controller> <controller type="pci" index="0" model="pci-root"> <alias name="pci.0" /> </controller> <controller type="ide" index="0"> <alias name="ide0" /> <address type="pci" domain="0x0000" bus="0x00" slot="0x01" function="0x1" /> </controller> <interface type="network"> <source network="public_interface" /> <vlan> <tag id="#public_vlan#" /> </vlan> <alias name="hostdev1" /> <address type="pci" domain="0x0000" bus="0x00" slot="0x11" function="0x0" /> </interface> <interface type="network"> <source network="inside_interface" /> <alias name="hostdev2" /> <address type="pci" domain="0x0000" bus="0x00" slot="0x12" function="0x0" /> </interface> <serial type="pty"> <source path="/dev/pts/3" /> <target port="0" /> <alias name="serial0" /> </serial> <console type="pty" tty="/dev/pts/3"> <source path="/dev/pts/3" /> <target type="serial" port="0" /> <alias name="serial0" /> </console> <memballoon model="none" /> </devices> <seclabel type="none" /> </domain>The following is a sample template of a VM which uses SR-IOV interfaces. Use this template by making edits, wherever applicable.<?xml version="1.0" encoding="UTF-8"?> <domain type="kvm"> <name>#domain_name#</name> <memory unit="KiB">8388608</memory> <currentMemory unit="KiB">8388608</currentMemory> <vcpu>8</vcpu> <cputune> <vcpupin vcpu="0" cpuset="0" /> <vcpupin vcpu="1" cpuset="1" /> <vcpupin vcpu="2" cpuset="2" /> <vcpupin vcpu="3" cpuset="3" /> <vcpupin vcpu="4" cpuset="4" /> <vcpupin vcpu="5" cpuset="5" /> <vcpupin vcpu="6" cpuset="6" /> <vcpupin vcpu="7" cpuset="7" /> </cputune> <resource> <partition>/machine</partition> </resource> <os> <type>hvm</type> </os> <features> <acpi /> <apic /> <pae /> </features> <cpu mode="host-passthrough" /> <clock offset="utc" /> <on_poweroff>destroy</on_poweroff> <on_reboot>restart</on_reboot> <on_crash>restart</on_crash> <devices> <emulator>/usr/bin/kvm-spice</emulator> <disk type="file" device="disk"> <driver name="qemu" type="qcow2" /> <source file="#folder#/#qcow_root#" /> <target dev="hda" bus="ide" /> <alias name="ide0-0-0" /> <address type="drive" controller="0" bus="0" target="0" unit="0" /> </disk> <disk type="file" device="cdrom"> <driver name="qemu" type="raw" /> <source file="#folder#/#Cloud_ INIT_ ISO#" /> <target dev="sdb" bus="sata" /> <readonly /> <alias name="sata1-0-0" /> <address type="drive" controller="1" bus="0" target="0" unit="0" /> </disk> <controller type="usb" index="0"> <alias name="usb0" /> <address type="pci" domain="0x0000" bus="0x00" slot="0x01" function="0x2" /> </controller> <controller type="pci" index="0" model="pci-root"> <alias name="pci.0" /> </controller> <controller type="ide" index="0"> <alias name="ide0" /> <address type="pci" domain="0x0000" bus="0x00" slot="0x01" function="0x1" /> </controller> <interface type='hostdev' managed='yes'> <mac address='52:54:00:79:19:3d'/> <driver name='vfio'/> <source> <address type='pci' domain='0x0000' bus='0x83' slot='0x0a' function='0x0'/> </source> <model type='virtio'/> </interface> <interface type='hostdev' managed='yes'> <mac address='52:54:00:74:69:4d'/> <driver name='vfio'/> <source> <address type='pci' domain='0x0000' bus='0x83' slot='0x0a' function='0x1'/> </source> <model type='virtio'/> </interface> <serial type="pty"> <source path="/dev/pts/3" /> <target port="0" /> <alias name="serial0" /> </serial> <console type="pty" tty="/dev/pts/3"> <source path="/dev/pts/3" /> <target type="serial" port="0" /> <alias name="serial0" /> </console> <memballoon model="none" /> </devices> <seclabel type="none" /> </domain> - Launch the VM by performing the following steps:
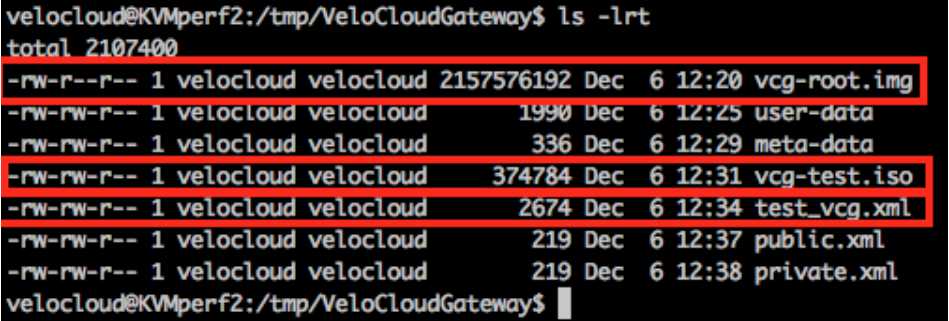
- Ensure you have the following three files in your directory as shown in the following sample screenshot:
- qcow file - vcg-root
- cloud-init - vcg-test.iso
- Domain XML file that defines the VM - test_vcg.xml, where test_vcg is the domain name.)
- Define VM.
velocloud@KVMperf2:/tmp/VeloCloudGateway$ virsh define test_vcg.xml
Domain test_vcg defined from test_vcg.xml
- Set VM to autostart.
velocloud@KVMperf2:/tmp/VeloCloudGateway$ virsh autostart test_vcg
- Start VM.
velocloud@KVMperf2:/tmp/VeloCloudGateway$ virsh start test_vcg
- Ensure you have the following three files in your directory as shown in the following sample screenshot:
- If you are using SR-IOV mode, after launching the VM, set the following on the Virtual Functions (VFs) used:
- Set the spoofcheck off.
ip link set eth1 vf 0 spoofchk off
- Set the Trusted mode on.
ip link set dev eth1 vf 0 trust on
- Set the VLAN, if required.
ip link set eth1 vf 0 vlan 3500
Note: The Virtual Functions configuration step is not applicable for OpenVSwitch (OVS) mode. - Set the spoofcheck off.
- Console into the VM.
virsh list
Id Name State
----------------------------------------------------
25 test_vcg running
velocloud@KVMperf2$ virsh console 25
Connected to domain test_vcg
Escape character is ^]
Special Consideration for KVM Host
- Deactivate GRO (Generic Receive Offload) on physical interfaces (to avoid unnecessary re-fragmentation in SD-WAN Gateway).
ethtool –K <interface> gro off tx off
- Deactivate CPU C-states (power states affect real-time performance). Typically, this can be done as part of kernel boot options by appending
processor.max_cstate=1or just deactivate in the BIOS. -
For production deployment, vCPUs must be pinned to the instance. No oversubscription on the cores should be allowed to take place.
