Describes how to add SD-WAN routes into the Azure network manually.
To add SD-WAN routes manually into the Azure network:
Prerequisites
Ensure you have completed provisioning the Azure VPN sites at the SASE Orchestrator side.
Procedure
- Log in to your Microsoft Azure account.
The
Microsoft Azure home screen appears.
- Go to All resources and from the list of available resources, select the Virtual WAN that you have created.
- Under the Virtual WAN architecture area, click VPN sites.
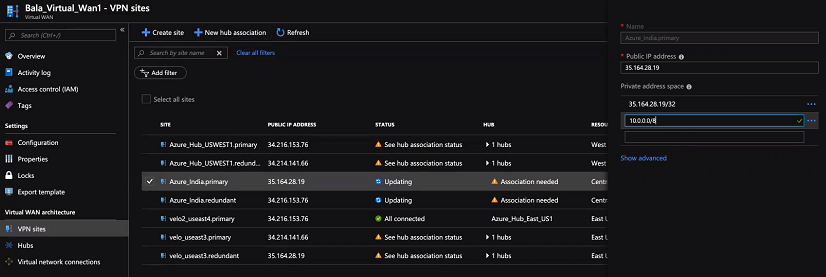
- From the available list of VPN sites, select your VPN site (for example, Non SD-WAN Destination name.primary), that is added as a result of Non SD-WAN Destination provisioning step done using the SASE Orchestrator.
- Click on the name of the selected VPN site and from the top of the next screen, select Edit site.
- In the Private address space text box, enter the address range for the SD-WAN routes.
- Click Confirm.
Similarly, you can edit your Redundant VPN site by following the above steps.
Note: Currently, Azure vWAN supports only Active/Active tunnel mode, and it does not have the provision to specify priority or primary tunnel to the VPN site (Primary and Redundant sites), and therefore load balancing will be done by Azure on equal cost multi-path routing. This may cause asymmetric traffic flow and might increase the latency for those flows. The workaround to avoid the asymmetric flow is to remove the
SD-WAN Gateway redundancy on the Azure vWAN Hub NVS tunnel; however removing of redundant Gateway tunnel may not be acceptable for all deployments and needs to handle with caution.