


Open Shortest Path First (OSPF) can be enabled only on a LAN interface as an active or passive interface. The Edge will only advertise the prefix associated with that LAN switch port. To get full OSPF functionality, you must use it in routed interfaces.
OSPF (Open Shortest Path First) is an interior gateway protocol (IGP) that operates within a single autonomous system (AS).
Note: OSPF is configurable only on the Global Segment.
OSPFv3 is introduced in the 5.2 release and provides support for the following:
- Support for OSPFv3 is introduced in the SD-WAN Edge for IPv6 underlay routing in addition to existing BGPv6 support. The following is supported:
- Underlay IPv6 route learning.
- Redistribution of OSPFv3 routes into overlay/BGP and vice-versa.
- Support for Overlay Flow Control (OFC).
- OSPFv3 is implemented with feature parity to OSPFv2 with the following exceptions:
- Point to Point (P2P) is not supported.
- BFDv6 with OSPFv3 is not supported.
- md5 authentication is not available, as OSPFv3 header does not support it.
This section describes how to configure dynamic routing with OSPFv2 and OSPFv3 along with Route Summarization.
Note: OSPFv2 supports only IPv4. OSPFv3 supports only IPv6 and is available starting with the 5.2 release.
Note: Route Summarization is available starting with the 5.2 release.
To activate OSPF, perform the steps in the procedure below:
Procedure
- In the SD-WAN service of the Enterprise Portal, click the Configure.
Note: Depending upon your login permissions, you might need to select a Customer or Partner first, then click the Configure tab as indicated in next step.
- From the left menu, select Profiles.
The Profile page displays.
- Click a Profile from the list of available Profiles (or Add a Profile if necessary).
- Go to the Routing & NAT section in the UI and click the arrow next to OSPF.
- In the OSPF Areas section, configure the Redistribution Settings for OSPFv2/v3, BGP Settings, and if applicable, Route Summarization as shown in the image below. See the table below for a description of the options and fields in the below image.
Note: OSPFv2 supports only IPv4. OSPFv3 supports only IPv6 and is only available in the 5.2 release.
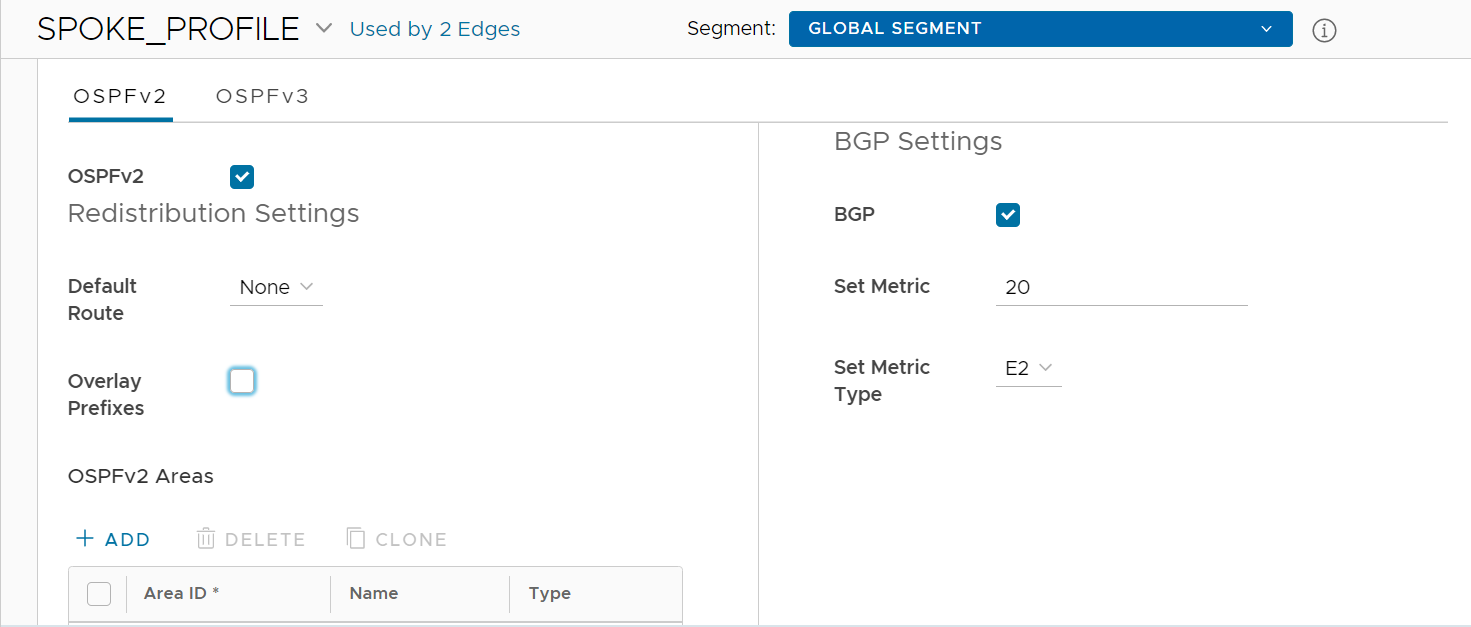
Option Description Redistribution Settings Default Route Choose an OSPF route type (O1 or O2) to be used for default route. Default selection for this configuration is "None". Advertise Choose either Always or Conditional. (Choosing Always means to Advertise the default route always. Choosing Conditional means to redistribute default route only when Edge learns via overlay or underlay). The “Overlay Prefixes” option must be checked to use the Conditional default route. Overlay Prefixes If applicable, check the Overlay Prefixes check box. BGP Settings BGP To enable injection of BGP routes into OSPF, select the BGP check box. BGP routes can be redistributed into OSPF, so if this is applicable, enter or choose the configuration options as follows: Set Metric In the Set Metric text box, enter the metric. (This is the metric that OSPF would put in its external LSAs that it generates from the redistributed routes). The default metric is 20. Set Metric Type From the Set Metric Type drop-down menu, choose a metric type. (This is either type E1 or E2 (OSPF External-LSA type)); the default type is E2). - In OSPF Areas, click +Add and configure the options, as described in the table below. Add additional areas, if necessary, by clicking +Add. The fields in the table below cannot be overridden at the Edge level.
Option Description Area ID Click inside the Area ID text box, enter an OSPF area ID. Name Click inside the Name text box, enter a descriptive name for your area. Type By default, the Normal type is selected. Only Normal type is supported at this time. - Next, configure the Interface Settings for OSPF. For configuration details, see either Configure Interface Settings for Profiles with New Orchestrator UI or Configure Interface Settings for Edges with New Orchestrator UI.
Note: OSPF has to be activated at the Profile level first before you can configure it on Edge interfaces.
- If applicable, configure Route Summarization.
Note: The Route Summarization feature is available starting with the 5.2 release, for an overview and use case for this feature, see Route Summarization. For configuration details, follow the steps below in Step #10.
- Scroll down to the Route Summarization area.
- Click +Add in the Route Summarization area. A new row is added to the Route Summarization area.
Configure route summarization, as described in the table below. See image below.
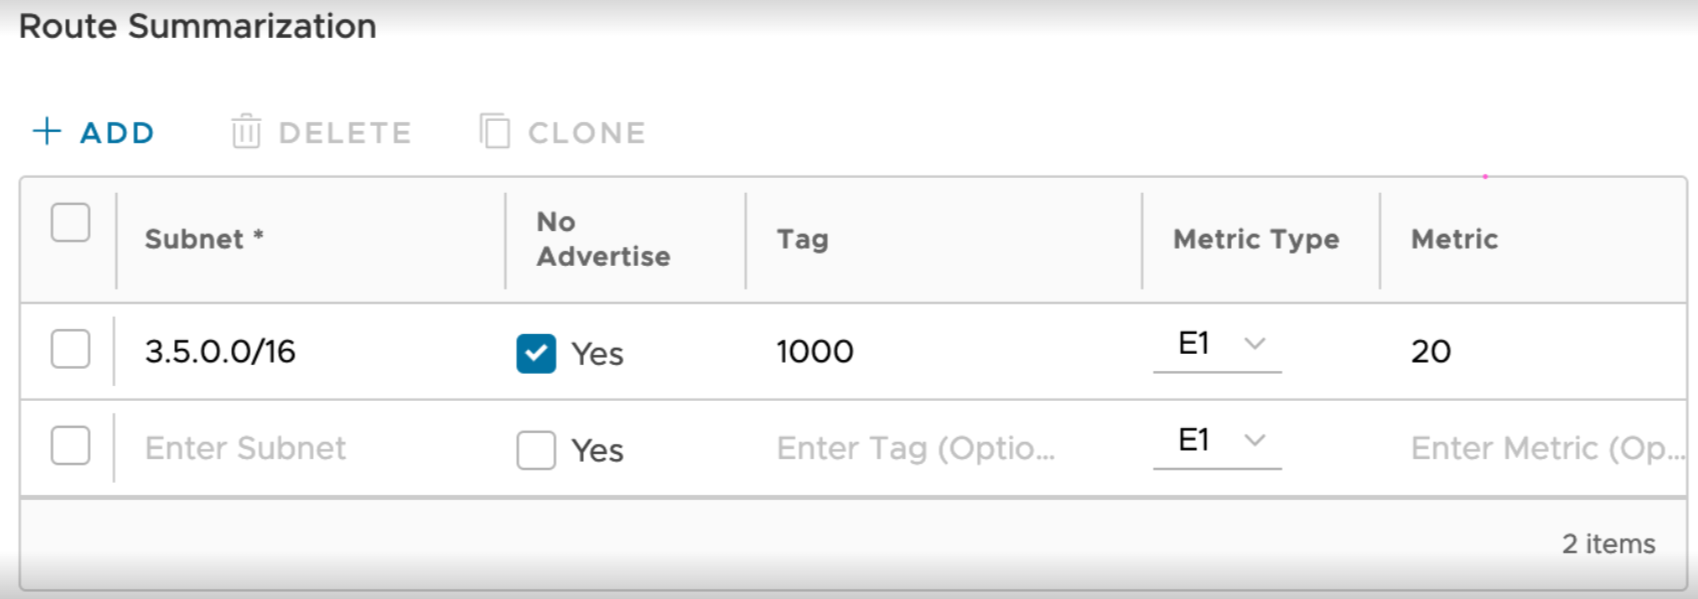
Option Description Subnet Enter the IP subnet. No Advertise When No Advertise is set, all the external routes (Type-5) that are under this supernet are summarized and have chosen not to advertise it. This means it effectively blocks the whole supernet from advertising to its peer. Tag Enter the router Tag value (1-4294967295). Metric Type Enter the Metric Type (E1 or E2). Metric Enter the advertised metric for this route ((0-16777215). - Add additional routes, if necessary, by clicking +Add. To Clone or Delete a route summarization, use the appropriate buttons, located next to +Add.
- Click Save Changes.
