


A customer with the Enhanced Firewall Services (EFS) functionality activated at the Global Settings level in VMware SASE Orchestrator can now individually configure and manage Security services such as URL Filtering (URL Category filtering, URL Reputation filtering), Malicious IP filtering, Intrusion Detection System (IDS) and Intrusion Prevention System (IPS). To block user traffic based on IDS/IPS Signature matching, category, and/or reputation of the URL or IP, the customer must create a Security Service Group using the pre-configured security services and associate that Security Service Group with the Firewall rules.
Before You Begin
- Ensure the Edge version is 6.0.0 for the URL Filtering (URL Category and URL Reputation) and Malicious IP filtering to work as expected. For the IDS and IPS service configuration, ensure the Edge version is 5.2.0 and later.
- Ensure the EFS feature is activated at the Enterprise level. Contact your Operator if you would want the EFS feature to be activated. An Operator can activate the EFS feature from the SD-WAN > Global Settings > Customer Configuration > SD-WAN Settings > Feature Access UI page.
Configure URL Categories Service
Currently, there are more than 80 URL categories including Social Networking, Financial Services, Phishing, and so on.
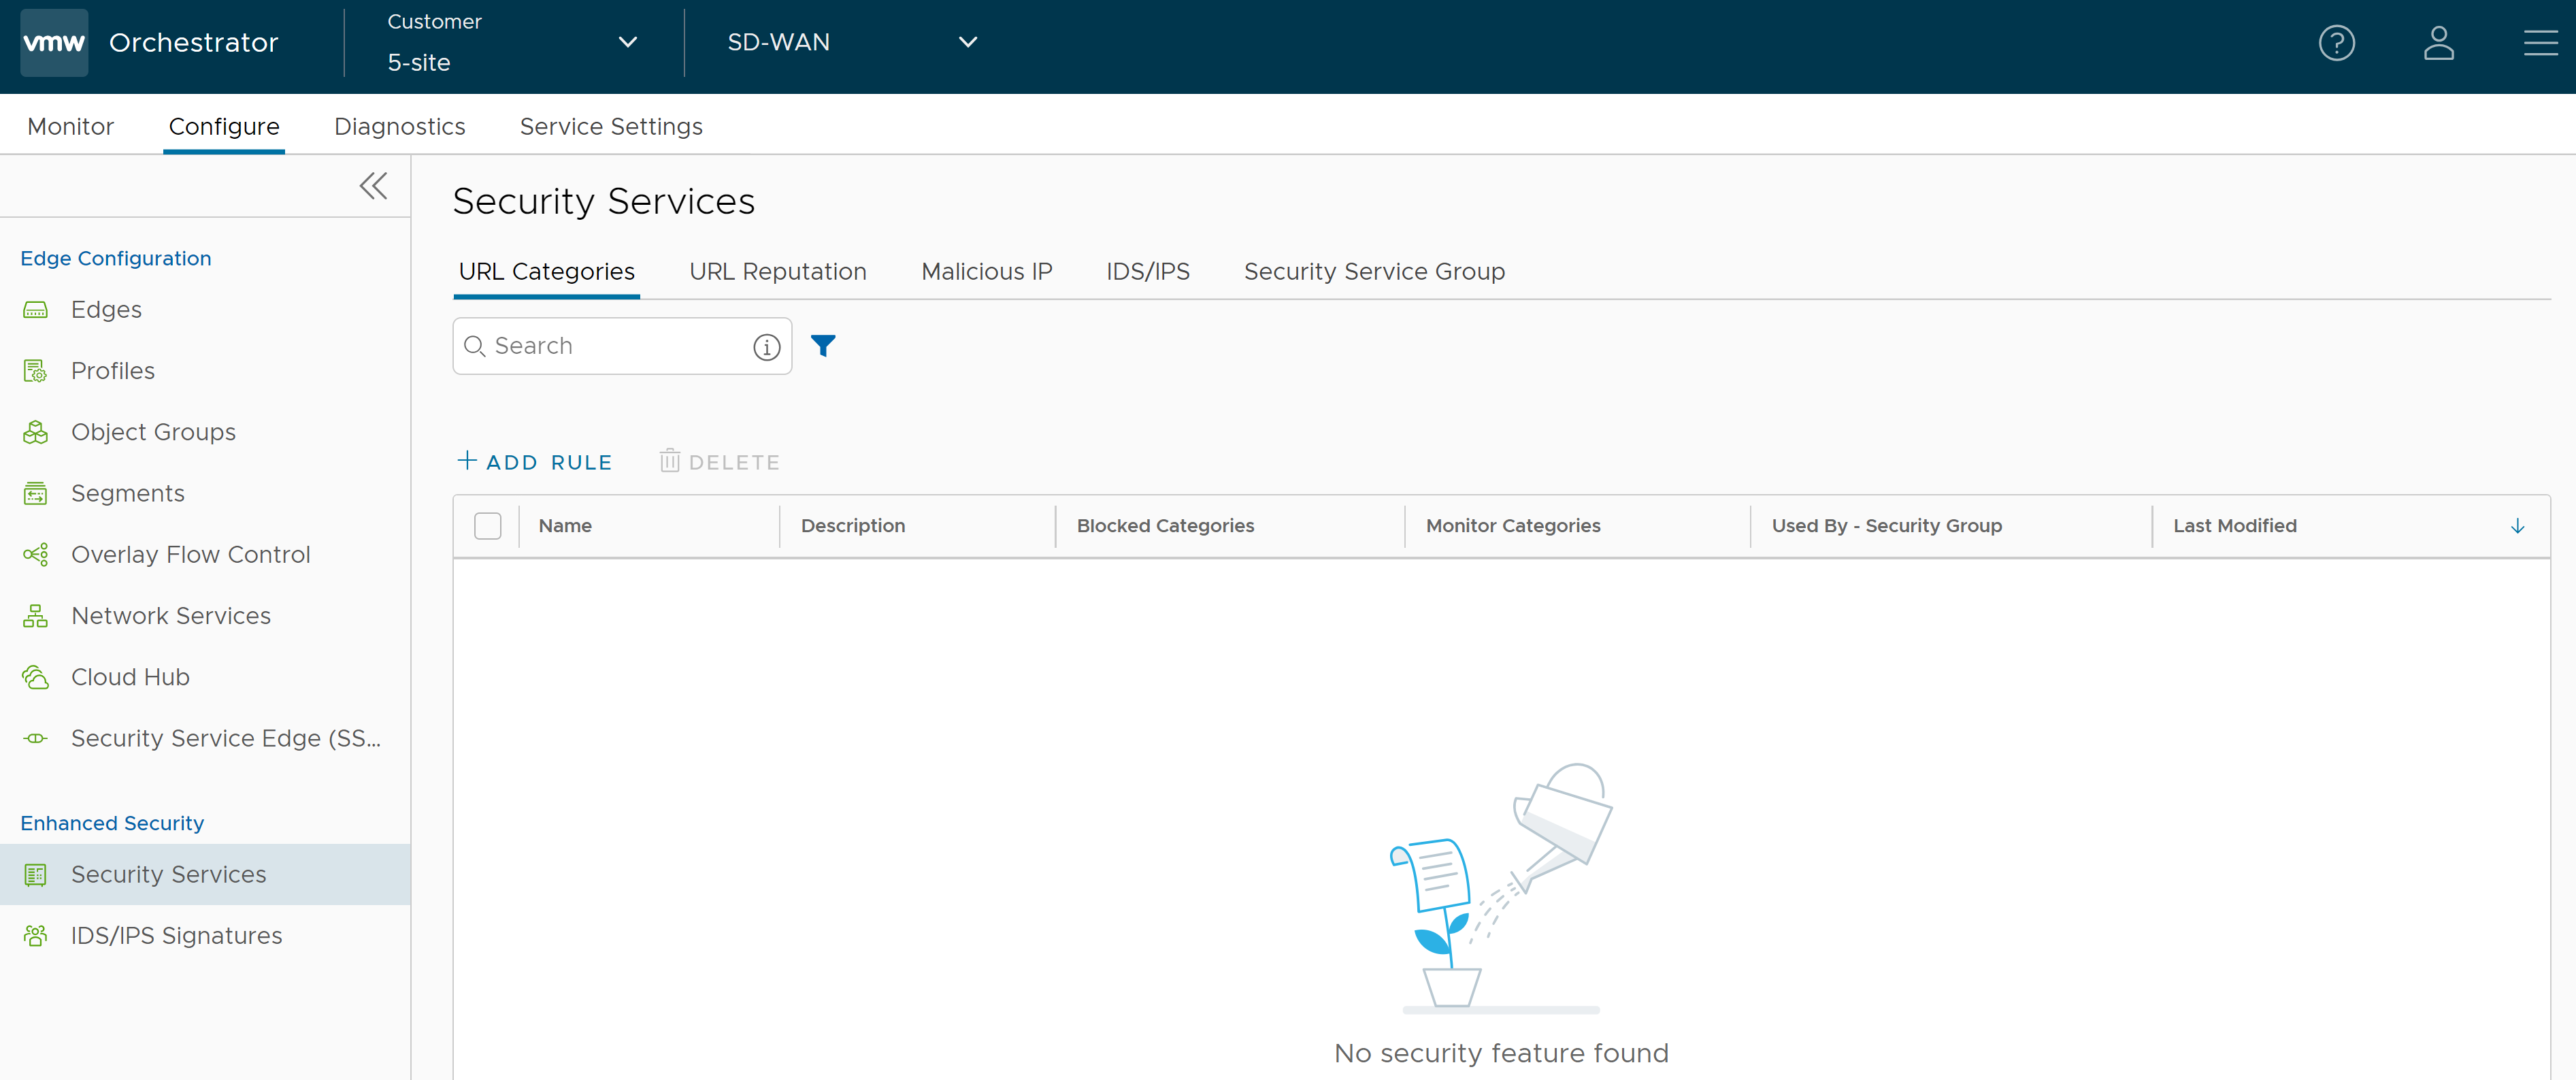
- In the SD-WAN service of the Enterprise portal, go to . The Security Services page appears.
- Click the URL Categories tab and click +ADD RULE. The Configure URL Category Service pop-up window appears.
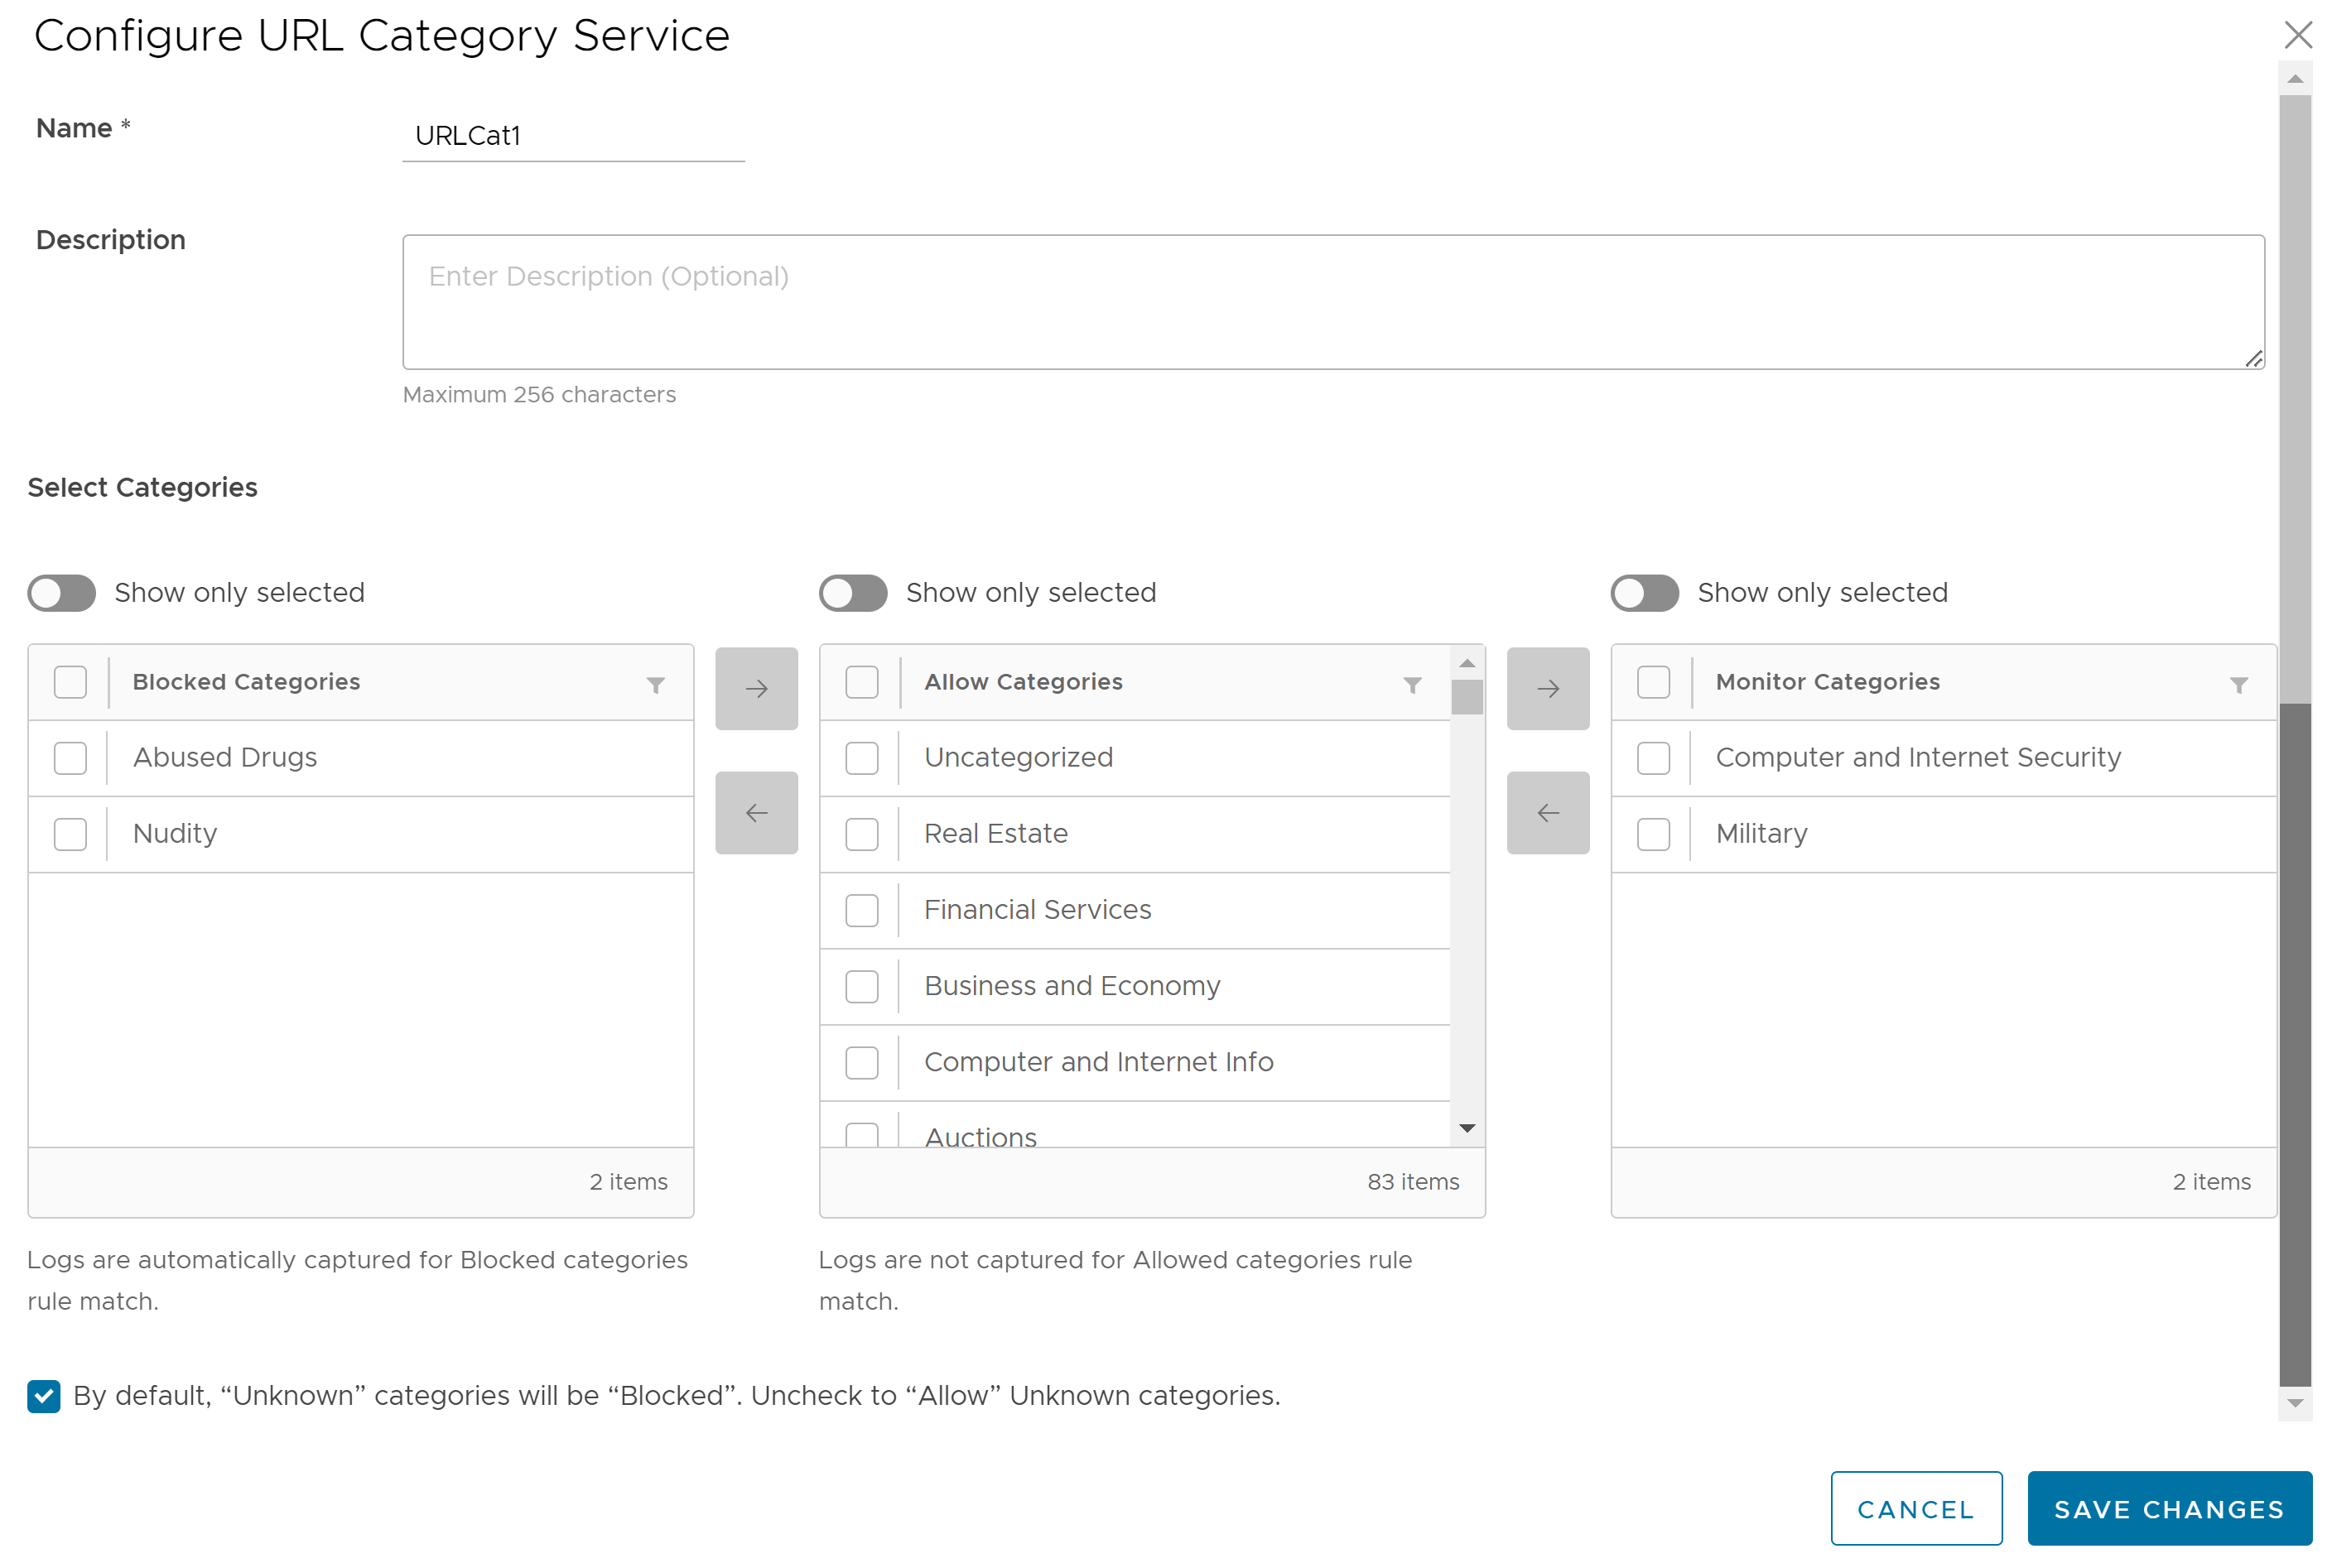
- Enter a unique name for the URL Categories service and provide a description as needed.
- From the Allow Categories list, you can select the categories that you want to block and move it to the Blocked Categories list by using the Left arrow button. Similarly, you can select the categories that you want to allow and log and move it to the Monitor Categories list by using the Right arrow button.
Note: Logs are captured automatically for firewall rules that match the Blocked and Monitor Categories. For Allow Categories, traffic is allowed but not logged.
- To allow URLs with Unknown categories, unselect the checkbox at the bottom.
Note: By default, Unknown categories will be blocked.
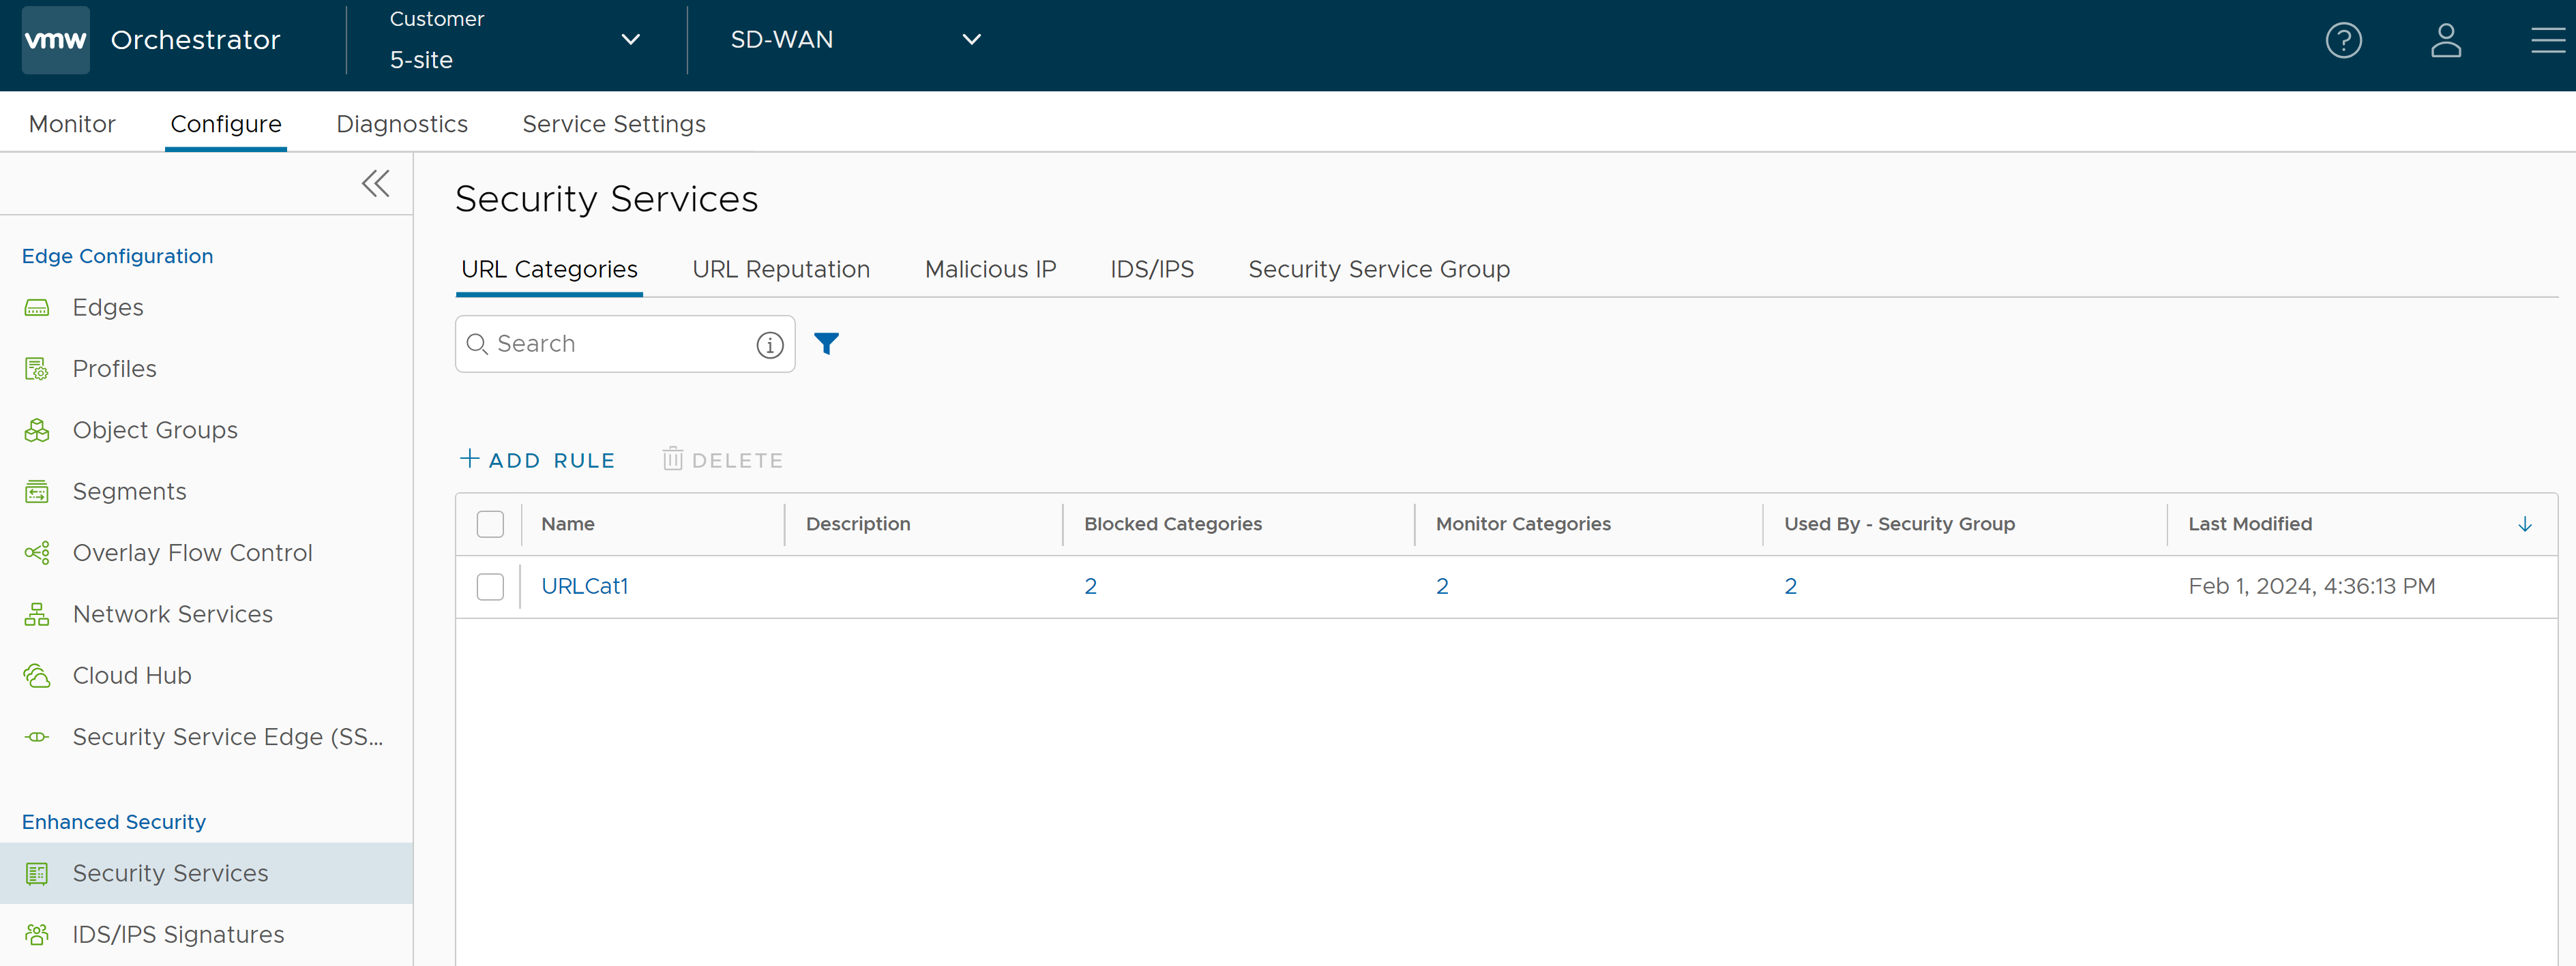
- Click Save Changes. A URL Category service rule is created, and it appears in the table in the URL Categories page.
- Click the link to the Security Service to modify the settings. To delete a Security Service, select the checkbox before the group and click Delete.
Note: Security Services in use cannot be deleted. If you want to delete a Security Service, it must first be removed from the associated Security Service Group and firewall rules.
To view the list of blocked categories, monitor categories, and security groups associated with the security service, click the respective links under the Blocked Categories, Monitor Categories, and Used By - Security Group columns.
Configure URL Reputation Service
URL reputation provides the trustworthiness of the Website. The reputation score classification for URL(s) and IP addresses is as given below:
- 81-100: Trustworthy
- 61-80: Low risk
- 41-60: Medium risk
- 21-40: Suspicious
- 01-20: High risk
-
Note: Trustworthy is the safest Reputation and has the least amount of risk.
URL Reputation service looks up the score of destination URLs and blocks the Edge traffic if their scores indicate a threat.
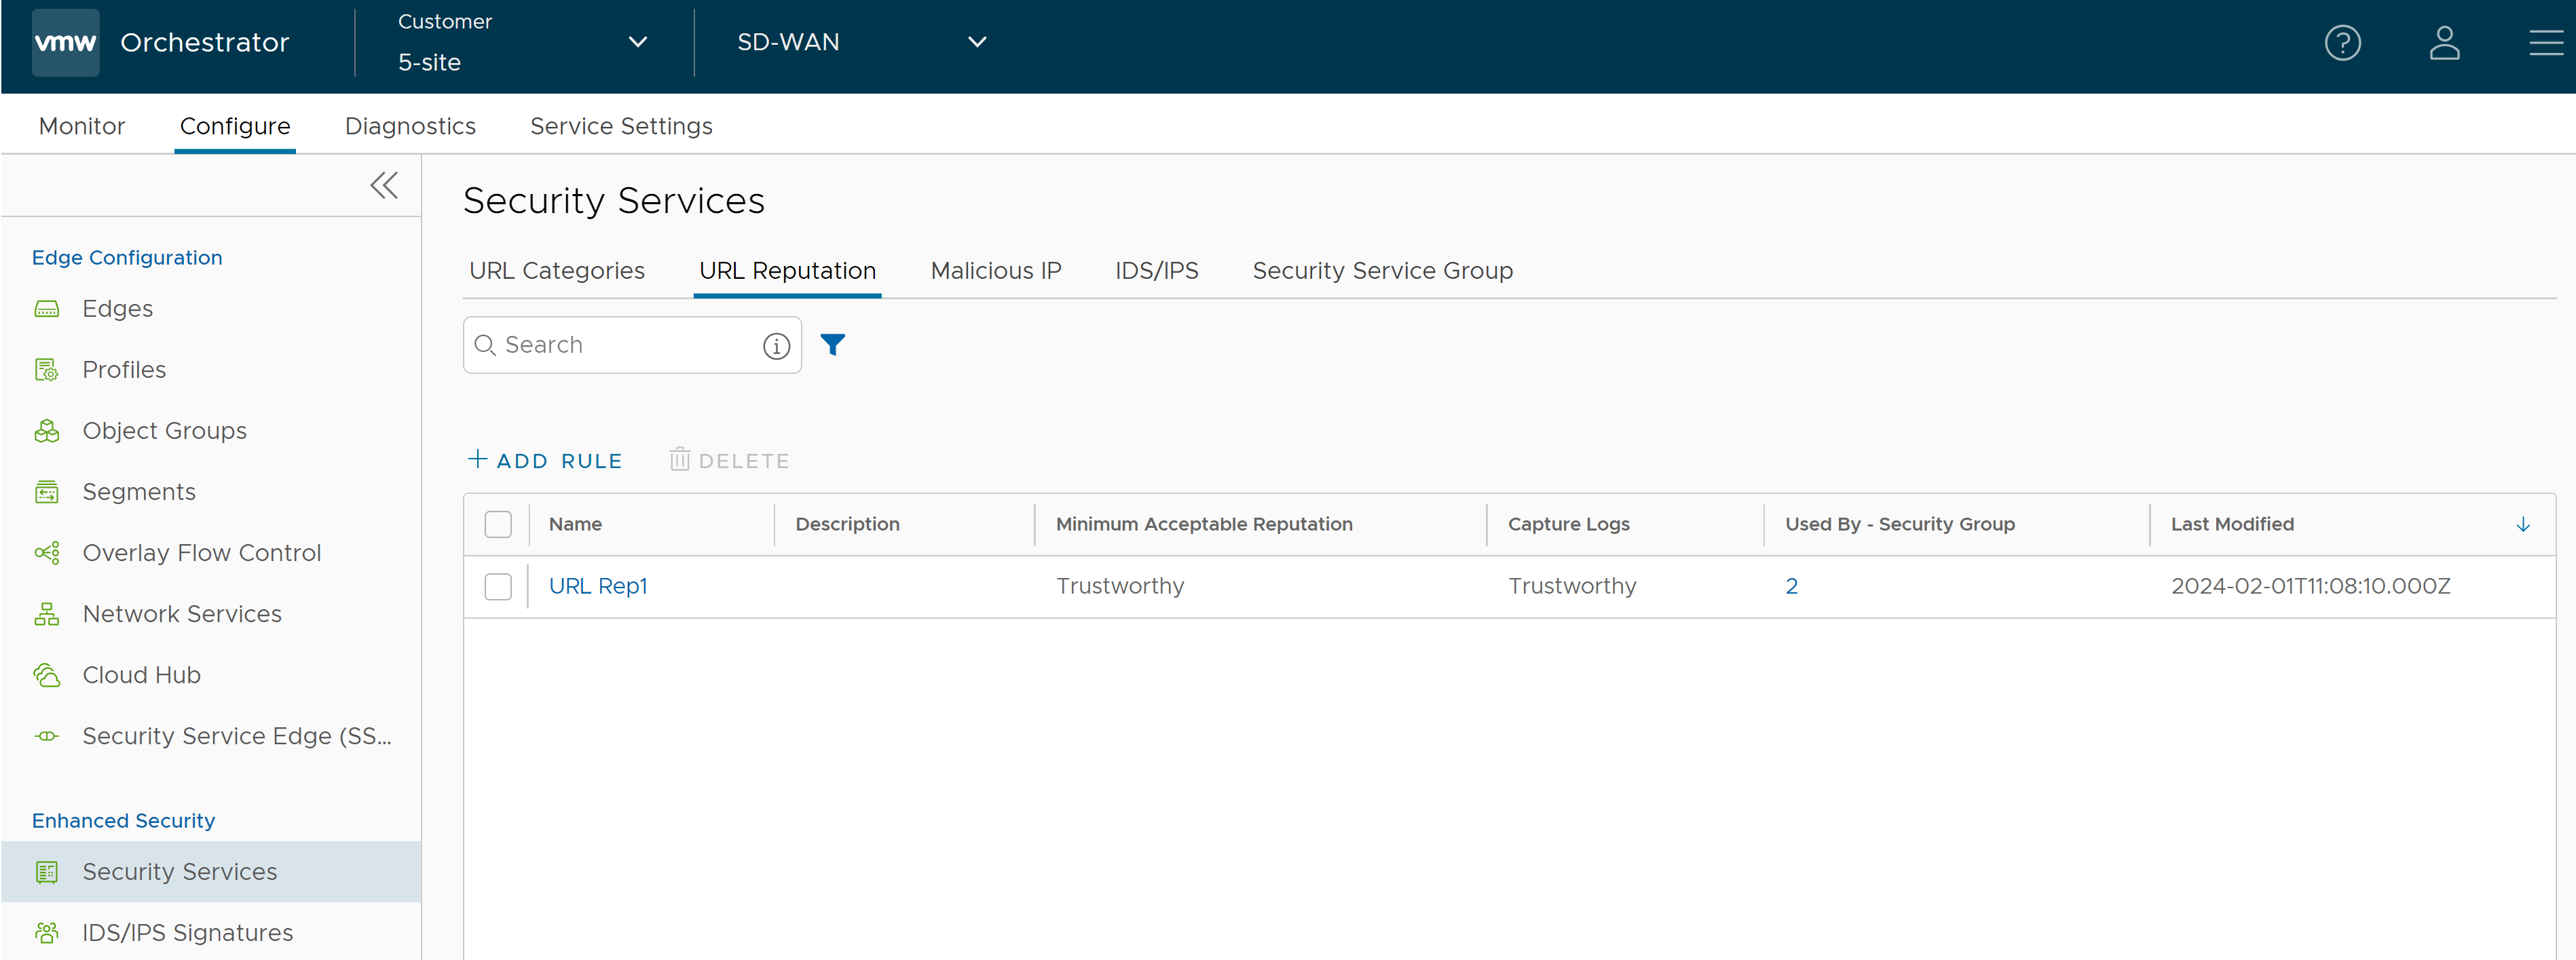
- In the SD-WAN service of the Enterprise portal, go to . The Security Services page appears.
- Click the URL Reputation tab and click +ADD RULE. The Configure URL Reputation Service pop-up window appears.
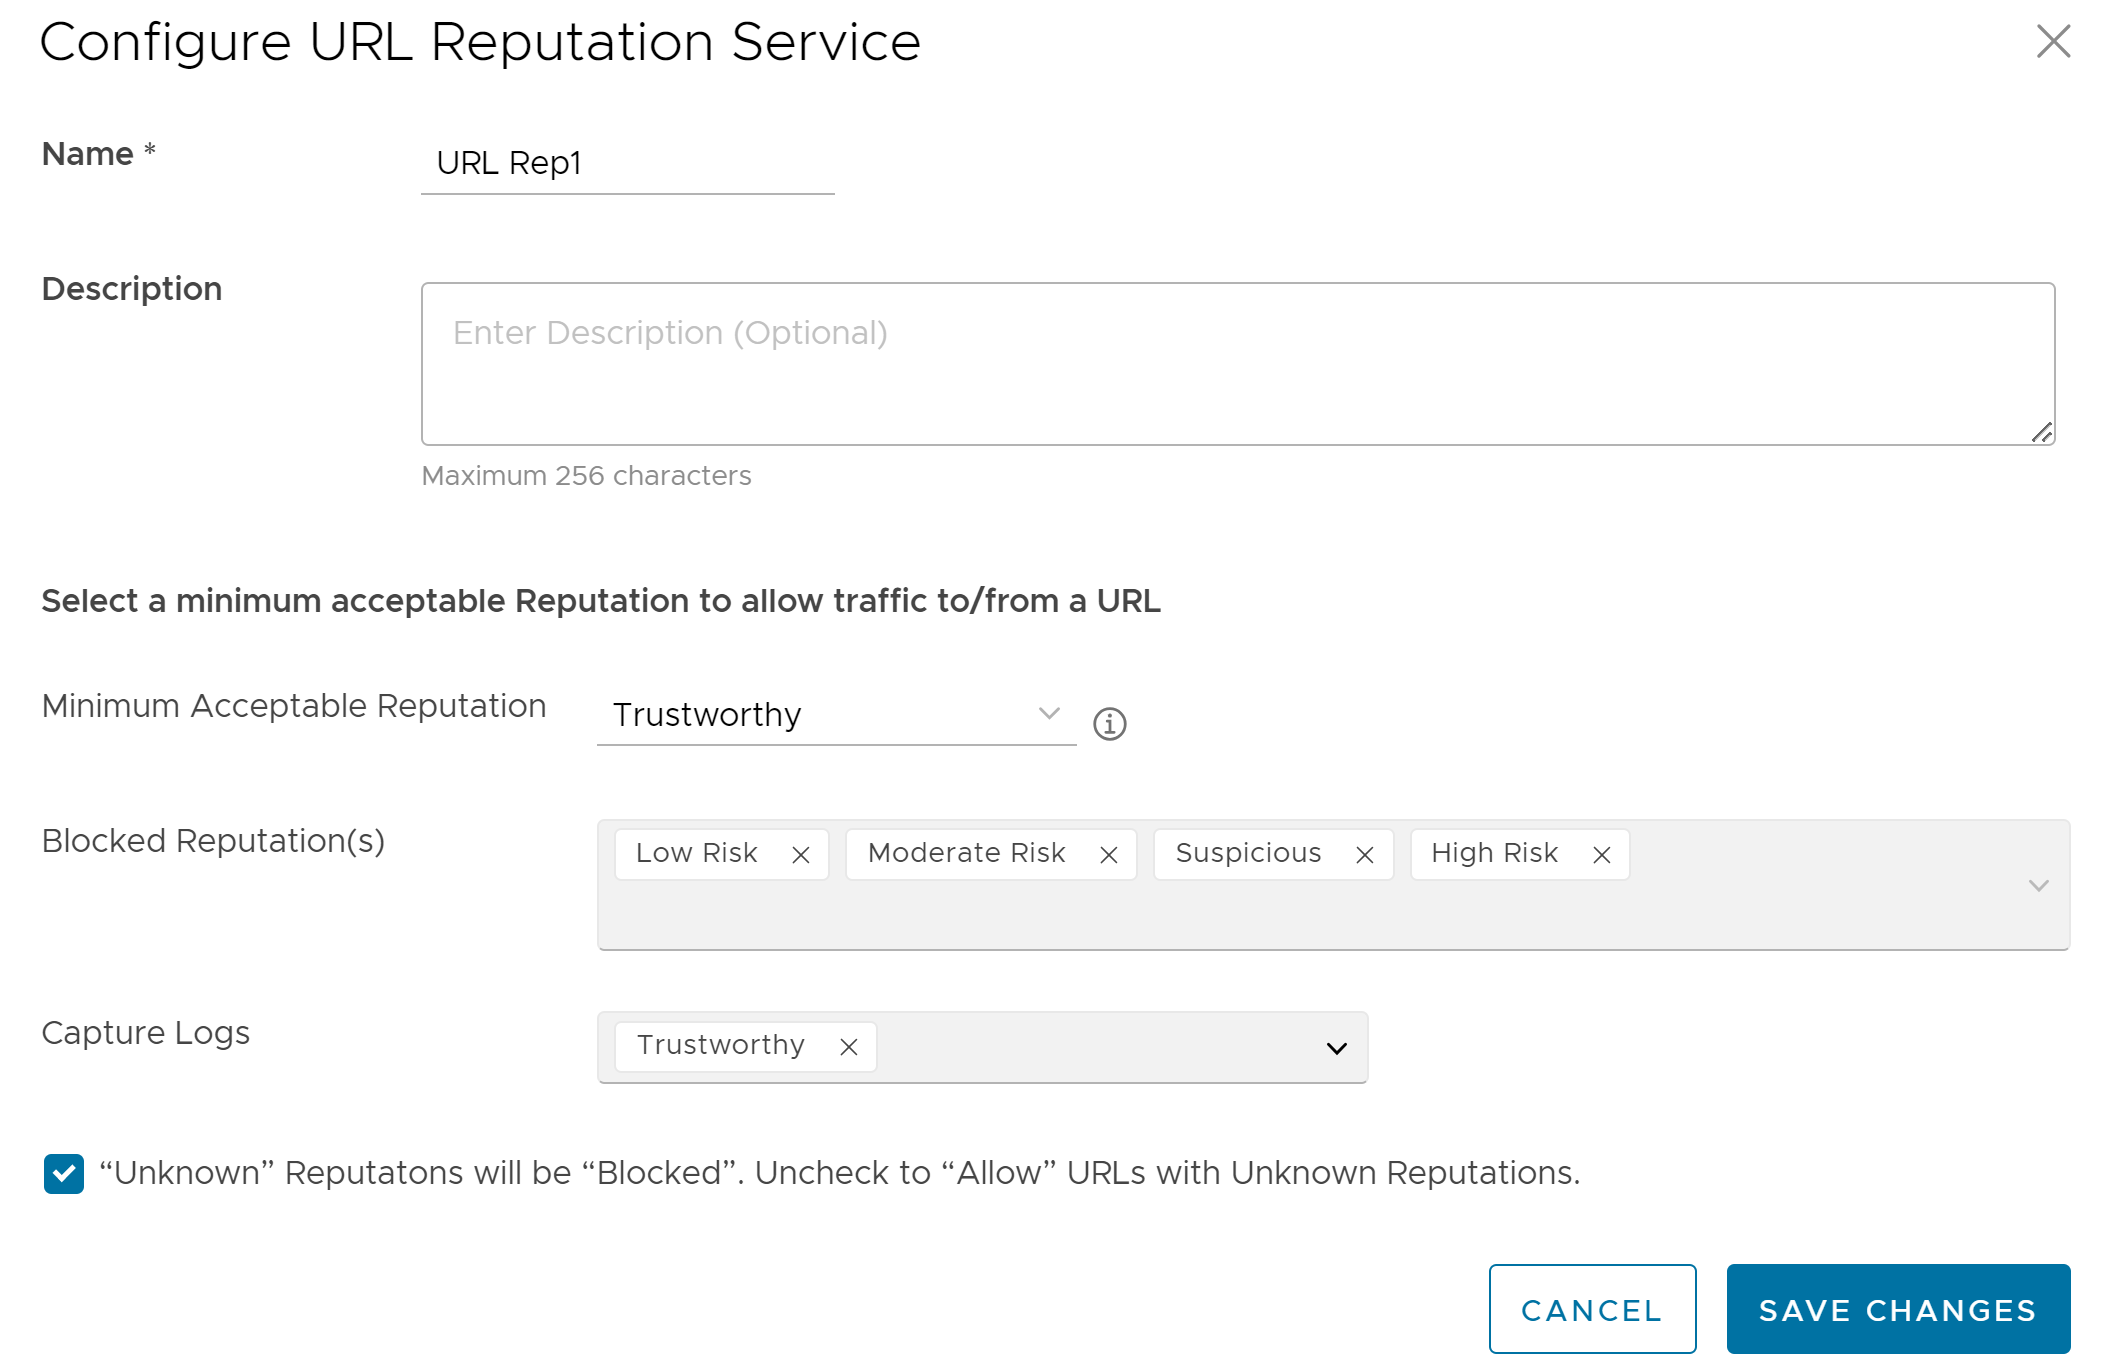
- Enter a unique name for the URL Reputation service and provide a description as needed.
- From the Minimum Acceptable Reputation drop-down menu, select an acceptable reputation to allow traffic to/from a URL. Once you configure the minimum acceptable reputation, all the other Reputations that need to be blocked are automatically listed in the Blocked Reputation(s) box. Traffic to/from any URL below the selected URL reputation level will be blocked and logged automatically, and traffic above the selected URL reputation level will be allowed but not logged automatically. You can specify the reputations to log using the Capture Logs drop-down menu.
- To allow URLs with Unknown Reputations, unselect the checkbox at the bottom. An URL is classified as having an "Unknown" reputation when there is no reputation information available from the URL Filtering service.
Note: By default, Unknown Reputations will be blocked.
- Click Save Changes. A URL Reputation service rule is created, and it appears in the table in the URL Reputation page.
- Click the link to the Security Service to modify the settings. To delete a Security Service, select the checkbox before the group and click Delete.
Configure Malicious IP Service
Blocking IP addresses can be useful for protecting a network or website from malicious activity. IP reputation score assigned by Webroot provides the trustworthiness of IP. Malicious IP service looks up the IP reputation score of destination IPs and blocks the Edge traffic if their scores indicate a malicious activity.
- In the SD-WAN service of the Enterprise portal, go to . The Security Services page appears.
- Click the Malicious IP tab and click +ADD RULE. The Configure Malicious IP Filtering Service pop-up window appears.
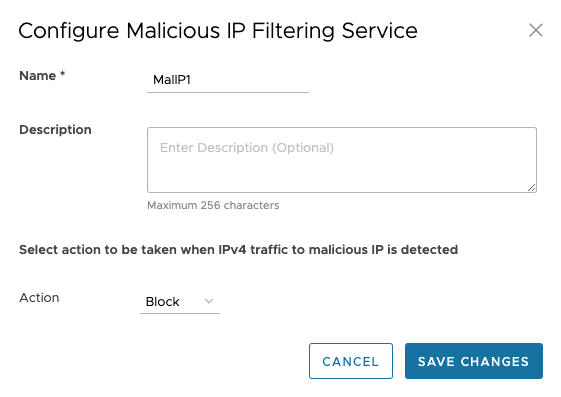
- Enter a unique name for the Malicious IP service and provide a description as needed.
- From the Action drop-down menu, select an action to be taken when IPv4 traffic to/from malicious IP is detected. You can select any one of the following options:
- Monitor - Allows and logs the IPv4 traffic automatically from the Malicious IP service.
- Block - Blocks and logs the IPv4 traffic automatically from the Malicious IP service.
Note: If the IP is not malicious, IPv4 traffic is allowed but not logged. - Click Save Changes. A Malicious IP service rule is created, and it appears in the table in the Malicious IP page.
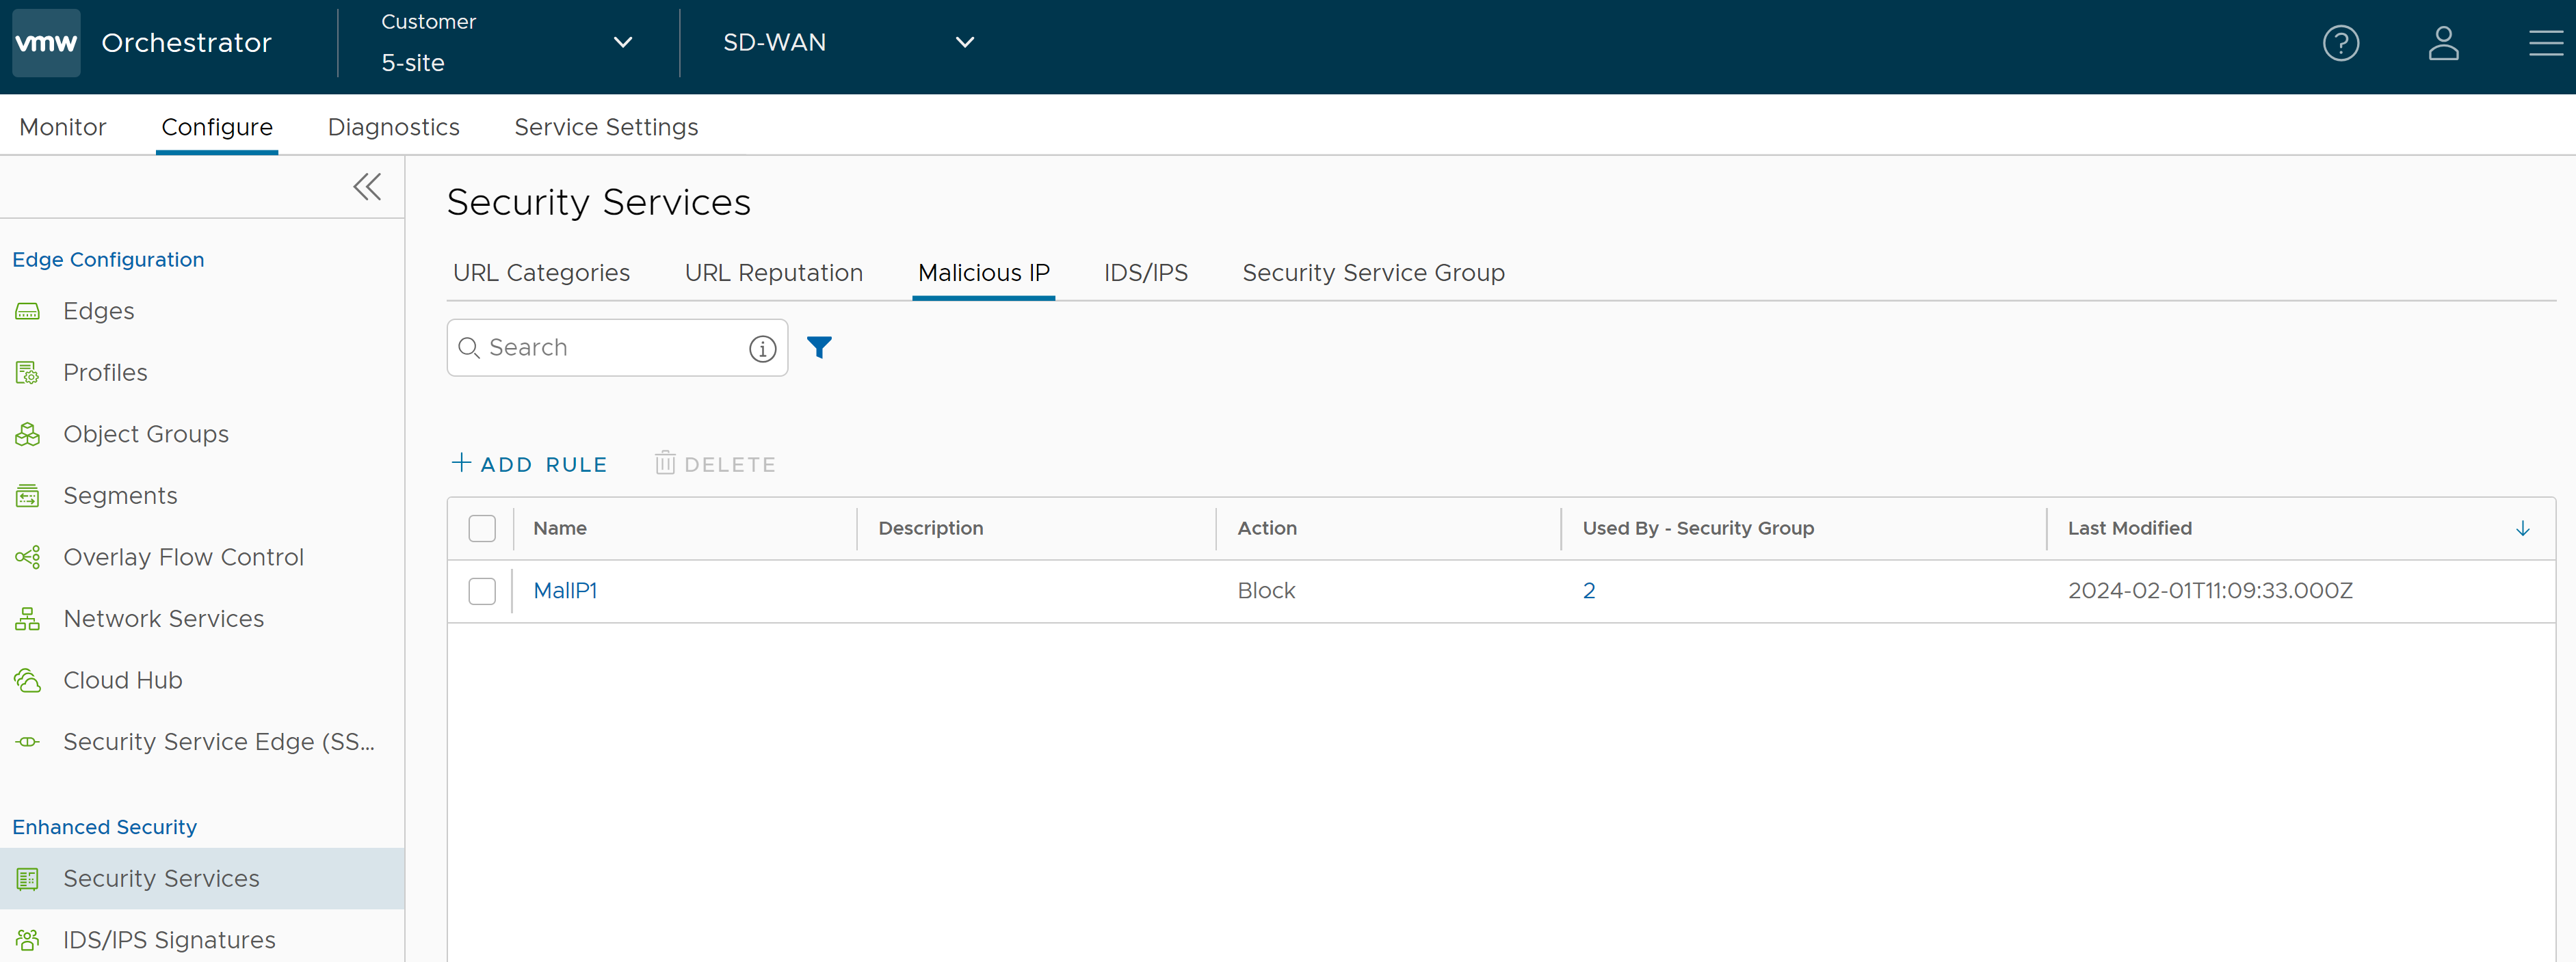
- Click the link to the Security Service to modify the settings. To delete a Security Service, select the checkbox before the group and click Delete.
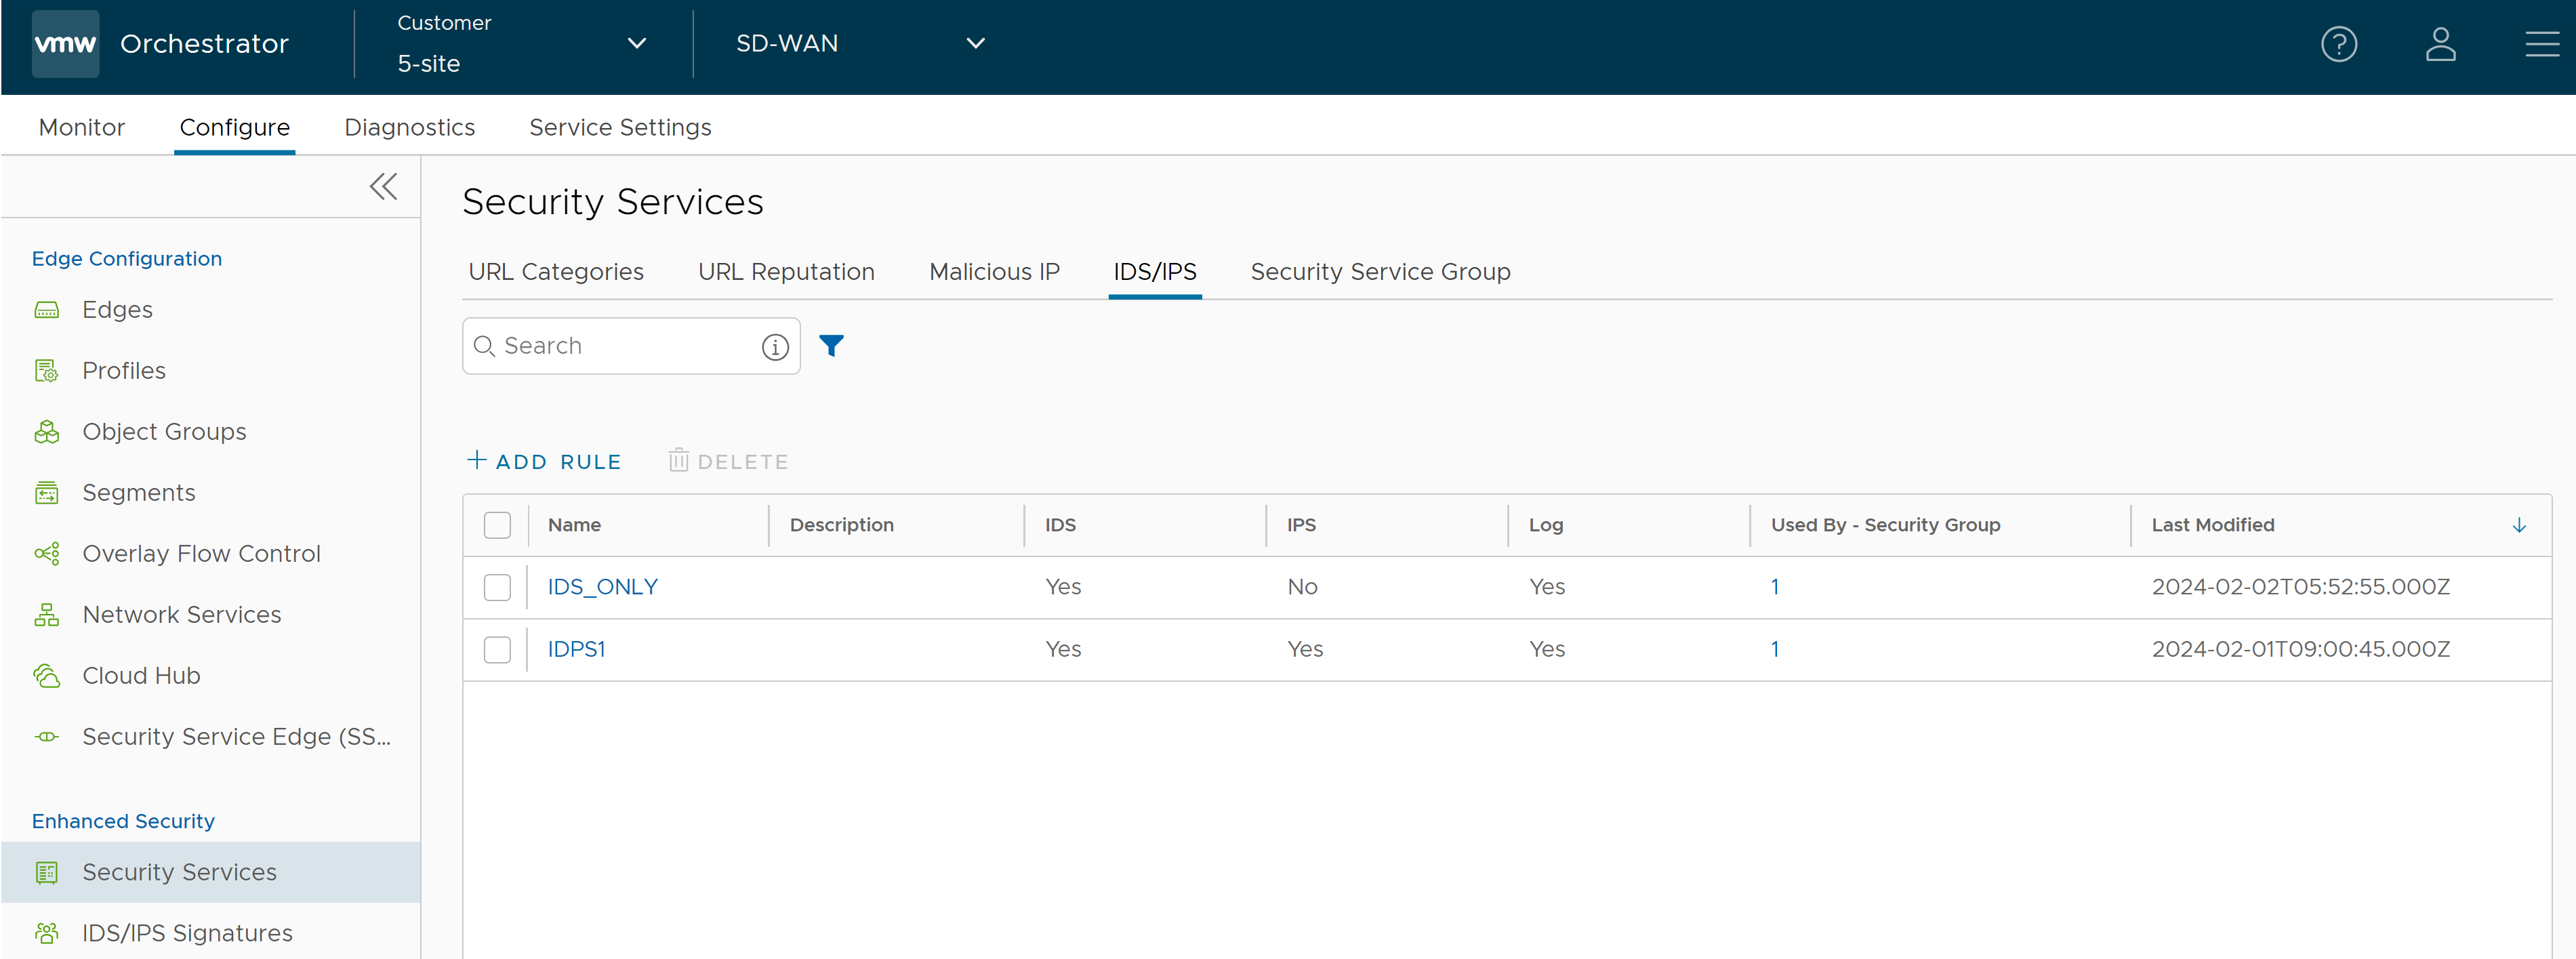
Configure IDS/IPS Security Service
- In the SD-WAN service of the Enterprise portal, go to . The Security Services page appears.
- Click the IDS/IPS tab and click +ADD RULE. The Configure IDS/IPS Security Service pop-up window appears.
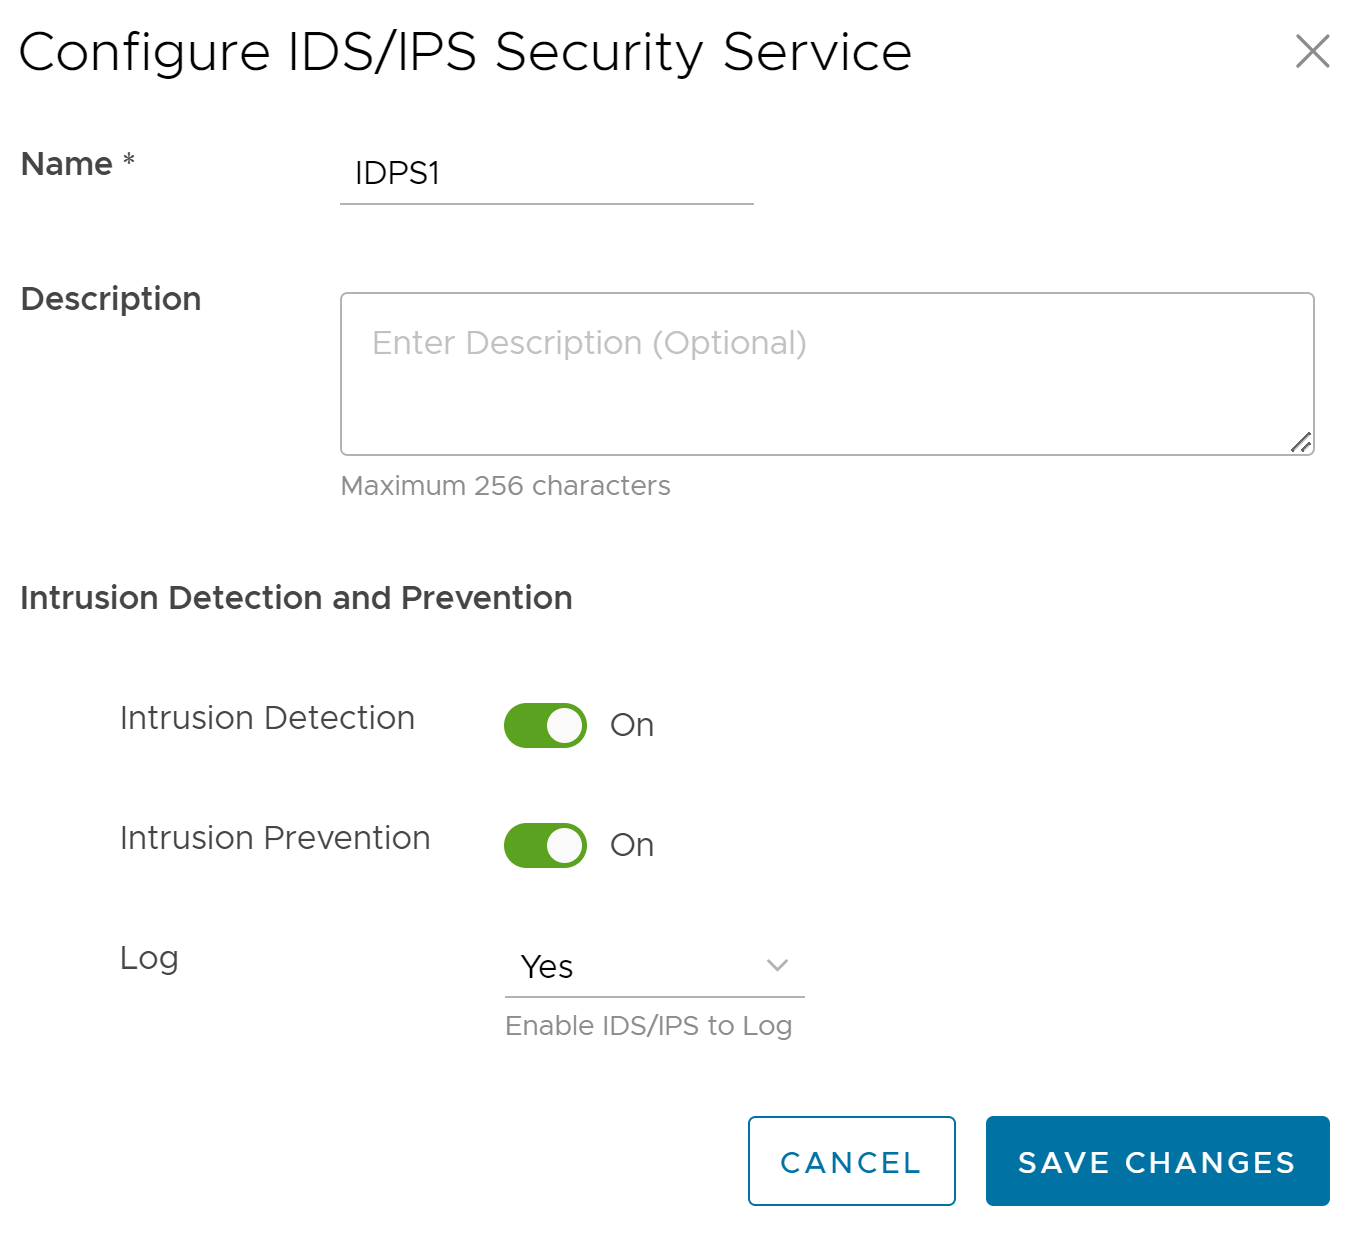
- Enter a unique name for the IDS/IPS service and provide a description as needed.
- Under the Intrusion Detection and Prevention section, activate Intrusion Detection (IDS) and/or Intrusion Prevention (IPS) toggle. When a user activates only IPS, IDS will be automatically activated. EFS engine inspects traffic sent/received through the Edges and matches content against signatures configured in the EFS engine. IDS/IPS Signatures are updated on a continuous basis with a valid EFS license. For more information about EFS, see Enhanced Firewall Services Overview.
- Intrusion Detection - When IDS is activated on Edges, the Edges detect if the traffic flow is malicious or not based on certain signatures configured in the engine. If an attack is detected, the EFS engine generates an alert and sends the alert message to SASE Orchestrator/Syslog Server if Firewall logging is activated in Orchestrator and will not drop any packets.
- Intrusion Prevention - When IPS is activated on Edges, the Edges detect if the traffic flow is malicious or not based on certain signatures configured in the engine. If an attack is detected, the EFS engine generates an alert and blocks the traffic flow to the client if the action in the signature rule is "Reject". If the action in the signature rule is "Alert", the traffic will be allowed without dropping any packets even if you configure IPS.
Note: VMware recommends customers to not activate VNF when IDS/IPS is activated on Edges. - From the Log drop-down menu, select Yes if you want to send the IDS/IPS logs to Orchestrator.
- Click Save Changes. An IDS/IPS service rule is created, and it appears in the table in the IDS/IPS page.
- Click the link to the Security Service to modify the settings. To delete a Security Service, select the checkbox before the group and click Delete.
Configure Security Service Group
- In the SD-WAN service of the Enterprise portal, go to . The Security Services page appears.
- Click the Security Service Group tab and click + CREATE GROUP. The New Security Service Group page appears.
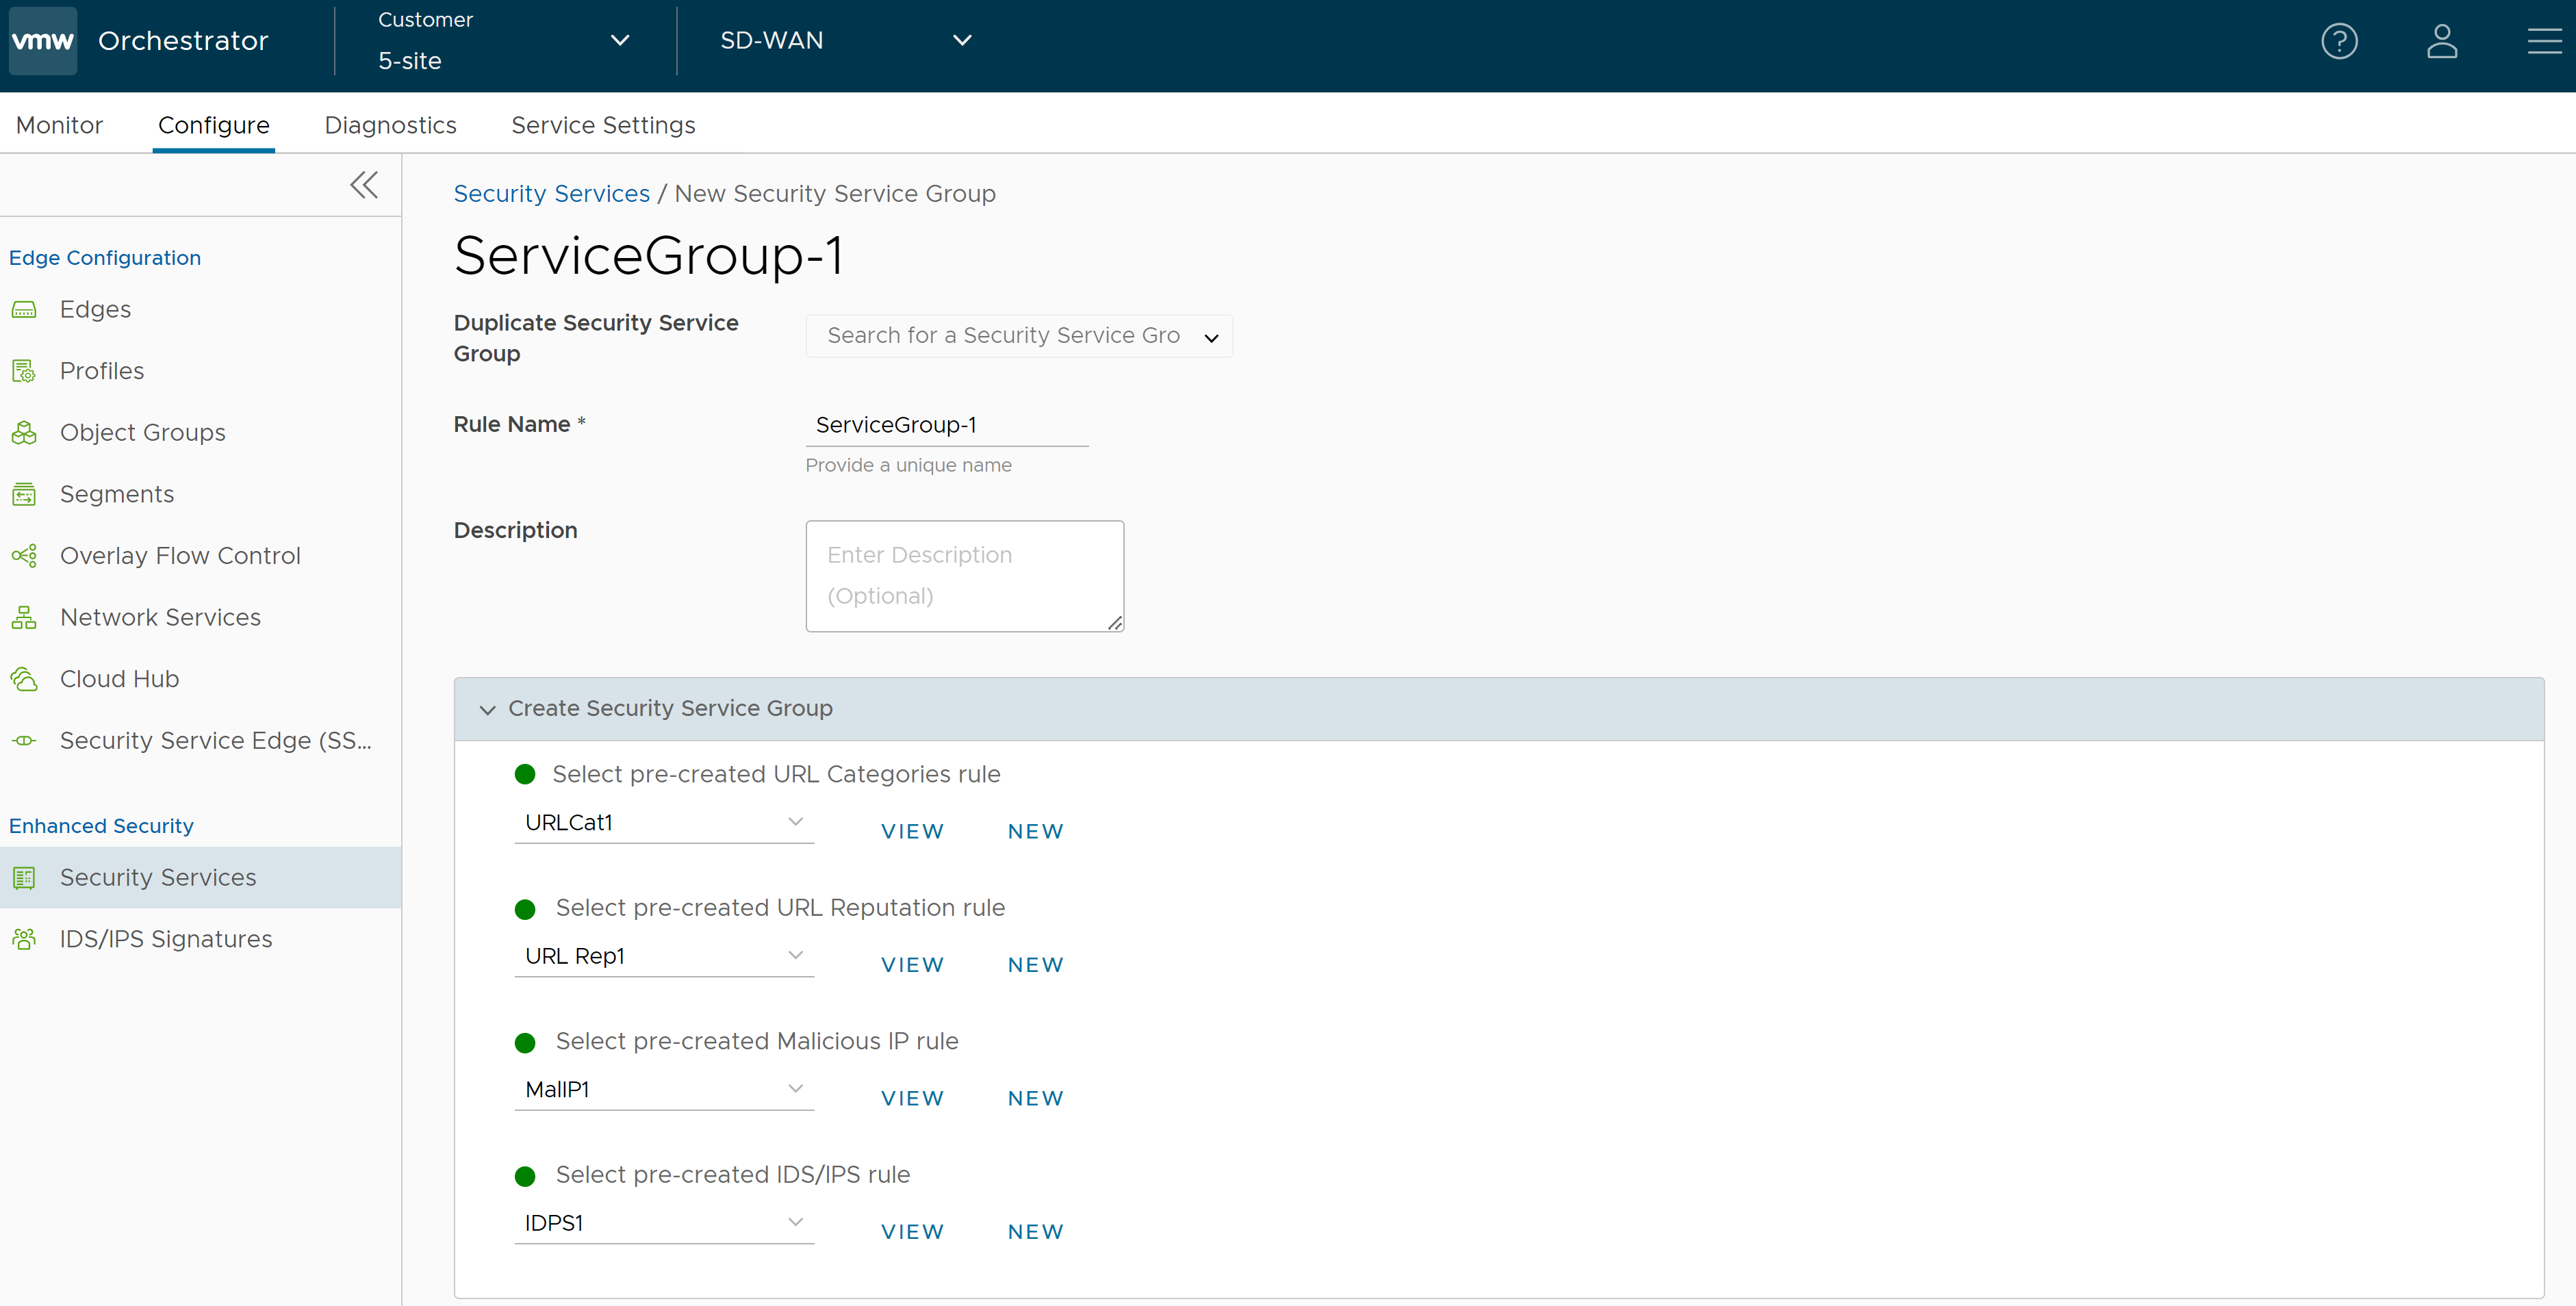
- If you want to create a new Service Group from an existing one, choose an option from the Duplicate Security Service Group drop-down menu and rename the rule name alone. All the other configurations will be automatically applied from the selected Security Service Group.
- To create a new Service Group, enter a unique name for the Security Service Group and provide a description as needed.
- From the Create Security Service Group section, you can select the pre-created security services for URL Categories, URL Reputation, Malicious IP, and IDS/IPS and group them together to create a Security Group. If you do not want to use the pre-created services, you can click the New button and create a new security service to associate it to the Security Group. Click the View button to view the configuration details of the selected security service.
- Click Save Changes. A Security Service Group is created, and it appears in the table in the Security Service Group page.
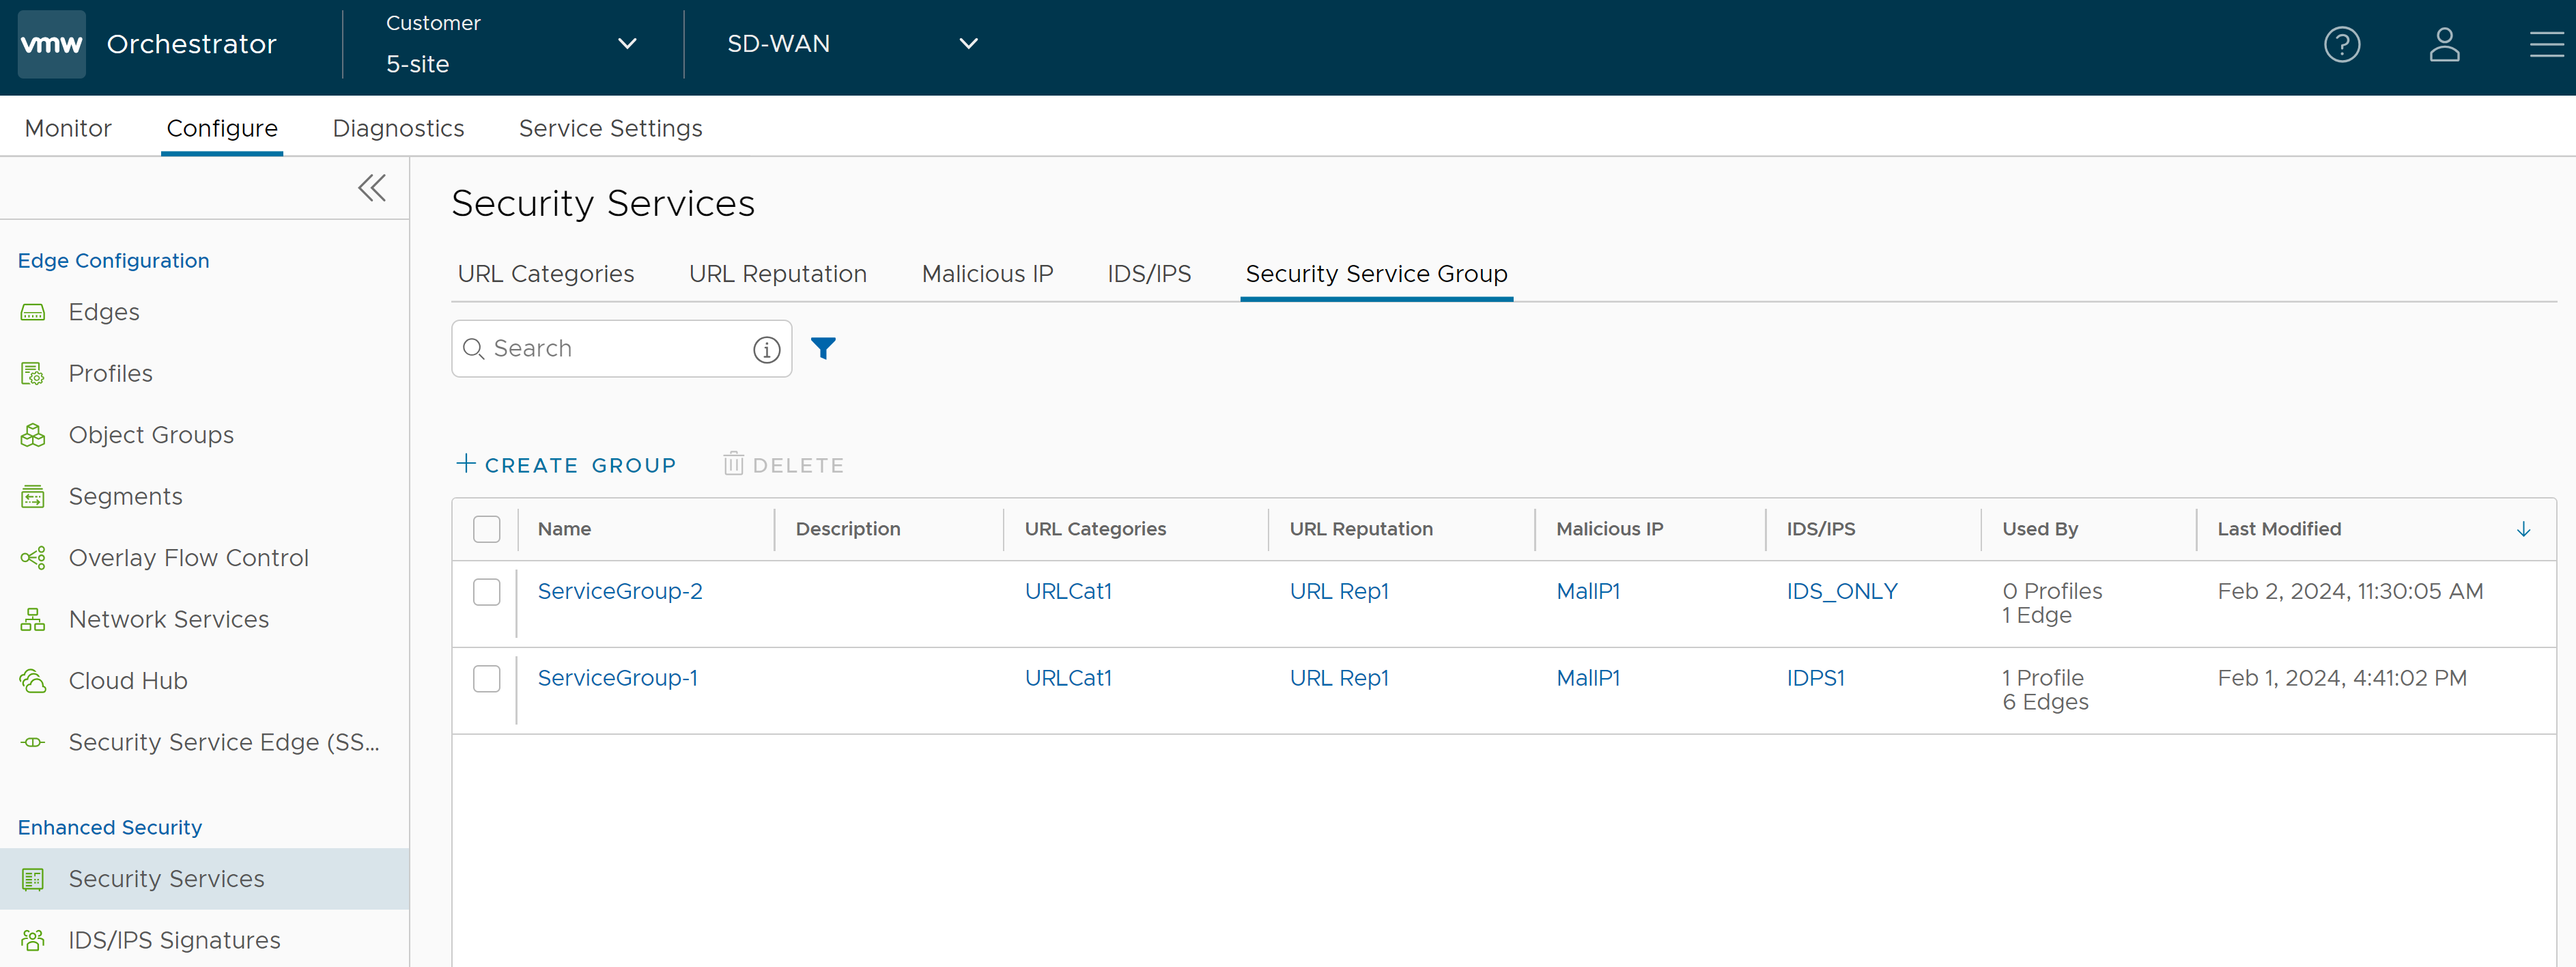
- Click the link to the Security Service Group to modify the settings. To delete a Security Service Group, select the checkbox before the group and click Delete.
Note: Security Service Group in use cannot be deleted. If you want to delete a Security Service group, it must first be removed from the associated firewall rules.
Associate a Security Service Group to a Firewall Rule at the Profile level
- In the SD-WAN service of the Enterprise portal, go to . The Profiles page displays the existing Profiles.
- Select a Profile to configure a firewall rule, and click the Firewall tab.
- Go to the Configure Firewall section and under the Firewall Rules area, click + NEW RULE. The New Rule page appears.
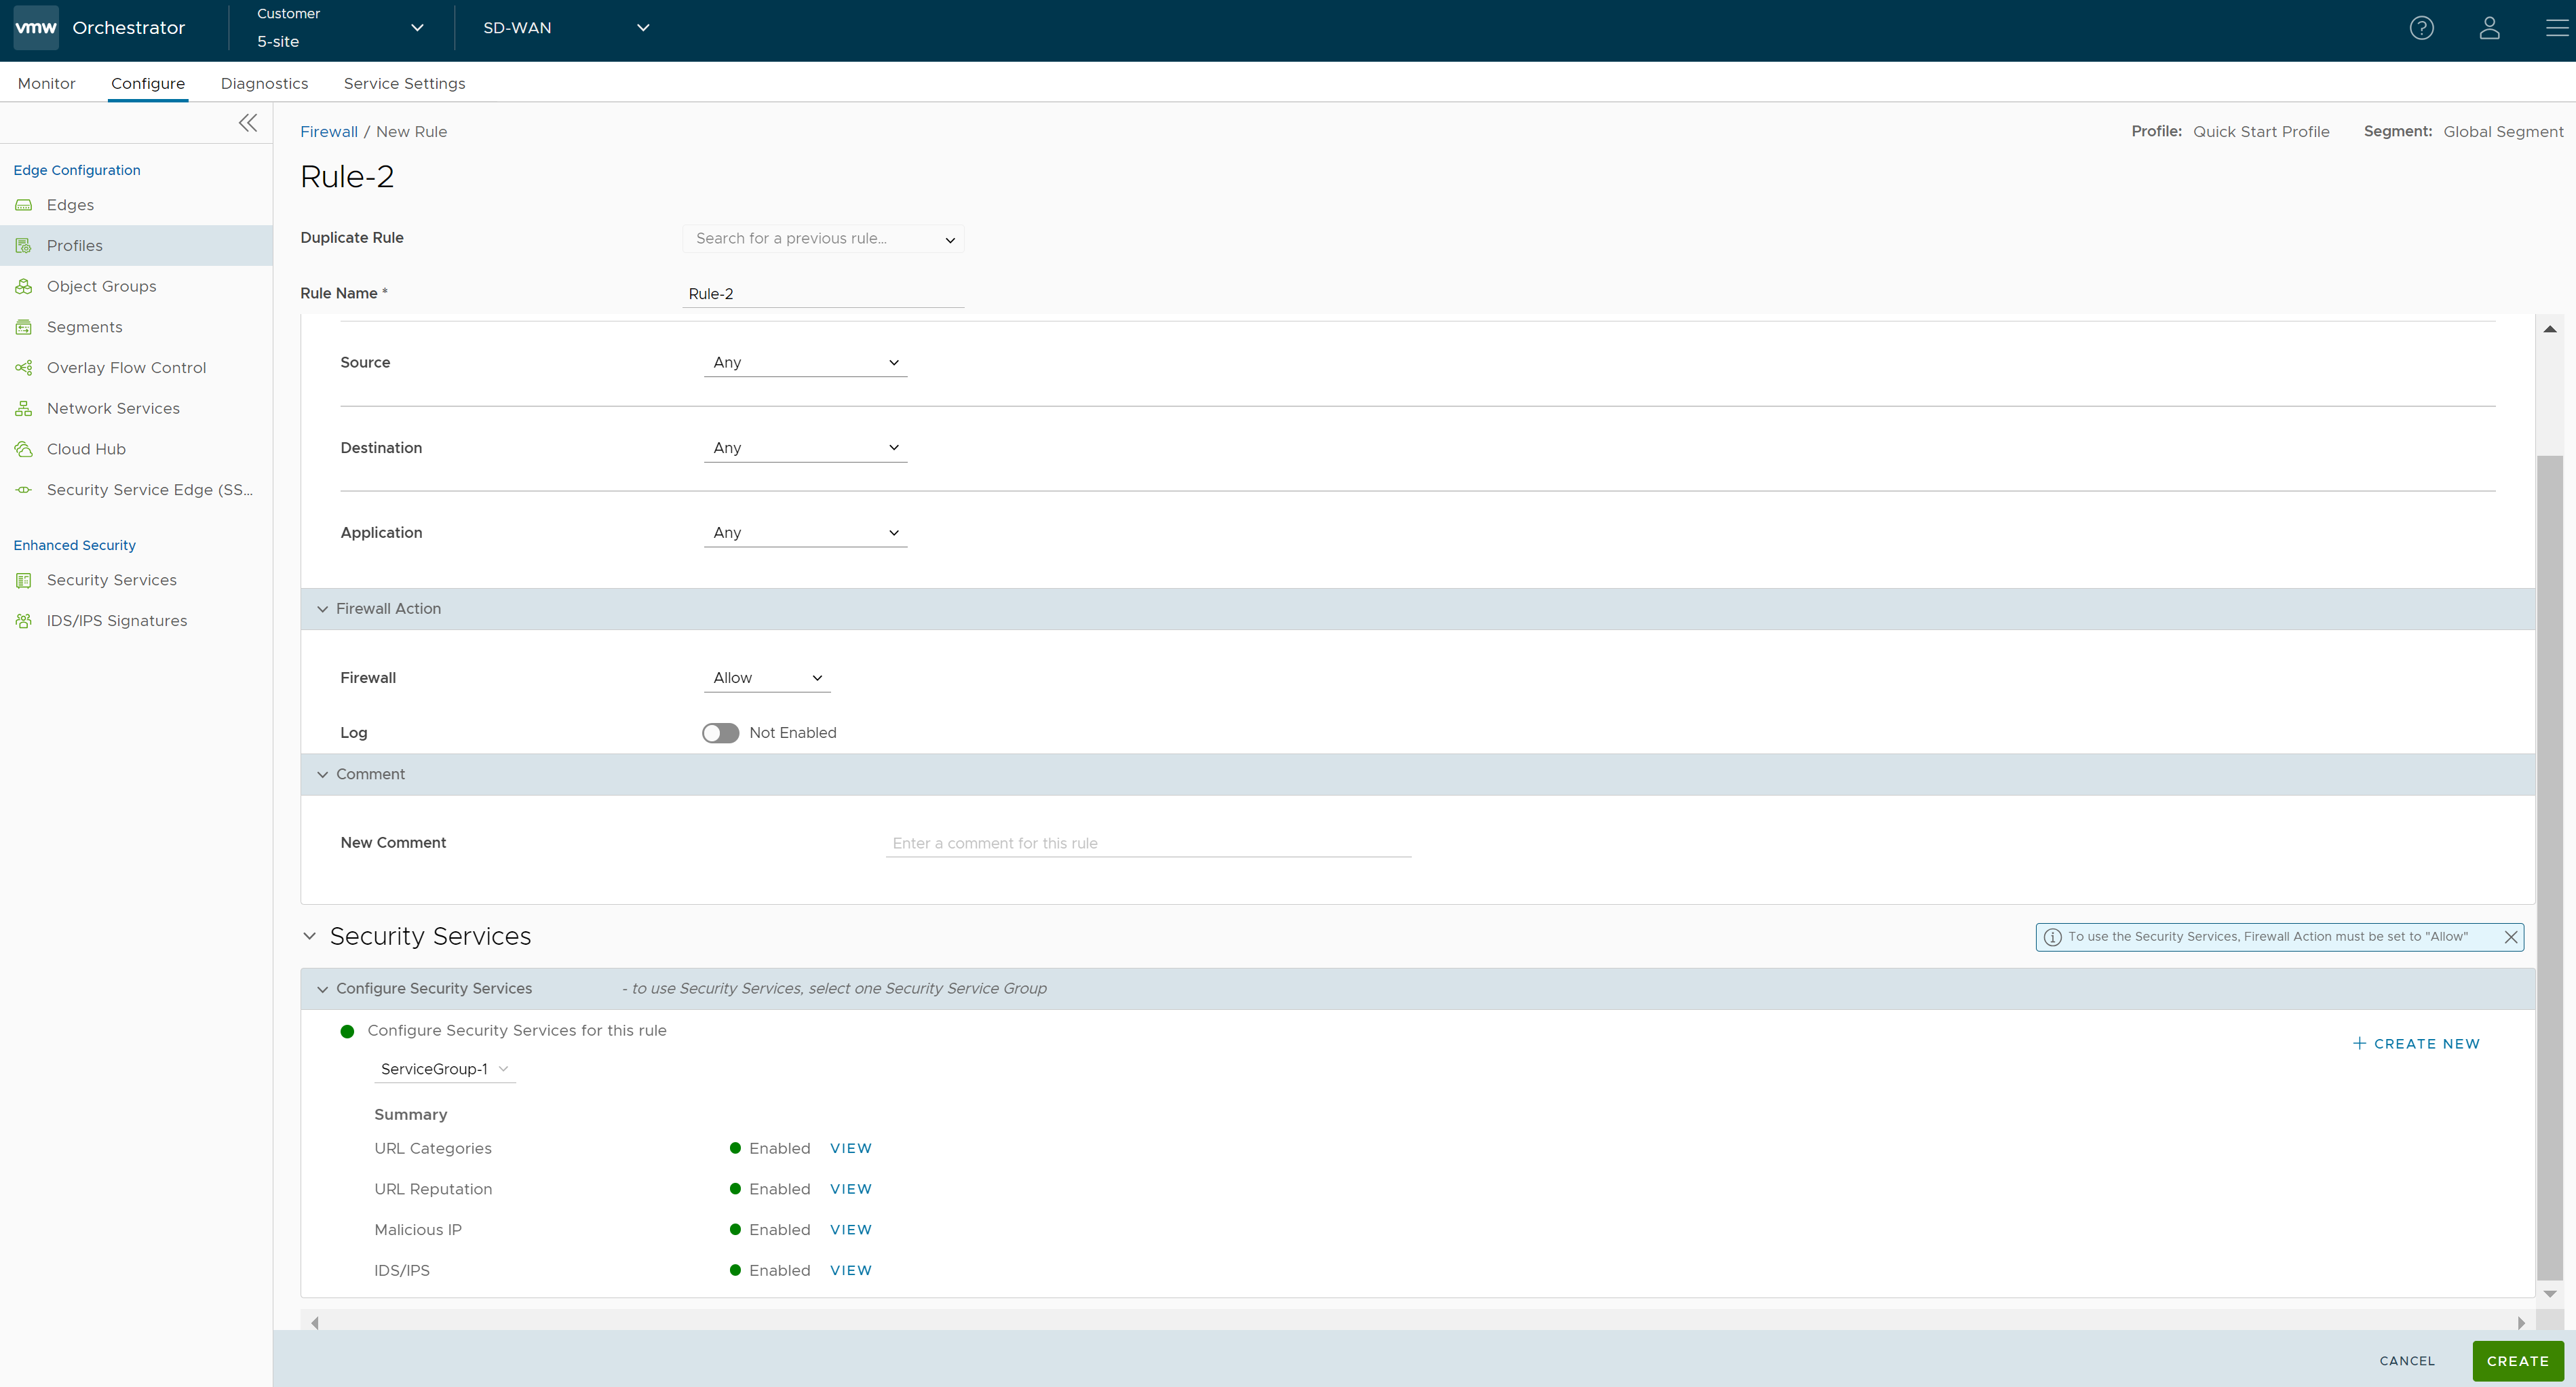
- In the Rule Name text box, enter a unique name for the Rule. To create a firewall rule from an existing rule, select the rule to be duplicated from the Duplicate Rule drop-down menu.
- In the Match and Firewall Action sections, configure the match conditions for the rule and the actions to be performed when the traffic matches the defined criteria, respectively. For more information, see Configure Firewall Rule.
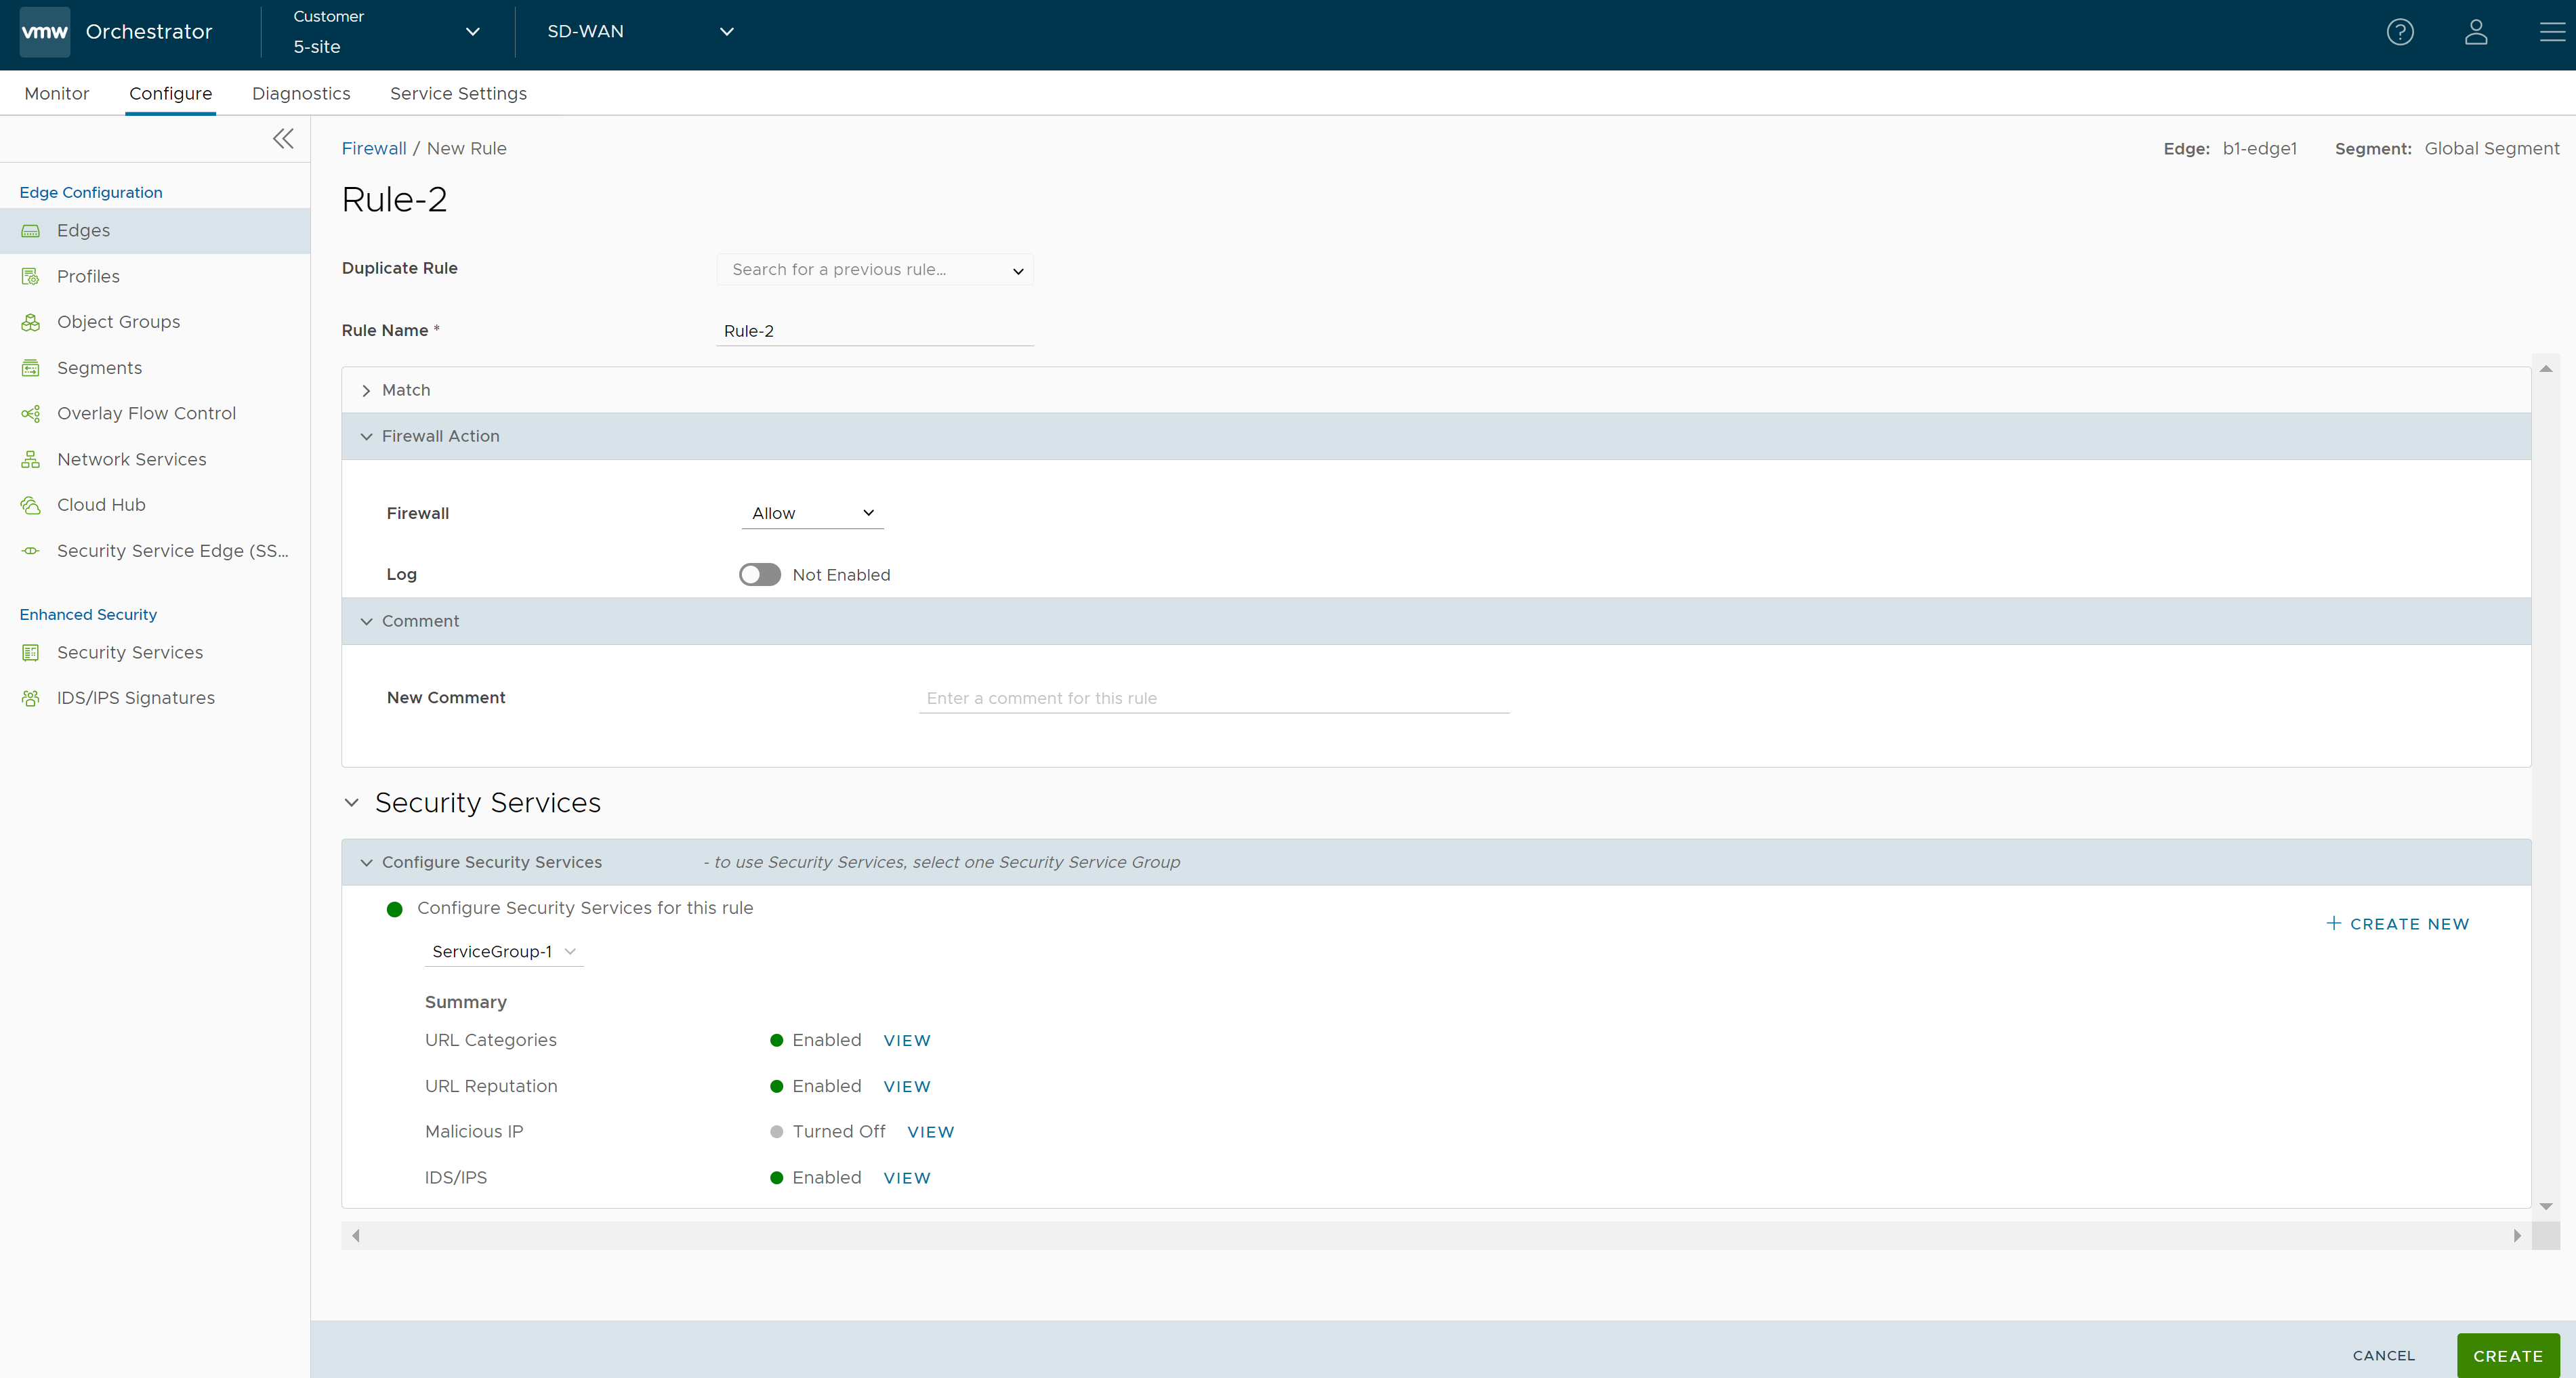
- In the Security Services section, configure the security service for the rule by selecting a Security Service Group from the drop-down menu. A summary of all the security services configured within the Security Service Group will be displayed. You can click the View button against each of the security services to view the configuration details.
Note: Security services can be activated in the rule only if the Firewall action is Allow. If the Firewall action is anything other than Allow, Security services will be deactivated.
- After configuring all the required settings, click Create. A firewall rule is created for the selected Profile, and it appears under the Firewall Rules area of the Profile Firewall page.
- Click Save Changes.
- In the SD-WAN service of the Enterprise portal, go to . The Profiles page displays the existing Profiles.
- Select a Profile to configure a firewall rule, and click the Firewall tab.
- Go to the Configure Firewall section and under Firewall Rules area, select the rule name for which you want to change the Security service configuration.
- Under the Security Services section, select a different Service Group to associate to the rule and click Edit.
- Click Save Changes.
Associate a Security Service Group to a Firewall Rule at the Edge level
- In the SD-WAN service of the Enterprise portal, go to . The Edges page displays the existing Edges.
- To configure an Edge, click the link to the Edge or click the View link in the Firewall column of the Edge.
- Click the Firewall tab.
- Go to the Configure Firewall section and from the Firewall Rules area, you can create a new rule with Security Service configurations or modify the existing rule's Security Service settings. Follow the procedure as described in Step 6 of Associate a Security Service Group to a Firewall Rule at the Profile level section.
 Note: The rules created at the Profile level cannot be updated at the Edge level. To override the rule, user needs to create the same rule at the Edge level with new parameters to override the Profile level rule.
 - After configuring all the required settings, click Create. A firewall rule is created for the selected Edge, and it appears under the Firewall Rules area of the Edge Firewall page.
- Click Save Changes.
