


This topic provides instructions for developers using the VMware SQL with MySQL for Tanzu Application Service for replication across multiple foundations or data centers.
You provision a leader-follower service instance across two foundations using the Multi‑Site Replication topology. This leader-follower service instance comprises two single node instances that are configured for replication.
The Multi‑Site Replication plan type is configured separately from the leader-follower service plan.
For more information about the Multi‑Site Replication topology, see About Multi‑Site Replication.
Prerequisites
Before you use VMware Tanzu for MySQL across multiple foundations, you must have:
- Access to the Multi‑Site Replication plan. Your operator configures this plan and enables access to it in your org and space.
- Selected two foundations to deploy your Multi‑Site Replication leader and follower VMs. Your operators must configure these foundations for multi‑site replication. For more information configuring a Multi‑Site Replication topology, see Preparing for Multi‑Site Replication.
Multi-site replication usage overview
To create a multi-site replication configuration across multiple foundations:
- Check the availability of the Multi‑Site Replication plan in the Marketplace in both your foundations. See Confirm the VMware SQL with MySQL for Tanzu Application Service service availability.
- Create a service instance on each foundation – a leader of your selected topology on your primary foundation, and a follower of type Multi‑Site Replication on your secondary foundation. See Create multi-site replication service instances.
- Configure replication from your leader to your follower service instances. See Configure multi-site replication.
- Bind the multi-site configured service instances to your apps. See Bind a multi-site configured service instance to your app.
- Modify your app to use the multi-site configured service instances. See Use the MySQL service in your app.
After you configure your multi-site service instances, you can manage them over the life cycle of your apps and data. For instructions on how to manage a VMware Tanzu for MySQL service instance, see Manage service instances.
Create multi-site service instances in your two foundations
You will create one service instance in your primary foundation to act as the replication leader. And you will create a second service instance in your secondary foundation (usually your disaster recovery site) to serve as the replication follower. Later sections establish the replication between these two service instances.
-
Check the availability of the Multi‑Site Replication plan in the Marketplace in both your foundations. See Confirm the VMware SQL with MySQL for Tanzu Application Service service availability.
-
In your primary foundation, create a leader service instance
-
Log in to the deployment for your primary foundation by running:
cf login PRIMARY-API-URLWhere
PRIMARY-API-URLis the API endpoint for the primary foundation. -
Create a primary service instance by running:
cf create-service p.mysql PLAN PRIMARY-INSTANCEWhere:
PLANis the name of the Multi‑Site Replication plan you want your leader to use.PRIMARY-INSTANCEis a name you choose to identify the service instance. This name appears underservicein output fromcf services.
For example:
$ cf create-service p.mysql db-small primary-db

Creating service primary-db in org my-org / space my-space as admin...
OK
Do not name your service instance
leaderorfollower. If you trigger a failover or switchover, the service instances in your primary and secondary foundations switch roles. For more information, see Triggering multi-site replication failover and switchover. -
(Optional) Watch the progress of the service instance creation by running:
watch cf servicesWait for the
last operationfor your instance to show ascreate succeeded.
For example:$ watch cf services
Getting services in org my-org / space my-space as admin... OK name service plan bound apps last operation primary-db p.mysql db-small create succeededIf you get an error, see Troubleshooting instances.
-
-
Create a follower Multi‑Site Replication service instance in your secondary foundation by repeating step 1, replacing references to
primarywithsecondary, and selecting a Multi‑Site Replication plan within your secondary foundation.
Configure multi-site using the mysql-tools plug-in
To reduce the complexity of configuring multi-site instance replication, VMware Tanzu for MySQL offers the mysql-tools plug-in to the cf CLI. This plug-in automates some of the manual steps documented in the later section Configure multi-site manually. The resulting configurations are functionally identical.
To configure multi-site replication across multiple foundations with mysql-tools, install the latest version of the mysql-tools cf CLI plug-in. For more information about the mysql-tools cf CLI plug-in, see mysql-cli-plugin in GitHub.
CautionThis procedure assumes you are using cf CLI v8 or greater. Earlier cf CLI versions are not compatible with the latest mysql-tools plug-in release.
The mysql-tools setup-replication command requires cf CLI v8. For more information, see [Upgrading to cf CLI v8](https://docs.cloudfoundry.org/cf-cli/v8.html) in the Cloud Foundry documentation.
To configure multi-site replication across foundations with mysql-tools, you will: - Save cloudfoundry targeting information for the primary foundation. - Save cloudfoundry targeting information for the secondary foundation. - Use mysql-tools to automatically establish replication between your instances in your primary and secondary foundations.
-
Create a leader service instance in your primary foundation and follower in your secondary foundation if you have not alredy done so.
More information is in Create multi-site service instances in your two foundations.
-
Save the cf config to target your primary foundation:
-
Log in to the deployment for your primary foundation by running:
cf login PRIMARY-API-URLWhere
PRIMARY-API-URLis the API endpoint for the primary foundation. -
Use mysql-tools to save the config
cf mysql-tools save-target PRIMARY-TARGET-NAMEWhere
PRIMARY-TARGET-NAMEis your chosen name for the primary foundation.
-
-
Save the cf config to target your the secondary foundation:
-
Log in to the deployment for your secondary foundation by running:
cf login SECONDARY-API-URLWhere
SECONDARY-API-URLis the API endpoint for the primary foundation. -
Use mysql-tools to save the config
cf mysql-tools save-target SECONDARY-TARGET-NAMEWhere
SECONDARY-TARGET-NAMEis your chosen name for the secondary foundation.
-
-
Use mysql-tools to configure replication between the primary and secondary foundations.
cf mysql-tools setup-replication --primary-target PRIMARY-TARGET-NAME --primary-instance PRIMARY-INSTANCE \
  --secondary-target SECONDARY-TARGET-NAME --secondary-instance SECONDARY-INSTANCE
Where: -
PRIMARY-TARGET-NAMEis your chosen name for the primary foundation. -PRIMARY-INSTANCEis your chosen name for the primary instance. -SECONDARY-TARGET-NAMEis your chosen name for the secondary foundation. -SECONDARY-INSTANCEis your chosen name for the secondary instance.Notes: - The mysql-tools plugin has shorthand flags for the above options. Type
cf mysql-tools setup-replicationfor a help message listing the options. - This step re-deploys both your leader and follower instances. Any Multi‑Site Replication instances will experience downtime during these redeploys. - The entire process may take several minutes or longer to complete, depending on your selected service instances and foundation configurations. - This step leverages tokens from your above foundationcf logincommands, and therefore should be launched shortly after performing those logins (e.g. within minutes) before those tokens expire. -
The plugin output shows status lines showing checkpoints for the various configuration steps:
Validating the primary instance: 'primary-db'. Validating the secondary instance: 'secondary-db'. Creating a 'host-info' service-key: 'MSHostInfo-1705540659' on the secondary instance: 'secondary-db'. Getting the 'host-info' service-key from the secondary instance: 'secondary-db'. Updating the primary with the secondary's 'host-info' service-key: 'MSHostInfo-1705540659'. Creating a 'credentials' service-key: 'MSCredInfo-1705541348' on the primary instance: 'primary-db'. Getting the 'credentials' service-key from the primary instance. 'primary-db'. Updating the secondary instance with the primary's 'credentials' service-key: 'MSCredInfo-1705541348'. -
Purge cf config information from your workstation:
cf mysql-tools remove-target PRIMARY-TARGET-NAME
cf mysql-tools remove-target SECONDARY-TARGET-NAME
Configure multi-site manually
You may manually establish replication between your two foundations. You may want to do this if you want to avoid briefly saving cloud foundry targeting information, or want to control the names of the service keys used to establish replication. When the manual steps are properly executed, the resulting configuration is functionally identical to one created by the mysql-tools plugin.
Steps to configure multi-site replication manually
After you create your service instances in primary and secondary foundations, you must configure replication between the two service instances.
You configure replication using service keys to pass connection information between the leader and follower service instances. You must not use these service keys for any other use case besides establishing multi-site replication.
Workflow for configuring multi-site replication
The following diagram describes the workflow for configuring multi-site replication:
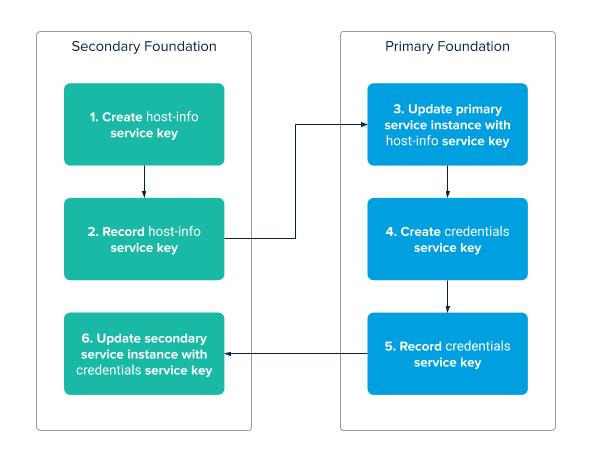
The steps shown in the diagram are as follows:
- Create host-info service key.
- Record host-info service key.
- Update secondary service instance with host-info service key.
- Create credentials service key.
- Record credentials service key.
- Update primary service instance with credentials service key.
Procedure for configuring multi-site replication
The following procedure assumes you created the leader service instance in the primary foundation and the follower service instance in the secondary foundation. You created these service instances in Create multi-site replication service instances.
-
Create a host-info service key for the service instance in your secondary foundation by running:
cf create-service-key SECONDARY-INSTANCE SERVICE-KEY \
  -c '{"replication-request": "host-info"}'
Where:
SECONDARY-INSTANCEis the name of the follower service instance you created in step 2 of Create multi-site replication service instances.SERVICE-KEYis a name you choose for the host-info service key.
For example:
$ cf create-service-key secondary-db host-info \ -c '{"replication-request": "host-info" }'
Creating service key host-info for service instance secondary-db as admin... OK -
View the
replication-credentialsfor your host-info service key by running:cf service-key SECONDARY-INSTANCE SERVICE-KEYWhere:
SECONDARY-INSTANCEis the name of the follower service instance you created in step 2 of Create multi-site replication service instances.SERVICE-KEYis the name of the host-info service key you created in step 1.
For example:
$ cf service-key secondary-db host-info-key

Getting key host-info-key for service instance secondary-db as admin...

  {
    "credentials": {
        "replication": {
            "peer-info": {
              "hostname": "6497378d-f518-4922-92d5-9530d3dc634a.mysql.service.internal",
              "ip": "10.0.19.12",
              "system_domain": "sys.secondary-domain.com",
              "uuid": "6497378d-f518-4922-92d5-9530d3dc634a"
          },
          "role": "leader"
        }
    }
  }
Caution
This procedure assumes you are using cf CLI v8 or greater. Earlier cf CLI versions do not include the top-level
credentialsJSON key in theircf service-keyresponse. - Record the output of the previous command, and remove the top-level
credentialskey. -
Log in to the deployment for your primary foundation by running:
cf login PRIMARY-API-URL -
Update your primary service instance with the host-info service key by running:
cf update-service PRIMARY-INSTANCE -c HOST-INFOWhere:
PRIMARY-INSTANCEis the name of the primary service instance you created in step 1 of Create multi-site replication service instances.HOST-INFOis the output you recorded in step 3.
For example:
$ cf update-service primary-db -c '{ "replication":{ \ "peer-info":{ "hostname": "6497378d-f518-4922-92d5-9530d3dc634a.mysql.service.internal", "ip": "10.0.18.12", "system_domain": "sys.secondary-domain.com", "uuid": "6497378d-f518-4922-92d5-9530d3dc634a" }, "role": "leader" } }'
Updating service instance primary-db as admin... OK -
Watch the progress of the service instance by running:
watch cf servicesWait for the
last operationfor your instance to show asupdate succeeded.
For example:$ watch cf services
Getting services in org my-org / space my-space as admin... OK name service plan bound apps last operation primary-db p.mysql db-small update succeededIf you get an error, see Troubleshooting instances.
-
Create a credentials service key for the leader service instance in your primary foundation by running:
cf create-service-key PRIMARY-INSTANCE SERVICE-KEY-NAME \
  -c '{"replication-request": "credentials"}'
Where:
PRIMARY-INSTANCEis the name of the leader service instance you created in step 1 of Create multi-site replication service instances.SERVICE-KEY-NAMEis a name you choose for the credentials service key.
(Note the-cflag is different than the flag used in step 1.)For example:
$ cf create-service-key primary-db cred-key \ -c '{"replication-request": "credentials" }'
Creating service key cred-key for service instance primary-db as admin... OK -
View the
replication-credentialsfor your credentials service key by running:cf service-key PRIMARY-INSTANCE SERVICE-KEY-NAMEWhere:
PRIMARY-INSTANCEis the name of the leader service instance you created in step 1 of Create multi-site replication service instances.SERVICE-KEY-NAMEis the name of the credentials service key you created in step 6.
For example:
$ cf service-key primary-db cred-key

Getting key cred-key for service instance primary as admin...

  {
    "credentials": {
      "replication": {
        "credentials": {
          "password": "a22aaa2a2a2aaaaa",
          "username": "6bf07ae455a14064a9073cec8696366c"
        },
        "peer-info": {
          "hostname": "878f5fb3-fcc5-43cd-8c1f-3018e9f277ad.mysql.service.internal",
          "ip": "10.0.17.12",
          "ports": {
              "agent":  8443,
              "backup": 8081,
              "mysql":  3306
           },
          "system_domain": "sys.primary-domain.com",
          "uuid": "878f5fb3-fcc5-43cd-8c1f-3018e9f277ad"
        },
        "role": "follower"
      }
    }
  }
Caution
This procedure assumes you are using cf CLI v8 or greater. Earlier cf CLI versions do not include the top-level
credentialsJSON key in theircf service-keyresponse. - Record the output of the previous command, and remove the top-level
credentialsJSON key. The resulting JSON is your “credentials service key”. -
Log in to the deployment for your secondary foundation by running:
cf login SECONDARY-API-URL -
Update your follower service instance with the credentials service key by running:
cf update-service SECONDARY-INSTANCE -c CREDENTIALSWhere:
SECONDARY-INSTANCEis name of the secondary service instance you created in step 2 of Create multi-site replication service instances.CREDENTIALSis the output you recorded in step 9.
For example:
$ cf update-service secondary-db -c '{"replication": {
    "credentials": {
      "password": "a22aaa2a2a2aaaaa",
      "username": "6bf07ae455a14064a9073cec8696366c"
    },
    "peer-info": {
      "hostname": "878f5fb3-fcc5-43cd-8c1f-3018e9f277ad.mysql.service.internal",
      "ip": "10.0.17.12",
      "ports": {
        "agent":  8443,
        "backup": 8081,
        "mysql":  3306
       },
      "system_domain": "sys.primary-domain.com",
      "uuid": "878f5fb3-fcc5-43cd-8c1f-3018e9f277ad"
    },
    "role": "follower"
  }
}'

Updating service instance primary-db as admin...
OK
You now have a multi-site configuration with replication enabled.
Upgrade a multi-site configuration
When upgrading the service instances used in a multi-site configuration, it is important to upgrade in a specific order: Follower first, then leader. This ensures that any incompatibilities between different multi-site MySQL versions are handled correctly.
Bind a multi-site configured service instance to your app
For an app to use a multi-site configuration, you must bind your app to your leader service instance in your primary foundation. If you want to use an active-active topology, you must additionally bind your app to the follower service instance in your secondary foundation.
For information about active-passive and app-layer active-active topologies, see see About active-passive topology and About appp-layer active-active topology.
To bind an app to a leader service instance:
-
Log in to the deployment for your primary foundation by running:
cf login PRIMARY-API-URL -
Bind your app to your primary service instance by doing the procedure in Bind a service instance to your app.
-
(Optional) If you are using an active-active topology, you must bind the same app to your follower service instance in your secondary foundation. To do this, repeat the previous steps and replace references to
primarywithsecondary. -
Modify your app to use the VMware Tanzu for MySQL service by using the procedure in Use the MySQL service in your app.
