


You can configure automated, physical backups for VMware SQL with MySQL for Tanzu Application Service.
Developers can create physical backups using the Cloud Foundry Command Line Interface (cf CLI) or logical backups using mysqldump.
For more information about physical backups, see Backing Up and Restoring VMware SQL with MySQL for Tanzu Application Service.
For more information about logical backups, see Backing Up and Restoring with mysqldump.
You can restore a physical backup by following the procedures in Restore a Service Instance.
About configuring automated backups
You can configure VMware Tanzu for MySQL to automatically back up databases to external storage. VMware Tanzu for MySQL backs up the entire data directory for each service instance.
VMware Tanzu for MySQL backs up your database on a schedule. You configure this schedule with a cron expression.
Configuring a cron expression overrides the default schedule for your service instance.
Developers can override the default for their service instance. For more information, see Backup Schedule.
To configure backups, follow the procedure for your external storage solution:
- Back up using SCP
- Back Up to Amazon S3 or Ceph
- Back Up to Amazon S3 with Instance Profile
- Back Up to GCS
- Back Up to Azure Storage
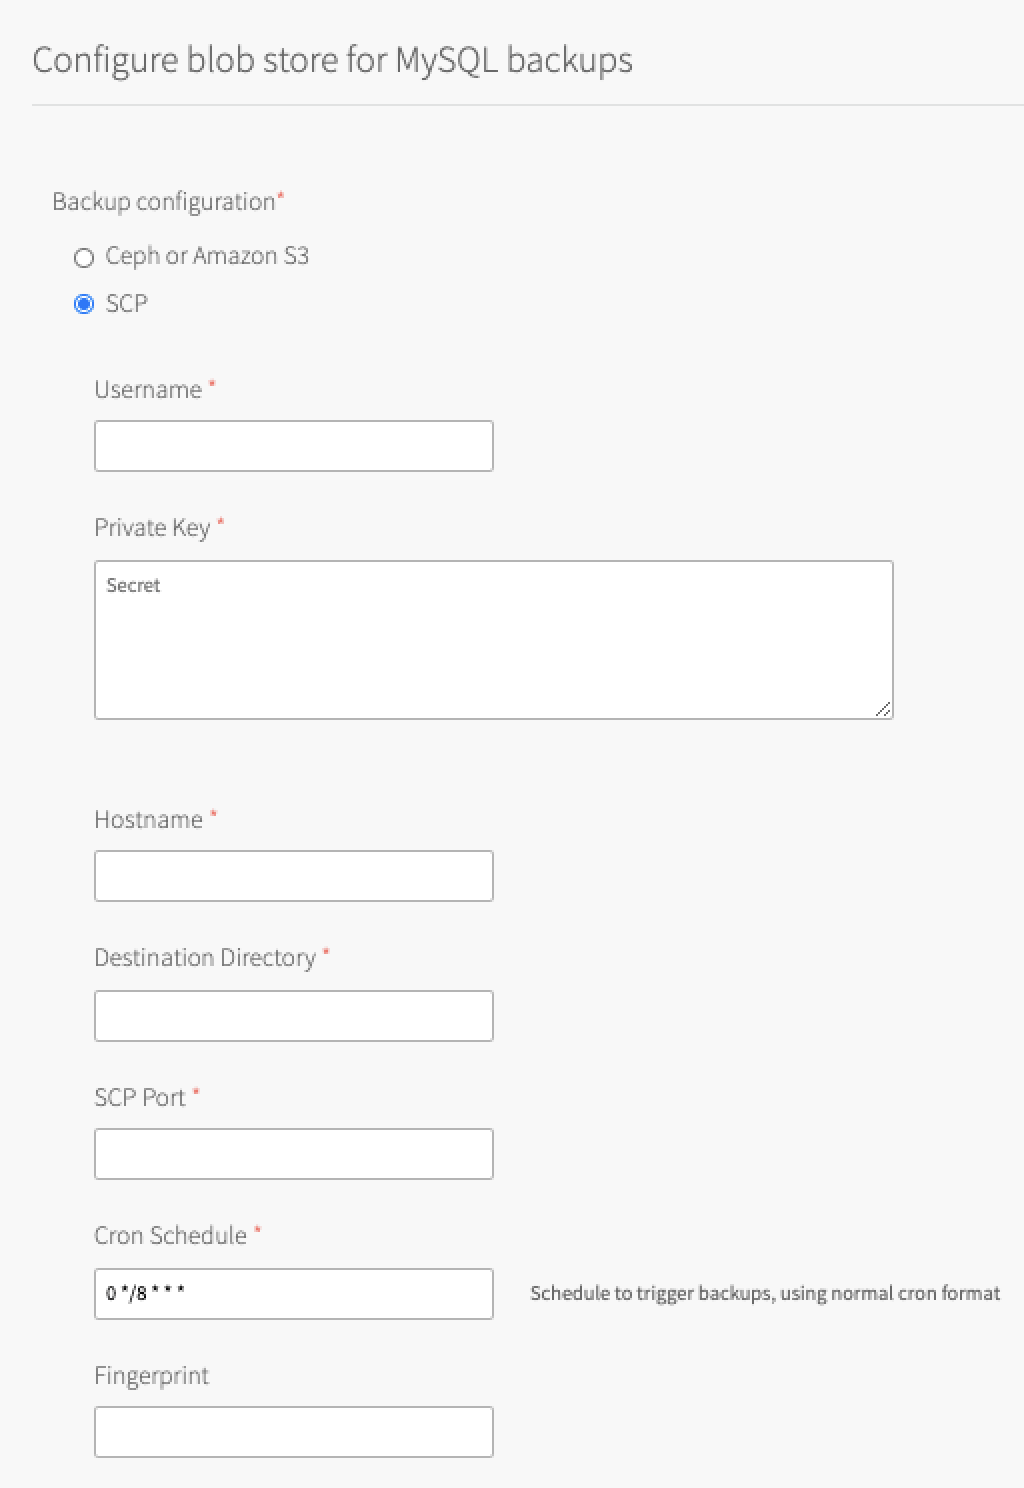
Back up using SCP
Secure copy protocol (SCP) enables operators to use any storage solution on the destination VM. This is the fastest method for backing up your database.
When you configure backups with SCP, VMware Tanzu for MySQL runs an SCP command that uses SFTP to securely copy backups to a VM or physical machine operating outside of your deployment. The operator provisions the backup machine separately from their installation.
To back up your database using SCP:
Create a public and private Key‑Pair
VMware Tanzu for MySQL accesses a remote host as a user with a private key for authentication. VMware recommends that this user and key-pair is only used for VMware Tanzu for MySQL.
-
Determine the remote host that you use to store backups for VMware Tanzu for MySQL. Ensure that the MySQL service instances can access the remote host.
VMware recommends using a VM outside your deployment for the destination of SCP backups. As a result, you might need to enable public IPs for the MySQL VMs.
-
(Recommended) Create a new user for VMware Tanzu for MySQL on the destination VM.
-
(Recommended) Create a new public and private key-pair for authenticating as the above user on the destination VM.
Configure backups in Ops Manager
Use Ops Manager to configure VMware Tanzu for MySQL to back up using SCP.
-
In Ops Manager, open the VMware Tanzu for MySQL tile Backups pane.
-
Select SCP.
-
Configure the fields as follows:
Field Instructions Username Enter the user that you created in Create a Public and Private Key‑Pair. Private Key Enter the private key that you created in Create a Public and Private Key‑Pair.
Store the public key that is used for SSH and SCP access on the destination VM.Hostname Enter the IP address or DNS entry that is used to access the destination VM. Destination Directory Enter the directory that VMware Tanzu for MySQL uploads backups to. SCP Port Enter the SCP port number for SSH. This port usually is 22.Cron Schedule Enter a cron expression using standard syntax. The cron expression sets the schedule for taking backups for each service instance. This overrides the default schedule for your service instance. Test your cron expression using a website such as Crontab Guru. Developers can override the default for their service instance. For more information, see Backup Schedule.
Fingerprint (Optional) Enter the fingerprint for the destination VM public key. The fingerprint detects any changes to the destination VM.
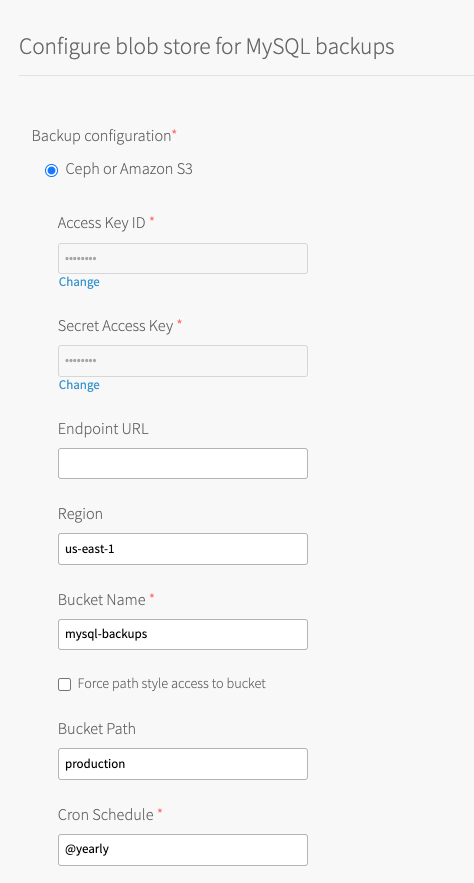
Back Up to Amazon S3 or Ceph
When you configure backups for Amazon S3 or Ceph, VMware Tanzu for MySQL runs an Amazon S3 client that saves the backups to one of the following:
- an Amazon S3 bucket
- a Ceph storage cluster
- another S3-compatible endpoint certified by VMware
For information about Amazon S3 buckets, see the Amazon documentation.
For information about Ceph storage clusters, see the Ceph documentation.
To back up your database to Amazon S3 or Ceph:
Create a Ccstom policy and access key
VMware Tanzu for MySQL accesses your S3 bucket through a user account. VMware recommends that this account be only used by VMware Tanzu for MySQL. You must apply a minimal policy that enables the user account upload backups to your S3 bucket. Then give the policy the permission to list and upload to buckets.
The procedure in this section assumes that you are using an Amazon S3 bucket. If you are using a Ceph or another S3-compatible bucket to create the policy and access key, follow the documentation for your storage solution. For more information about Ceph S3 bucket policies, see the Ceph documentation.
To create a policy and access key in Amazon Web Services (AWS):
-
Create a policy for your VMware Tanzu for MySQL user account.
In AWS, create a new custom policy by following this procedure in the AWS documentation.
Paste in the following permissions:
{ "Version": "2012-10-17", "Statement": [ { "Sid": "MySQLBackupPolicy", "Effect": "Allow", "Action": [ "s3:ListBucket", "s3:ListBucketMultipartUploads", "s3:ListMultipartUploadParts", "s3:PutObject" ], "Resource": [ "arn:aws:s3:::MY_BUCKET_NAME/*", "arn:aws:s3:::MY_BUCKET_NAME" ] } ] } -
Record the Access Key ID and Secret Access Key user credentials for a new user account by following this procedure in the AWS documentation. Ensure you select Programmatic access and Attach existing policies to user directly. You must attach the policy you created in the previous step.
Configure backups in Ops Manager
Use Ops Manager to connect VMware Tanzu for MySQL to your S3 account.
Prerequisite: Before beginning this procedure, you must have an S3 bucket in which to store the backups.
-
In Ops Manager, open the VMware Tanzu for MySQL tile Backups pane.
-
Select Ceph or Amazon S3.
-
Configure the fields as follows:
Field Instructions Access Key ID and Secret Access Key Enter the S3 Access Key ID and Secret Access Key that you created in Create a Custom Policy and Access Key. Endpoint URL Enter the S3-compatible endpoint URL for uploading backups.
The URL must start withhttp://orhttps://.
The default ishttps://s3.amazonaws.com.
If you are using a public S3 endpoint, see the S3 Endpoint procedure in Step 3: Director Config Page.Region Enter the region where your bucket is located. Bucket Name Enter the name of your bucket.
Do not include ans3://prefix, a trailing/, or underscores. VMware recommends using the naming conventionDEPLOYMENT-backups. For example,sandbox-backups.Force path style access to bucket The default behavior in VMware Tanzu for MySQL 2.9 and later uses a virtual-style URL.
Select this check box if you use:- Amazon S3 and your bucket name is not compatible with virtual hosted-style URLs.
- An S3-compatible endpoint such as Minio that might require path-style URLs.
If you are using a blobstore that uses a specific set of domains in its server certificate, add a new wildcard domain or use path-style URLs if supported by the blobstore.
For general information about the deprecation of S3 path-style URLs, see AWS blog posts: Amazon S3 Path Deprecation Plan – The Rest of the Story and the subsequent Update to Amazon S3 Path Deprecation Plan.
Bucket Path (Optional) Enter the path in the bucket to store backups.
You can use this to keep the backups from this foundation separate from those of other foundations that might also backup to this bucket. For example,Foundation-1. This field is only available as of v2.10.3.Cron Schedule Enter a cron expression using standard syntax. The cron expression sets the schedule for taking backups for each service instance. This overrides the default schedule for your service instance. Test your cron expression using a website such as Crontab Guru. Developers can override the default for their service instance. For more information, see Backup Schedule.
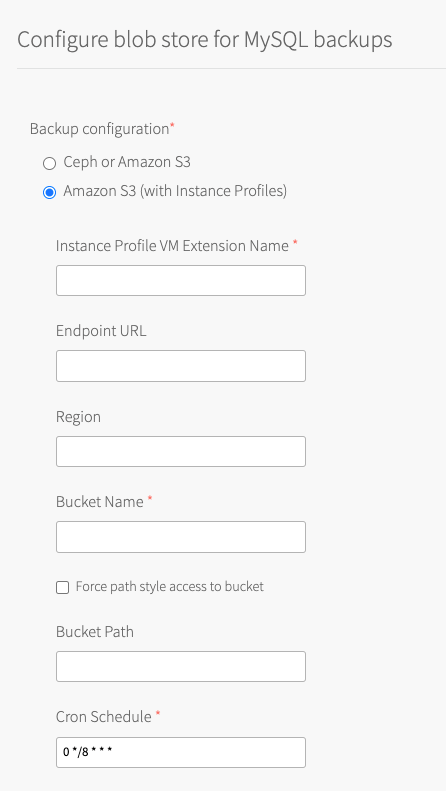
Back up to Amazon S3 with instance profile
Configuring this backup method requires operators to run the upgrade-all-service-instances errand during Apply Changes.
Backups fail until the service instance is upgraded.
When you configure backups for Amazon S3 with Instance Profile, VMware Tanzu for MySQL allows the Identity and Access Management (IAM) user or role used by BOSH to pass the new backups IAM role to a new EC2 instance.
You can use the procedure in this section to allow VMware Tanzu for MySQL to upload backups to Amazon S3 without static credentials (Access and Secret Access Key ID).
Prerequisite: You must be running VMware Tanzu Application Service for VMs (TAS for VMs) on AWS.
The process for configuring backups for an Amazon S3 with Instance Profile is:
- Create an IAM Role with a custom policy
- Add a policy to the existing Ops Manager user or role
- Configure a VM Extension
- Apply changes and upgrade all service instances
- (Optional) Verify the IAM Role is associated with MySQL service instances
Create an IAM role with a custom policy
First, you must create a policy for your VMware Tanzu for MySQL user account.
For more information about AWS identity and access management, see the AWS documentation.
For more information about users, groups, and roles in AWS, see the AWS documentation.
To create an IAM Role with a custom policy:
-
In AWS, create an IAM role with a new custom policy by following this procedure in the AWS documentation.
Paste in the following permissions:{ "Version": "2012-10-17", "Statement": [ { "Effect": "Allow", "Action": [ "s3:GetObject", "s3:PutObject", "s3:ListBucket", "s3:ListBucketVersions", "s3:ListObjects" ], "Resource": [ "arn:aws:s3:::BUCKET-NAME", "arn:aws:s3:::BUCKET-NAME/*" ] } ] }Where
BUCKET-NAMEis the name of the bucket. -
Record the Amazon Resource Name (ARN) of this new IAM role. This is used in Add a Policy to the Existing Ops Manager User or Role.
- Record the name of the Instance Profile associated with this new IAM role. This is used in Create a VM Extension in Ops Manager.
Add a Policy to the existing Ops Manager user or role
Next, you must add a new policy to the existing Ops Manager IAM user or role that is configured in the AWS Config pane of the BOSH Director for AWS tile. This policy allows the IAM user or role used by BOSH to pass the new backups IAM role to a new EC2 instance.
Depending on your configuration, this is either a user or a role. To find the existing user or role and add a policy:
- Log into Ops Manager. To log in, see Log In to Ops Manager For the First Time.
- Click the BOSH Director for AWS tile.
-
Select AWS Config.
The following tabs expand to show instructions depending on the type of AWS Config that is already configured:- You must find the existing IAM user associated with the static credentials that are used here. The name of the IAM user is not listed here in the BOSH Director for AWS tile UI.
To find retrieve your AWS Key information and find the existing IAM user, use the AWS Identity and Access Management (IAM) credentials that you generated in Step 3: Create an IAM User for Ops Manager in Preparing to Deploy Ops Manager on AWS Manually.
- Find the name of the existing IAM role in the AWS IAM Instance Profile field.
For more information about this role, see Create an IAM role or user for Ops Manager in Preparing to Deploy Ops Manager on AWS Manually.
- You must find the existing IAM user associated with the static credentials that are used here. The name of the IAM user is not listed here in the BOSH Director for AWS tile UI.
-
On the AWS Management Console, add a new policy to that IAM User or Role:
{
  "Version": "2012-10-17",
  "Statement": [
    {
      "Sid": "AllowToCreateInstanceWithMySQLBackupstInstanceProfile",
      "Effect": "Allow",
      "Action": "iam:PassRole",
      "Resource": [
            "arn:aws:iam::540390724081:role/MYSQL-BACKUPS-ROLE"
      ]
    }
  ]
}
Where
MYSQL-BACKUPS-ROLEis the ARN of the role created in the previous section.
Configure a VM Extension
Create a VM Extension in Ops Manager
There are two methods that you can use to create a VM Extension in Ops Manager:
-
Using the Ops Manager API directly. For more information, see Create or Update a VM Extension in the Ops Manager documentation.
-
Using the Ops Manager CLI (om) to create the VM extension. For information about
create-vm-extension, see om create-vm-extension in GitHub.
JSON example to specify the instance profile name:
{
  "name": "VM-EXTENSION-NAME",
  "cloud_properties": {
    "iam_instance_profile": "INSTANCE-PROFILE-NAME"
  }
}
Where:
VM-EXTENSION-NAMEis the unique VM extension name that Ops Manager managesINSTANCE-PROFILE-NAMEis the name of the instance profile created in Create an IAM Role with a Custom Policy.
Apply the VM Extension to the dedicated-mysql-broker job
These are the following methods that you can use to apply the VM extension to the dedicated-mysql-broker job in the VMware Tanzu for MySQL tile:
-
Using the Ops Manager API directly. For more information, see Apply VM Extensions to a Job in the Ops Manager documentation.
-
Using the om CLI to configure the tile. Add the
additional_vm_extensionskey in theresource-configsection of the product configuration and use the om CLI.
For information about configuring using a YAML configuration file, see om configure-product in GitHub.
Set the VM Extension name
Now that you have created and applied the VM extension, you must set it in the VMware Tanzu for MySQL tile.
To set the VM extension name:
- Log into Ops Manager. To log in, see Log In to Ops Manager For the First Time.
- Click the VMware Tanzu for MySQL tile.
- Select Backups.
- Select Amazon S3 (with Instance Profiles)
-
Configure the fields as follows:
Field Instructions Instance Profile VM Extension Name Enter the VM-EXTENSION-NAMEthat you created in Create a VM Extension in Ops Manager.Endpoint URL Enter the S3-compatible endpoint URL for uploading backups.
The URL must start withhttp://orhttps://.
The default ishttps://s3.amazonaws.com.
If you are using a public S3 endpoint, see the S3 Endpoint procedure in Step 3: Director Config Page in Configuring BOSH Director on AWS.Region Enter the region where your bucket is located. Bucket Name Enter the name of your bucket.
Do not include ans3://prefix, a trailing/, or underscores. VMware recommends using the naming conventionDEPLOYMENT-backups. For example,sandbox-backups.Force path style access to bucket The default behavior in VMware Tanzu for MySQL 2.9 and later uses a virtual-style URL.
Select this check box if you use:- Amazon S3 and your bucket name is not compatible with virtual hosted-style URLs.
- An S3-compatible endpoint such as Minio that might require path-style URLs.
If you are using a blobstore that uses a specific set of domains in its server certificate, add a new wildcard domain or use path-style URLs if supported by the blobstore.
For general information about the deprecation of S3 path-style URLs, see AWS blog posts: Amazon S3 Path Deprecation Plan – The Rest of the Story and the subsequent Update to Amazon S3 Path Deprecation Plan.
Bucket Path (Optional) Enter the path in the bucket to store backups.
You can use this to keep the backups from this foundation separate from those of other foundations that might also backup to this bucket. For example,Foundation-1. This field is only available as of v2.10.3.Cron Schedule Enter a cron expression using standard syntax. The cron expression sets the schedule for taking backups for each service instance. This overrides the default schedule for your service instance. Test your cron expression using a website such as Crontab Guru. Developers can override the default for their service instance. For more information, see Backup Schedule.
-
Click Save.
Apply Ccanges and upgrade all service instances
The changes to your service instances are not complete until you apply your configuration changes.
This allows the service instances to begin using the instance profile instead of static credentials for backup and restore. Static credentials are not provided to existing service instances and backups fail until you upgrade the service instances.
To apply changes and upgrade all service instances for VMware Tanzu for MySQL:
- Return to the Ops Manager Installation Dashboard.
- Click Review Pending Changes.
- Deselect the check boxes for all products except BOSH Director and VMware SQL with MySQL for Tanzu Application Service.
- Verify that the check box for the
Upgrade all On-demand MySQL Service Instanceserrand is activated. - Click Apply Changes.
(Optional) Verify the IAM role is associated with MySQL service instances
To verify that the IAM role is associated with the MySQL service instances:
- On the AWS Management Console, find any EC2 instance that begins with
mysql/GUID. - Verify that the IAM Role is present in the details for the instance.
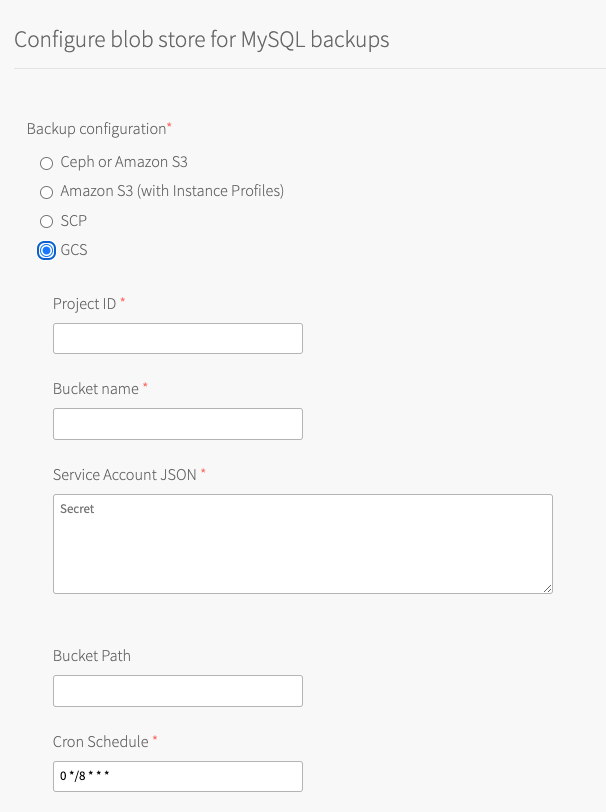
Back up to GCS
When you configure backups for a Google Cloud Storage (GCS) bucket, VMware Tanzu for MySQL runs a GCS SDK that saves backups to a GCS bucket.
For information about GCS buckets, see the GCS documentation.
To back up your database to Google Cloud Storage (GCS):
Create a service account and private key
VMware Tanzu for MySQL accesses your GCS bucket through a service account. VMware recommends that this account is only used by VMware Tanzu for MySQL. You must apply a minimal policy that enables the service account to upload backups to your GCS bucket.
The service account needs the following permissions:
- List and upload to buckets
- (Optional) Create buckets if they do not already exist
To create a service account and private key in GCS:
- Create a new service account by following this procedure in the GCS documentation.
When you create the service account:- Enter a unique name for the service account name.
- Add the Storage Admin role.
- Create and download a private key JSON file.
Configure backups in Ops Manager
Use Ops Manager to connect VMware Tanzu for MySQL to your GCS account.
-
In Ops Manager, open the VMware Tanzu for MySQL tile Backups pane.
-
Select GCS.
-
Configure the fields as follows:
Field Instructions Project ID Enter the Project ID for the Google Cloud project that you are using. Bucket name Enter the bucket name that VMware Tanzu for MySQL uploads backups to. Bucket Path (Optional) Enter the path in the bucket to store backups.
You can use this to keep the backups from this foundation separate from those of other foundations that might also backup to this bucket. For example,Foundation-1. This field is only available as of v2.10.3.Service Account JSON Enter the contents of the service account JSON file that you downloaded when creating a service account in Create a Service Account and Private Key. Cron Schedule Enter a cron expression using standard syntax. The cron expression sets the schedule for taking backups for each service instance. This overrides the default schedule for your service instance. Test your cron expression using a website such as Crontab Guru. Developers can override the default for their service instance. For more information, see Backup Schedule.
Back Up to Azure storage
When you configure backups for Azure Storage, VMware Tanzu for MySQL runs an Azure SDK that saves backups to an Azure storage account.
For information about Azure Storage, see the Azure documentation.
To back up your database to Azure Storage:
Create a storage account and access key
VMware Tanzu for MySQL accesses your Azure Storage account through a storage access key. VMware recommends that this account be only used by VMware Tanzu for MySQL. You must apply a minimal policy that enables the storage account upload backups to your Azure Storage.
The storage account needs the following permissions:
- List and upload to buckets
- (Optional) Create buckets if they do not already exist
To create a storage account and access key:
-
Create a new storage account by following this procedure in the Azure documentation.
-
View your access key by following this procedure in the Azure documentation
Configure backups in Ops Manager
To back up your database to your Azure Storage account:
-
In Ops Manager, open the VMware Tanzu for MySQL tile Backups pane.
-
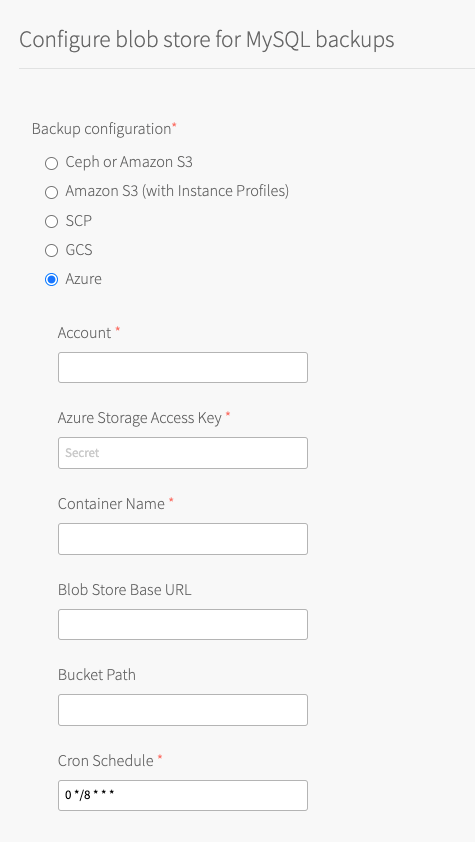
Select Azure.
 /
/ -
Configure the fields as follows:
Field Instructions Account Enter the Azure Storage account name that you created in Create a Storage Account and Access Key. Azure Storage Access Key Enter one of the storage access keys that you viewed in Create a Storage Account and Access Key. Container Name Enter the container name that VMware Tanzu for MySQL uploads backups to. Blob Store Base URL To use an on-premise blob storage, enter the hostname of the blob storage. By default, backups are sent to the public Azure blob storage. The Blob Store Base URL must follow the format: my-storage-account.my-custom.domain/MY-CONTAINER-NAME.Bucket Path (Optional) Enter the path in the bucket to store backups.
You can use this to keep the backups from this foundation separate from those of other foundations that might also backup to this bucket. For example,Foundation-1. This field is only available as of v2.10.3.Cron Schedule Enter a cron expression using standard syntax. The cron expression sets the schedule for taking backups for each service instance. This overrides the default schedule for your service instance. Test your cron expression using a website such as Crontab Guru. Developers can override the default for their service instance. For more information, see Backup Schedule.
