


When creating Steps within Network Configuration Manager Chained Compliance, you can also Preview a test, displaying test information. This can be done even if you have not completed all the Steps for the test, or if you have not yet Saved the test. This feature allows you to get instance test results, based on several selections, while creating your test.
See the following example of Previewing a test .
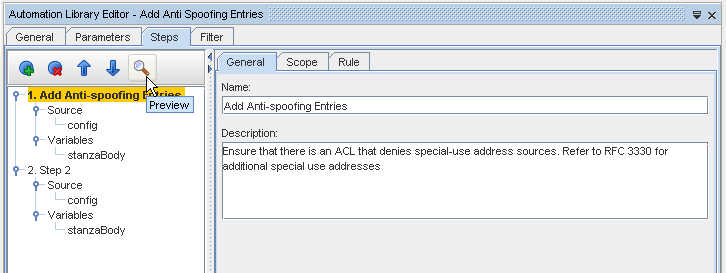
- To begin the Preview process, select a valid test from the Steps navigation tree in the Library Editor, then click the Preview icon on the tool bar.
- Next, at the Select Device window, you can select from the Network drop-down options to select one specific Network, or All Networks.
- At the Device Name field, you can either enter in the name of one Device (or the partial name of a device),then click Search. To view a listing of all available devices, click Search.
- Select one device from the listing.
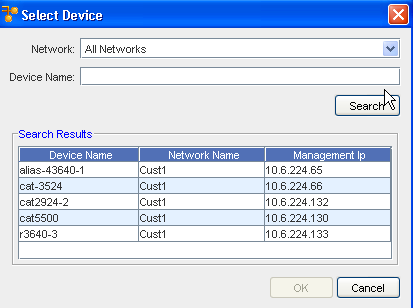
- After selecting the device, click Ok.
Note:
- When you select a device for preview, you are prompted with all the configuration units available in the device and you should select the required configuration unit . If the device you selected has no configs available, an error message displays, and you will must select another device from the Select Device window.
- The selected configuration is used only for the test preview and will not be carried forward or applied while running Compliance Audit on the device.
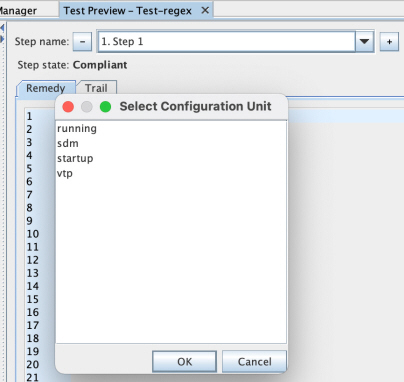
- When you have selected a device, the Select Configuration Unit window opens, where you must make a selection before you can view the Preview of the test. Select a configuration unit from the list, then click Ok. The Test Preview results display.
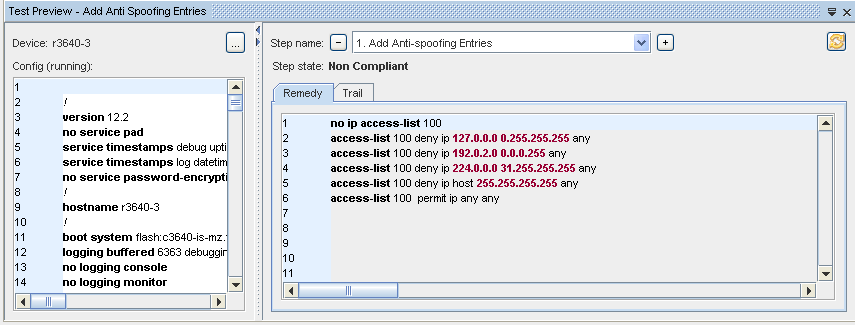
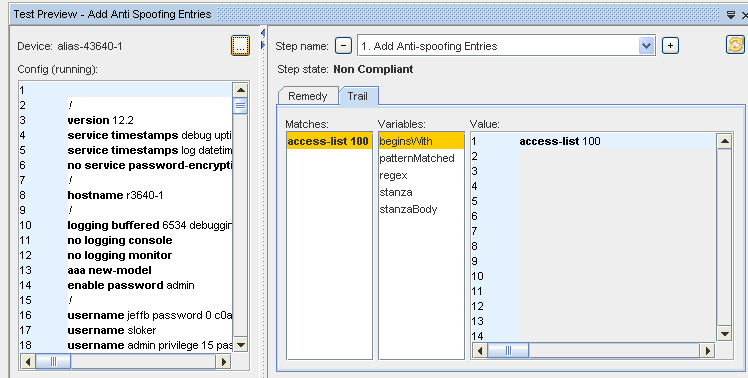
- In the left pane, the selected configuration for the selected device is displayed for the device that you selected.
- The right pane contains the Step results of the step displayed in the Step name section. To see the results for another step, you can click the Step name drop-down arrow and select a Step, or you can use the plus sign (+) to change to the next step name, or the minus sign (-) to go back to the previous step name. Test results are immediately shown, based on the content of the Step information.
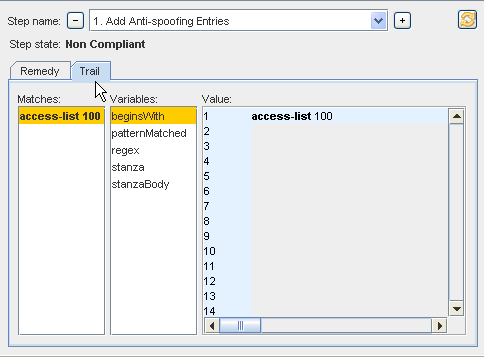
- Note that the Step state is displayed under the Step name. In this instance, the Device is shown to be Non-Compliant for this test. There are several types associated with the Step state.
-
Compliant - the device is in compliance with the current step
-
Non-Compliant - the device is not in compliance with the current step
-
Not Audited - there is no content in the Rule tab
-
Did Not Qualify - attempted to run the Step, but the Scope was empty, for example, nothing in the input for the step matched the scope or the filters
-
Click the Remedy or the Trail tab to view additional information.
If you have a Remedy included in that step (from the Rule tab content), this information is displayed in the Remedy tab. The Remedy that shows in that tab is only the Remedy for that specific Step.
The Trail tab contains the Matches information shows the first match , and the Variables are shown in the second pane. The Value section is the actual content of the variable. You can click within the list of Variables to see the Value displayed for that Match.
Notes:
-
You can use the plus sign ( +) and the minus sign (-) to go between Steps to preview the test results for each step
-
You can alter the information within the Configuration content, and then click the Refresh icon to refresh the view, and see new test results
-
You can also edit the existing information contained within the test (in the General, Scope and Rule tabs) in the Test Editor, and then click the Preview button again to view completely new test results based on your test changes.
-
You can go back and forth between the Test Editor and the Test Preview as many times as needed to view test results based on any number of changes; selecting a new device using the Select device for preview button; making changes to the General, Scope and Rule tabs content; changing the content of the configuration displayed in the Preview.
-
You can work in the Test Editor, while still viewing the results of another test in the Preview
Previewing and running more tests,
- First, to change the device you are testing against or to change the configuration unit you are previewing , click the Select device for preview icon (in the right pane) to view the Select Device window.

- With the Device Select window open, select another device to run this test against, and click Ok.
- Click the Preview test icon again, to preview the test results for that device.
The preview results are once again displayed, based on the device selected or configuration unit selected, and the options and selections previously entered in the Compliance steps.
Again, remember that you can make changes to the configuration content, click Refresh, and run the test again. When changes are made to the config, you will see the results of the test in the Remedy and Trail tabs. The results displayed in the Matches: section shows as regular text when Compliant, and shows in bold when Non-Compliant.
Editing Tests,
-
You can edit the test you are previewing by going back into the Step Editor and making changes to the content in any or all of the Steps.
-
Once changes are made, click the Preview button, and make Network and Device selections to view new test results, based on your changes. This is not needed if the configuration is already loaded.
-
You can also go back to the Step editor, and select a different test from the navigation tree (for example Step 2) and then click the Preview button to see the test results and additional test information based on the Step you selected.

