


You can define a Scope for this Compliance test. This new scope feature replaces the former Preconditions tab in the Automation Library editor. Scope allows you to set the input for the step.
-
The first action you take within this tab is to click the Add Step
 icon. This then puts Step 1 into the navigation tree, and also lists Step 1 as the Name of this step in the General tab.
 With this tab you can specify configuration commands that must be present before the test is run. You will also enter the actual expression that is searched for in the configuration, and the remedy for an empty scope.
-
This Scope tab allows you to select the Step input source .
-
You can define variables from these items, or set a pre-defined scope (for example, Cisco IOS Interfaces).
-
The Step input is the main or first source your test searches for in the configuration files.
Note: For the first step, the default Input source is Entire Config. This cannot be changed, and is already selected.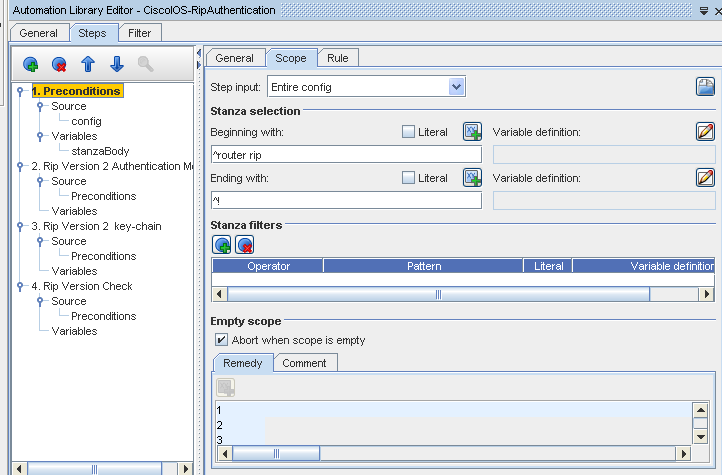 Note: Each time you add another step, the step is numbered. For example, you may have 1. Preconditions, 2. Rip Version 2 Authentication Module, etc.
Notice that when you make a change in the Name field in the General tab, the change is then reflected in the Navigation tree where the steps are listed.
-
-
You can continue to create steps and further define your search within the device configuration by going to the Scope tab or Rule tab.
-
Next, you can select to narrow your context by using "Beginning with" and "Ending with" regular expressions and filters in the Stanza selection section. Each regular expression can extract variables for later use. You can select to have a Literal string (which you enter manually), or you can select a Variable definition using the icon to view the available options. The Literal check box indicates the text is not treated as a RegEx.
Now, when the test is run, the " Beginning With " content is the first content that the test searches for within the configuration.
The Ending with: ^! represents where the search ends within the content of the configuration.
-
Once you have determined your RegEx expression, and created a group, you must then give that group a variable definition. Click the Edit Variable Definition icon to define a group.
-
At the Stanza filters section, you can add a row for filters. Select one of the following from the Operator drop-down: Contains Any, Not Contains, or Contains All.
-
At the Empty scopesection, you can select to Abort the test if the scope is not found (when Scope is empty) . You can also decide to add a Remedy Configlet by entering the remedy contents into the Remedy section. This instructs the test to use this specific Remedy if the scope context defined is not found during the test.
-
If needed, you can add comments that define your remedy in the Comments section.
-
If warranted, continue by going to the Rule tab.
-
For additional information on the Compliance Steps, see The Chained Compliance Steps Design Overview.
