There are two tabs located within the Schedule Manager.
-
The Job View is just that, a listing of the current jobs that have been scheduled to run, along with information pertaining to each job.
-
The second tab at the top of the Schedule Manager is the Recurring Series tab. If there have been any jobs scheduled to run on a Recurring Series , those jobs are listed within this tab. The Recurring Series tab displays primary information for recurring jobs.

This tab is much like the Job View tab, giving you access to details, and providing the same information on each job through the General and Task tabs.
Notice that the tool bar options within the Recurring tab are more limited than those options on the Job View tab. This is because the recurring jobs are very specific. For example, you cannot Execute or Cancel a recurring job .
Note the following icons:

When the recurring Series  icon is selected, the original or primary recurring jobs are listed. These are the jobs that were originally created to run specifically at set intervals.
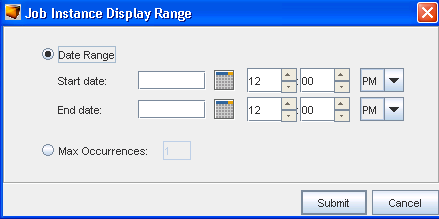
The Instances  icon, when selected, allows you to make changes in the "instances" you want to run from the originally scheduled job. Each time a scheduled recurring job runs, it creates an instance.
When the Instances icon is selected, the Job Instant Display Range window opens. From here, you can make changes to an "instance". For example, if you want the Max Occurrences to be 10, click the radio button, and insert the number 10. Click Submit when you have made selections from this window. This tells the application that you want the original recurring job to run 10 instances.
You can also alter the Date Range of the "instance" by first clicking the Date Range radio button, then entering the day and the time for both the Start and End dates.