


Device level permissions determine the actions that the user or group is able to complete on a device and its details. Although the user or group (as a whole) has permissions set up to the group, the permissions per device are set up individually. The device setup is a two-part task:
-
Selecting the devices the user or group is to have access to
-
Setting the permissions explicitly for the device
First step: To assign devices for user or group access,
-
From the menu bar, access Tools -> System Administration. The System Administration window opens.
-
In the navigation pane, expand Global -> User Management.
-
Select System Groups . The right pane contains all available groups.
-
Select a group, then click Permissions. The Access Control Administration - [User ID or Group Name] window opens.
-
In the tree menu, select Device Permissions. The right pane populates only if the user or group has been given permissions to other devices.
-
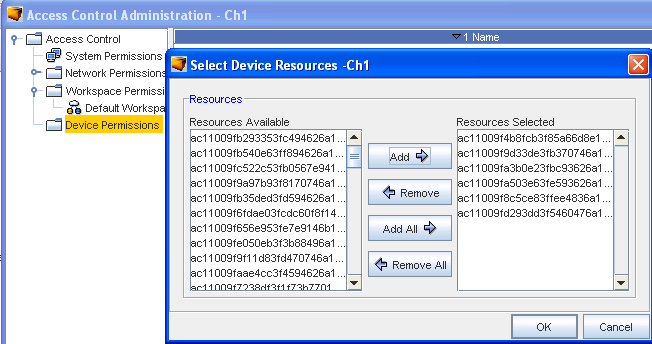
Click Manage. The Select Device Resource window opens.
-
In the Resource Available column, select the Devices to which the user or group are to have permissions.
-
Click Add. The selected devices are moved to the Resources Selected column.
Note: A sequence of devices can be selected by holding down the Shift key while selecting devices. Or... Multiple, non-sequential devices can be selected by holding the Ctrl key while selecting devices. -
Repeat steps 7 and 8 for each device to which access is required.
-
If a user requires access to all devices , without making a selection, click Add All.
-
When finished, click OK. The Select Device Resource window closes.
The right pane reflects the devices that were selected in the Select Device Resource window. You can now select the explicit device permissions for the group.
Second step: Set device level permissions,
-
In the navigation pane, expand the Device Permissions folder. The devices listed are the same devices that were just selected in the Select Device Resource window.
-
Select a Device by double-clicking on the device name. The right pane populates with the Set permissions for [device name] options.
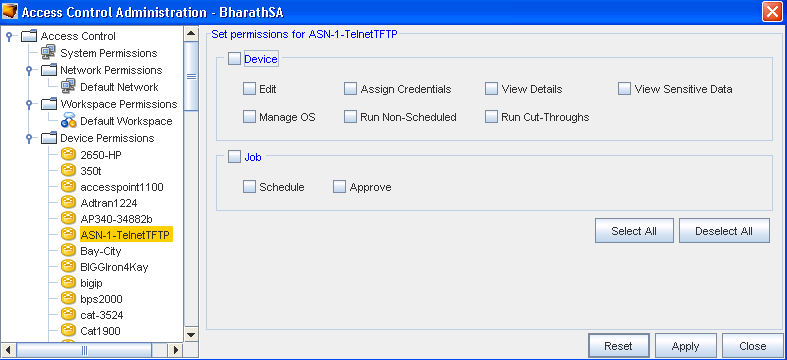
These options represent the permissions that the user or group have for this specific device. There are two sections in the area:
-
All permissions in both areas
-
One or more permissions from each area
-
Permissions from only one area
-
-
To select all options in an area, click the check box next to Device or Job.
Or, to provide select options in each section, click the check box next to the required options.
-
To provide the user or group with all device permissions, click Select All. All options are checked. (This action can be reversed by clicking the De-select All button.)
-
When you have selected the appropriated options, click Apply at the bottom of the window. The Access Control Administration - [User ID or Group Name] window closes.
-
Repeat the above steps for each device.
| Device |
The Device section provides permissions for access to the config to Edit, View device passwords, View details, and Update the OS of the device. It also allows permissions for Assign Credentials, work with Run Non-scheduled tasks, and complete Run Cut-Throughs. |
| Job |
The Job section provides the user or group with permission to Schedule and/or Approve jobs for the device. |
The user or group can be assigned to:
