


Auto Discovery jobs can be scheduled and then rescheduled. By storing all Auto Discovery jobs that have be created for each network, you are able to select and schedule any existing job. All settings for the stored jobs are saved, and can be edited. For more information, see Edit Auto Discovery Jobs.
To schedule and submit an Auto Discovery job for approval,
-
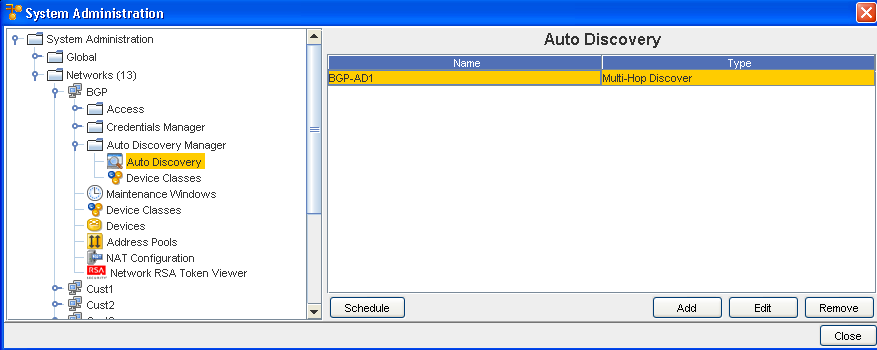
From the menu bar toolbar, select Tools -> System Administration. The System Administration window opens.
-
In the navigation pane, expand the Networks folder.
-
Click Auto Discovery .
-
Click Schedule. The Schedule Auto Discovery Job window opens.
The Schedule Job Tab
The Schedule Job tab is divided into two sections:
-
Job Details
-
Schedule Job
There are also two tabs, Schedule Job and Notification.
Schedule Job - Job Details
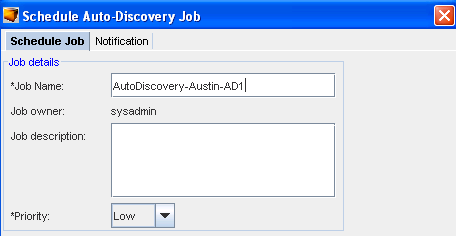
The following fields are available when scheduling a job. The required fields are identified by an asterisk (*).
| Field |
Description |
| Job Name |
Required Field. The job name is how you refer to the job in the job history. |
| Job Owner |
System generated, from the user creating the job |
| Job Description |
Optional. Comment area for outlining job significance and other details that other users may find helpful during a review of the job history and tasks. |
| Priority Setting |
Priority Setting priority allows the job to run ahead of other scheduled jobs, depending on the prioritized setting. Priority settings are: Low, Medium, and High. The default is Medium. If you are running a cut-through the priority must be High. |
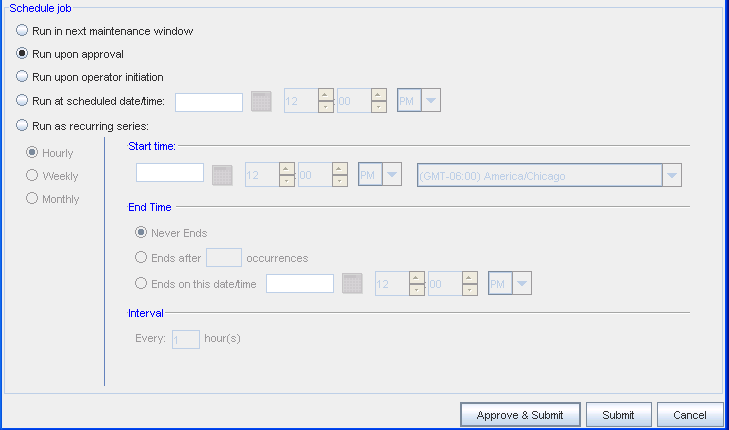
Schedule Job
The following fields are available when scheduling a job.
| Field |
Description |
| Run in next maintenance window |
Setting allowing the job to run in the next maintenance window |
| Run upon approval |
Setting allowing the job to run as soon as the job is approved. If you have job approval permissions, when you schedule the job you can also approve it to run immediately. |
| Run upon operator initiation |
Will run when the operator designates the activity |
| Run at scheduled date/time |
Used to set a specific date and time the job will run. This allows you to run jobs when best for your network, or based on planned network changes. |
| Run as recurring series |
Used for pushing updates to the network automatically. Not only allowing you to set the start date, but also the end date for a limited time-span and frequency. If necessary, the update can be set to never end. This option allows the updates to continue, unless manually canceled in the Scheduler. |
| R ecurring Options: |
- Frequency (Hourly, Weekly, Monthly) - Start Time - End Time - Interval (Set by hours) The recurring updates do not change unless updated in the Scheduler. |
The Approve & Submit button, located on the bottom of all tabs, can be used when adequate permissions have been granted. When clicked, the job is immediately sent to the scheduler, based on the defined settings.
-
Enter the information needed in the Job Details section.
-
Make your selections in the Notifications tab.
-
Make your selections in the Schedule Job section, then click the appropriate button ( Approve & Submit or Submit) at the bottom of the window.
