


In this article, you'll learn how to configure Okta identity provider to use with the sample application Animal Rescue.
Configuring Okta OIDC provider
You can use a free developer account or configure your existing account.
Create an authorization server for the Animal Rescue app
A new authorization server is required because Animal Rescue needs its own set of scopes and claims.
Login to the Okta admin dashboard.
Go to Security, then click API.
On the Authorization Servers tab, click Add Authorization Server.
Enter "Animal Rescue" as the name and set the audience to
api://animal-rescue.Go to the new created settings page, copy the value in the Issuer field. Use this value as
issuer-uriduring Gateway setup.Switch to the Scopes tab and add a new scope:
animals.adopt(with any display name and description). Select User Consent and Metadata.
Switch to the Claims tab and add a new claim:
groups, set Include in token type to Always to ID Token, Value type to Groups, with filter matching regex ".*" (to include all groups). Optionally, configure Include in togroupsscope (you need to create the scope first) if you'd like to include groups information only when a certain scope is requested and approved.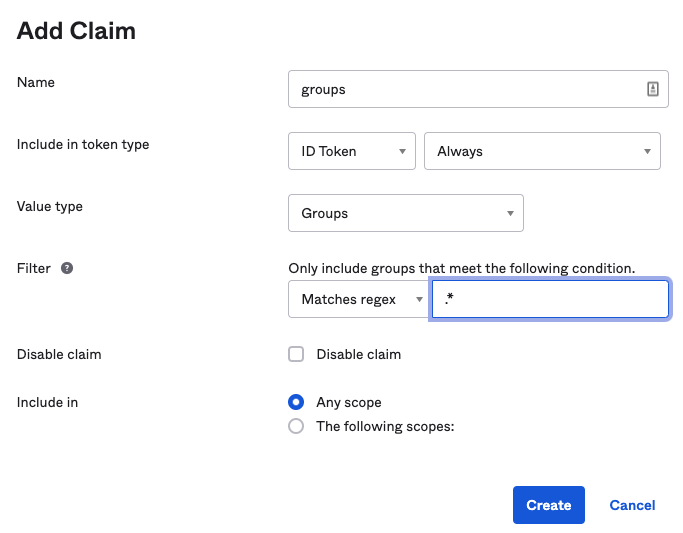
Add a new claim
user_nameand set it to be always included into ID token, configure value to beuser.email. The claim value can be configured using Okta Expression Language.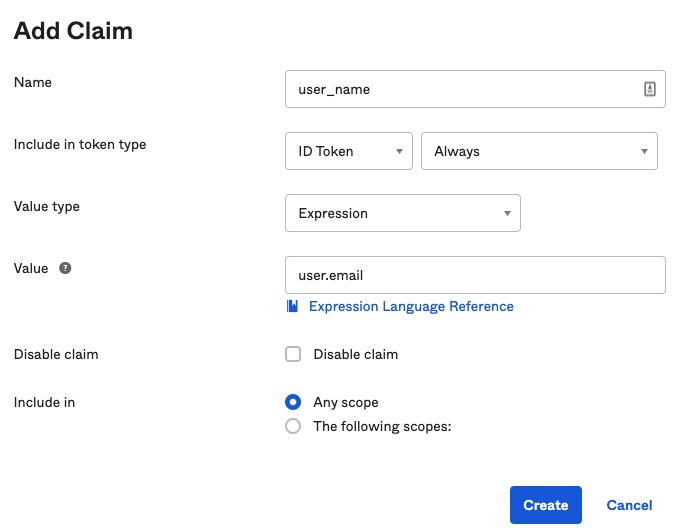
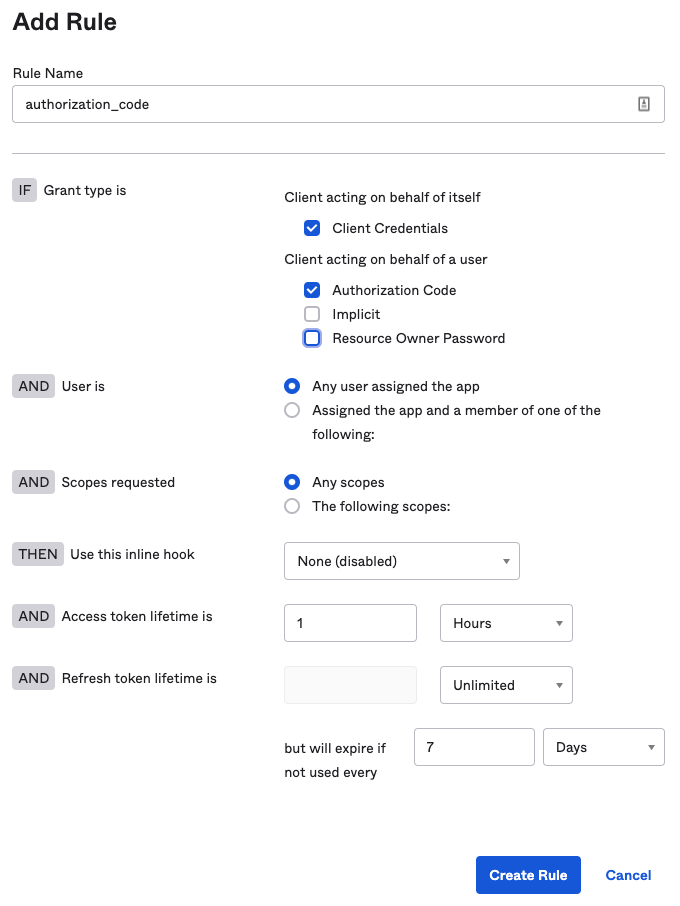
Switch to the Access Policies tab and create a Default access policy, assigned to all clients.
Add a new rule to allow
authorization_codegrant, for any user, any scope.
Create users and groups
Go to Directory and then select People from the main menu.
- Click Add Person and configure all required fields.
Go to Directory and then select Groups from the main menu.
- Click Add Group and create an Adopter group.
- Click Manage People in the Adopter group and add the accounts you created above.
Create a new application
Go to Applications and then select Applications in the main menu.
- Click Create App Integration.
- Select OIDC - OpenID Connect as the Sign-on method.
- Select Web Application as the Application type.
- In Sign-in redirect URIs, add
<gateway url>/login/oauth2/code/sso. If your gateway has not been deployed yet, you can skip this step for now and add the redirect URI later. - Select Authorization Code grant type for the app.
- In Assignments, select Limit access to selected groups, add the "Adopter" group. Click Save.
- In the General tab, copy the generated Client ID and Client Secret*.
- You can optionally select Proof Key for Code Exchange (PKCE) by selecting Require PKCE as additional verification.
Configuration summary
After you complete the steps above, you should have the following values:
- Issuer URI This should be the value from the authorization server you created, not your account Okta domain.
- Client ID
- Client secret
- One or two test users, ideally with different groups for testing.
Verify that this is complete before proceeding to the next step.
Configure the Animal Rescue app and gateway
Clone the repo first.
Configure SSO params
In the animal-rescue repo,
Create
backend/secrets/sso-credentials.txtwith the command below:jwk-set-uri=<issuer uri>/v1/keysCreate
gateway/sso-secret-for-gateway/secrets/test-sso-credentials.txtwith the following:scope=openid,profile,email,groups,animals.adopt client-id=<client id> client-secret=<client id> issuer-uri=<issuer uri>If you decided to use
groupsscope to get groups information, make sure it is listed inscopeparameter.The issuer URI must exactly match the value from the server configuration, including trailing slashes! You can always check expected value by navigating to
<issuer-uri>/.well-known/openid-configurationURL.If you configured the authorization server to require Proof Key for Code Exchange (PKCE) as additional verification, add
pkce-enabled=truetotest-sso-credentials.txt.Edit
gateway/gateway-demo.yamland addroles-attribute-nameintossosection:sso: secret: animal-rescue-sso roles-attribute-name: "groups"The default value is "roles". Alternatively you can configure Okta to return the "roles" claim instead of "groups".
Configure routes security
Edit backend/k8s/animal-rescue-backend-route-config.yaml file. Add Scopes=animals.adopt filter to /api/animals/*/adoption-requests/** route if you'd like to use scopes to authorize access to Adoption Request API, or Roles=Adopter if you'd like to use roles. You can keep both filters as well.
    - ssoEnabled: true
      tokenRelay: true
      predicates:
        - Path=/api/animals/*/adoption-requests/**
        - Method=POST,PUT,DELETE
      tags:
        - "pet adoption"
      filters:
        - Scopes=animals.adopt
Deploy the app
Run kustomize build . | kubectl apply -f - or refer to Animal Rescue README for most up to date deployment instructions.
Test the app
Port-forward the gateway demo-demo service:
kubectl port-forward service/gateway-demo 8080:80
Navigate to your gateway URL, http://localhost:8080/rescue.
Note If you are using dynamic IP address you may need to go back to Okta and configure this IP address in the list of allowed Redirect URIs.
Try logging in with different test users, within or without "Adopter" groups and add, edit or delete adoption request. You should see a successful response or "Request failed with status code 403" error message depending on your groups list and approved scopes.
