


Secure a Kubernetes cluster with pod security policies
Introduction
As container technologies mature and more applications transition to clustered environments, defining and implementing cluster security policies becomes ever more important. Cluster security policies provide a framework to ensure that pods and containers run only with the appropriate privileges and access only a finite set of resources. Security policies also provide a way for cluster administrators to control resource creation, by limiting the capabilities available to specific roles, groups or namespaces.
This guide introduces you to pod security policies in Kubernetes. It provides the definition, the process of creation and activation, and the testing procedures. However, considering that pod security policies are often tailored to an organization's rules and specific application requirements, there is no universal solution. Instead, this guide will delve into three typical scenarios and guide you through creating pod security policies tailored to each.
NoteTo know more about configuring role-based access control (RBAC) in your Kubernetes cluster, see RBAC guide.
Assumptions and prerequisites
This guide makes the following assumptions:
You have a Kubernetes cluster running with the kubectl command-line tool installed and support for pod security policies enabled.
You have an intermediate understanding of how Kubernetes works, and its core resources and operations.
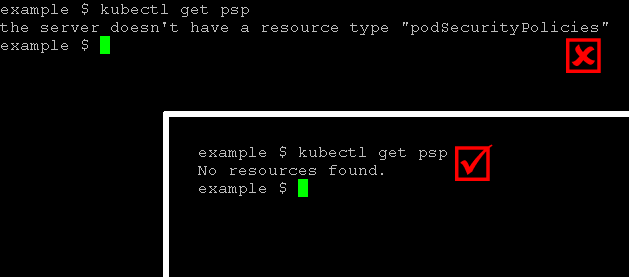
It's important to know that you can only use pod security policies if your Kubernetes cluster's admission controller has them enabled. You can check this by running the command kubectl get psp. If it's not supported, you'll see an error when you run this command.
the server doesn't have a resource type "podSecurityPolicies".
The following image illustrates the difference in command output between a server that does not support pod security policies and one that does:
To enable support for pod security policies:
- If you are using Minikube, enable support for pod security policies and the other recommended admission controller plugins by starting Minikube with the following command (note the PodSecurityPolicy option at the end):
minikube start --extra-config=apiserver.GenericServerRunOptions.AdmissionControl=NamespaceLifecycle,LimitRanger,ServiceAccount,PersistentVolumeLabel,DefaultStorageClass,ResourceQuota,DefaultTolerationSeconds,PodSecurityPolicy
- If you're using a different platform for your Kubernetes cluster, check the documentation from the company that provides your cluster to see if they already support pod security policies. If not, look for instructions on how to turn them on.
The examples in this guide have been tested using a Minikube cluster running Kubernetes v1.6.4, but should be generally applicable to any Kubernetes cluster with pod security policy support.
Understand pod security policies
In Kubernetes, a pod security policy is represented by a PodSecurityPolicy resource. This resource lists the conditions a pod must meet in order to run in the cluster. Here's an example of a pod security policy, expressed in YAML:
apiVersion: policy/v1beta1
kind: PodSecurityPolicy
metadata:
  name: example
spec:
  privileged: false
  runAsUser:
    rule: MustRunAsNonRoot
  seLinux:
    rule: RunAsAny
  fsGroup:
    rule: RunAsAny
  supplementalGroups:
    rule: RunAsAny
  volumes:
  - 'nfs'
  hostPorts:
  - min: 100
    max: 100
Briefly, this pod security policy implements the following security rules:
- Disallow containers running in privileged mode
- Disallow containers that require root privileges
- Disallow containers that access volumes apart from NFS volumes
- Disallow containers that access host ports apart from port 100
Later parts of this guide will delve into these rules with more detail. For now, let's examine the overall structure of a pod security policy.
- The metadata section of the policy specifies its name.
- The spec section of the policy outlines the key criteria a pod must fulfil in order to be allowed to run.
Here is a brief description of the main options available. To learn more, see official Kubernetes documentation.
- The privileged field indicates whether to allow containers that use privileged mode. Learn more about privileged mode.
- The runAsUser field defines which users a container can run as. Most commonly, it is used to prevent pods from running as the root user.
- The seLinux field defines the Security-Enhanced Linux (SELinux) security context for containers and only allows containers that match that context. Learn more about SELinux.
- The supplementalGroups and fsGroup fields define the user groups or fsGroup-owned volumes that a container may access. Learn more about fsGroups and supplemental groups.
- The volumes field defines the type(s) of volumes a container may access. Learn more about volumes.
- The hostPorts field, together with related fields like hostNetwork, hostPID and hostIPC, restrict the ports (and other networking capabilities) that a container may access on the host system.
To better explain how pod security policies work in practice, the following sections illustrate common use cases and also walk you through the commands to add, view and remove pod security policies in a cluster.
Case 1: Prevent pods from running with root privileges
Restricting containers in pods from running as the root user and thereby creating a more secure cluster environment is one of the most common uses for pod security policies. To see this in action, create the following pod security policy and save it as restrict-root.yaml:
apiVersion: policy/v1beta1
kind: PodSecurityPolicy
metadata:
  name: restrict-root
spec:
  privileged: false
  runAsUser:
    rule: MustRunAsNonRoot
  seLinux:
    rule: RunAsAny
  fsGroup:
    rule: RunAsAny
  supplementalGroups:
    rule: RunAsAny
  volumes:
  - '*'
Activate the policy by executing the command below, which creates the new policy from the file:
kubectl create -f restrict-root.yaml
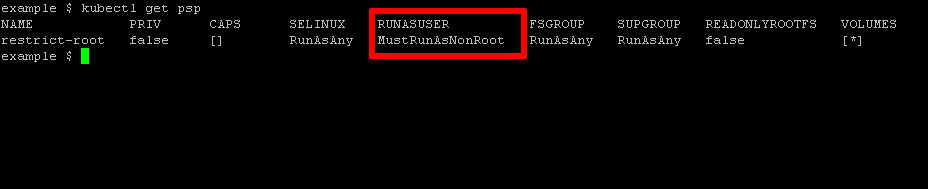
Check that the policy has been installed with the command below, which lists all active policies in the cluster:
kubectl get psp
Here's a sample of what you should see:
Once the policy has been installed, the next step is to test it, by attempting to run a container that requires root privileges. One such example is Bitnami's MariaDB container. Try to deploy it using the command below:
kubectl run --image=bitnami/mariadb:10.1.24-r2 mymariadb --port=3306 --env="MARIADB_ROOT_PASSWORD=gue55m3"
Since the pod security policy explicitly disallows pods or containers with root privileges, this request should be rejected and you should see an error like this when you check pod status:
container has runAsNonRoot and image will run as root
Here's an example of the error output from kubectl get pods:

Delete the pod security policy as follows:
kubectl delete psp restrict-root
Then, create a more permissive policy by setting the runAsUser field to runAsAny and save it as permit-root.yaml. Here's what this more permissive policy looks like:
apiVersion: policy/v1beta1
kind: PodSecurityPolicy
metadata:
  name: permit-root
spec:
  privileged: false
  runAsUser:
    rule: RunAsAny
  seLinux:
    rule: RunAsAny
  fsGroup:
    rule: RunAsAny
  supplementalGroups:
    rule: RunAsAny
  volumes:
  - '*'
As before, install and activate the policy with the following command:
kubectl create -f permit-root.yaml
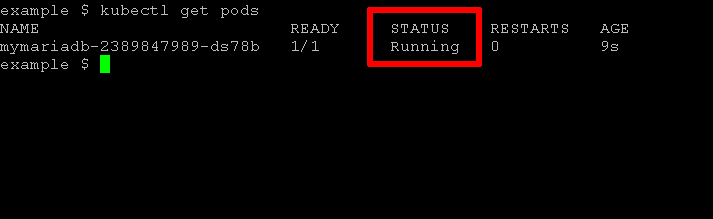
Now, delete the previous deployment and try deploying Bitnami's MariaDB container again. This time, the deployment should take place successfully, as the new security policy allows containers to run as any user, including the root user. Check the status with kubectl get pods and you should see the pod running, as shown below:
NoteWhen a Kubernetes cluster is started with pod security policy support, Kubernetes follows a "default-deny" approach. This means that, by default, pods are not allowed to run unless they match the criteria outlined in a pod security policy. This also means that if your cluster does not have at least one pod security policy in place, no pods will run and Kubernetes will let you know that you should activate a pod security policy with the error message no providers available to validate pod request.
Case 2: Prevent pods from accessing certain volume types
As a cluster administrator, you may wish to limit the available storage choices for containers, to minimize costs or prevent information access. This can be accomplished by specifying the available volume types in the volumes key of a pod security policy. To illustrate, consider the following policy which restricts containers to only NFS volumes:
apiVersion: policy/v1beta1
kind: PodSecurityPolicy
metadata:
  name: restrict-volumes
spec:
  privileged: false
  runAsUser:
    rule: RunAsAny
  seLinux:
    rule: RunAsAny
  fsGroup:
    rule: RunAsAny
  supplementalGroups:
    rule: RunAsAny
  volumes:
  - 'nfs'
Install this policy as explained in the previous section and then test it, by attempting to deploy a pod that requests a different volume type. One such example is Bitnami's WordPress deployment, which uses PersistentVolumeClaims (PVCs) and secrets for its data. Attempt to deploy it using the following command:
kubectl create -f https://raw.githubusercontent.com/bitnami/bitnami-docker-wordpress/master/kubernetes.yml
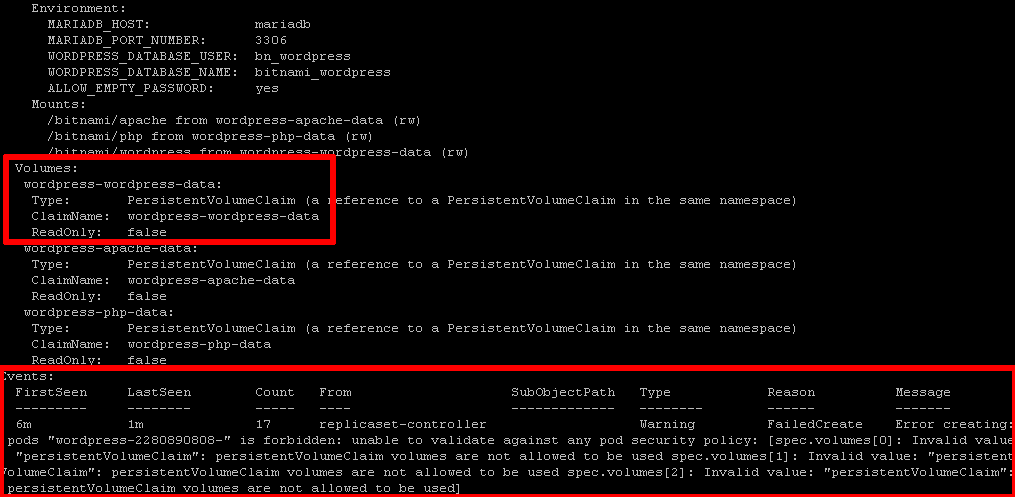
Since the pod security policy only allows pods that use NFS volumes, this request should be rejected and you should see an error like this when you check status:
Invalid value: "persistentVolumeClaim": persistentVolumeClaim volumes are not allowed to be used
Here's an example of the error output:
Delete the policy and the failed deployment, and install a different policy that allows access to both secret and PVC volume types, as shown below:
apiVersion: policy/v1beta1
kind: PodSecurityPolicy
metadata:
  name: permit-volumes-pvc-secret
spec:
  privileged: false
  runAsUser:
    rule: RunAsAny
  seLinux:
    rule: RunAsAny
  fsGroup:
    rule: RunAsAny
  supplementalGroups:
    rule: RunAsAny
  volumes:
  - 'persistentVolumeClaim'
  - 'secret'
With this, your next attempt at deploying Bitnami WordPress should be successful:

Case 3: Prevent pods from accessing host ports
Another common security concern is containers gaining access to host resources, such as host ports or network interfaces. Pod security policies allow cluster administrators to implement in-depth security rules to restrict such access. A simple example is restricting a container from accessing any host ports, as shown below:
apiVersion: policy/v1beta1
kind: PodSecurityPolicy
metadata:
  name: restrict-ports
spec:
  privileged: false
  runAsUser:
    rule: RunAsAny
  seLinux:
    rule: RunAsAny
  fsGroup:
    rule: RunAsAny
  supplementalGroups:
    rule: RunAsAny
  volumes:
  - '*'
  hostPorts:
  - min: 0
    max: 0
Install this policy as explained previously and then test it, by deploying a container that attempts to map a container port to a host port. Bitnami's MariaDB container is well-suited for this experiment. Try to deploy it and make it available on host port 3306 using the following command:
kubectl run --image=bitnami/mariadb:10.1.24-r2 mymariadb --port=3306 --hostport=3306 --env="MARIADB_ROOT_PASSWORD=gue55m3"
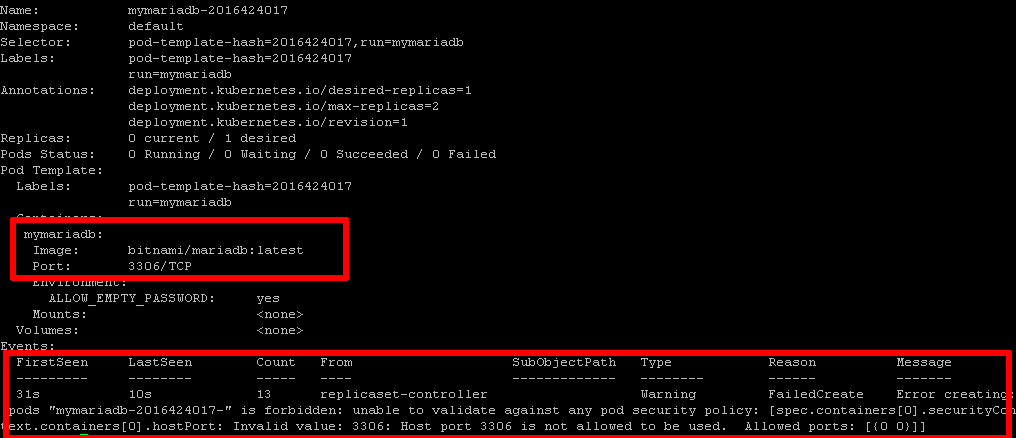
Since the pod security policy clearly states no to accessing the host port, your request will be denied. When you check the deployment status, you'll likely see an error message like this:
Invalid value: 3306: Host port 3306 is not allowed to be used. Allowed ports: [{0 0}]
Here's an example of the error output:
Delete the policy and the failed deployment, and install a different policy that allows restricted host port access, as shown below.
apiVersion: policy/v1beta1
kind: PodSecurityPolicy
metadata:
  name: permit-port-3306
spec:
  privileged: false
  runAsUser:
    rule: RunAsAny
  seLinux:
    rule: RunAsAny
  fsGroup:
    rule: RunAsAny
  supplementalGroups:
    rule: RunAsAny
  volumes:
  - '*'
  hostPorts:
  - min: 3306
    max: 3306
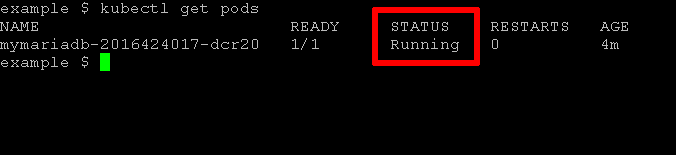
You should now be able to deploy the Bitnami MariaDB container using the command shown previously. Here is the result:
Useful links
These three examples show that pod security policies let cluster administrators control the pods and containers in a Kubernetes cluster. They can allow or block access to resources based on organizational rules and each application's needs. Pod security policies are easy to understand, create, and implement, making them a valuable tool in a cluster administrator's security kit.
To learn more about the topics discussed in this guide, visit the following links:
