


Install Pinniped on Tanzu Application Platform
Pinniped is used to support authentication on Tanzu Application Platform (commonly known as TAP). This topic tells you how to install Pinniped on a single cluster of Tanzu Application Platform.
NoteThis topic only provides an example of one possible installation method for Pinniped on Tanzu Application Platform by using the default Contour ingress controler included in the platform. See Pinniped documentation for more information about the specific installation method that suits your environment.
Use this topic to learn how to deploy two Pinniped components into the cluster:
-
Pinniped Supervisor: An OIDC server which allows users to authenticate with an external identity provider (IDP). It hosts an API for the concierge component to fulfill authentication requests.
-
Pinniped Concierge: A credential exchange API that takes a credential from an identity source, for example, Pinniped Supervisor, proprietary IDP, as input. The Pinniped Concierge authenticates the user by using the credential, and returns another credential that is parsable by the host Kubernetes cluster or by an impersonation proxy that acts on behalf of the user.
Prerequisites
Meet these prerequisites:
- Install the package
certmanager. This is included in Tanzu Application Platform. - Install the package
contour. This is included in Tanzu Application Platform. - Create a
workspacedirectory to function as your workspace.
Environment planning
If you run Tanzu Application Platform on a single cluster, both Pinniped Supervisor and Pinniped Concierge are installed to this cluster.
When running a multicluster setup, you must decide which cluster to deploy the Supervisor onto. Furthermore, every cluster must have the Concierge deployed. Pinniped Supervisor runs as a central component that is consumed by multiple Pinniped Concierge instances. As a result, Pinniped Supervisor must be deployed to a single cluster that meets the prerequisites. You can deploy Pinniped Supervisor to the View Cluster of your Tanzu Application Platform, because it is a central single instance cluster. For more information, see Overview of multicluster Tanzu Application Platform.
You must deploy the Pinniped Concierge to every cluster that you want to enable authentication for, including the View Cluster itself.
See the following diagram for a possible deployment model: 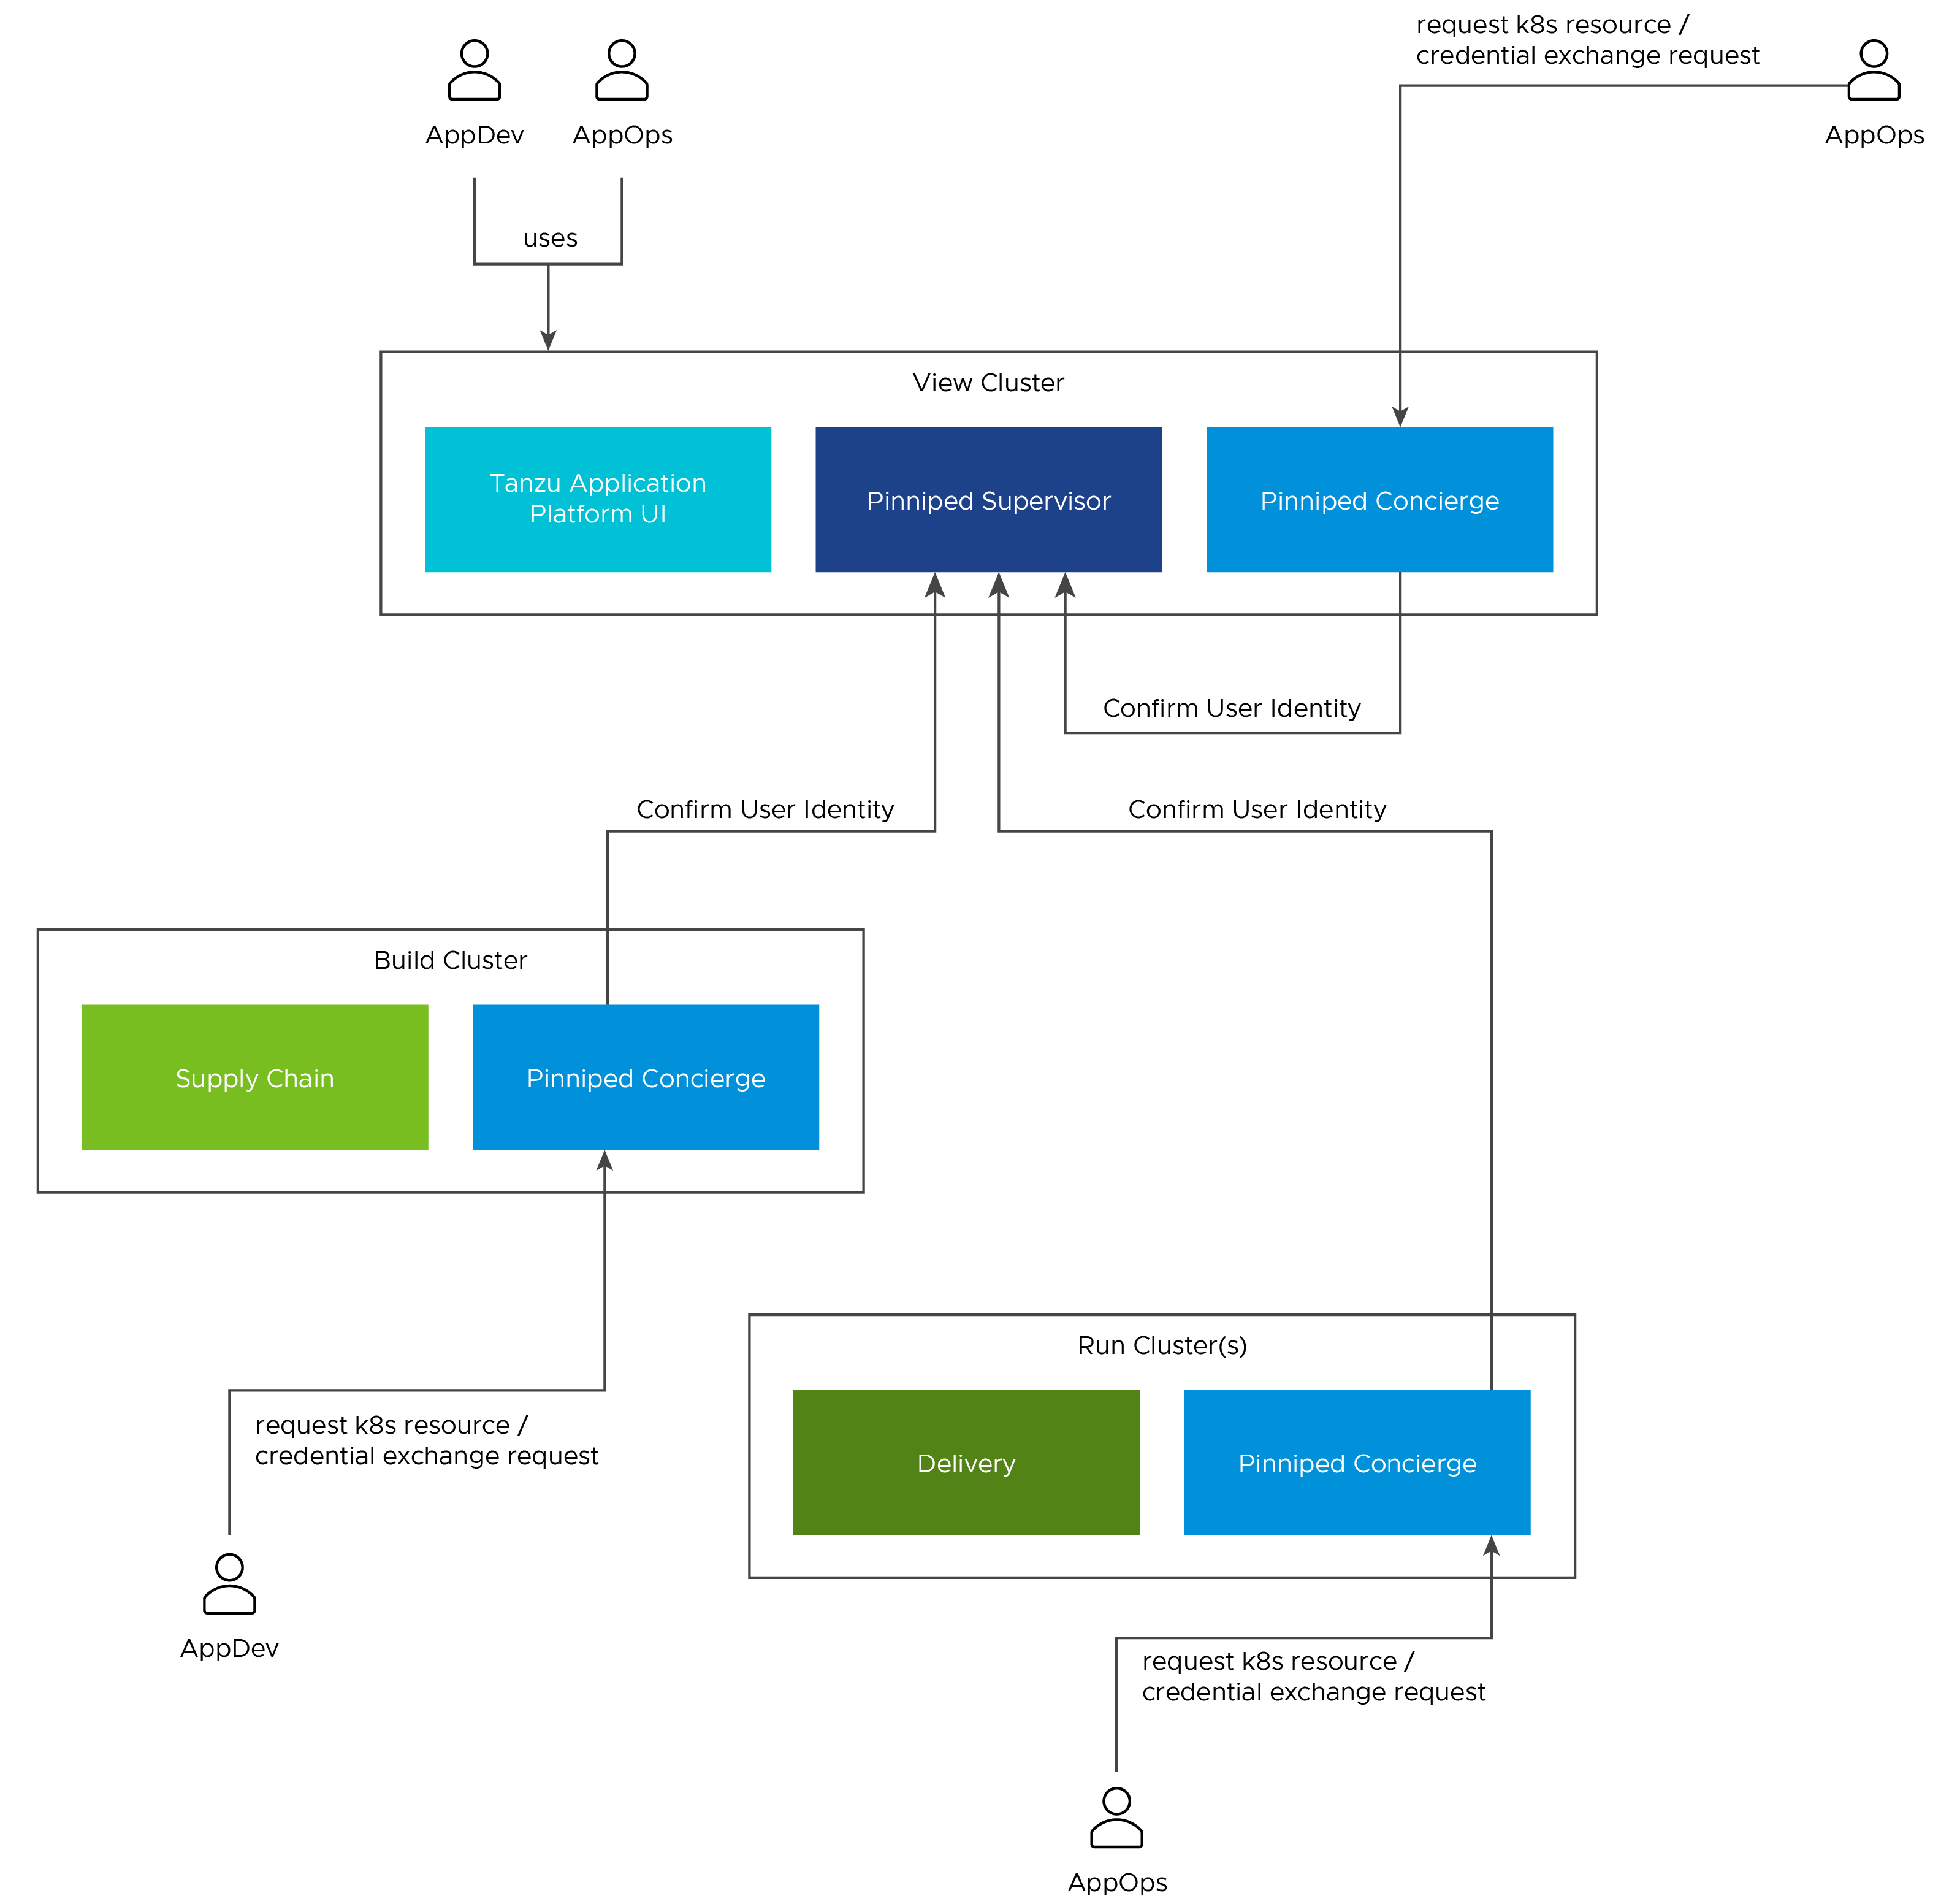
For more information about the Pinniped architecture and deployment model, see Pinniped documentation.
Install Pinniped Supervisor by using Let’s Encrypt
Follow these steps to install pinniped-supervisor:
- Switch tooling to the desired cluster.
- Create the necessary certificate files.
- Create the Ingress resources.
- Create the
pinniped-supervisorconfiguration. - Apply these resources to the cluster.
Create Certificates (letsencrypt or cert-manager)
Choose a fully qualified domain name (FQDN) that can resolve to the Contour instance in the tanzu-system-ingress namespace. The FQDN pinniped-supervisor.example.com is used in the following sections.
Create a ClusterIssuer for letsencrypt and a TLS certificate resource for Pinniped Supervisor by creating the following resources and saving them into workspace/pinniped-supervisor/certificates.yaml:
---
apiVersion: cert-manager.io/v1
kind: ClusterIssuer
metadata:
  name: letsencrypt-staging
  namespace: cert-manager
spec:
  acme:
    email: "EMAIL"
    privateKeySecretRef:
      name: letsencrypt-staging
    server: https://acme-staging-v02.api.letsencrypt.org/directory
    solvers:
    - http01:
        ingress:
          class: contour

---
apiVersion: cert-manager.io/v1
kind: Certificate
metadata:
  name: pinniped-supervisor-cert
  namespace: pinniped-supervisor
spec:
  secretName: pinniped-supervisor-tls-cert
  dnsNames:
  - "DNS-NAME"
  issuerRef:
    name: letsencrypt-staging
    kind: ClusterIssuer
Where:
EMAILis the user email address forletsencrypt. For example,[email protected]DNS-NAMEis the domain in which thepinniped-supervisoris published. For example,pinniped-supervisor.example.com
Create Ingress resources
Create a Service and Ingress resource to make the pinniped-supervisor accessible from outside the cluster.
To do so, create the following resources and save them into workspace/pinniped-supervisor/ingress.yaml:
---
apiVersion: v1
kind: Service
metadata:
  name: pinniped-supervisor
  namespace: pinniped-supervisor
spec:
  ports:
  - name: pinniped-supervisor
    port: 8443
    protocol: TCP
    targetPort: 8443
  selector:
    app: pinniped-supervisor

---
apiVersion: projectcontour.io/v1
kind: HTTPProxy
metadata:
  name: pinniped-supervisor
  namespace: pinniped-supervisor
spec:
  virtualhost:
    fqdn: "DNS-NAME"
    tls:
      passthrough: true
  tcpproxy:
    services:
    - name: pinniped-supervisor
      port: 8443
Where:
DNS-NAMEis the domain in which thepinniped-supervisoris published. For example,pinniped-supervisor.example.comtls.passthrough: truespecifies that the TLS connection is forwarded to and terminated in the supervisor pod.
Create the pinniped-supervisor configuration
Create a FederationDomain to link the concierge to the supervisor instance and configure an OIDCIdentityProvider to connect the supervisor to your OIDC Provider. The following example uses auth0 as the OIDCIdentityProvider. For more information about how to configure different identity providers, including OKTA, GitLab, OpenLDAP, Dex, Microsoft AD and more, see Pinniped documentation.
To create the pinniped-supervisor configuration, create the following resources and save them into workspace/pinniped-supervisor/oidc_identity_provider.yaml:
apiVersion: idp.supervisor.pinniped.dev/v1alpha1
kind: OIDCIdentityProvider
metadata:
  namespace: pinniped-supervisor
  name: auth0
spec:
  # Specify the upstream issuer URL associated with your auth0 application.
  issuer: https://"APPLICATION-SUBDOMAIN".auth0.com/

  # Specify how to form authorization requests.
  authorizationConfig:
    additionalScopes: ["openid", "email"]
    allowPasswordGrant: false

  # Specify how claims are mapped to Kubernetes identities. This varies by provider.
  claims:
    username: email
    groups: groups

  # Specify the name of the Kubernetes Secret that contains your
  # application's client credentials (created as follows).
  client:
    secretName: auth0-client-credentials

---
apiVersion: v1
kind: Secret
metadata:
  namespace: pinniped-supervisor
  name: auth0-client-credentials
type: secrets.pinniped.dev/oidc-client
stringData:
  clientID: "AUTH0-CLIENT-ID"
  clientSecret: "AUTH0-CLIENT-SECRET"

---
apiVersion: config.supervisor.pinniped.dev/v1alpha1
kind: FederationDomain
metadata:
  name: pinniped-supervisor-federation-domain
  namespace: pinniped-supervisor
spec:
  issuer: "DNS-NAME"
  tls:
    secretName: pinniped-supervisor-tls-cert
Where:
APPLICATION-SUBDOMAINis the application specific subdomain that is assigned after the application registration.AUTH0-CLIENT-IDandAUTH0-CLIENT-SECRETare the credentials retrieved from the application registration.DNS-NAMEis the domain in which thepinniped-supervisoris published. For example,pinniped-supervisor.example.com
Apply the resources
After creating the resource files, you can install them into the cluster. Follow these steps to deploy them as a kapp application:
-
Install the
pinniped-supervisorby running:kapp deploy -y --app pinniped-supervisor -f pinniped-supervisor -f https://get.pinniped.dev/v0.22.0/install-pinniped-supervisor.yamlNote
To keep the security patches up to date, you must install the most recent version of Pinniped. See Vmware Tanzu Pinniped Releases in GitHub for more information.
-
Get the external IP address of Ingress by running:
kubectl -n tanzu-system-ingress get svc/envoy -o jsonpath='{.status.loadBalancer.ingress[0].ip}' -
If not already covered by the Tanzu Application Platform wildcard DNS entry, add an entry to the DNS system to bind the external IP address with.
Switch to production issuer (letsencrypt or cert-manager)
Follow these steps to switch to a letsencrypt production issuer so the generated TLS certificate is recognized as valid by web browsers and clients:
-
Edit the ClusterIssuer for
letsencryptand add TLS certificate resource forpinniped-supervisorby creating or updating the following resources and saving them intoworkspace/pinniped-supervisor/certificates.yaml:--- apiVersion: cert-manager.io/v1 kind: ClusterIssuer metadata: name: letsencrypt-prod namespace: cert-manager spec: acme: server: https://acme-v02.api.letsencrypt.org/directory email: "EMAIL" privateKeySecretRef: name: letsencrypt-prod solvers: - http01: ingress: class: contour --- apiVersion: cert-manager.io/v1 kind: Certificate metadata: name: pinniped-supervisor-cert namespace: pinniped-supervisor spec: secretName: pinniped-supervisor-tls-cert dnsNames: - "DNS-NAME" issuerRef: name: letsencrypt-prod kind: ClusterIssuerWhere:
EMAILis the user email address forletsencrypt. For example,[email protected]DNS-NAMEis the domain in which thepinniped-supervisoris published. For example,pinniped-supervisor.example.com
-
Create or update the
pinniped-supervisorkapp application:kapp deploy -y --app pinniped-supervisor -f pinniped-supervisor -f https://get.pinniped.dev/v0.22.0/install-pinniped-supervisor.yaml
Install Pinniped Supervisor Private CA
Follow these steps to install pinniped-supervisor:
- Switch tooling to the desired cluster.
- Create the necessary certificate files.
- Create the Ingress resources.
- Create the
pinniped-supervisorconfiguration. - Apply these resources to the cluster.
Create Certificate Secret
Choose a fully qualified domain name (FQDN) that can resolve to the Contour instance in the tanzu-system-ingress namespace. Create a certificate by using a CA that the clients trust. This FQDN can be under the ingress_domain in the TAP values file, or a dedicated DNS entry. The FQDN pinniped-supervisor.example.com is used in the following sections.
After the certificate files are available, they must be encoded to base64 format in a single-line layout. For example, you can encode the certificate file my.crt by running:
cat my.crt | base64 -w 0
Create the following resource and save it into workspace/pinniped-supervisor/ingress.yaml:
---
apiVersion: v1
kind: Secret
metadata:
  name: pinniped-supervisor-tls-cert
  namespace: pinniped-supervisor
type: kubernetes.io/tls
data:
  tls.crt: PRIVATE-KEY
  tls.key: PUBLIC-KEY
Where:
PRIVATE-KEYis the base64 encoded public key.PUBLIC-KEYis the base64 encoded public key.
Create Ingress resources
Create a Service and Ingress resource to make the pinniped-supervisor accessible from outside the cluster.
To do so, create the following resources and save them into workspace/pinniped-supervisor/ingress.yaml:
---
apiVersion: v1
kind: Service
metadata:
  name: pinniped-supervisor
  namespace: pinniped-supervisor
spec:
  ports:
  - name: pinniped-supervisor
    port: 8443
    protocol: TCP
    targetPort: 8080
  selector:
    app: pinniped-supervisor

---
apiVersion: projectcontour.io/v1
kind: HTTPProxy
metadata:
  name: pinniped-supervisor
  namespace: pinniped-supervisor
spec:
  virtualhost:
    fqdn: "DNS-NAME"
    tls:
      passthrough: true
  tcpproxy:
    services:
    - name: pinniped-supervisor
      port: 8443
Where:
DNS-NAMEis the domain in which thepinniped-supervisoris published. For example,pinniped-supervisor.example.comtls.passthrough: truespecifies that the TLS connection is forwarded to and terminated in the supervisor pod.
Create the pinniped-supervisor configuration
Create a FederationDomain to link the concierge to the supervisor instance and configure an OIDCIdentityProvider to connect the supervisor to your OIDC Provider. The following example uses auth0 as the OIDCIdentityProvider. For more information about how to configure different identity providers, including OKTA, GitLab, OpenLDAP, Dex, Microsoft AD and more, see Pinniped documentation.
To create the pinniped-supervisor configuration, create the following resources and save them into workspace/pinniped-supervisor/oidc_identity_provider.yaml:
apiVersion: idp.supervisor.pinniped.dev/v1alpha1
kind: OIDCIdentityProvider
metadata:
  namespace: pinniped-supervisor
  name: auth0
spec:
  # Specify the upstream issuer URL associated with your auth0 application.
  issuer: https://"APPLICATION-SUBDOMAIN".auth0.com/

  # Specify how to form authorization requests.
  authorizationConfig:
    additionalScopes: ["openid", "email"]
    allowPasswordGrant: false

  # Specify how claims are mapped to Kubernetes identities. This varies by provider.
  claims:
    username: email
    groups: groups

  # Specify the name of the Kubernetes Secret that contains your
  # application's client credentials (created as follows).
  client:
    secretName: auth0-client-credentials

---
apiVersion: v1
kind: Secret
metadata:
  namespace: pinniped-supervisor
  name: auth0-client-credentials
type: secrets.pinniped.dev/oidc-client
stringData:
  clientID: "AUTH0-CLIENT-ID"
  clientSecret: "AUTH0-CLIENT-SECRET"

---
apiVersion: config.supervisor.pinniped.dev/v1alpha1
kind: FederationDomain
metadata:
  name: pinniped-supervisor-federation-domain
  namespace: pinniped-supervisor
spec:
  issuer: "DNS-NAME"
  tls:
    secretName: pinniped-supervisor-tls-cert
Where:
APPLICATION-SUBDOMAINis the application specific subdomain that is assigned after the application registration.AUTH0-CLIENT-IDandAUTH0-CLIENT-SECRETare the credentials retrieved from the application registration.DNS-NAMEis the domain in which the pinniped-supervisor is published. For example,pinniped-supervisor.example.com
Apply the resources
After creating the resource files, you can install them into the cluster. Follow these steps to deploy them as a kapp application:
-
Install the supervisor by running:
kapp deploy -y --app pinniped-supervisor -f pinniped-supervisor -f https://get.pinniped.dev/v0.22.0/install-pinniped-supervisor.yamlNote
To keep the security patches up to date, you must install the most recent version of Pinniped. See Vmware Tanzu Pinniped Releases in GitHub for more information.
-
Get the external IP address of Ingress by running:
kubectl -n tanzu-system-ingress get svc/envoy -o jsonpath='{.status.loadBalancer.ingress[0].ip}' -
If not already covered by a Tanzu Application Platform wildcard DNS entry, add an entry to the DNS system to bind the external IP address with.
Install Pinniped Concierge
To install Pinniped Concierge:
- Switch tooling to the desired cluster.
-
Deploy the Pinniped Concierge by running:
kapp deploy -y --app pinniped-concierge \ -f https://get.pinniped.dev/v0.22.0/install-pinniped-concierge.yaml -
Get the CA certificate of the supervisor by running the following command against the cluster running the
pinniped-supervisor:kubectl get secret pinniped-supervisor-tls-cert -n pinniped-supervisor -o 'go-template={{index .data "tls.crt"}}'Note
The
tls.crtcontains the entire certificate chain including the CA certificate forletsencryptgenerated certificates. -
Create the following resource to
workspace/pinniped-concierge/jwt_authenticator.yaml:--- apiVersion: authentication.concierge.pinniped.dev/v1alpha1 kind: JWTAuthenticator metadata: name: pinniped-jwt-authenticator spec: issuer: "DNS-NAME" audience: concierge tls: certificateAuthorityData: "CA-DATA"If you use the
letsencryptproduction issuer, you can omit thetlssection:--- apiVersion: authentication.concierge.pinniped.dev/v1alpha1 kind: JWTAuthenticator metadata: name: pinniped-jwt-authenticator spec: issuer: "DNS-NAME" audience: conciergeWhere:
DNS-NAMEis the domain in which thepinniped-supervisoris published. For example,pinniped-supervisor.example.comCA-DATAis the public key of the signing CA or the public key of the Pinniped httpproxy certificate.
-
Deploy the resource by running:
kapp deploy -y --app pinniped-concierge-jwt --into-ns pinniped-concierge -f pinniped-concierge/jwt_authenticator.yaml
Log in to the cluster
