


Set up multicluster Supply Chain Security Tools - Store
This topic describes how you can deploy Supply Chain Security Tools (SCST) - Store in a multicluster setup, including installing multiple profiles such as View, Build, Run, and Iterate.
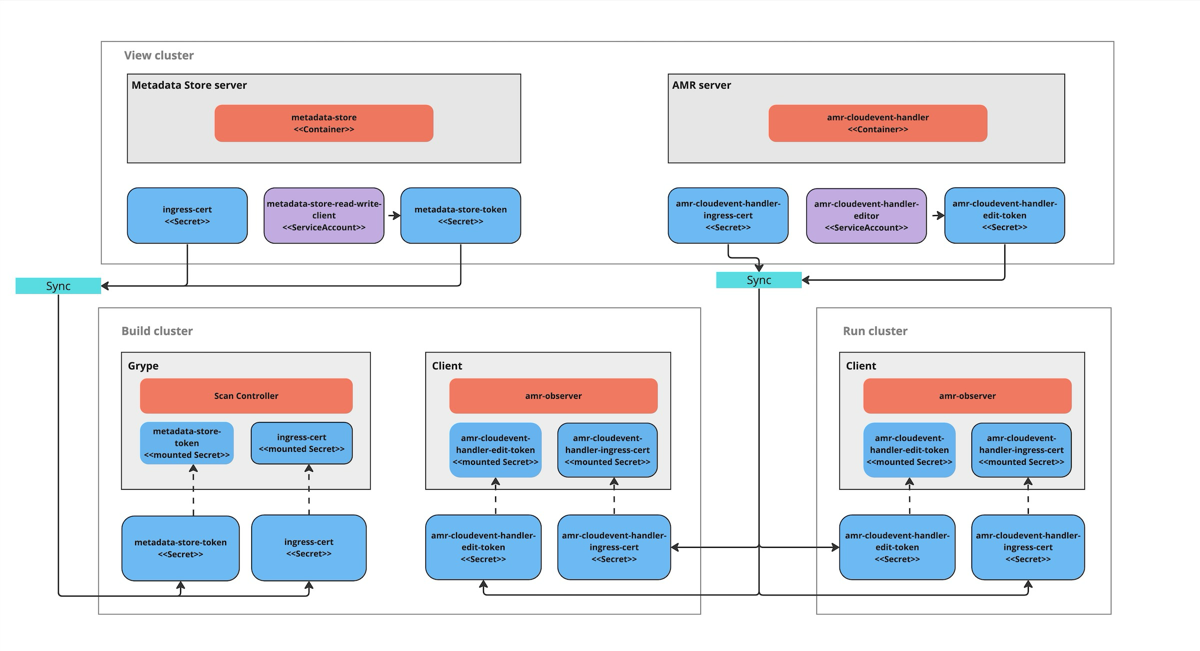
Overview
After installing the View profile, but before installing the Build profile and Run profile, you must copy some configurations from the View cluster to the Build and Run Kubernetes clusters. This topic explains how to add these configurations, which allow components in the Build and Run clusters to communicate with SCST - Store in the View cluster.
Before you begin
You must first install the View profile. This installation automatically creates the CA certificates and tokens necessary to talk to the CloudEvent Handler.
Procedure summary
To deploy SCST - Store in a multicluster setup:
- Copy the Metadata Store CA certificate from the View cluster.
- Copy the AMR CloudEvent Handler CA certificate from the View cluster.
- Copy the Metadata Store authentication token from the View cluster.
- Copy the AMR CloudEvent Handler edit token from the View cluster.
- Apply the Metadata Store CA certificate and authentication token to the Build cluster.
- Apply the AMR CloudEvent Handler CA certificate and edit token for the Build and Run cluster.
- Install the Build and Run profiles.
NoteThis topic assumes that you are using SCST - Scan 2.0, as described in Add testing and scanning to your application. If you are still using the deprecated SCST - Scan 1.0, you must follow these steps and the extra steps required for Scan 1.0 too.
Copy SCST - Store CA certificates from the View cluster
To copy SCST - Store CA certificates from the View cluster, you must copy the Metadata Store CA certificate and the AMR CloudEvent Handler CA certificate from the View cluster.
Copy the Metadata Store CA certificate from the View cluster
With your kubectl targeted at the View cluster, you can get Metadata Store’s TLS CA certificate by running:
MDS_CA_CERT=$(kubectl get secret -n metadata-store ingress-cert -o json | jq -r ".data.\"ca.crt\"" | base64 -d)
Copy the AMR CloudEvent Handler CA certificate data from the View cluster
With kubectl targeted at the View cluster, you can get the AMR CloudEvent Handler TLS CA certificate’s data by running:
CEH_CA_CERT_DATA=$(kubectl get secret -n metadata-store amr-cloudevent-handler-ingress-cert -o json | jq -r ".data.\"ca.crt\"" | base64 -d)
Copy SCST - Store authentication tokens from the View cluster
To copy SCST - Store tokens from the View cluster, you must copy the Metadata Store authentication token and the AMR CloudEvent Handler edit token from the View cluster.
Copy the Metadata Store authentication token from the View cluster
Copy the Metadata Store authentication token into an environment variable by running:
MDS_AUTH_TOKEN=$(kubectl get secrets metadata-store-read-write-client -n metadata-store -o jsonpath="{.data.token}" | base64 -d)
You use this environment variable in the next step.
Copy the AMR CloudEvent Handler edit token from the View cluster
Copy the AMR CloudEvent Handler token into an environment variable by running:
CEH_EDIT_TOKEN=$(kubectl get secrets amr-cloudevent-handler-edit-token -n metadata-store -o jsonpath="{.data.token}" | base64 -d)
You use this environment variable in the next step.
Apply the SCST - Store CA certificates and SCST - Store tokens to the Build and Run clusters
After you copy the certificate and tokens apply them to the Build and Run clusters before deploying the profiles.
Build cluster:
- Metadata Store CA certificate
- Metadata Store authentication token
- CloudEvent Handler CA certificate
- CloudEvent Handler edit token
Run cluster:
- CloudEvent Handler CA certificate
- CloudEvent Handler edit token
Apply the CloudEvent Handler CA certificate data and edit token to the Build and Run clusters
You can apply the CloudEvent Handler CA certificate and edit the token to the Build and Run clusters. These values must be accessible during the Build and Run profile deployments.
- Update kubectl to target the Build cluster.
-
If you already installed the Build cluster, skip to the next step. Otherwise, create a namespace for the CloudEvent Handler CA certificate and edit token by running:
kubectl create ns amr-observer-system -
Update the Build profile
values.yamlfile to add the following snippet. The code configures the CA certificate and endpoint. Inamr.observer.cloudevent_handler.endpointyou specify the location of the CloudEvent Handler that was deployed to the View cluster. Inamr.observer.ca_cert_datayou paste the content of$CEH_CA_CERT_DATA, which you copied earlier.amr: observer: auth: kubernetes_service_accounts: enable: true cloudevent_handler: endpoint: https://amr-cloudevent-handler.<VIEW-CLUSTER-INGRESS-DOMAIN> ca_cert_data: | <CONTENTS OF $CEH_CA_CERT_DATA> -
Create a secret to store the CloudEvent Handler edit token by running:
kubectl create secret generic amr-observer-edit-token \
 --from-literal=token=$CEH_EDIT_TOKEN -n amr-observer-system
This command uses the
CEH_EDIT_TOKENenvironment variable. -
Repeat the earlier steps, but configure kubectl to target the Run cluster instead of the Build cluster.
The Build and Run clusters now each have a CloudEvent Handler CA certificate and edit token named amr-observer-edit-token in the namespaces metadata-store-secrets and amr-observer-system. Now you are ready to deploy the Build and Run profiles.
Install the Build and Run profiles
If you came to this topic from Install multicluster Tanzu Application Platform profiles after installing the View profile, return to that topic to install the Build profile and install the Run profile.
Extra steps required for Scan 1.0
Scan 1.0 was deprecated in Tanzu Application Platform v1.10. The default scan component to use in the Test and Scan supply chain is Scan 2.0. These steps are required in addition to the earlier steps if you are still using Scan 1.0. For more information about Scan 1.0 and Scan 2.0, see the SCST - Scan component overview
Configure SCST - Scan with the Metadata Store CA certificate and authentication token on the Build cluster
Within the Build profile values.yaml file, add the following snippet:
scanning:
  metadataStore:
    exports:
      ca:
        pem: |
          <CONTENTS OF $MDS_CA_CERT>
      auth:
        token: <CONTENTS OF $MDS_AUTH_TOKEN>
This snippet contains the content of $MDS_CA_CERT and $MDS_AUTH_TOKEN copied in an earlier step. This content configures SCST - Scan with the Metadata Store CA certificate and authentication token.
Configure Grype in the Build profile values file
The Build profile values.yaml file uses the secrets you created to configure the Grype scanner that communicates with SCST - Store. After performing a vulnerabilities scan, the Grype scanner sends the scan result to SCST - Store.
For example:
...
grype:
  targetImagePullSecret: "TARGET-REGISTRY-CREDENTIALS-SECRET"
  metadataStore:
    url: METADATA-STORE-URL-ON-VIEW-CLUSTER # URL with http / https
    caSecret:
        name: store-ca-cert
        importFromNamespace: metadata-store-secrets # Must match with ingress-cert.data."ca.crt" of store on view cluster
    authSecret:
        name: store-auth-token # Must match with valid store token of metadata-store on view cluster
        importFromNamespace: metadata-store-secrets
...
Where:
METADATA-STORE-URL-ON-VIEW-CLUSTERis the ingress URL of SCST - Store deployed to the View cluster. For example,https://metadata-store.example.com. For more information, see Ingress support.TARGET-REGISTRY-CREDENTIALS-SECRETis the name of the secret that contains the credentials to pull an image from the registry for scanning.
Export SCST - Store secrets to a developer namespace in a Tanzu Application Platform multicluster deployment
SCST - Scan 1.0 required SCST - Store to be configured in every developer namespace with an SCST - Store certificate and authentication token.
To export secrets by creating SecretExport resources on the developer namespace:
- Verify that you created and populated the
metadata-store-secretsnamespace. -
Create the
SecretExportresources by running:cat <<EOF | kubectl apply -f - --- apiVersion: secretgen.carvel.dev/v1alpha1 kind: SecretExport metadata: name: store-ca-cert namespace: metadata-store-secrets spec: toNamespaces: [DEV-NAMESPACES] --- apiVersion: secretgen.carvel.dev/v1alpha1 kind: SecretExport metadata: name: store-auth-token namespace: metadata-store-secrets spec: toNamespaces: [DEV-NAMESPACES] EOFWhere
DEV-NAMESPACESis an array of developer namespaces where the Metadata Store secrets are exported.
For information about metadata configuration, see Cluster-specific scanner configurations.
ImportantIn a multicluster configuration, copy the Metadata Store values mentioned earlier from the View cluster to the
values.yamlfile that you used to install the Build cluster.
Additional resources
