


Set up dynamic provisioning of service instances
In this Services Toolkit tutorial you learn how service operators can set up a new, self-serve, and customized service for Tanzu Application Platform (commonly known as TAP). The example uses VMware RabbitMQ for Kubernetes, but the steps and learnings can apply to almost any other service.
About this tutorial
Target user role: Service operator
Complexity: Advanced
Estimated time: 60 minutes
Topics covered: Dynamic provisioning, Crossplane, VMware RabbitMQ for Kubernetes operator
Learning outcomes: The ability to offer new, on-demand, and customized services in your Tanzu Application Platform clusters
Prerequisites
Before you can follow this tutorial, you must have:
- Access to a Tanzu Application Platform cluster v1.5.0 or later.
- A basic familiarity with Crossplane, particularly the concepts of
CompositionandCompositeResourceDefinition. To learn about these concepts, see the Crossplane documentation.
Scenario
This tutorial is centered around the following scenario.
You work at BigCorp and are tasked to provide an on-demand, self-serve RabbitMQ service for BigCorp’s development teams who are working with Tanzu Application Platform. You reviewed the RabbitMQ offering that is available with Bitnami Services and discovered that it is an excellent service for testing and quickly getting started, but it is not quite suitable for BigCorp’s stringent and specific needs.
In particular, you must comply with BigCorp’s auditing and logging policy. You want to enforce that every RabbitMQ cluster in use on the platform adheres to that policy. However, you don’t want to be a blocker for the application teams and want to offer them self-serve access to RabbitMQ whenever they need it, without incurring any untoward delays. You have heard about the dynamic provisioning capability in Tanzu Application Platform and want to use it to complete your task.
In this tutorial, you learn how to:
- Install the RabbitMQ Cluster Kubernetes operator
- Create a
CompositeResourceDefinition - Create a
Composition - Create a provisioner-based class
- Understand and create the necessary Role-based access control (RBAC) permissions
- Create a claim for the class to test it all out
- Understand how all the pieces fit together to power the dynamic provisioning capability in Tanzu Application Platform
Concepts
The following diagram provides an overview of the elements of dynamic provisioning and how they fit together.
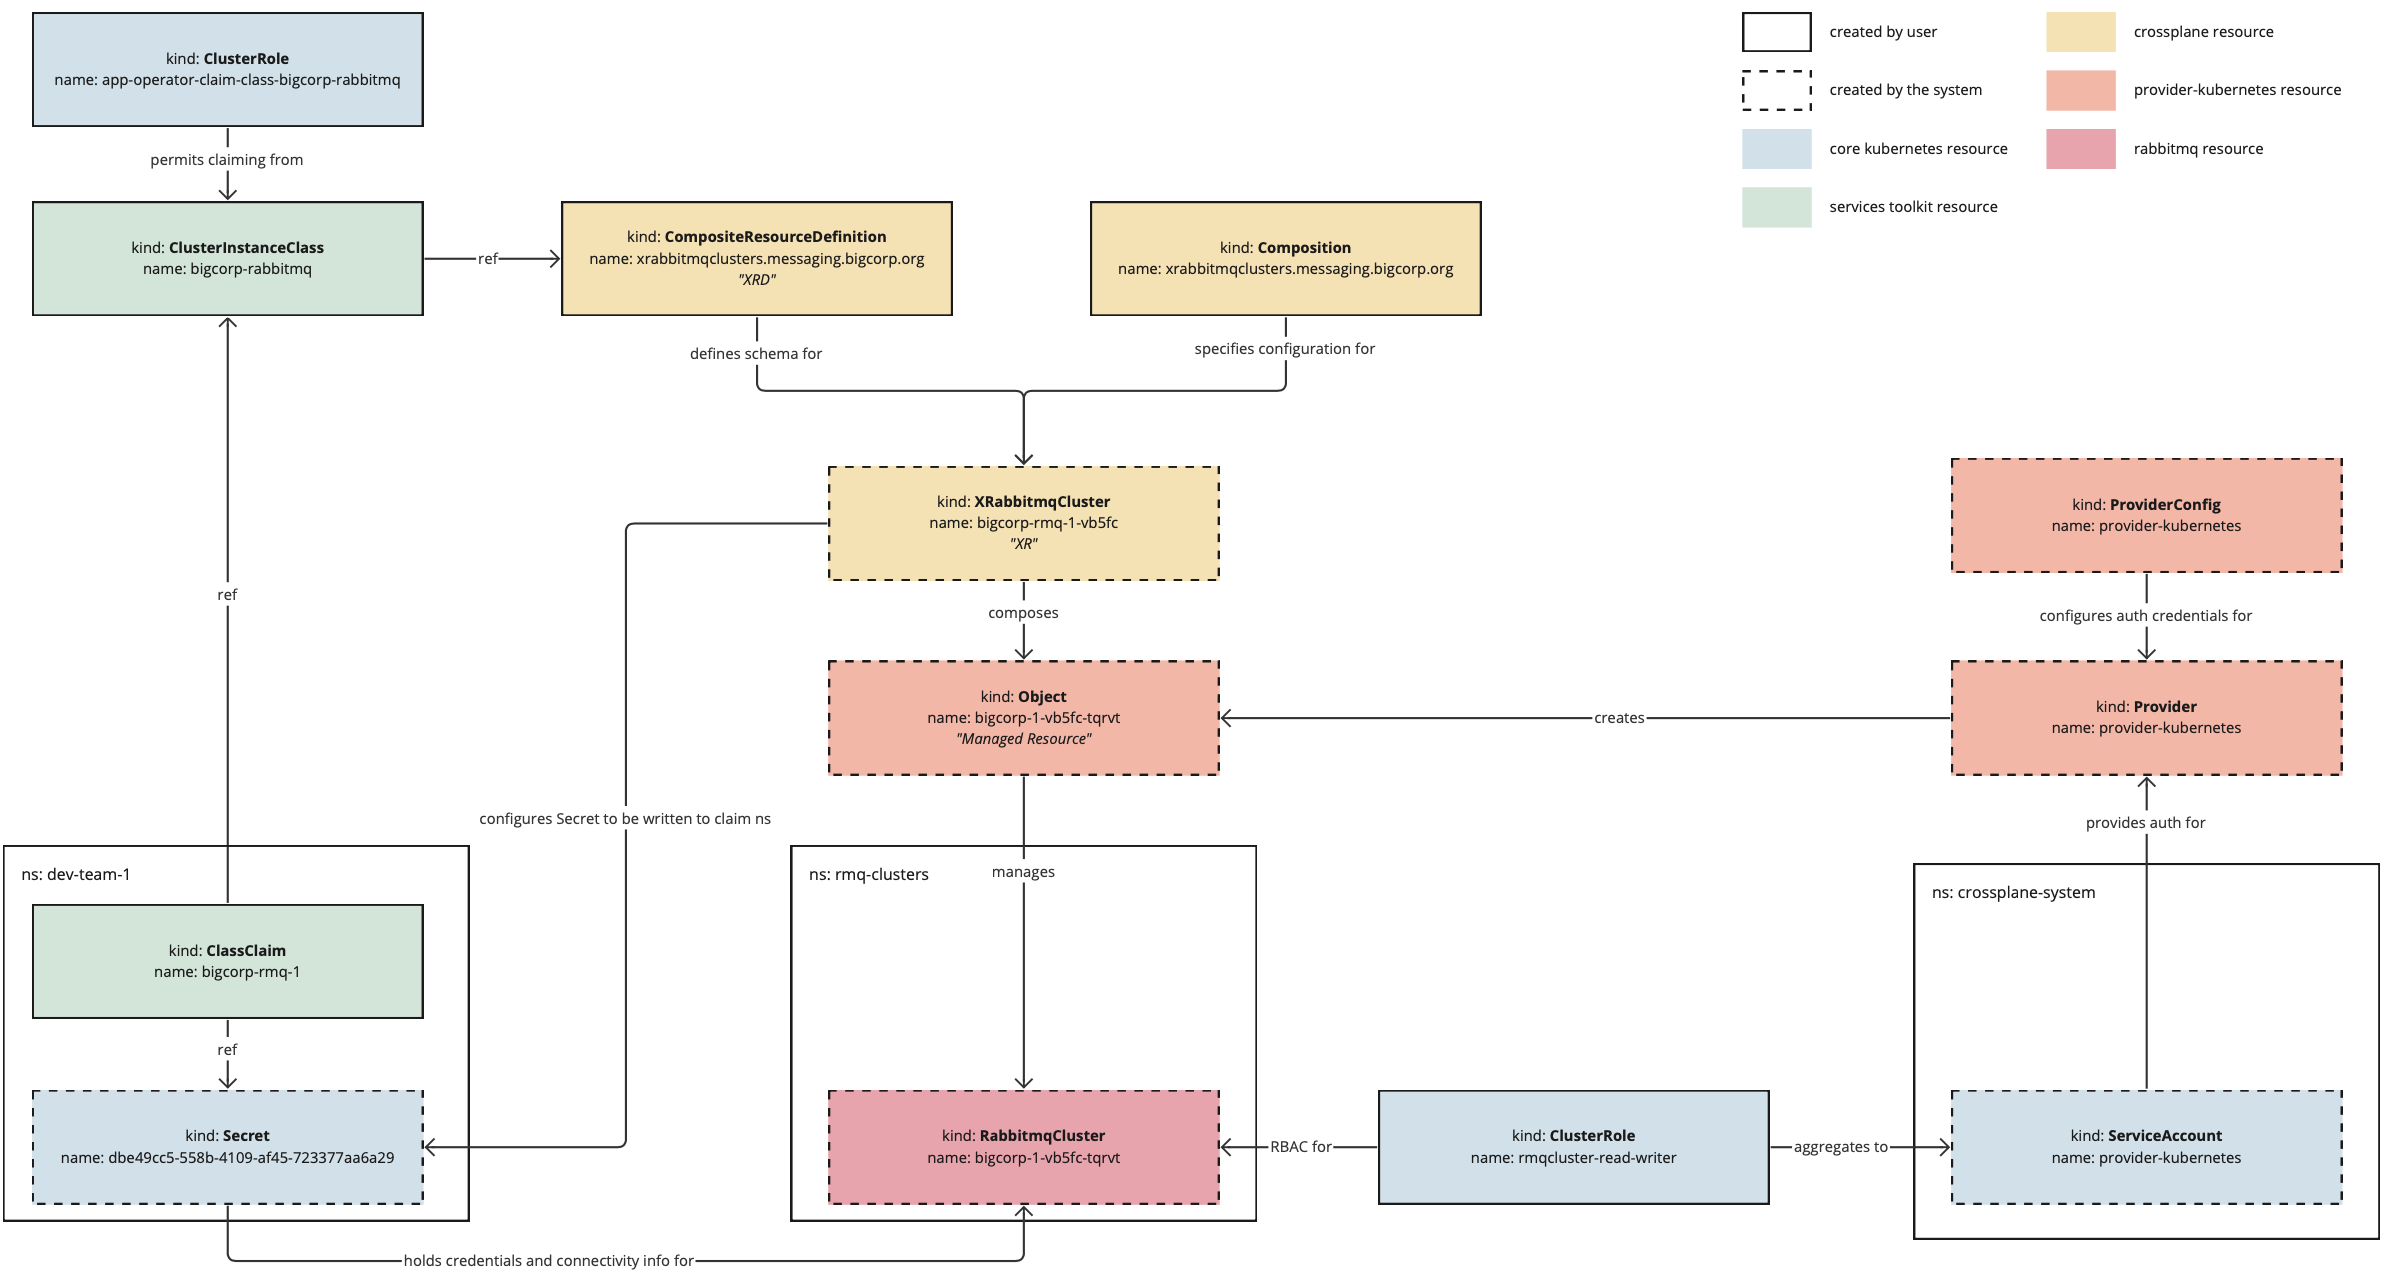
The following is a high-level overview of how the system works:
- The service operator creates a
CompositeResourceDefinitionand aComposition, which together define the configuration of the service instances that will be dynamically provisioned. - The service operator creates a class pointing to the
CompositeResourceDefinition. This informs application development teams that the service is available. - The service operator applies necessary RBAC to permit the system to create the necessary resources and authorize application development teams to create claims for the class.
- The application developer creates a claim referring to the class and optionally passes through parameters to override any default configuration where permissible.
- The system creates a
CompositeResourcethat merges information provided in the claim with default configuration specified by the system and configuration defined in theComposition. - Crossplane reconciles the
CompositeResourceinto a service instance and writes credentials for the instance into aSecret. - The
Secretis written back to the application developer’s namespace so that application workloads can use it.
As you follow this tutorial, it will address the parts of this diagram in more detail.
Procedure
The following steps show you how to configure dynamic provisioning for a service.
Step 1: Install an operator
When adding a new service to Tanzu Application Platform, ensure that there are a suitable set of APIs available in the cluster from which to construct the service instances. Usually, this involves installing one or more Kubernetes operators into the cluster.
Because the aim of this tutorial is to set up a new RabbitMQ service, install the RabbitMQ Cluster Operator for Kubernetes.
NoteThe steps in this tutorial use the open source version of the operator. For most real-world deployments, VMware recommends using the official supported version that VMware provides. For more information, see VMware RabbitMQ for Kubernetes.
Install the Kubernetes operator using the kapp CLI by running:
kapp -y deploy --app rmq-operator --file https://github.com/rabbitmq/cluster-operator/releases/latest/download/cluster-operator.yml
This makes available in the cluster a new API group/version of rabbitmq.com/v1beta1 and kind named RabbitmqCluster. You can now use this API to create RabbitMQ cluster instances as part of the dynamic provisioning setup.
Step 2: Create a CompositeResourceDefinition
The dynamic provisioning capability in Tanzu Application Platform relies on Crossplane. You can find the specific integration point at .spec.provisioner.crossplane.compositeResourceDefinition in the ClusterInstanceClass API for Tanzu Application Platform.
This field references a CompositeResourceDefinition, which you create in this step of the procedure. The CompositeResourceDefinition (XRD) defines the shape of a new, custom API type that encompasses the specific set of requirements laid out by the scenario in this tutorial.
To create the CompositeResourceDefinition:
-
Configure a
CompositeResourceDefinitionby creating a file namedxrabbitmqclusters.messaging.bigcorp.org.xrd.yamlwith the following contents:# xrabbitmqclusters.messaging.bigcorp.org.xrd.yaml --- apiVersion: apiextensions.crossplane.io/v1 kind: CompositeResourceDefinition metadata: name: xrabbitmqclusters.messaging.bigcorp.org spec: connectionSecretKeys: - host - password - port - provider - type - username group: messaging.bigcorp.org names: kind: XRabbitmqCluster plural: xrabbitmqclusters versions: - name: v1alpha1 referenceable: true schema: openAPIV3Schema: properties: spec: description: The OpenAPIV3Schema of this Composite Resource Definition. properties: replicas: description: The desired number of replicas forming the cluster type: integer storageGB: description: The desired storage capacity of a single replica, in GB. type: integer type: object type: object served: true -
Apply the file to the Tanzu Application Platform cluster by running:
kubectl apply -f xrabbitmqclusters.messaging.bigcorp.org.xrd.yaml -
To verify the status of the XRD you created, run:
kubectl get xrdsIf successful, the
xrabbitmqclusters.messaging.bigcorp.orgis listed withESTABLISHED=True.You might see some other XRDs listed as well. These are the
*.bitnami.*.tanzu.vmware.comXRDs. These are part of thebitnami.services.tanzu.vmware.compackage with Tanzu Application Platform and serve as the basis of the Bitnami Services. You can ignore these other XRDs for now, but to see how they are used in practice, see Claim services on Tanzu Application Platform and Consume services on Tanzu Application Platform in the Tanzu Application Platform getting started guide. -
To inspect the
messaging.bigcorp.org/v1alpha1API group/version that was created by the XRD, run:kubectl explain --api-version=messaging.bigcorp.org/v1alpha1 xrabbitmqclusters.specAs a result of creating the XRD, a new API group/version of
messaging.bigcorp.org/v1alpha1and kind namedXRabbitmqClusterbecome available in the cluster. When you inspect this API, you can see that thereplicasandstorageGBproperties configured in the XRD are present in the specification ofXRabbitmqCluster.You can also see that Crossplane has injected some other fields into the specification as well.
About the CompositeResourceDefinition
The following is a condensed explanation of parts of the CompositeResourceDefinition related to dynamic provisioning in Tanzu Application Platform. For a detailed explanation of CompositeResourceDefinition, see the Crossplane documentation.
-
.spec.claimNames:The example in this tutorial does not specify
.spec.claimNamesin the XRD. The dynamic provisioning capability in Tanzu Application Platform uses Crossplane’s cluster-scoped composite resources, rather than Crossplane’s namespace-scoped claims. Claims here refer to the Crossplane concept, not to be confused with Tanzu Application Platform claims. As such, this configuration is not required, although it does not cause any adverse effects if you add it. -
.spec.connectionKeys:This field detects the keys that will exist in the
Secretresulting from the dynamic provisioning request. You likely want thisSecretto conform to the Service Binding Specification for Kubernetes because this helps to enable application workloads in Tanzu Application Platform to automatically configure service instances. This is assumes that the application is using a binding-aware library such as Spring Cloud Bindings. Specific key name requirements vary by service type, but all must provide thetypekey. -
.spec.properties:The
.spec.propertiessection in the schema forv1alpha1is where you, as the service operator, can set which configuration options you want to expose to application development teams. In the example in this section, there are two configuration options:replicasandstorageGB. By adding these properties to the specification, you give development teams control over these configuration options. For example, you might want to addstorageGBif the development teams have more knowledge about how much storage their apps require than you do. By addingstorageGByou can allow them to decide for themselves how much storage they require.You can choose to add as many or as few configuration options as you like. You can also choose to set default values. In highly regulated environments, you might not want to allow for any configuration by developers at all.
In the scenario at the beginning of this tutorial, it says that you must comply with the auditing and logging policy. You do not specify any configuration related to auditing or logging in the XRD in this step. This is intentional because in this scenario there are strict auditing and logging requirements and cannot permit developers to override those. In the next step you learn how to ensure that those requirements get enforced on the resulting RabbitMQ clusters.
Step 3: Create a Crossplane Composition
You do most of the configuration for dynamic provisioning when you create the Composition. This section has the basics you must know to start to create a Composition for use in Tanzu Application Platform. For a more detailed explanation about the Composition, see the Crossplane documentation.
To create the Composition:
-
Configure a
Compositionby creating a file namedxrabbitmqclusters.messaging.bigcorp.org.composition.yamlwith the following contents:# xrabbitmqclusters.messaging.bigcorp.org.composition.yaml --- apiVersion: apiextensions.crossplane.io/v1 kind: Composition metadata: name: xrabbitmqclusters.messaging.bigcorp.org spec: compositeTypeRef: apiVersion: messaging.bigcorp.org/v1alpha1 kind: XRabbitmqCluster resources: - base: apiVersion: kubernetes.crossplane.io/v1alpha2 kind: Object spec: forProvider: manifest: apiVersion: rabbitmq.com/v1beta1 kind: RabbitmqCluster metadata: namespace: rmq-clusters spec: terminationGracePeriodSeconds: 0 replicas: 1 persistence: storage: 1Gi resources: requests: cpu: 200m memory: 1Gi limits: cpu: 300m memory: 1Gi rabbitmq: envConfig: | RABBITMQ_LOGS="" additionalConfig: | log.console = true log.console.level = debug log.console.formatter = json log.console.formatter.json.field_map = verbosity:v time msg domain file line pid level:- log.console.formatter.json.verbosity_map = debug:7 info:6 notice:5 warning:4 error:3 critical:2 alert:1 emergency:0 log.console.formatter.time_format = epoch_usecs connectionDetails: - apiVersion: v1 kind: Secret namespace: rmq-clusters fieldPath: data.provider toConnectionSecretKey: provider - apiVersion: v1 kind: Secret namespace: rmq-clusters fieldPath: data.type toConnectionSecretKey: type - apiVersion: v1 kind: Secret namespace: rmq-clusters fieldPath: data.host toConnectionSecretKey: host - apiVersion: v1 kind: Secret namespace: rmq-clusters fieldPath: data.port toConnectionSecretKey: port - apiVersion: v1 kind: Secret namespace: rmq-clusters fieldPath: data.username toConnectionSecretKey: username - apiVersion: v1 kind: Secret namespace: rmq-clusters fieldPath: data.password toConnectionSecretKey: password writeConnectionSecretToRef: namespace: rmq-clusters connectionDetails: - fromConnectionSecretKey: provider - fromConnectionSecretKey: type - fromConnectionSecretKey: host - fromConnectionSecretKey: port - fromConnectionSecretKey: username - fromConnectionSecretKey: password patches: - fromFieldPath: metadata.name toFieldPath: spec.forProvider.manifest.metadata.name type: FromCompositeFieldPath - fromFieldPath: spec.replicas toFieldPath: spec.forProvider.manifest.spec.replicas type: FromCompositeFieldPath - fromFieldPath: spec.storageGB toFieldPath: spec.forProvider.manifest.spec.persistence.storage transforms: - string: fmt: '%dGi' type: Format type: string type: FromCompositeFieldPath - fromFieldPath: metadata.name toFieldPath: spec.writeConnectionSecretToRef.name transforms: - string: fmt: '%s-rmq' type: Format type: string type: FromCompositeFieldPath - fromFieldPath: metadata.name toFieldPath: spec.connectionDetails[0].name transforms: - string: fmt: '%s-default-user' type: Format type: string type: FromCompositeFieldPath - fromFieldPath: metadata.name toFieldPath: spec.connectionDetails[1].name transforms: - string: fmt: '%s-default-user' type: Format type: string type: FromCompositeFieldPath - fromFieldPath: metadata.name toFieldPath: spec.connectionDetails[2].name transforms: - string: fmt: '%s-default-user' type: Format type: string type: FromCompositeFieldPath - fromFieldPath: metadata.name toFieldPath: spec.connectionDetails[3].name transforms: - string: fmt: '%s-default-user' type: Format type: string type: FromCompositeFieldPath - fromFieldPath: metadata.name toFieldPath: spec.connectionDetails[4].name transforms: - string: fmt: '%s-default-user' type: Format type: string type: FromCompositeFieldPath - fromFieldPath: metadata.name toFieldPath: spec.connectionDetails[5].name transforms: - string: fmt: '%s-default-user' type: Format type: string type: FromCompositeFieldPath readinessChecks: - type: MatchString fieldPath: status.atProvider.manifest.status.conditions[1].status # ClusterAvailable matchString: "True" -
Apply the file to the Tanzu Application Platform cluster by running:
kubectl apply -f xrabbitmqclusters.messaging.bigcorp.org.composition.yaml
About the Composition
The following is a condensed explanation of the most relevant parts of the Composition.
About .spec.compositeTypeRef
The .spec.compositeTypeRef is configured to refer to XRabbitmqCluster on the messaging.bigcorp.org/v1alpha1 API group/version.
...
spec:
  compositeTypeRef:
    apiVersion: messaging.bigcorp.org/v1alpha1
    kind: XRabbitmqCluster
...
This is the API that was created when you applied the XRD in Step 2: Creating a CompositeResourceDefinition. By configuring .spec.compositeTypeRef to refer to this API, you are instructing Crossplane to use the configuration contained within this Composition to compose subsequent managed resources whenever it observes that a new XRabbitmqCluster resource is created in the cluster. Tanzu Application Platform’s dynamic provisioning system creates the XRabbitmqCluster resources automatically. To visualize how these pieces fit together, see the diagram in Concepts earlier.
About .spec.resources
The .spec.resources section is where you specify the managed resources to be created. Managed resources are tied to Crossplane’s providers. Each provider defines a set of managed resources that can then be used in compositions. Tanzu Application Platform includes two providers with the Crossplane package: provider-helm and provider-kubernetes. This makes a Release managed resource available that manages Helm releases. It also makes an Object managed resource available that manages arbitrary Kubernetes resources.
You can install and use any other provider. To find the latest providers, see the Upbound Marketplace. The more providers you install, the more managed resources you can choose from in your compositions.
The Object managed resource
The goal is to compose the resources required to create service instances and to surface the credentials and connectivity information required to connect to those instances in a known and repeatable way. This tutorial uses the RabbitmqCluster resource, which presents one single API to use to create fully functioning RabbitMQ clusters with credentials stored in Secrets in the cluster.
However, RabbitmqCluster is not a Crossplane managed resource so you cannot refer to this resource directly under .spec.resources. To work around this, use provider-kubernetes and its corresponding Object managed resource. Object enables you to wrap any arbitrary Kubernetes resource, such as RabbitmqCluster, into a Crossplane managed resource and then to use them like any other managed resource inside Compositions.
...
spec:
  resources:
  - base:
      apiVersion: kubernetes.crossplane.io/v1alpha2
      kind: Object
      spec:
        forProvider:
          manifest:
            apiVersion: rabbitmq.com/v1beta1
            kind: RabbitmqCluster
            metadata:
              namespace: rmq-clusters
            spec:
              terminationGracePeriodSeconds: 0
              replicas: 1
              persistence:
                storage: 1Gi
              resources:
                requests:
                  cpu: 200m
                  memory: 1Gi
                limits:
                  cpu: 300m
                  memory: 1Gi
              rabbitmq:
                envConfig: |
                  RABBITMQ_LOGS=""
                additionalConfig: |
                  log.console = true
                  log.console.level = debug
                  log.console.formatter = json
                  log.console.formatter.json.field_map = verbosity:v time msg domain file line pid level:-
                  log.console.formatter.json.verbosity_map = debug:7 info:6 notice:5 warning:4 error:3 critical:2 alert:1 emergency:0
                  log.console.formatter.time_format = epoch_usecs
...
The Object managed resource is where you configure RabbitmqCluster resources. This is the place where you can fine-tune the configuration of the RabbitMQ clusters to your needs.
The scenario mentions that you are particularly concerned about your company’s logging policy. The configuration in the Object translates that policy into default configuration on the RabbitmqCluster resource by specifying .spec.rabbitmq.additionalConfig for the resource. This was taken from one of the examples in the RabbitMQ Cluster Operator GitHub repository. You can configure the resource however you want and to whatever requirements necessary.
The patches section
The Object also sets default values for the number of replicas and the amount of persistent storage for new RabbitmqClusters to one replica and 1 Gi. However, you want to allow these two values to be configurable by the application development teams as specified in Step 2: Creating a CompositeResourceDefinition. You can configure this using patches.
...
patches:
  - fromFieldPath: metadata.name
    toFieldPath: spec.forProvider.manifest.metadata.name
    type: FromCompositeFieldPath
...
All of the patches are of type FromCompositeFieldPath, which allows you to take values defined on the composite resource (XRabbitmqCluster in this case) and to pass them through to the underlying managed resource (an Object wrapping RabbitmqCluster in this case). The first patch sets the name of the RabbitmqCluster to the same name as the name of the composite resource XRabbitmqCluster, which were created using generateName, thereby ensuring a unique name for each dynamically provisioned RabbitmqCluster instance.
...
patches:
...
  - fromFieldPath: spec.replicas
    toFieldPath: spec.forProvider.manifest.spec.replicas
    type: FromCompositeFieldPath
  - fromFieldPath: spec.storageGB
    toFieldPath: spec.forProvider.manifest.spec.persistence.storage
    transforms:
    - string:
        fmt: '%dGi'
        type: Format
      type: string
    type: FromCompositeFieldPath
...
The second and third patches pass through configuration for the number of replicas and amount of persistent storage, which overrides the default values already configured.
The remaining patches all do the same thing, which is to patch in the name of the Secret for the fields in the connectionDetails section.
...
- fromFieldPath: metadata.name
  toFieldPath: spec.connectionDetails[0].name
  transforms:
  - string:
      fmt: '%s-default-user'
      type: Format
    type: string
  type: FromCompositeFieldPath
...
When creating a RabbitmqCluster resource using the RabbitMQ Cluster Kubernetes operator, the operator creates a Secret containing credentials and connectivity information used to connect to the cluster. That Secret is named x-default-user, where x is the name of the RabbitmqCluster resource. Because the name of the RabbitmqCluster cannot be known upfront, you must use patches to ensure that the connectionDetails section refers to the correctly-named Secret.
The connectionDetails sections are where you configure which keys and values to expose in the resulting Secret. You must specify the same set of keys as defined in the original XRD.
The readinessChecks section
Configuring readiness checks helps to keep consumers of dynamic provisioning, that is, the application teams, informed about when the resulting service instances are ready for application workloads to use.
...
readinessChecks:
  - type: MatchString
    fieldPath: status.atProvider.manifest.status.conditions[1].status # ClusterAvailable
    matchString: "True"
Where possible, use the Ready condition to verify readiness. However, the RabbitmqCluster API doesn’t expose a Ready condition, so you must configure the ready check on ClusterAvailable instead.
The namespace
One final important decision is the name of the namespace in which to create the dynamically provisioned RabbitmqCluster resources. This tutorial uses the rmq-clusters namespace.
...
spec:
  resources:
  - base:
      apiVersion: kubernetes.crossplane.io/v1alpha2
      kind: Object
      spec:
        forProvider:
          manifest:
            apiVersion: rabbitmq.com/v1beta1
            kind: RabbitmqCluster
            metadata:
              namespace: rmq-clusters
...
To make sure that the rmq-clusters namespace exists, run:
kubectl create namespace rmq-clusters
This configuration says that all dynamically provisioned RabbitmqCluster resources must be placed in the same rmq-clusters namespace. To place each new cluster into a separate namespace, you must create an additional Object managed resource to wrap the creation of a Namespace and to apply patches to the resources accordingly. For this tutorial you only require one namespace.
Step 4: Creating a provisioner-based class
After creating the XRD and the Composition, you must integrate what you configured into Tanzu Application Platform’s classes and claims model so that application teams can use it. The first step is to create a provisioner-based class and to point it at the XRD you created.
To create the provisioner-based class:
-
Configure a
ClusterInstanceClassby creating a file namedbigcorp-rabbitmq.class.yamlwith the following contents:# bigcorp-rabbitmq.class.yaml --- apiVersion: services.apps.tanzu.vmware.com/v1alpha1 kind: ClusterInstanceClass metadata: name: bigcorp-rabbitmq spec: description: short: On-demand RabbitMQ clusters precision engineered to meet the needs of BigCorp! provisioner: crossplane: compositeResourceDefinition: xrabbitmqclusters.messaging.bigcorp.org -
Apply the file to the Tanzu Application Platform cluster:
kubectl apply -f bigcorp-rabbitmq.class.yamlThis is called a provisioner-based class because you configured
.spec.provisioner. For more information, see ClusterInstanceClass.
By creating this class you are informing application teams that the service is available. Application teams can discover it by using the tanzu service class list command. They can also use tanzu service class get bigcorp-rabbitmq, which provides detailed information about the class, including details of the replicas and storageGB parameters that you configured earlier.
Step 5: Configure supporting RBAC
There are two parts of RBAC to consider when you set up a new service for dynamic provisioning in Tanzu Application Platform.
The first relates to granting permissions to the providers used in the compositions. The Composition created earlier uses Object managed resources to create RabbitmqCluster resources. Therefore, you must grant provider-kubernetes permission to create RabbitmqCluster resources. You do this by using an aggregating ClusterRole.
The second RBAC element detects who is authorized to use the new service. This is important because you are configuring an on-demand service and making it available to application teams. Without any other supporting policy in place, application teams can create as many RabbitmqClusters as they like. However, you must be conscious of resource use and might want to control who can create new service instances on-demand.
You grant authorization by using standard Kubernetes RBAC resources. Dynamic provisioning uses a custom RBAC verb, claim, which you can apply to classes to permit claiming from them.
To configure RBAC:
-
Configure a
ClusterRolethat grants permissions to the providers used in the compositions by creating a file namedprovider-kubernetes-rmqcluster-read-writer.rbac.yamlwith the following contents:# provider-kubernetes-rmqcluster-read-writer.rbac.yaml --- apiVersion: rbac.authorization.k8s.io/v1 kind: ClusterRole metadata: name: rmqcluster-read-writer labels: services.tanzu.vmware.com/aggregate-to-provider-kubernetes: "true" rules: - apiGroups: - rabbitmq.com resources: - rabbitmqclusters verbs: - "*" -
Apply the file to the Tanzu Application Platform cluster by running:
kubectl apply -f provider-kubernetes-rmqcluster-read-writer.rbac.yamlNote
While not necessary here, a corresponding label
services.tanzu.vmware.com/aggregate-to-provider-helm: "true"exists for aggregating RBAC permissions toprovider-helmas well. -
Configure a
ClusterRoleto authorize who can use the service by creating a file namedapp-operator-claim-class-bigcorp-rabbitmq.rbac.yamlwith the following contents:# app-operator-claim-class-bigcorp-rabbitmq.rbac.yaml --- apiVersion: rbac.authorization.k8s.io/v1 kind: ClusterRole metadata: name: app-operator-claim-class-bigcorp-rabbitmq labels: apps.tanzu.vmware.com/aggregate-to-app-operator-cluster-access: "true" rules: - apiGroups: - services.apps.tanzu.vmware.com resources: - clusterinstanceclasses resourceNames: - bigcorp-rabbitmq verbs: - claim -
Apply the file to the Tanzu Application Platform cluster by running:
kubectl apply -f app-operator-claim-class-bigcorp-rabbitmq.rbac.yamlThis
ClusterRolegrants anyone with theapp-operatorTanzu Application Platform user role the permission to claim from thebigcorp-rabbitmqclass.
Step 6: Verify your configuration
To test your configuration, create a claim for the class to trigger the dynamic provisioning of a new RabbitMQ cluster. This step is usually performed by the application operator, rather than the service operator, but it is important that you confirm that everything is configured correctly.
To create the claim:
-
Create a
ClassClaimby creating a file namedbigcorp-rmq-1.claim.yamlwith the following contents:# bigcorp-rmq-1.claim.yaml --- apiVersion: services.apps.tanzu.vmware.com/v1alpha1 kind: ClassClaim metadata: name: bigcorp-rmq-1 spec: classRef: name: bigcorp-rabbitmq parameters: storageGB: 2 replicas: 3 -
Apply the file to the Tanzu Application Platform cluster by running:
kubectl apply -f bigcorp-rmq-1.claim.yaml -
After the RabbitMQ service is provisioned, verify that the claim status is ready by running:
kubectl get classclaim bigcorp-rmq-1In the output, the claim status will report
Ready=True.
