


Get started with Tanzu Developer Tools for VS Code
This topic guides you through getting started with VMware Tanzu Developer Tools for Visual Studio Code (VS Code).
Prerequisite
Install VMware Tanzu Developer Tools for Visual Studio Code.
Configure Local Source Proxy or use a source image registry
Configure Local Source Proxy if you’re able to do so. For more information, see the Local Source Proxy documentation.
If you cannot use Local Source Proxy, use a source image registry. Before deploying a workload, you must authenticate with an image registry to store your source code. You can use the Docker CLI to authenticate or you can set environment variables that the Tanzu CLI can use to authenticate.
- Docker CLI
-
To authenticate by using the Docker CLI, run:
docker login $REGISTRY_HOSTNAME -u $REGISTRY_USERNAME -p $REGISTRY_PASSWORD - Tanzu CLI
-
To authenticate by using the Tanzu CLI, export environment variables by running:
export TANZU_APPS_REGISTRY_CA_CERT=PATH-TO-CA-CERT.nip.io.crt export TANZU_APPS_REGISTRY_PASSWORD=USERNAME export TANZU_APPS_REGISTRY_USERNAME=PASSWORDCA_CERTis only needed for a custom or private registry.
For more information, see Workload creation fails due to authentication failure in Docker Registry.
Set up Tanzu Developer Tools
The extension makes use of the following files within your project:
workload.yamlcatalog-info.yamlTiltfile.tanzuignore
You can create these files by using the instructions in this topic, or use the files in the View an example project section.
There are two ways to create these files:
- Using the code snippets that Tanzu Developer Tools provide, which create templates in empty files that you then fill in with the required information.
- Writing the files manually.
Create the workload.yaml file
workload.yaml provides instructions to the Supply Chain Choreographer about how to build and manage a workload.
The extension requires only one workload.yaml file per project. workload.yaml must be a single-document YAML file, not a multidocument YAML file.
Before beginning to write your workload.yaml file, ensure that you know:
- The name of your application. For example,
my app. - The workload type of your application. For example,
web. - The GitHub source code URL. For example,
github.com/mycompany/myapp. - The Git branch of the source code that you intend to use. For example,
main.
- Code snippets
-
To create a
workload.yamlfile by using code snippets:- (Optional) Create a directory named
configin the root directory of your project. For example,my project/config. - Create a file named
workload.yamlin the new config directory. For example,my project/config/workload.yaml. -
Open the new
workload.yamlfile in VS Code, entertanzu workloadin the file to trigger the code snippets, and either press Enter or left-click thetanzu workloadtext in the drop-down menu.
-
Fill in the template by pressing the Tab key.
- (Optional) Create a directory named
- Manual
-
To create your
workload.yamlfile manually, follow this example:apiVersion: carto.run/v1alpa1 kind: Workload metadata: name: APP-NAME labels: apps.tanzu.vmware.com/workload-type: WORKLOAD-TYPE app.kubernetes.io/part-of: APP-NAME spec: source: git: url: GIT-SOURCE-URL ref: branch: GIT-BRANCH-NAMEWhere:
APP-NAMEis the name of your application.WORKLOAD-TYPEis the type of this workload. For example,web.GIT-SOURCE-URLis your GitHub source code URL.GIT-BRANCH-NAMEis the Git branch of your source code.
Alternatively, you can use the Tanzu CLI to create a
workload.yamlfile. For more information about the Tanzu CLI command, see Create or update a workload in the Tanzu CLI documentation.
Create the catalog-info.yaml file
catalog-info.yaml enables the workloads of this project to appear in Tanzu Developer Portal.
Before beginning to write your catalog-info.yaml file, ensure that you:
- Know the name of your application. For example,
my app. - Have a description of your application ready.
- Code snippets
-
To create a
catalog-info.yamlfile by using the code snippets:- (Optional) Create a directory named
catalogin the root directory of your project. For example,my project/catalog. - Create a file named
catalog-info.yamlin the new config directory. For example,my project/catalog/catalog-info.yaml. -
Open the new
catalog-info.yamlfile in VS Code, entertanzu catalog-infoin the file to trigger the code snippets, and then either press Enter or left-click thetanzu catalog-infotext in the drop-down menu.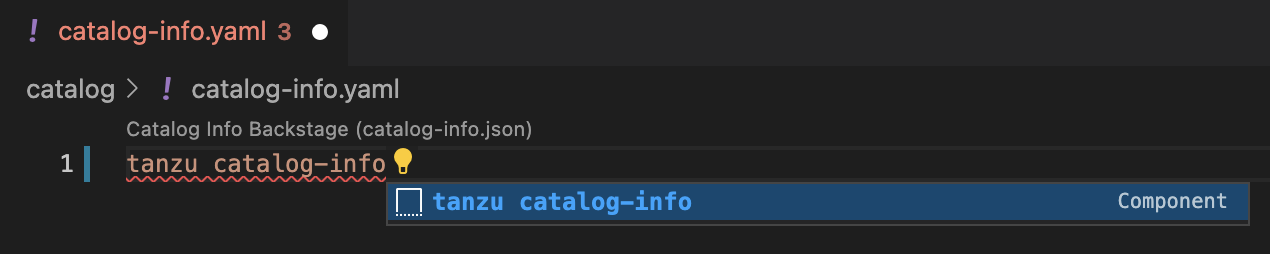
-
Fill in the template by pressing the Tab key.
- (Optional) Create a directory named
- Manual
-
To create your
catalog-info.yamlfile manually, follow this example:apiVersion: backstage.io/v1alpha1 kind: Component metadata: name: APP-NAME description: APP-DESCRIPTION tags: - tanzu annotations: 'backstage.io/kubernetes-label-selector': 'app.kubernetes.io/part-of=APP-NAME' spec: type: service lifecycle: experimental owner: default-teamWhere:
APP-NAMEis the name of your applicationAPP-DESCRIPTIONis the description of your application
Create the Tiltfile file
The Tiltfile file provides the Tilt configuration to enable your project to Live Update on your Kubernetes cluster that has Tanzu Application Platform. The Tanzu Developer Tools extension requires only one Tiltfile per project.
Before beginning to write your Tiltfile file, ensure that you know:
- The name of your application. For example,
my app. - Whether you want to compile the source image from a local directory other than the project directory or otherwise leave the
local pathvalue unchanged. For more information, see local path in the glossary. - The path to your
workload.yamlfile. For example,config/workload.yaml. - The name of your current Kubernetes context, if the targeting Kubernetes cluster enabled by Tanzu Application Platform is not running on your local machine.
- Code Snippets
-
To create a Tiltfile file by using the code snippets:
- Create a file named
Tiltfilewith no file extension in the root directory of your project. For example,my-project/Tiltfile. -
Open the new Tiltfile file in VS Code and enter
tanzu tiltfilein the file to trigger the code snippets, and then either press Enter or left-click thetanzu tiltfiletext in the drop-down menu.
-
Fill in the template by pressing the Tab key.
-
If the targeting Kubernetes cluster enabled by Tanzu Application Platform is not running on your local machine, add a new line to the end of the Tiltfile template and enter:
allow_k8s_contexts('CONTEXT-NAME')Where
CONTEXT-NAMEis the name of your current Kubernetes context.
- Create a file named
- Manual
-
To create a Tiltfile file manually, follow this example:
# For multi-module projects, set the LOCAL_PATH to the project root.
# For example, if your Tiltfile's path is .../my-project/module1/Tiltfile, then set LOCAL_PATH = ".."
LOCAL_PATH = os.getenv("LOCAL_PATH", default='.')
NAMESPACE = os.getenv("NAMESPACE", default='default')

k8s_custom_deploy(
   'APP-NAME',
   apply_cmd="tanzu apps workload apply -f PATH-TO-WORKLOAD-YAML --live-update" +
       " --local-path " + LOCAL_PATH +
       " --namespace " + NAMESPACE +
       " --yes >/dev/null" +
       " && kubectl get workload APP-NAME --namespace " + NAMESPACE + " -o yaml",
   delete_cmd="tanzu apps workload delete -f PATH-TO-WORKLOAD-YAML --namespace " + NAMESPACE + " --yes" ,
   deps=['pom.xml', './target/classes'],
   container_selector='workload',
   live_update=[
       sync('./target/classes', '/workspace/BOOT-INF/classes')
   ]
)

k8s_resource('APP-NAME', port_forwards=["8080:8080"],
   extra_pod_selectors=[{'carto.run/workload-name': 'APP-NAME', 'app.kubernetes.io/component': 'run'}])
allow_k8s_contexts('CONTEXT-NAME')
Where:
APP-NAMEis the name of your application.PATH-TO-WORKLOAD-YAMLis the local file system path toworkload.yaml. For example,config/workload.yaml.CONTEXT-NAMEis the name of your current Kubernetes context. If your Kubernetes cluster enabled by Tanzu Application Platform is running locally on your local machine, you can remove the entireallow_k8s_contextsline. For more information, see the Tilt documentation.
Create a .tanzuignore file
The .tanzuignore file specifies the file paths to exclude from the source code image. When working with local source code, you can exclude files from the source code to be uploaded within the image. Directories must not end with the system path separator (/ or \). See this example. in GitHub.
View an example project
Before you begin, you need a container registry for the sample application.
You can view a sample application that demonstrates the necessary configuration files. There are two ways to obtain the sample application:
- Application Accelerator
-
If your company has configured
Application Accelerator, you can obtain the sample application there if it was not removed. To do so:
- Open Application Accelerator.
- Search for
Tanzu Java Web Appin Application Accelerator. - Add the required configuration information and generate the application.
- Unzip the file and open the project in a VS Code workspace.
- Clone from GitHub
-
To clone the sample application from GitHub:
- Run
git cloneto clone the tanzu-java-web-app repository from GitHub. - Change into the
tanzu-java-web-appdirectory. - Open the Tiltfile and replace
your-registry.io/projectwith your container registry.
- Run
Next steps
