


Create a new application accelerator
This topic guides you through creating an accelerator and registering it in a Tanzu Application Platform (commonly known as TAP) instance.
Tanzu Application Platform offers a selection of built-in accelerators to streamline your development process. However, if these accelerators don’t meet your needs, you can create a new accelerator. By creating an accelerator, you can ensure that your technology stacks and organizational best practices are adhered to.
NoteThis guide follows a quick start format. See the Application Accelerator documentation for advanced features.
What you will do
- Create a new accelerator project that contains an
accelerator.yamlfile andREADME.mdfile. - Configure the
accelerator.yamlfile to alter the project’sREADME.md. - Test your accelerator locally using the Tanzu CLI
generate-from-localcommand. - Create a new Git repository for the project and push the project to it.
- Register the accelerator in a Tanzu Application Platform instance.
- Verify project generation with the new accelerator by using Tanzu Developer Portal (formerly named Tanzu Application Platform GUI).
Set up Visual Studio Code
-
To simplify accelerator authoring, code assist capabilities are available. To install the extension, navigate to the Marketplace page for the YAML plug-in and click Install.
Note
Code assist for authoring accelerators is also available in the IntelliJ IDE. You can enable this by selecting Application Accelerator in the schema mapping drop-down menu. For more information about how to enable this, see the IntelliJ Using schemas from JSON Schema Store documentation.
- After you install the plug-in, editing files entitled
accelerator.yamlautomatically uses the code assist capabilities.
Create a simple project
To create your project, follow these instructions to set up the project directory, prepare the README.md and accelerator.yaml, and test your accelerator.
Set up the project directory
-
Create a new directory for the project named
myProjectand change to the newly created directory.mkdir myProject cd myProject -
Create two new files in the
myProjectdirectory namedREADME.mdandaccelerator.yaml.touch README.MD accelerator.yaml
Prepare the README.md and accelerator.yaml
The following instructions require using Visual Studio Code to edit the files.
-
Using Visual Studio Code, open the
README.md, copy and paste the following code block into it, and save the file.CONFIGURABLE_PARAMETER_#is targeted to be transformed during project generation in the upcomingaccelerator.yamldefinition.## Tanzu Application Accelerator Sample Project This is some very important placeholder text that should describe what this project can do and how to use it. Here are some configurable parameters: * CONFIGURABLE_PARAMETER_1 * CONFIGURABLE_PARAMETER_2 -
Open
accelerator.yamland begin populating the file section using the snippet below. This section contains important information, such as the accelerator’s display name, description, tags, and more.For all possible parameters available in this section, see Creating accelerator.yaml.
accelerator: displayName: Simple Accelerator description: Contains just a README iconUrl: https://blogs.vmware.com/wp-content/uploads/2022/02/tap.png tags: - simple - getting-started -
Add the configuration parameters using the following code snippet. This configures what parameters are displayed in the accelerator form during project creation.
In this example snippet, the field
firstConfigurableParametertakes in text the user provides. ThesecondConfigurableParameterdoes the same, except it is only displayed if the user checkssecondConfigurableParameterCheckboxbecause of thedependsOnparameter.For more information about possible options, see Creating accelerator.yaml.
# Place this after the 'tags' section from the previous step options: - name: firstConfigurableParameter inputType: text label: The text used to replace the first placeholder text in the README.md. Converted to lowercase. defaultValue: Configurable Parameter 1 required: true - name: secondConfigurableParameterCheckbox inputType: checkbox dataType: boolean label: Enable to configure the second configurable parameter, otherwise use the default value. - name: secondConfigurableParameter inputType: text label: The text used to replace the second placeholder text in the README.md. Converted to lowercase. defaultValue: Configurable Parameter 2 dependsOn: name: secondConfigurableParameterCheckbox -
Add the
engineconfiguration by using the following code snippet and save the file.The
engineconfiguration tells theaccelerator enginebehind the scenes what must be done to the project files during project creation. In this example, this instructs the engine to replaceCONFIGURABLE_PARAMETER_1and, if the check box is checked,CONFIGURABLE_PARAMETER_2with the parameters that the user passes in during project creation.This also leverages Spring Expression Language (SpEL) syntax to convert the text input to all lowercase.
For more information about the possible parameters for use within the
enginesection, see Creating accelerator.yaml.# Place this after the `options` section from the previous step engine: merge: - include: [ "README.md" ] chain: - type: ReplaceText substitutions: - text: "CONFIGURABLE_PARAMETER_1" with: "#firstConfigurableParameter.toLowerCase()" - condition: "#secondConfigurableParameterCheckbox" chain: - type: ReplaceText substitutions: - text: "CONFIGURABLE_PARAMETER_2" with: "#secondConfigurableParameter.toLowerCase()"
Test the accelerator
It is important to quickly test and iterate on accelerators as they are being developed to ensure that the resulting project is generated as expected.
-
Using the terminal of your choice with access to the
tanzucommand, run the following command to test the accelerator created earlier.This step takes the local
accelerator.yamland project files, configures the project using the parameters passed in through the--optionsfield, and outputs the project to a specified directory.Important
This step requires that the
TANZU-APPLICATION-ACCELERATOR-URLendpoint is exposed and accessible. For more information, see Server API connections for operators and developers.tanzu accelerator generate-from-local \ --accelerator-path simple-accelerator="$(pwd)" `# The path to new accelerator` \ --server-url TANZU-APPLICATION-ACCELERATOR-URL `# Example: https://accelerator.mytapcluster.myorg.com` \ --options '{"firstConfigurableParameter": "Parameter 1", "secondConfigurableParameterCheckbox": true, "secondConfigurableParameter":"Parameter 2"}' \ -o "${HOME}/simple-accelerator/" `# Change this path to change where the project folder gets generated` -
After the project is generated, a status message is displayed.
generated project simple-accelerator -
Navigate to the output directory and verify that the
README.mdis updated based on the--optionsspecified in the precedinggenerate-from-localcommand.## Tanzu Application Accelerator Sample Project This is some very important placeholder text that should describe what this project can do and how to use it. Here are some configurable parameters: - parameter 1 - parameter 2
Upload the project to a Git repository
The Application Accelerator system and Tanzu Developer Portal depend on an accelerator project residing inside a Git repository. For this example, GitHub is used.
-
Create a new repository in GitHub and ensure that Visibility is set to Public. Click Create Repository.
-
To push your accelerator project (not the generated project from
generate-from-local) to GitHub, follow the instructions that GitHub provides for the …or create a new repository on the command line that is shown after clicking Create Repository. Instructions can also be found in the GitHub documentation. -
Verify that the project is pushed to the target repository.
Register the accelerator to the Tanzu Application Platform and verify project generation output
Now that the accelerator is committed to its own repository, you can register the accelerator to Tanzu Developer Portal for developers to generate projects from the newly created accelerator.
To do so, use the URL of the Git repository and branch name created earlier and run the following command using the Tanzu CLI to register the accelerator to Tanzu Developer Portal.
Note
tanzu accelerator createworks with monorepos as well. Add the--git-sub-pathparameter with the desired subpath to fetch the accelerator project in that directory. For more information, see tanzu accelerator create.
tanzu accelerator create simple-accelerator --git-repository https://github.com/myusername/myprojectrepository --git-branch main
The accelerator can take time to reconcile. After it has reconciled, it is available for use in Tanzu Developer Portal and the Application Accelerator extension for Visual Studio Code.
Verify project generation output by using Tanzu Developer Portal
-
Navigate to your organization’s instance of Tanzu Developer Portal.
-
On the left navigation pane, click Create.
-
Using the search bar near the left side of the page, search for
simple accelerator. After you’ve found it, click Choose on the accelerator card.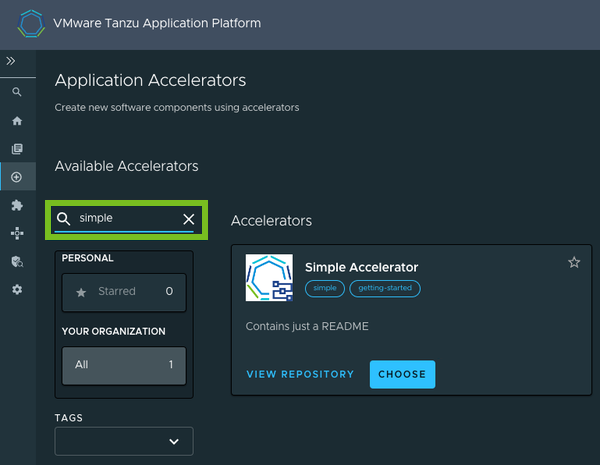
-
Configure the project by filling in the parameters in the form.
The options you defined in
accelerator.yamlare now displayed for you to configure. ThesecondConfigurableParameterdependsOnsecondConfigurableParameterCheckboxmight be hidden depending on whether the check box is selected.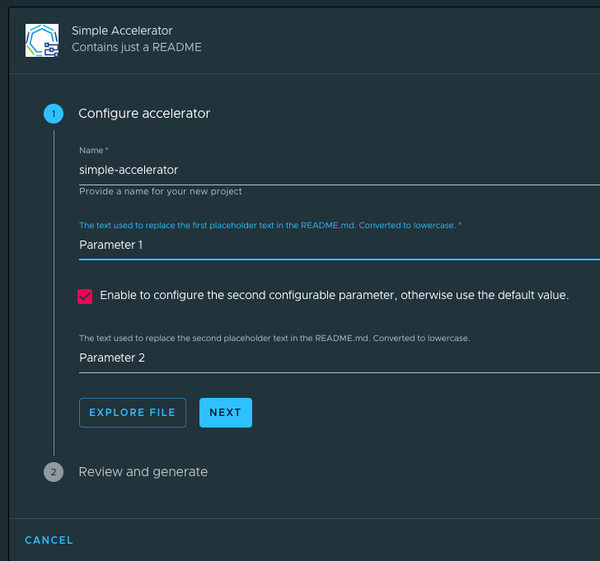
-
After configuration is complete, click Next.
Note
Depending on your organization’s Tanzu Application Platform configuration, you might be presented with an option to create a Git repository. In this guide, this is skipped and is covered in Deploy an app on Tanzu Application Platform.
-
On the Review and generate step, review the parameters and click Generate Accelerator.
-
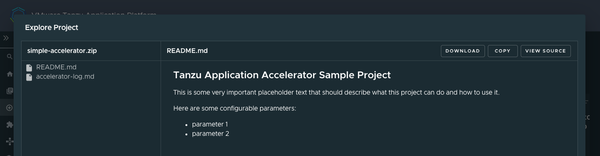
Explore the ZIP file of the configured project and verify that the project is generated with the parameters you provided during configuration.
Learn more about Application Accelerator
-
For advanced functionality when creating accelerators, such as accelerator best practices, accelerator fragments, engine transforms, and more, see the Application Accelerator documentation.
-
For more information about Application Accelerator configurations, see the Configure Application Accelerator documentation.
-
For information about installing the Application Accelerator extension for Visual Studio Code, see the Application Accelerator Visual Studio Code extension documentation.
-
For general accelerator troubleshooting, see Troubleshooting Application Accelerator for VMware Tanzu.
