


Catalog operations
The software catalog setup procedures in this topic make use of Backstage. For more information about Backstage, see the Backstage documentation.
Adding catalog entities
This section describes how you can format your own catalog. Creating catalogs consists of building metadata YAML files stored together with the code. This information is read from a Git-compatible repository consisting of these YAML catalog definition files. Changes made to the catalog definitions on your Git infrastructure are automatically reflected every 200 seconds or when manually registered.
For each catalog entity kind you create, there is a file format you must follow. For information about all types of entities, see the Backstage documentation.
You can use the example blank catalog described in the Tanzu Developer Portal (formerly named Tanzu Application Platform GUI) prerequisites as a foundation for creating user, group, system, and main component YAML files.
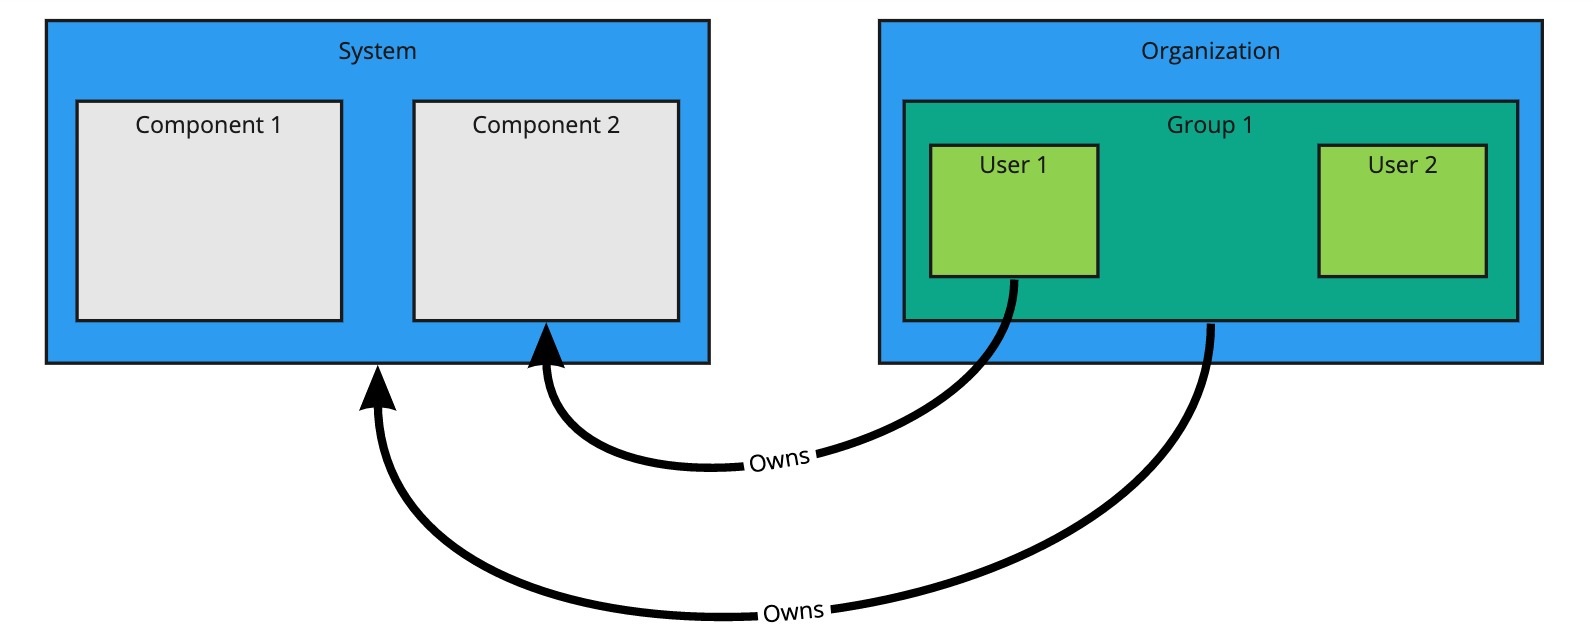
The organization contains Group 1, and Group 1 contains Users 1 and 2. System contains Components 1 and 2. User 1 owns Component 2. Group 1 owns System.
Users and groups
A user entity describes a specific person and is used for identity purposes. Users are members of one or more groups. A group entity describes an organizational team or unit.
Users and groups have different descriptor requirements in their descriptor files:
- User descriptor files require
apiVersion,kind,metadata.name, andspec.memberOf. - Group descriptor files require
apiVersion,kind, andmetadata.name. They also requirespec.typeandspec.childrenwherespec.childrenis another group.
To link a logged-in user to a user entity, include the optional spec.profile.email field.
Sample user entity:
apiVersion: backstage.io/v1alpha1
kind: User
metadata:
  name: default-user
spec:
  profile:
    displayName: Default User
    email: [email protected]
    picture: https://avatars.dicebear.com/api/avataaars/[email protected]?background=%23fff
  memberOf: [default-team]
Sample group entity:
apiVersion: backstage.io/v1alpha1
kind: Group
metadata:
  name: default-team
  description: Default Team
spec:
  type: team
  profile:
    displayName: Default Team
    email: [email protected]
    picture: https://avatars.dicebear.com/api/identicon/[email protected]?background=%23fff
  parent: default-org
  children: []
For more information about user entities and group entities, see the Backstage documentation.
Systems
A system entity is a collection of resources and components.
System descriptor files require values for apiVersion, kind, metadata.name, and also spec.owner where spec.owner is a user or group.
A system has components when components specify the system name in the field spec.system.
Sample system entity:
apiVersion: backstage.io/v1alpha1
kind: System
metadata:
  name: backstage
  description: Tanzu Developer Portal System
spec:
  owner: default-team
For more information about system entities, see the Backstage documentation.
Components
A component describes a software component, or what might be described as a unit of software.
Component descriptor files require values for apiVersion, kind, metadata.name, spec.type, spec.lifecycle, and spec.owner.
Some useful optional fields are spec.system and spec.subcomponentOf, both of which link a component to an entity that it is part of.
apiVersion: backstage.io/v1alpha1
kind: Component
metadata:
  name: backstage-component
  description: Tanzu Developer Portal Component
  annotations:
    'backstage.io/kubernetes-label-selector': 'app=backstage' #Identifies the Kubernetes objects that make up this component
    'backstage.io/techdocs-ref': dir:. #TechDocs label
spec:
  type: service
  lifecycle: alpha
  owner: default-team
  system: backstage
For more information about component entities, see the Backstage documentation.
Update software catalogs
The following procedures describe how to update software catalogs.
Register components
To update your software catalog with new entities without re-deploying the entire tap-gui package:
- Go to your Software Catalog page.
- Click Register Entity at the top-right of the page.
- Enter the full path to link to an existing entity file and start tracking your entity.
- Import the entities and view them in your Software Catalog page.
Deregister components
To deregister an entity:
- Go to your Software Catalog page.
- Select the entity to deregister, such as component, group, or user.
- Click the three dots at the top-right of the page and then click Unregister….
Add or change organization catalog locations
To add or change organization catalog locations, you can use static configuration or you can use GitLabDiscoveryProcessor to discover and register catalog entities that match the configured path.
- Use static configuration
-
To use static configuration to add or change catalog locations:
-
Update components by changing the catalog location in either the
app_configsection oftap-gui-values.yamlor the custom values file you used when installing. For example:tap_gui: app_config: catalog: locations: - type: url target: UPDATED-CATALOG-LOCATION -
Register components by adding the new catalog location in either the
app_configsection oftap-gui-values.yamlor the custom values file you used when installing. For example:tap_gui: app_config: catalog: locations: - type: url target: EXISTING-CATALOG-LOCATION - type: url target: EXTRA-CATALOG-LOCATIONWhen targeting GitHub, don’t write the raw URL. Instead, use the URL that appears when you navigate to the file in the browser. The catalog processor cannot set up the files properly if you use the raw URL.
- Example raw URL:
https://raw.githubusercontent.com/user/repo/catalog.yaml - Example target URL:
https://github.com/user/repo/blob/main/catalog.yaml
When targeting GitLab, use a scoped route to the catalog file. This is a route with the
/-/separator after the project name. If you don’t use a scoped route, your entity fails to appear in the catalog.- Example unscoped URL:
https://gitlab.com/group/project/blob/main/catalog.yaml - Example target URL:
https://gitlab.com/group/project/-/blob/main/catalog.yaml
For more information about static catalog configuration, see the Backstage documentation.
- Example raw URL:
-
- Use GitLabDiscoveryProcessor
-
To use
GitLabDiscoveryProcessorto discover and register catalog entities:-
Use
type: gitlab-discoveryto makeGitLabDiscoveryProcessorcrawl the GitLab instance to discover and register catalog entities that match the configured path. For more information, see the Backstage documentation. -
Update the package to include the catalog:
-
If you installed Tanzu Developer Portal by using a profile, run:
tanzu package installed update tap \ --package tap.tanzu.vmware.com \ --version PACKAGE-VERSION \ --values-file tap-values.yaml \ --namespace tap-install -
If you installed Tanzu Developer Portal as an individual package, run:
tanzu package installed update tap-gui \
--package tap-gui.tanzu.vmware.com \
--version PACKAGE-VERSION \
--values-file tap-gui-values.yaml \
--namespace tap-install
-
-
Verify the status of this update by running:
tanzu package installed list -n tap-install
-
Install demo apps and their catalogs
To set up one of the demos, you can choose a blank catalog or a sample catalog.
Yelb system
The Yelb demo catalog in GitHub includes all the components that make up the Yelb system and the default Backstage components.
Install Yelb
To install Yelb:
- Download the necessary file for running the Yelb application itself from GitHub.
- Install the application on the Kubernetes cluster that you used for Tanzu Application Platform. Preserve the metadata labels on the Yelb application objects.
Install the Yelb catalog
To install the Yelb catalog:
- Download the Tanzu Application Platform Developer Portal Yelb Catalog catalog from the Broadcom Support Portal.
- Unpack the downloaded TAR archive to a local drive.
- Follow the earlier steps for Register components to register the
catalog-info.yamlin the root of the unpacked archive and register all the catalog entities that constitute the Yelb system.
