


Configure a TLS certificate by using cert-manager and a ClusterIssuer
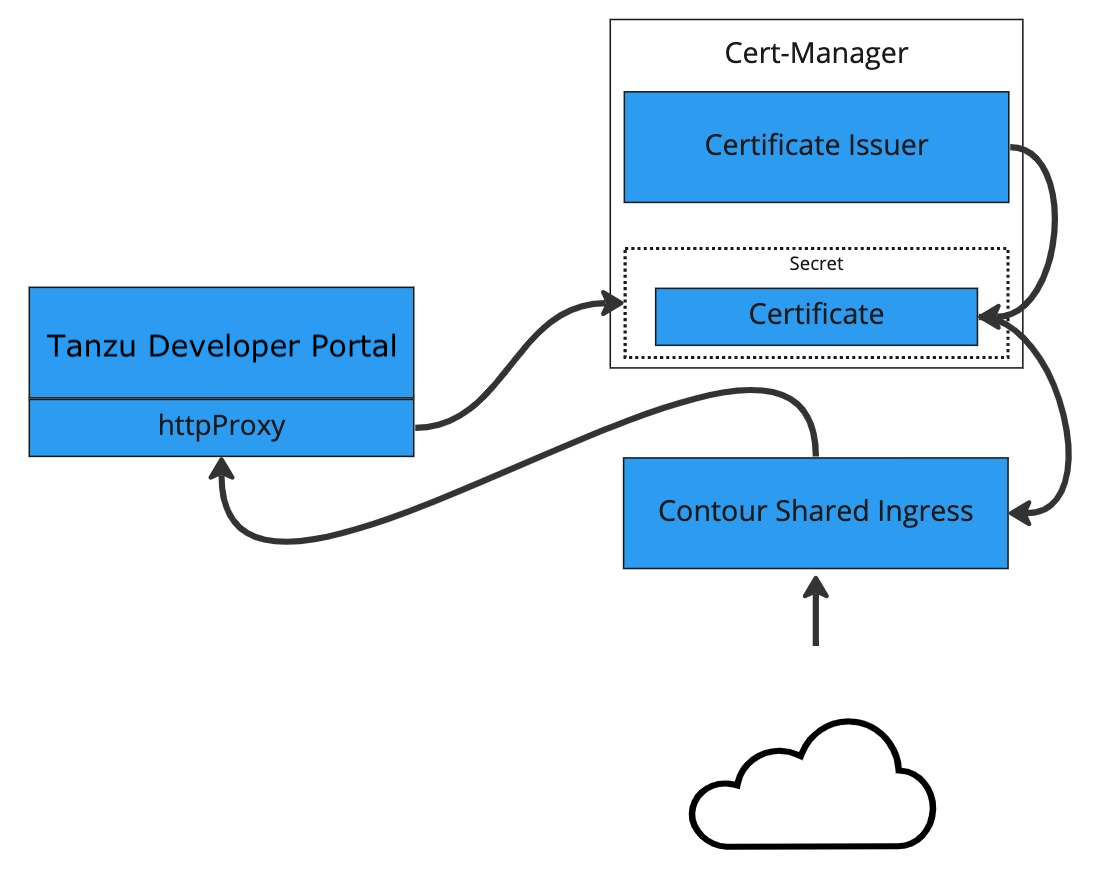
This topic tells you how to use cert-manager to create a certificate issuer and then generate a certificate for Tanzu Developer Portal (formerly called Tanzu Application Platform GUI) to use based on that issuer.
This topic uses the free certificate issuer Let’s Encrypt. You can use other certificate issuers compatible with cert-manager in a similar fashion.
Prerequisites
Fulfil these prerequisites:
-
Install a Tanzu Application Platform profile that includes cert-manager. Verify you did this by running the following command to detect the cert-manager namespace:
kubectl get ns -
Obtain a domain name that you control or own and have proof that you control or own it. In most cases, this domain name is the one you used for the
INGRESS-DOMAINvalues when you installed Tanzu Application Platform and Tanzu Developer Portal. - If cert-manager cannot perform the challenge to verify your domain’s compatibility, you must do so manually. For more information, see How It Works and Getting Started in the Let’s Encrypt documentation.
-
Ensure that your domain name is pointed at the shared Contour ingress for the installation. Find the IP address by running:
kubectl -n tanzu-system-ingress get services envoy -o jsonpath='{.status.loadBalancer.ingress[0].ip}'
Procedure
To configure a self-signed TLS certificate for Tanzu Developer Portal:
-
Create a
certificate.yamlfile that defines an issuer and a certificate. For example:apiVersion: cert-manager.io/v1 kind: ClusterIssuer metadata: name: letsencrypt-http01-issuer namespace: cert-manager spec: acme: server: https://acme-v02.api.letsencrypt.org/directory email: EMAIL-ADDRESS privateKeySecretRef: name: letsencrypt-http01-issuer solvers: - http01: ingress: class: contour --- apiVersion: cert-manager.io/v1 kind: Certificate metadata: namespace: cert-manager name: tap-gui spec: commonName: tap-gui.INGRESS-DOMAIN dnsNames: - tap-gui.INGRESS-DOMAIN issuerRef: name: letsencrypt-http01-issuer kind: ClusterIssuer secretName: tap-guiWhere:
EMAIL-ADDRESSis the email address that Let’s Encrypt shows as responsible for this certificateINGRESS-DOMAINis your domain value that matches the values you used when you installed the profile
-
Add the issuer and certificate to your cluster by running:
kubectl apply -f certificate.yamlBy applying the certificate, cert-manager attempts to perform an HTTP01 challenge by creating an Ingress resource specifically for the challenge. This is automatically removed from your cluster after the challenge is completed. For more information about how this works, and when it might not, see the cert-manager documentation.
-
Validate the certificate was created and is ready by running:
kubectl get certs -n cert-managerWait a few moments for this to take place, if need be.
-
Configure Tanzu Developer Portal to use the newly created certificate. To do so, update the
tap-values.yamlfile that you used during installation to include the following items under thetap-guisection:- A top-level
tlskey with subkeys fornamespaceandsecretName - A namespace referring to the namespace containing the
Certificateobject from earlier - A secret name referring to the
secretNamevalue defined in yourCertificateresource earlier
Example:
tap_gui: tls: namespace: cert-manager secretName: tap-gui # Additional configuration below this line as needed - A top-level
-
Update the Tanzu Application Platform package with the new values in
tap-values.yamlby running:tanzu package installed update tap -p tap.tanzu.vmware.com -v TAP-VERSION --values-file tap-values.yaml -n tap-installWhere
TAP-VERSIONis the version that matches the values you used when you installed the profile.
