


Use Tanzu Developer Tools for IntelliJ
Ensure that the project you want to use the Tanzu Developer Tools for IntelliJ extension with has the required files specified in Getting started.
The extension requires only one Tiltfile and one workload.yaml file per project. workload.yaml must be a single-document YAML file, not a multi-document YAML file.
Workload Actions
The extension enables you to apply, debug, and Live Update your application on a Kubernetes cluster that has Tanzu Application Platform. The developer sandbox experience enables developers to Live Update their code and simultaneously debug the updated code, without having to deactivate Live Update when debugging.
Apply a workload
The extension enables you to apply workloads on your Kubernetes cluster that has Tanzu Application Platform.
To apply a workload:
-
Right-click anywhere in the IntelliJ project explorer and click Tanzu > Apply Workload or right-click on an associated workload in the Workloads panel and click Apply Workload.
-
Click Tanzu > Modify Apply Configuration.
The Tanzu workload apply command is triggered in the terminal and the workload is applied. A new workload appears on the Tanzu panel.
Delete a workload
The extension enables you to delete workloads on your Kubernetes cluster that has Tanzu Application Platform.
To delete a workload right-click anywhere in the IntelliJ project explorer and click Tanzu > Delete Workload or right-click on an associated workload in the Workloads panel and click Delete Workload.
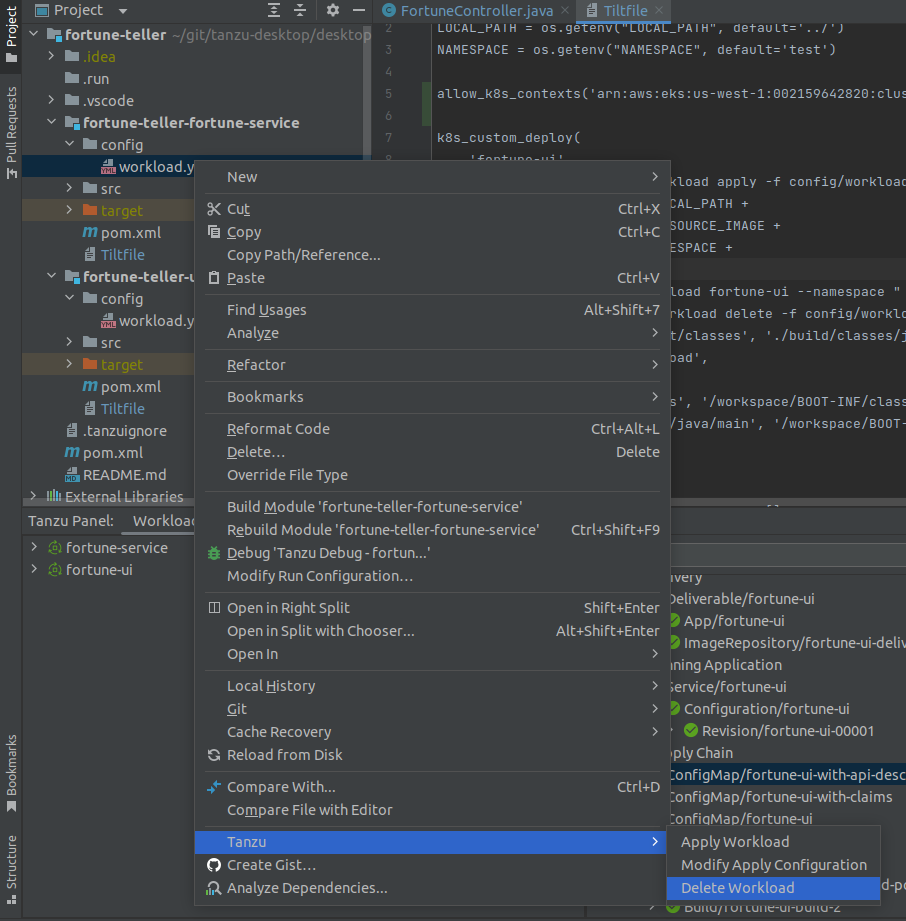
A message appears that prompts you to delete the workload and not warn again, delete the workload, or cancel. A notification appears showing that the workload was deleted.
Debugging on the cluster
The extension enables you to debug your application on a Kubernetes cluster that has Tanzu Application Platform.
Debugging requires a single-document workload.yaml file in your project. For how to create workload.yaml, see Set up Tanzu Developer Tools.
The developer sandbox experience enables developers to Live Update their code, and simultaneously debug the updated code, without having to deactivate Live Update when debugging.
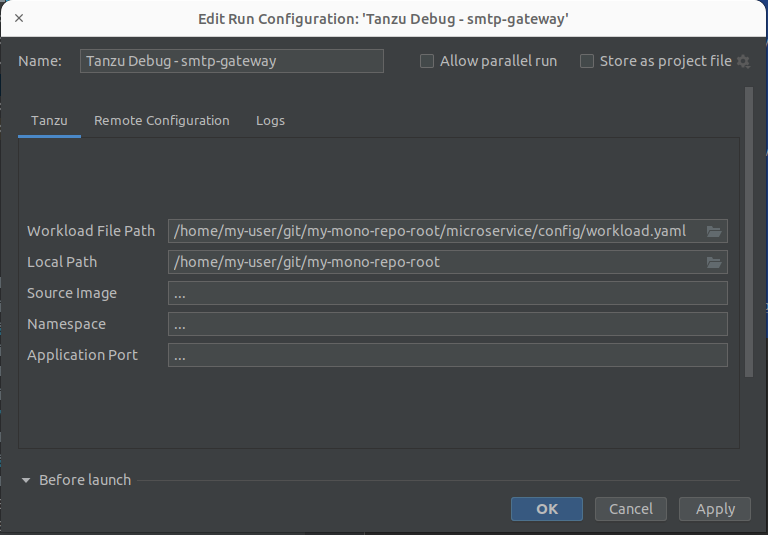
Start debugging on the cluster
To start debugging on the cluster:
- Add a breakpoint in your code.
-
Right-click the
workload.yamlfile in your project and click Debug ‘Tanzu Debug Workload…’ in the pop-up menu or right-click on an associated workload in the Workloads panel and click Debug Workload.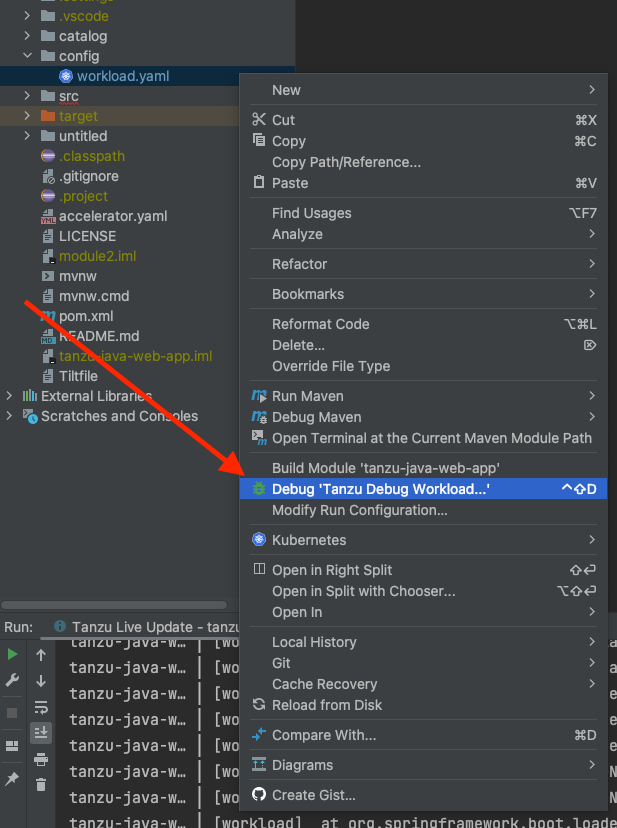
-
Ensure that the configuration parameters are set:
- Source Image: This is the registry location for publishing local source code. For example,
registry.io/yourapp-source. The source image parameter is optional if you have configured Local Source Proxy. - Local Path: This is the path on the local file system to a directory of source code to build.
- Namespace: This is the namespace that workloads are deployed into.
You can also manually create Tanzu Debug configurations by using the Edit Configurations IntelliJ UI.
- Source Image: This is the registry location for publishing local source code. For example,
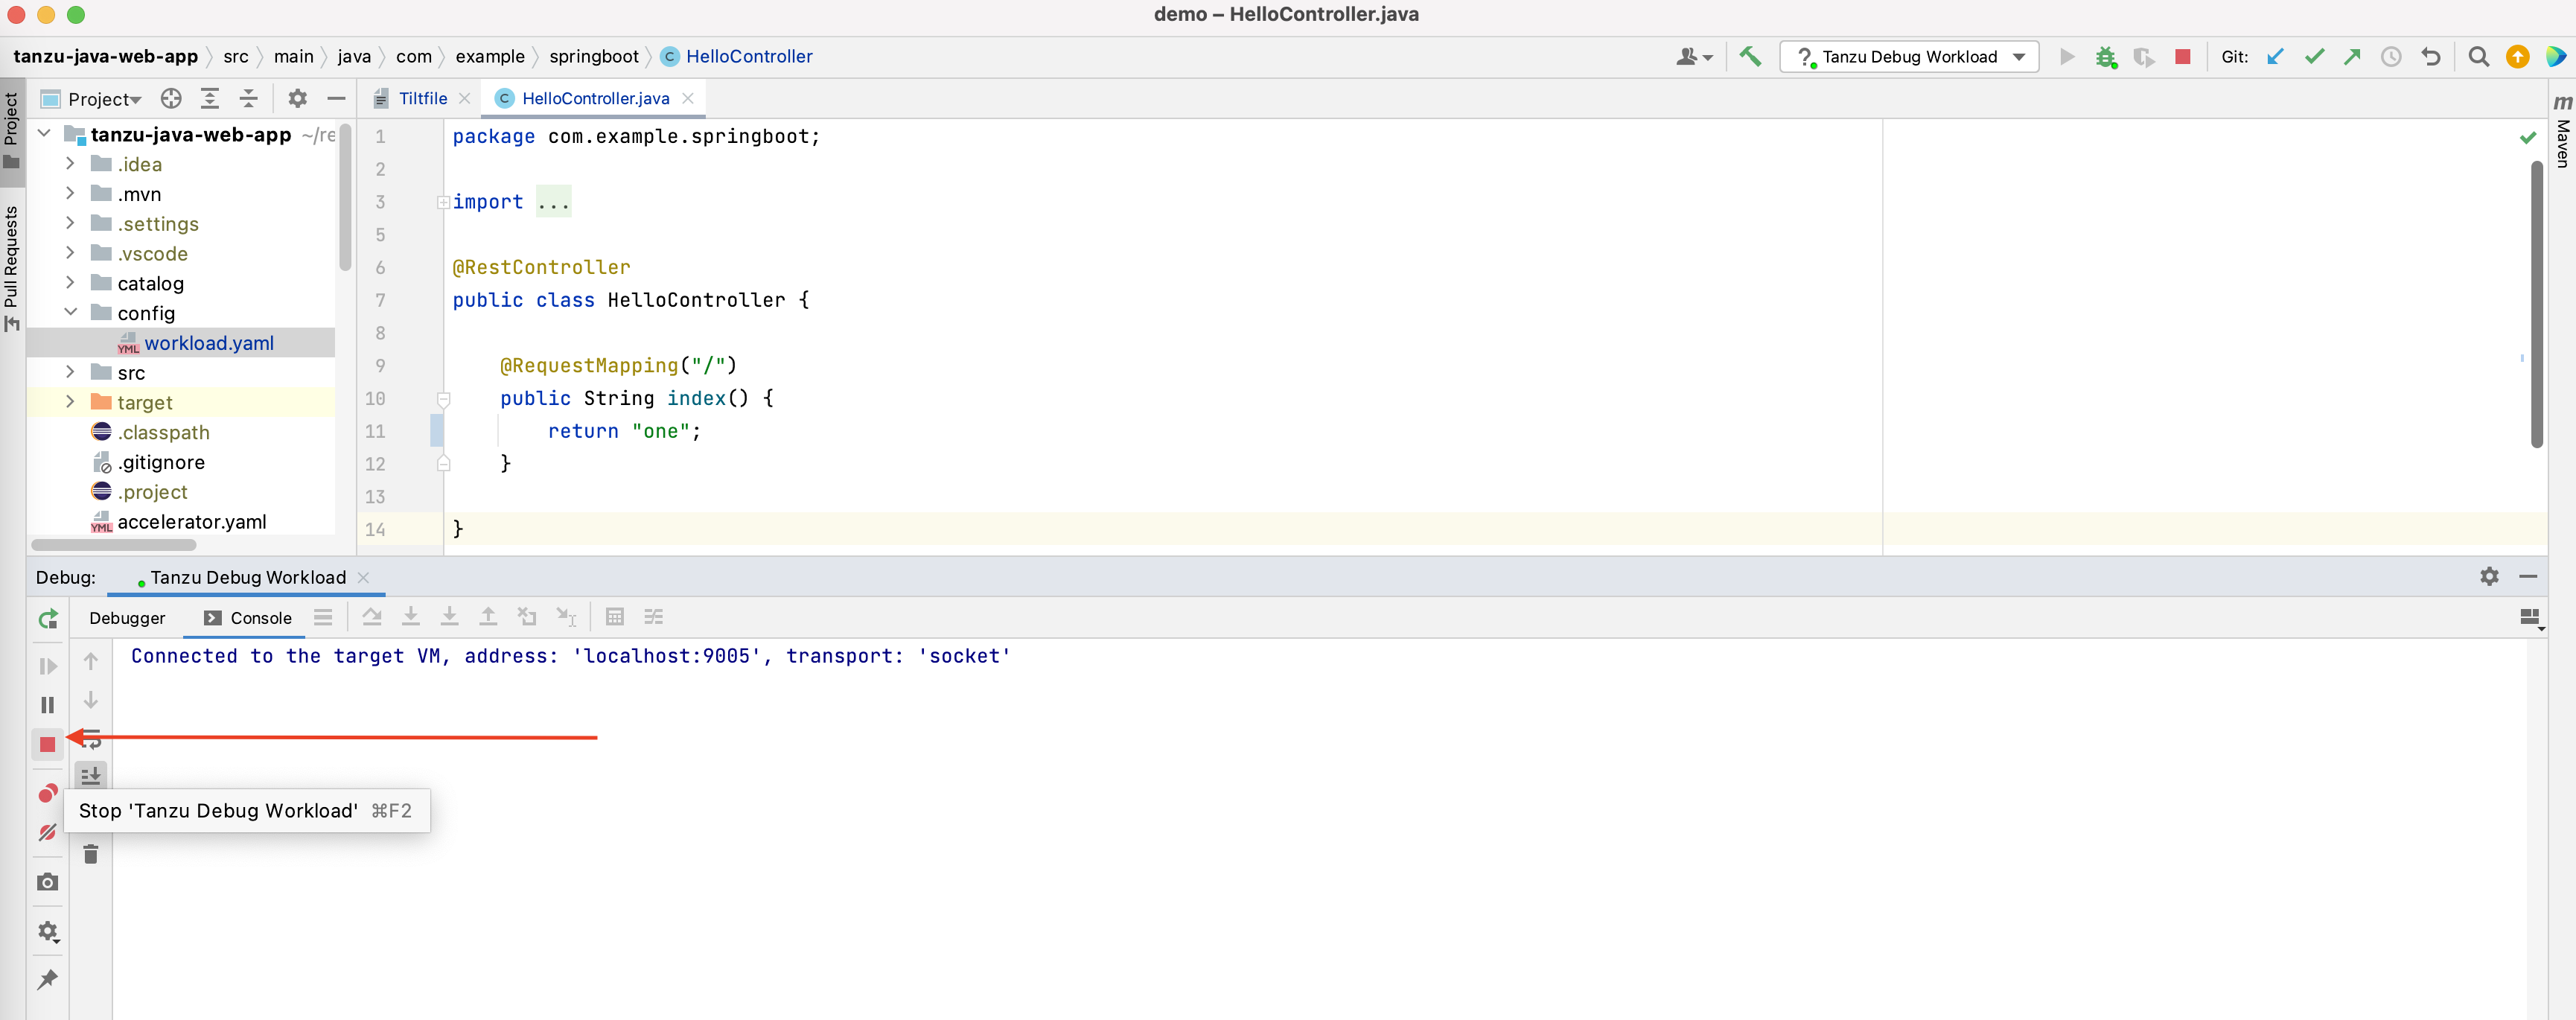
Stop Debugging on the Cluster
Click the stop button in the Debug overlay to stop debugging on the cluster.
Live Update
See the following sections for how to use Live Update.
Start Live Update
Before using Live Update, verify that your auto-save setting is either off or on with a delay. The delay must be long enough for the application to restart between auto saves to allow enough time for your app to Live Update when files change. This auto-save setting is in Preferences > Appearance & Behavior > System Settings > Autosave.
To start Live Update:
-
Right-click your project’s Tiltfile and then click Run ‘Tanzu Live Update - …’ or right-click on an associated workload in the Workloads panel and then click Live Update Workload.
-
Ensure that the configuration parameters are set:
- Source Image: This is the registry location for publishing local source code. For example,
registry.io/yourapp-source. It must include both a registry and a project name. The source image parameter is optional if you have configured Local Source Proxy. - Local Path: This is the path on the local file system to a directory of source code to build.
- Namespace: This is the namespace that workloads are deployed into.
- Source Image: This is the registry location for publishing local source code. For example,
NoteYou must compile your code before the changes are synchronized to the container. For example,
Build Project:⌘+F9.
Stop Live Update
To stop Live Update, use the native controls to stop the Tanzu Live Update Run Configuration that is running.

Tanzu Workloads panel
The current state of the workloads is visible in the Tanzu Workloads view. This view is a separate section in the bottom of the Explorer view in the Side Bar. The view shows the current status of each workload, namespace, and cluster. It also shows whether Live Update and Debug is running, stopped, or deactivated.
The Tanzu Activity tab in the Panels view enables developers to visualize the supply chain, delivery, and running application pods. The tab enables a developer to view and describe logs on each resource associated with a workload from within their IDE. The tab displays detailed error messages for each resource in an error state.
Workload commands are available from the Tanzu Workloads panel on workloads that have an associated module in the current project.
This association is based on a module name and a workload name matching. For example, a project with a module named my-app is associated with a deployed workload named my-app.
When taking an action from the Tanzu Workloads panel, the action uses the namespace of the deployed workload regardless of the configuration in the module.
For example, you might have a Live Update configuration with a namespace argument of my-apps-1, but running the action from a deployed workload in namespace my-apps-2 starts a Live Update session with a namespace argument of my-apps-2.
The Tanzu Workloads panel uses the cluster and defaults to the namespace specified in the current kubectl context. 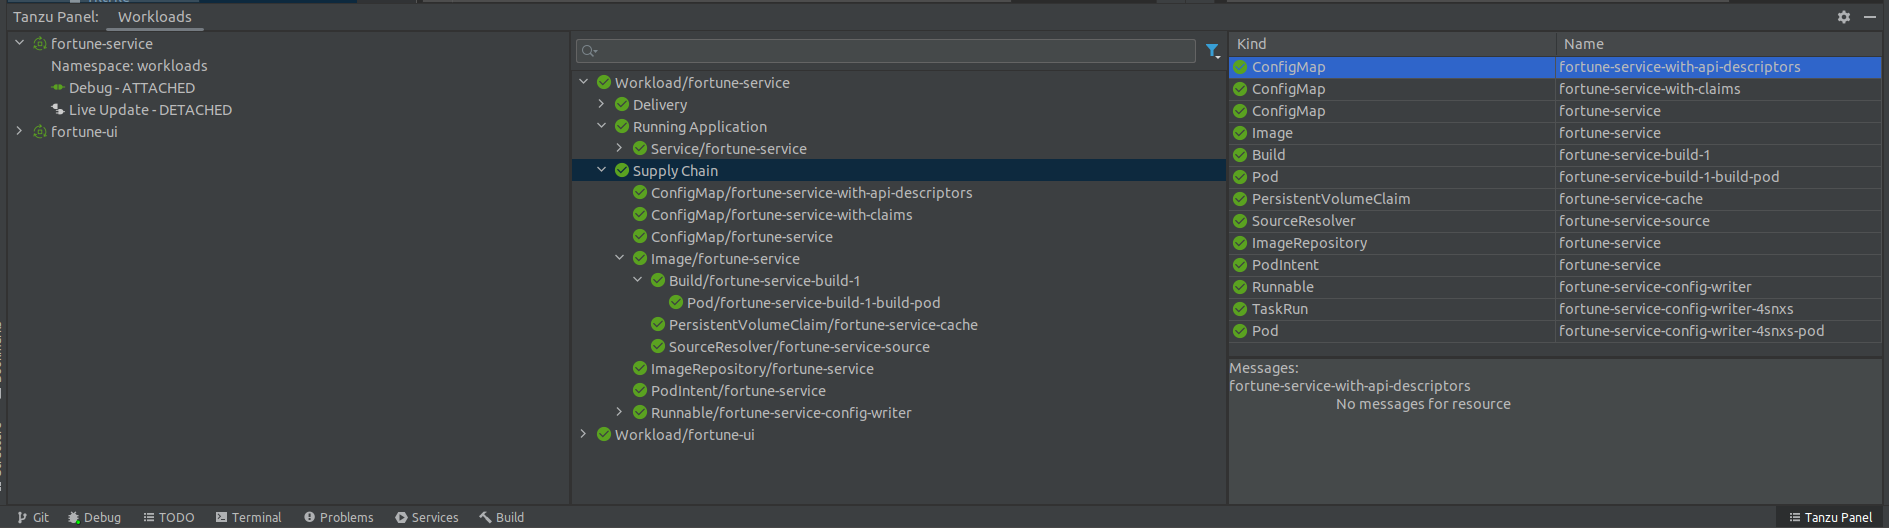
To add a namespace:
-
View the current context and namespace by running:
kubectl config get-contexts -
Set a namespace for the current context by running:
kubectl config set-context --current --namespace=YOUR-NAMESPACE -
If you are using the
KUBECONFIGenvironment variable to organize access to different clusters on macOS, use the CLI to run the IDE instead of Dock or Spotlight. For why, see Troubleshooting.
To add additional namespaces to your Workloads panel:
-
Click on the gear icon in the upper right corner of the Workloads panel.
-
Click on Select Namespaces…
-
Select the checkboxes of the namespaces that you want to add to your panel.
Working with microservices in a monorepo
A monorepo is single Git repository that contains multiple workloads. Each individual workload is placed in a subfolder of the main repository.
You can find an example of this in Application Accelerator.
The relevant accelerator is called Spring SMTP Gateway, and you can obtain its source code as an accelerator or directly from the application-accelerator-samples GitHub repository.
This project is an example of a typical layout:
MONO-REPO-ROOT/pom.xml(parent pom)microservice-app-1/pom.xmlmvnw(and other mvn-related files for building the workload)Tiltfile(supports Live Update)configworkload.yaml(supports deploying and debugging from IntelliJ)
src/(contains source code for this microservice)microservice-app-2/- …similar layout
Recommended structure: Microservices that can be built independently
In this example, each of the microservices can be built independently of one another. Each subfolder contains everything needed to build that workload.
This is reflected in the source section of workload.yaml by using the subPath attribute:
apiVersion: carto.run/v1alpha1
kind: Workload
metadata:
  name: microservice-app-1
  ...
spec:
  source:
    git:
      ref:
        branch: main
      url: https://github.com/kdvolder/sample-mono-repo.git
    subPath: microservice-app-1 # build only this
  ...
For setting up your own repositories, it’s best practice to set up a monorepo so that each microservice can be built completely independently.
To work with these monorepos:
-
Import the monorepo as a project into IntelliJ.
-
Interact with each of the subfolders as you would interact with a project containing a single workload.
Alternative structure: Services with build-time interdependencies
Some monorepos do not have submodules that can be independently built. Instead the pom.xml files of the submodules are set up to have some build-time interdependencies. For example:
- A submodule
pom.xmlcan reference the parentpom.xmlas a common place for centralized dependency management. - A microservice submodule can reference another, as a maven dependency.
- Several microservice submodules can reference one or more shared library modules.
For these projects, make these adjustments:
-
Make
workload.yamlpoint to the repository root, not a subfolder. Because submodules have dependencies on code outside of their own subfolder, all source code from the repository must be supplied to the workload builder. -
Make
workload.yamlspecify additional buildpack arguments through environment variables. They differentiate the submodule that the build is targeting.Both of these
workload.yamlchanges are in the following example:apiVersion: carto.run/v1alpha1 kind: Workload metadata: name: fortune-ui labels: apps.tanzu.vmware.com/workload-type: web app.kubernetes.io/part-of: fortune-ui spec: build: env: - name: BP_MAVEN_BUILD_ARGUMENTS value: package -pl fortune-teller-ui -am # indicate which module to build. - name: BP_MAVEN_BUILT_MODULE value: fortune-teller-ui # indicate where to find the built artefact to deploy. source: git: url: https://github.com/my-user/fortune-teller # repository root ref: branch: mainFor more information about these and other
BP_xxxbuildpack parameters, see the Buildpack documentation. -
Make the local path attribute in the launch configuration for each workload point to the path of the repository root. Because submodules have dependencies on code outside of their own subfolder, all source code from the repository must be supplied to the workload builder.
Change logging verbosity
The Tanzu Language Server saves logs to ~/tanzu-langserver.log. You can change the log verbosity in Preferences > Tools > Tanzu Developer Tools.
Work with Native Image for Java
Native Image is technology for compiling Java code ahead of time to a binary, which is a native executable file. For more information about Native Image, see the GraalVM documentation.
Native Image requires some changes to your workload.yaml files, such as adding new environment variables to the build section of the workload specifications:
spec:
  build:
    env:
      - name: BP_NATIVE_IMAGE
        value: "true"
      - name: BP_MAVEN_BUILD_ARGUMENTS
        value: -Dmaven.test.skip=true --no-transfer-progress package -Pnative
      - name: BP_JVM_VERSION
        value: 17 ## only JVM 17 and later versions support native images. Depending on your configuration, this might already be the default value.
Use native images with Maven
If you are using Maven, you must also add a native profile that includes native-maven-plugin for the build phase in pom.xml:
<profiles>
   	<profile>
        <id>native</id>
        <build>
           <plugins>
              <plugin>
                 <groupId>org.graalvm.buildtools</groupId>
                   <artifactId>native-maven-plugin</artifactId>
                </plugin>
            </plugins>
         </build>
   	</profile>
</profiles>
Supported Features
There are some differences on supported features when working with Native images:
- You can deploy workloads with native images by running the
Tanzu: Apply Workloadcommand. - You can delete workloads with native images by running the
Tanzu: Delete Workloadcommand. - Debug and Live Update are not supported when using native images. However you can add an additional
workload.yamlfile that doesn’t use a native image to iterate on your development.
This example workload.yaml specification has a native image flag:
...
spec:
  build:
    env:
      - name: BP_NATIVE_IMAGE
        value: "true"
...
This example workload.yaml specification doesn’t have a native image flag:
...
spec:
  build:
    env:
      #- name: BP_NATIVE_IMAGE
      #  value: "true"
...
The Tanzu Workloads panel adds the Native label to any workloads that contain native images. 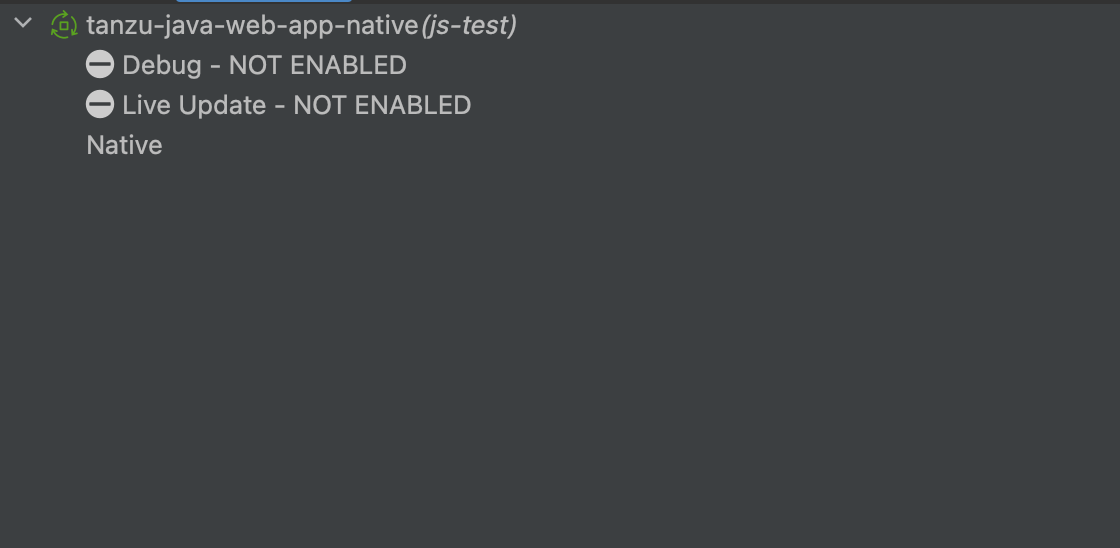 .
.
Update Workload Apply configurations
The --wait-timeout and the --type flags can be configured.
For more information, see the Tanzu CLI Command Reference documentation.
To use Telepresence, use --type server. 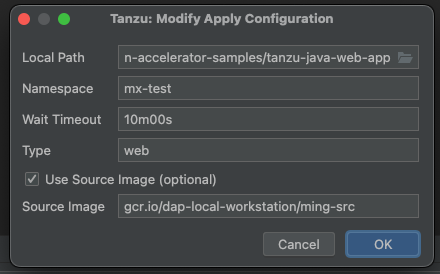 .
.
