Supply Chain Choreographer in Tanzu Developer Portal
This topic tells you about Supply Chain Choreographer in Tanzu Developer Portal.
Overview
The Supply Chain Choreographer (SCC) plug-in enables you to visualize the execution of a workload by using any of the installed Out-of-the-Box supply chains. For more information about the Out-of-the-Box (OOTB) supply chains that are available in Tanzu Application Platform, see Supply Chain Choreographer for Tanzu.
Prerequisites
To use Supply Chain Choreographer in Tanzu Developer Portal you must have:
- One of the following installed on your cluster:
- Tanzu Application Platform Full profile
- Tanzu Application Platform View profile
- Tanzu Developer Portal package and a metadata store package
- One of the following installed on the target cluster where you want to deploy your workload:
For more information, see Overview of multicluster Tanzu Application Platform
Enable CVE scan results
To see CVE scan results within Tanzu Developer Portal, connect Tanzu Developer Portal to the Tanzu Application Platform component Supply Chain Security Tools - Store (SCST - Store).
Automatically connect Tanzu Developer Portal to SCST - Store
Tanzu Developer Portal has automation for enabling connection between Tanzu Developer Portal and SCST - Store. This automation is active by default and requires no configuration.
ImportantThere is a known issue with the automatic configuration breaking the SBOM download feature introduced in Tanzu Application Platform v1.6. To fix this issue, edit
tap-values.yamlas described in Troubleshooting.
To deactivate this automation, add the following block to the Tanzu Developer Portal section within tap-values.yaml:
# ...
tap_gui:
  # ...
  metadataStoreAutoconfiguration: false
This file change creates a service account for the connection with privileges scoped only to Metadata Store. In addition, it mounts the token of the service account into the Tanzu Developer Portal pod and produces for you the app_config section necessary for Tanzu Developer Portal to communicate with SCST - Store.
Troubleshooting
For debugging the automation, or for verifying that the automation is active, you must know which resources are created. The following commands display the different Kubernetes resources that are created when tap_gui.metadataStoreAutoconfiguration is set to true:
$ kubectl -n tap-gui get serviceaccount metadata-store
NAME             SECRETS   AGE
metadata-store   1         AGE-VALUE
$ kubectl -n tap-gui get secret metadata-store-access-token
NAME                          TYPE                                  DATA   AGE
metadata-store-access-token   kubernetes.io/service-account-token   3      AGE-VALUE
$ kubectl -n tap-gui get clusterrole metadata-store-reader
NAME                    CREATED AT
metadata-store-reader   CREATED-AT-TIME
$ kubectl -n tap-gui get clusterrolebinding read-metadata-store
NAME                  ROLE                                AGE
read-metadata-store   ClusterRole/metadata-store-reader   AGE-VALUE
There is another condition that impacts whether the automation creates the necessary service account. If your configuration includes a /metadata-store block, the automation doesn’t create the Kubernetes resources for use in autoconfiguration and the automation doesn’t overwrite the proxy block that you provide. To use the automation, you must delete the block at tap_gui.app_config.proxy["/metadata-store"].
For example, a tap-values.yaml file with the following content does not create additional Kubernetes resources as described earlier:
# ...
tap_gui:
  # ...
  app_config:
    # ...
    proxy:
      '/metadata-store':
        target: SOMETHING
Manually connect Tanzu Developer Portal to the Metadata Store
To manually enable CVE scan results:
- Obtain the read-write token, which is created by default when installing Tanzu Application Platform. Alternatively, create an additional read-write service account.
-
Add this proxy configuration to the
tap-gui:section oftap-values.yaml:tap_gui: app_config: proxy: /metadata-store: target: https://metadata-store-app.metadata-store:8443/api/v1 changeOrigin: true secure: false allowedHeaders: ['Accept', 'Report-Type-Format'] headers: Authorization: "Bearer ACCESS-TOKEN" X-Custom-Source: project-starWhere
ACCESS-TOKENis the token you obtained after creating a read-write service account.
ImportantThe
Authorizationvalue must start with the wordBearer.
Enable GitOps Pull Request Flow
Set up for GitOps and pull requests to enable the supply chain box-and-line diagram to show Approve a Request in the Config Writer stage details view when the Config Writer stage is clicked. For more information, see GitOps vs. RegistryOps.
Supply Chain Visibility
Before using the Supply Chain Visibility (SCC) plug-in to visualize a workload, you must create a workload.
The workload must have the app.kubernetes.io/part-of label specified, whether you manually create the workload or use one supplied with the OOTB supply chains.
Use the left sidebar navigation to access your workload and visualize it in the supply chain that is installed on your cluster.
The example workload described in this topic is named tanzu-java-web-app.
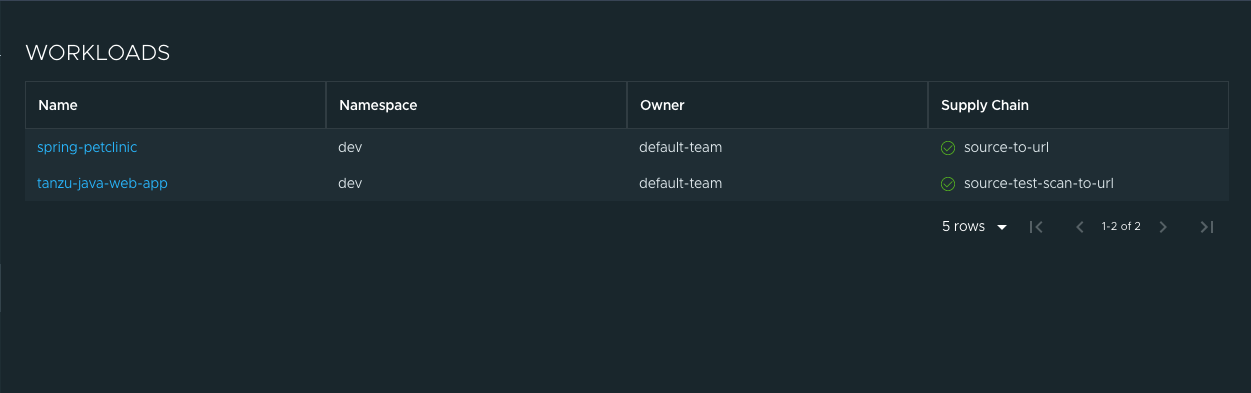
Click tanzu-java-web-app in the WORKLOADS table to navigate to the visualization of the supply chain.
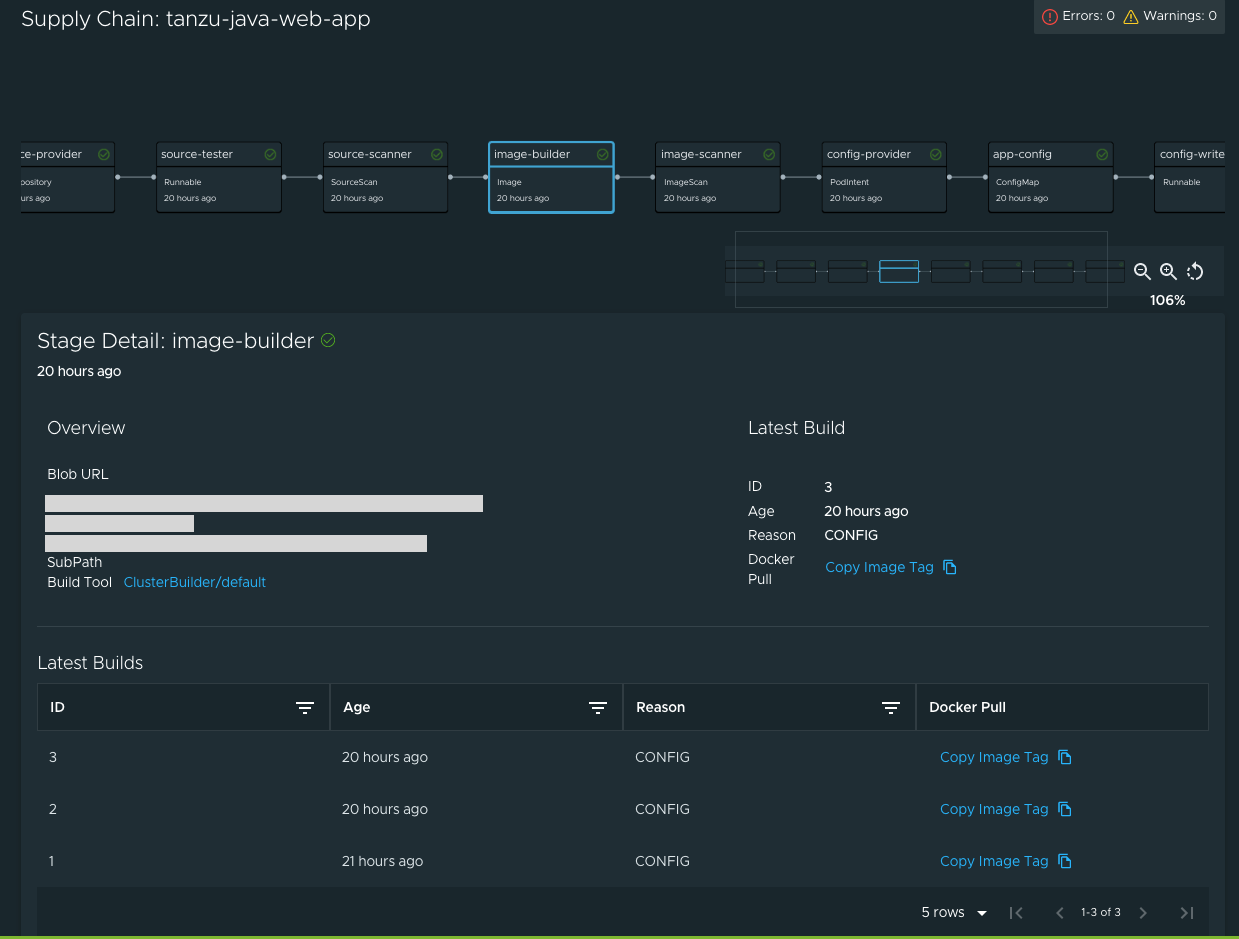
There are two sections within this view:
- The box-and-line diagram at the top shows all the configured custom resource definitions (CRDs) that this supply chain uses, and any artifacts that the supply chain’s execution outputs
- The Stage Detail section at the bottom shows source data for each part of the supply chain that you select in the diagram view
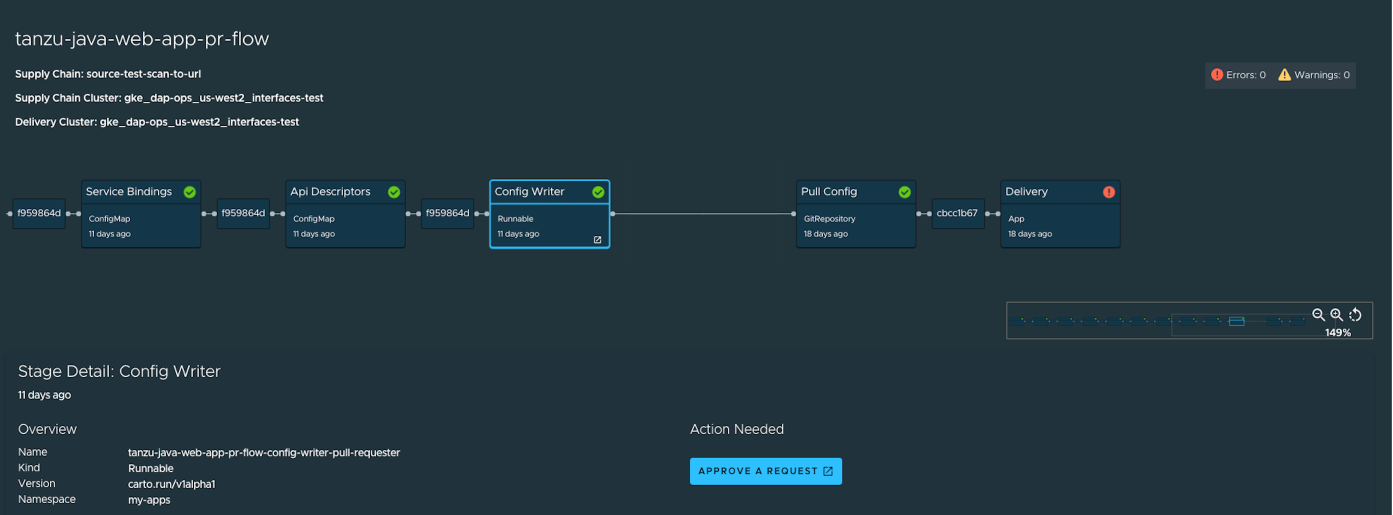
When a workload is deployed to a cluster that has the deliverable package installed, a new section appears in the supply chain that shows Pull Config boxes and Delivery boxes.
When you have a Pull Request configured in your environment, access the merge request from the supply chain by clicking APPROVE A REQUEST. This button is displayed after you click Config Writer in the supply chain diagram.
View Vulnerability Scan Results
Click the Source Scan stage or Image Scan stage to view vulnerability source scans and image scans for workload builds. The data is from Supply Chain Security Tools - Store.
CVE issues represent any vulnerabilities associated with a package or version found in the source code or image, including vulnerabilities from past scans.
NoteFor example, the
log4shellpackage is found in image ABC on 1 January without any CVEs. On 15 January, the log4j CVE issue is found while scanning image DEF. If a user returns to the Image Scan stage for image ABC, the log4j CVE issue appears and is associated with thelog4shellpackage.
Triage vulnerabilities (alpha)
This feature enables you to store analysis data for each of the vulnerabilities found in the scan.
CautionThe capability to triage scan results in Tanzu Developer Portal is in the alpha stage, which means that it is still in early development and is subject to change at any point. You might encounter unexpected behavior from it.
The feature is turned off by default in Tanzu Developer Portal. To enable the feature, add the following YAML to your configuration section within the tap-values.yaml file:
# tap-values.yaml

tap_gui:
  app_config:
    customize:
      features:
        supplyChain:
          enableTriageUI: true
When you select a scan stage, the system shows a table with vulnerabilities and a Triage Status column where you can see the latest status stored for each vulnerability.
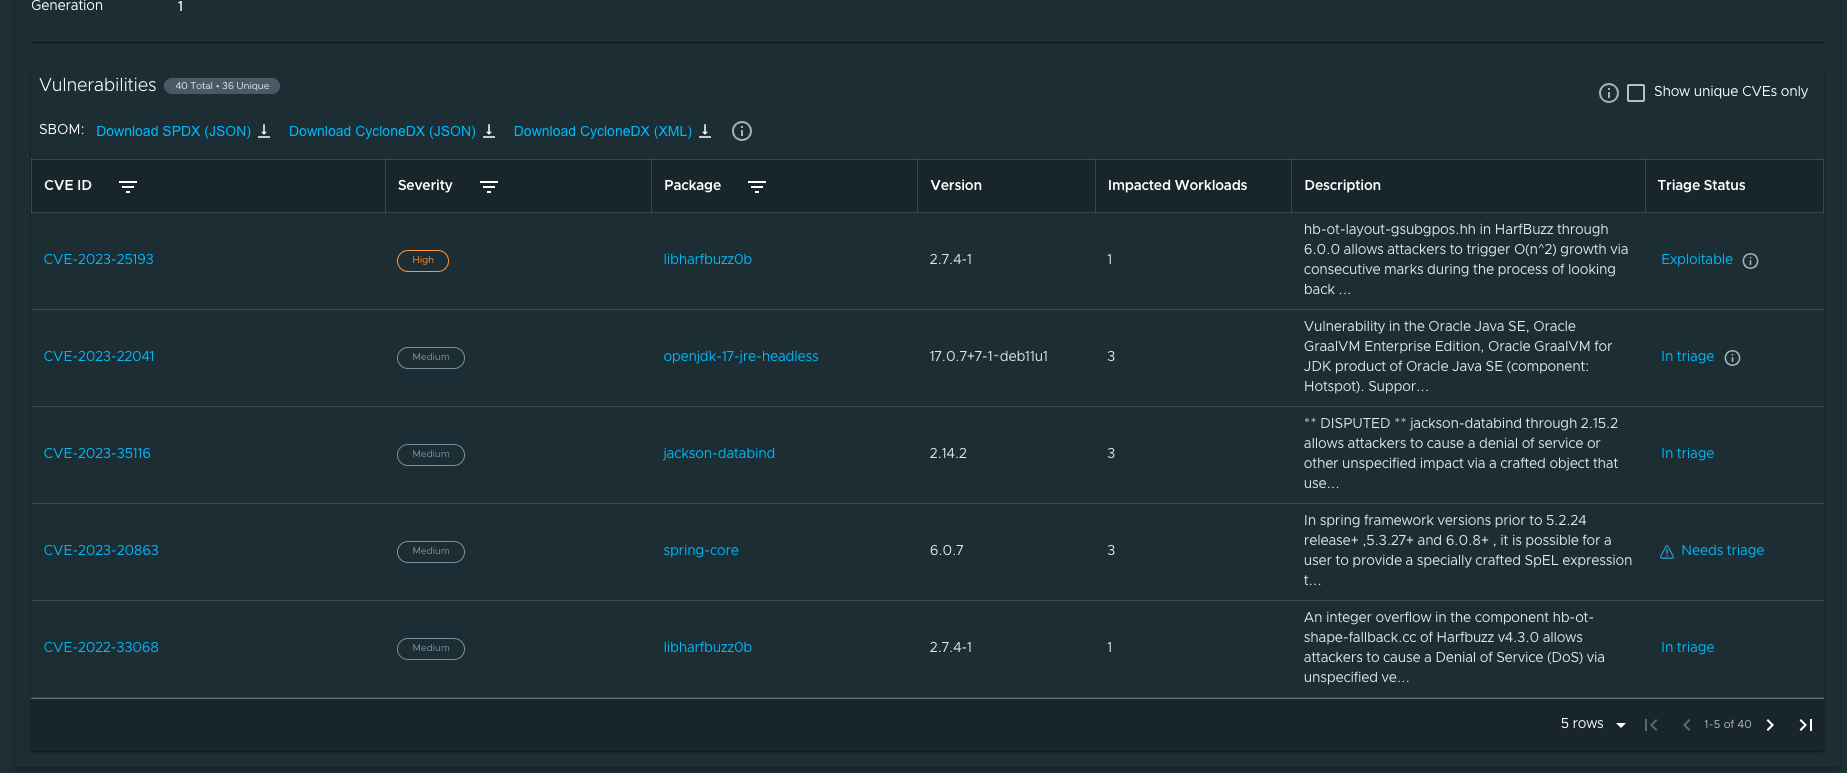
The triage panel enables you to select a status, justification, and resolutions from a set of options, and has a text box to add extra details for the analysis. After you submit this information, the status is updated on the table and the latest analysis is visible the next time you open the panel.
Needs triage is the default status for all vulnerabilities. After you submit an analysis, the status changes and the information button next to the status shows you the stored vulnerability analysis.
Support for CRDs
Tanzu Developer Portal v1.7.0 introduced support for CRDs. The following example illustrates the creation of a basic custom resource definition (CRD), which is used as part of a supply chain and its visualization in the workload:
To define and use a CRD in a supply chain:
- Define the CRD.
- Set CRD permissions.
- Define the supply chain.
- Define the
ClusterTemplate. - Create the workload.
- Visualize the workload.
Define the CRD
To define a CRD:
- Create a new YAML file with the name
NAME-crd.yaml. For example,rockets-crd.yaml. -
Add the following basic structure to the YAML file:
apiVersion: apiextensions.k8s.io/v1
kind: CustomResourceDefinition
metadata:
 name: ...
spec: ...
At its most basic, a CRD must have
apiVersion,kind,metadata, andspec.The
apiVersionfor a CRD must always beapiextensions.k8s.io/v1and thekindmust beCustomResourceDefinition. -
Add values for
groupandname. The value forgroupis usually expressed in a domain URL format, such ascompany.com, and thenamevalue can be anything.The following example uses
spaceagency.comfor thegroupandrocketsfor thename.apiVersion: apiextensions.k8s.io/v1 kind: CustomResourceDefinition metadata: name: rockets.spaceagency.com spec: group: spaceagency.com scope: Namespaced names: plural: rockets singular: rocket kind: Rocket shortNames: - rocEnsure that the name used in
metadata.namefollows the formatPLURAL-NAME.GROUP. In this example it isrockets.spaceagency.com. -
Add properties in the
specsection under a list calledversions. Make each version an object with anameand aschemafor the version, so that the CRD looks like the following example:apiVersion: apiextensions.k8s.io/v1 kind: CustomResourceDefinition metadata: ... spec: ... versions: - name: v1 served: true storage: true schema: openAPIV3Schema: type: object properties: spec: type: object properties: type: type: string fuel: type: string payloadCapacity: type: stringThe
versionsproperty also has mandatoryservedandstorageproperties. For more information aboutservedandstorage, and CRDs in general, see the Kubernetes documentation.For this example the
schemais anopenAPIV3Schemaobject. For more information, see the OpenAPI Specification in GitHub.The
openAPIV3Schemaobject lists the attributes that the instances will have and their types. In this example there are 3 attributes (type,fuel, andpayloadCapacity), and all of them are strings. -
Verify that your CRD looks like this finished example:
apiVersion: apiextensions.k8s.io/v1 kind: CustomResourceDefinition metadata: name: rockets.spaceagency.com spec: group: spaceagency.com scope: Namespaced names: plural: rockets singular: rocket kind: Rocket shortNames: - roc versions: - name: v1 served: true storage: true schema: openAPIV3Schema: type: object properties: spec: type: object properties: type: type: string fuel: type: string payloadCapacity: type: string
(Optional) Add custom data to display in the SCC UI
You can display custom data in the SCC plug-in UI by using the Printer Column feature. For more information, see the Kubernetes documentation.
NoteYou must have a service account with permissions to view the CRD, which is where printer column data is maintained. When using a service account without this permission, you don’t see any printer column data and you don’t see any warning that the data is missing.
A printer column is a list that is specified as part of a version object. Each list item specifies the following for printing:
- A column name
- The type of the value
- A JSON path, relative to the CRD itself, that shows where to get the value
The following example has 3 printer columns for displaying the .spec.type, .spec.fuel, and .spec.payloadCapacity attributes:
apiVersion: apiextensions.k8s.io/v1
kind: CustomResourceDefinition
metadata:
  name: rockets.spaceagency.com
spec:
  group: spaceagency.com
  scope: Namespaced
  names:
    plural: rockets
    singular: rocket
    kind: Rocket
    shortNames:
      - roc
  versions:
  - name: v1
    served: true
    storage: true
    schema:
      openAPIV3Schema:
        type: object
        properties:
          spec:
            type: object
            properties:
              type:
                type: string
              fuel:
                type: string
              payloadCapacity:
                type: string
additionalPrinterColumns:
- name: Type
type: string
jsonPath: .spec.type
- name: Fuel
type: string
jsonPath: .spec.fuel
- name: Payload Capacity
type: string
jsonPath: .spec.payloadCapacity
Set resource permissions
To use resources in a supply chain, set resource permissions:
-
Create a new YAML file named
permissions.yaml. -
Add a
Roleto define which actions (verbs) are allowed on this resource:apiVersion: rbac.authorization.k8s.io/v1 kind: Role metadata: namespace: NAMESPACE name: NAME rules: - apiGroups: ["API-GROUPS"] resources: ["RESOURCES-NAME"] verbs: - get - list - watch - create - patch - update - delete - deletecollectionWhere:
NAMESPACEis the namespace in which the rules apply. For example,my-apps.NAMEis the name for the role. For example,rocket-reader.API-GROUPSis the name of the groups. For example,spaceagency.comorapiextensions.k8s.io/v1.RESOURCES-NAMEis the name of the resources. For example,rocketsorcustomresourcedefinitions.
-
Add a
RoleBindingto bind this newRoleto theserviceAccountthat you typically use:apiVersion: rbac.authorization.k8s.io/v1 kind: RoleBinding metadata: name: BINDING-NAME namespace: NAMESPACE subjects: - kind: ServiceAccount name: default namespace: my-apps roleRef: kind: Role name: ROLE-REFERENCE-NAME apiGroup: rbac.authorization.k8s.ioWhere:
BINDING-NAMEis the binding name. For example,rocket-reader-binding.NAMESPACEis the namespace. For example,my-apps.ROLE-REFERENCE-NAMEis the role reference name. For example,rocket-reader.
In this binding you associate the
defaultservice account that you use with the new role you created. The two definitions together look like this example:apiVersion: rbac.authorization.k8s.io/v1 kind: Role metadata: namespace: my-apps name: rocket-reader rules: - apiGroups: ["spaceagency.com"] resources: ["rockets"] verbs: - get - list - watch - create - patch - update - delete - deletecollection --- apiVersion: rbac.authorization.k8s.io/v1 kind: RoleBinding metadata: name: rocket-reader-binding namespace: my-apps subjects: - kind: ServiceAccount name: default namespace: my-apps roleRef: kind: Role name: rocket-reader apiGroup: rbac.authorization.k8s.ioImportant
If you defined
additionalPrinterColumnsin your CRD, you must grant permissions for both the group you defined in the CRD and to theapiextensions.k8s.io/v1group that contains the definition of your resource.The finished definitions look like the following example:
apiVersion: rbac.authorization.k8s.io/v1
kind: Role
metadata:
  namespace: my-apps
  name: rocket-reader
rules:
- apiGroups: ["spaceagency.com", "apiextensions.k8s.io/v1"]
  resources: ["rockets", "customresourcedefinitions"]
  verbs:
  - get
  - list
  - watch
  - create
  - patch
  - update
  - delete
  - deletecollection
---
apiVersion: rbac.authorization.k8s.io/v1
kind: RoleBinding
metadata:
  name: rocket-reader-binding
  namespace: my-apps
subjects:
- kind: ServiceAccount
  name: default
  namespace: my-apps
roleRef:
  kind: Role
  name: rocket-reader
  apiGroup: rbac.authorization.k8s.io
Define the supply chain
Now that you have a CRD and the permissions for it, you can define a supply chain that uses this CRD as one of its resources.
The following example is a simple supply chain that has only one stage that uses an instance of the CRD. You can create the supply chain by downloading another supply chain and editing it.
-
List the existing supply chains in your cluster by running:
kubectl get ClusterSupplyChain -n NAMESPACEWhere
NAMESPACEis your namespace. For example,my-apps. -
Download one of them to a file by running:
kubectl get ClusterSupplyChain SUPPLY-CHAIN -n NAMESPACE -oyaml >> ~/supply-chain.yamlWhere:
SUPPLY-CHAINis the name a supply chain you discovered earlier.NAMESPACEis your namespace.
For example:
$ kubectl get ClusterSupplyChain source-test-scan-to-url -n my-apps -oyaml >> ~/supply-chain.yaml -
Edit the downloaded supply-chain definition as follows:
apiVersion: carto.run/v1alpha1
kind: ClusterSupplyChain
metadata:
  name: SUPPLY-CHAIN-NAME
spec:
  resources:
  - name: RESOURCES-NAME
    templateRef:
      kind: ClusterTemplate
      name: TEMPLATE-REFERENCE-NAME
  selector:
    apps.tanzu.vmware.com/LABEL: "true"
  selectorMatchExpressions:
  - key: apps.tanzu.vmware.com/workload-type
    operator: In
    values:
    - web
    - server
    - worker
Where:
SUPPLY-CHAIN-NAMEis the supply-chain name. For example,source-scan-test-scan-to-url-rockets.RESOURCES-NAMEis the resources name. For example,rocket-provider.TEMPLATE-REFERENCE-NAMEis the template reference name. For example,rocket-source-template.apps.tanzu.vmware.com/LABEL:is a label that must be present, when creating the workload, to use this supply chain. For example,apps.tanzu.vmware.com/has-rockets: "true".
apiVersionandkindstay the same.metadata.nameis created for this new supply chain.The
spec.selectorfield states which label selector is used to select this supply chain when creating a workload. -
Save the supply-chain YAML file as
NAME-supply-chain.yaml. For example,rocket-supply-chain.yaml.
Define the ClusterTemplate
In this procedure you define, for the resources field, a single resource that uses an instance of your CRD.
This example supply chain has just a single resource (stage), which is named rocket-provider. The supply chain uses a templateRef, of the kind ClusterTemplate, which is named rocket-source-template.
At its most basic, a supply chain’s resource is an object consisting of a name and a templateRef pointing to an existing ClusterTemplate.
To define a new ClusterTemplate:
-
List existing
ClusterTemplateresources by running:kubectl get ClusterTemplates -n NAMESPACEWhere
NAMESPACEis your namespace -
Download a
ClusterTemplateresource that you found by running:kubectl get ClusterTemplates TEMPLATE-NAME -n NAMESPACE -oyaml >> ~/cluster-template.yamlWhere:
TEMPLATE-NAMEis the name of theClusterTemplateresource you found. For example,config-writer-template.NAMESPACEis your namespace. For example,my-apps.
For example:
$ kubectl get ClusterTemplates config-writer-template -n my-apps -oyaml >> ~/cluster-template.yaml -
Verify that the file, when cleaned up, looks similar to the following:
apiVersion: carto.run/v1alpha1 kind: ClusterTemplate metadata: name: rocket-source-template spec: lifecycle: mutable ytt: | #@ load("@ytt:data", "data") #@ def merge_labels(fixed_values): #@ labels = {} #@ if hasattr(data.values.workload.metadata, "labels"): #@ exclusions = ["kapp.k14s.io/app", "kapp.k14s.io/association"] #@ for k,v in dict(data.values.workload.metadata.labels).items(): #@ if k not in exclusions: #@ labels[k] = v #@ end #@ end #@ end #@ labels.update(fixed_values) #@ return labels #@ end --- apiVersion: spaceagency.com/v1 kind: Rocket metadata: name: falcon9 labels: #@ merge_labels({ "app.kubernetes.io/component": "rocket" }) spec: type: Falcon 9 fuel: RP-1/LOX payloadCapacity: 22000 kgmetadata.namematches the name specified in the supply-chain resource.An instance of the new CRD is used in the
specof this resource through theyttfield. ytt is a templating language that can output resource instances.A function is retained that takes in labels from the workload and propagates them to the resource. This function is not essential, but is usually performed to propagate important labels from the workload down to the individual resources.
-
Save the file as
NAME-cluster-template.yaml. For example,rocket-cluster-template.yaml.
You have now completed all the necessary definitions to create a workload that uses this new supply chain and the new CRD.
Create the workload
Now that you have all of the resources, apply them to a cluster and then create a workload:
-
Apply your CRD by running:
kubectl apply -f rockets-crd.yaml -
Apply the resource permissions by running:
kubectl apply -f permissions.yaml -
Apply the cluster template by running:
kubectl apply -f rocket-cluster-template.yaml -
Apply the supply chain by running:
kubectl apply -f rocket-supply-chain.yamlThe cluster now has all the necessary resource definitions to create a workload by using the new supply chain, which, in turn, uses an instance of the new resource.
-
Create the workload by running:
tanzu apps workload create tanzu-rockets-test-x \
--type web \
--label app.kubernetes.io/part-of=tanzu-rockets \
--label apps.tanzu.vmware.com/has-rockets=true \
--yes \
--namespace my-apps
The label
apps.tanzu.vmware.com/has-rockets=trueis explicitly set. Theselectorproperty, specified when defining the new supply chain, ties the new supply chain with this particular workload.
Visualize the workload
To see the workload rendered through the Supply Chain plug-in:
-
Go to the supply chain plug-in section in Tanzu Developer Portal and locate the workload among the listed ones:

The workload
tanzu-rockets-xis Healthy. The Supply Chain column shows that it is using thesource-scan-test-scan-to-url-rocketssupply chain. -
Click on it to see its details. The Workload graph appears. Given that the supply chain
source-scan-test-scan-to-url-rocketsonly specified oneresource, you see a simple single-stage graph.
-
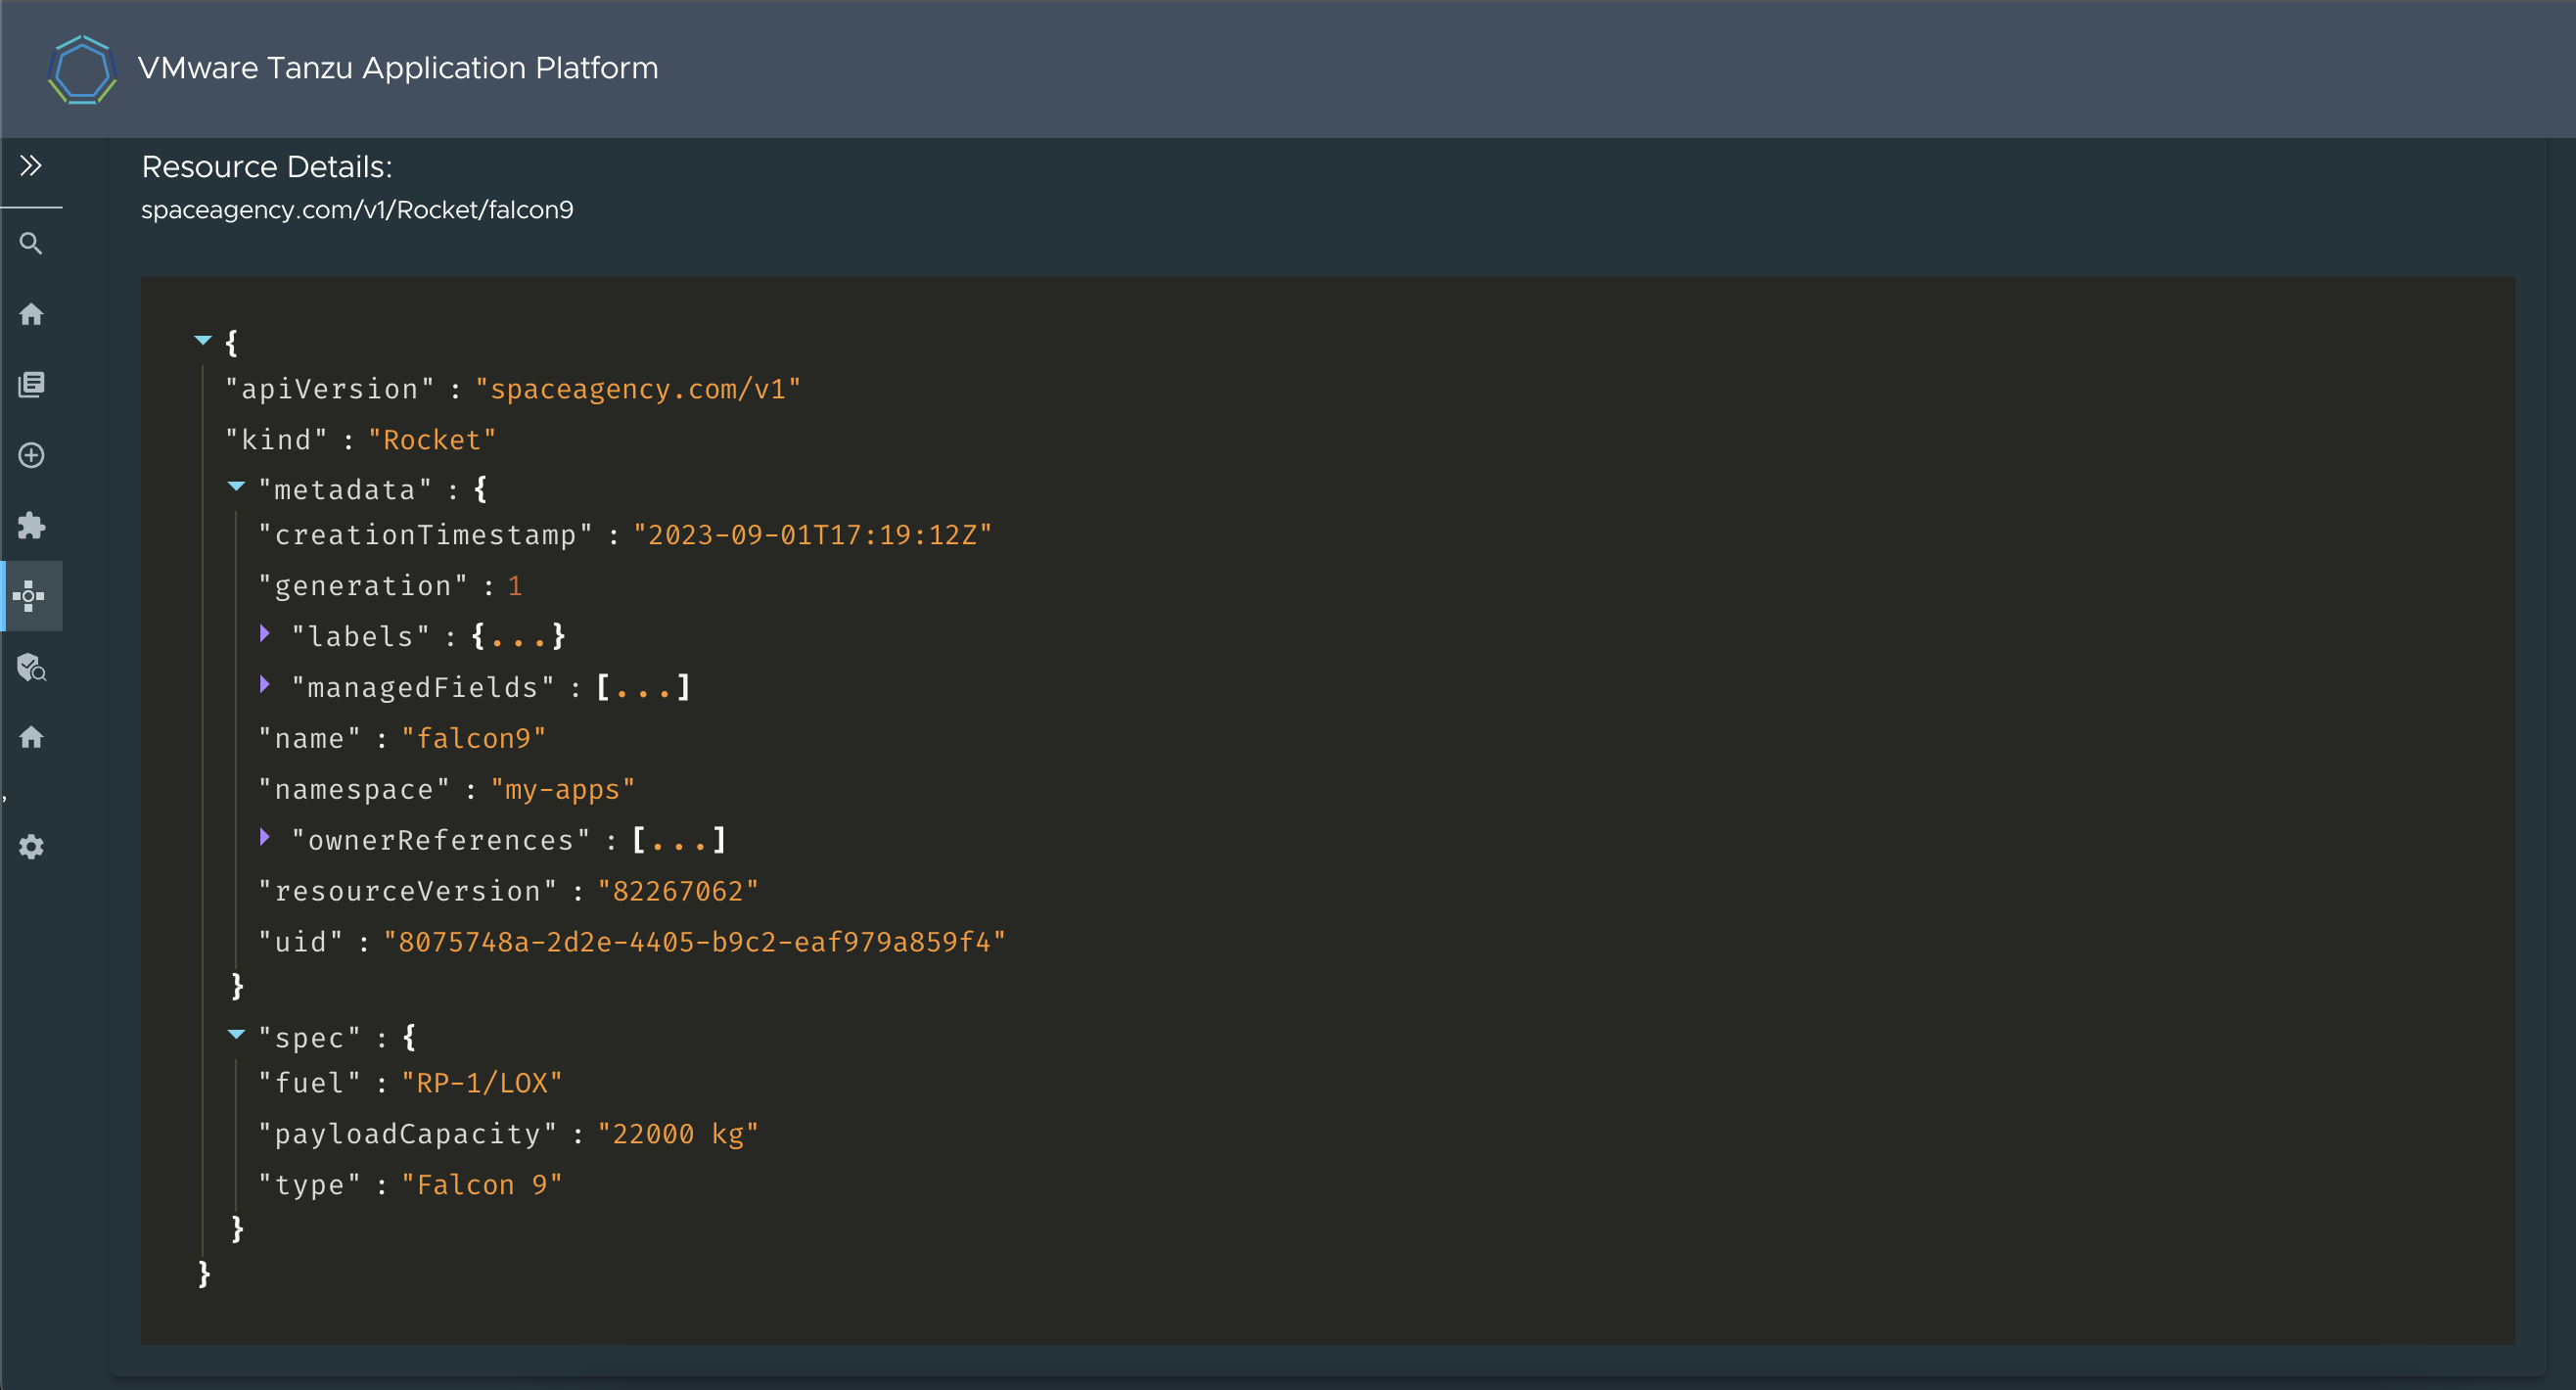
Scroll down the screen to see the details associated with the stage.

The printer columns that you defined in the CRD are now rendered in the Overview section. This happens with any CRD that you define and that includes the
additionalPrinterColumnsdefinition. -
Go to the end of the section to see the full resource in JSON format.