Consume services on Tanzu Application Platform
This topic for application developers guides you through deploying two application workloads and configuring them to communicate using a service instance. The topic uses RabbitMQ as an example, but the process is the same regardless of the service you want to consume.
You will use the Tanzu Services CLI plug-in and will learn about classes, claims, and bindings.
What you will do
- Discover existing claims on service instances within your namespace
- Create two application workloads and bind them to an existing claim so that the workloads use the service instance.
Overview
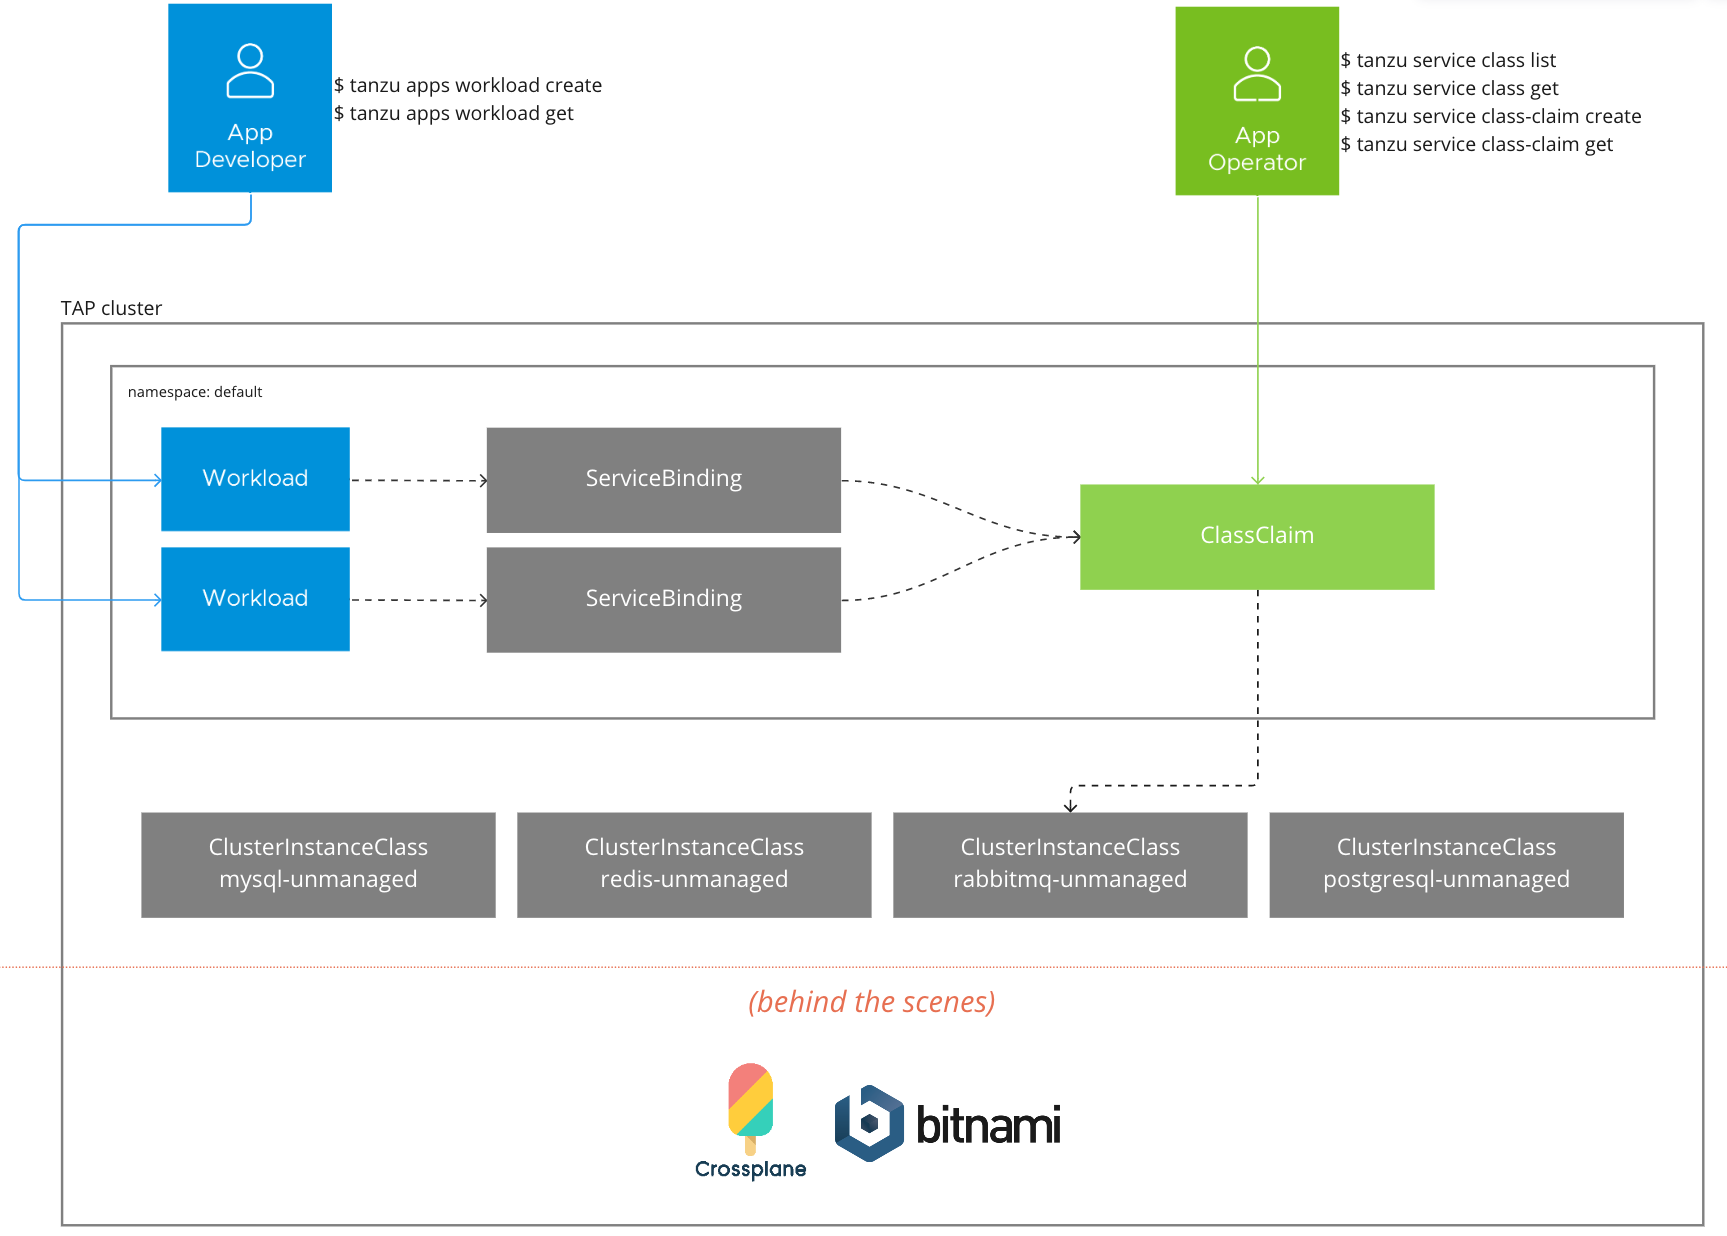
The following diagram depicts a summary of what this tutorial covers.

Bear the following observations in mind as you work through this guide:
-
There is a set of four service classes preinstalled on the cluster.
-
Service operators do not need to configure or setup these four services.
-
The life cycle of a service binding is implicitly tied to the life cycle of a workload, and is managed by the application developer.
-
The life cycles of claims are explicitly managed by the application operator.
-
The diagram and tutorial in this guide are predominantly focused on the application operator and developer user roles, as such the inner workings of how service instances are provisioned are not in the diagram and are labeled as “behind the scenes”.
Prerequisites
Before following this tutorial, an application developer must:
- Have access to a cluster with Tanzu Application Platform installed.
- Have the Tanzu CLI and the corresponding plug-ins.
- Have access to the
defaultnamespace which has been set up to use installed packages. For more information, see Set up developer namespaces to use your installed packages. - Have a Tanzu Application Platform cluster that can pull source code from GitHub.
Discovering existing claims
This section covers using tanzu service class-claim list and tanzu service class-class get to discover existing claims within your namespace and obtaining information needed †o bind your workload to them.
-
To get the list of claims within your namespace, run:
tanzu service class-claim listExpected output:
NAME CLASS READY REASON rabbitmq-1 rabbitmq-unmanaged True Ready -
To get detailed information about the claim, run:
tanzu service class-claim get rabbitmq-1Expected output:
  Name: rabbitmq-1
  Namespace: default
  Claim Reference: services.apps.tanzu.vmware.com/v1alpha1:ClassClaim:rabbitmq-1
  Class Reference:
    Name: rabbitmq-unmanaged
  Parameters:
    storageGB: 3
  Status:
    Ready: True
    Claimed Resource:
      Name: b5982046-a1e9-40cf-8282-00fe67a2f868
      Namespace: default
      Group:
      Version: v1
      Kind: Secret
Binding application workloads to the service instance
This section covers using tanzu apps workload create with the --service-ref flag to create workloads and to bind them to the service instance through the claim.
In Tanzu Application Platform, service bindings are created when you create application workloads using the --service-ref flag of the tanzu apps workload create command.
To create an application workload:
-
Review the output of the
tanzu service class-claim getcommand you ran in Discovering existing claims earlier, and note the value of theClaim Reference. This is the value to pass to--service-refwhen creating the application workloads. -
Create the application workload by running:
tanzu apps workload create spring-sensors-consumer-web \ --git-repo https://github.com/tanzu-end-to-end/spring-sensors \ --git-branch rabbit \ --type web \ --label app.kubernetes.io/part-of=spring-sensors \ --annotation autoscaling.knative.dev/minScale=1 \ --service-ref="rmq=services.apps.tanzu.vmware.com/v1alpha1:ClassClaim:rabbitmq-1" tanzu apps workload create \ spring-sensors-producer \ --git-repo https://github.com/tanzu-end-to-end/spring-sensors-sensor \ --git-branch main \ --type web \ --label app.kubernetes.io/part-of=spring-sensors \ --annotation autoscaling.knative.dev/minScale=1 \ --service-ref="rmq=services.apps.tanzu.vmware.com/v1alpha1:ClassClaim:rabbitmq-1" -
After the workloads are ready, visit the URL of the
spring-sensors-consumer-webapp. Confirm that sensor data is passing from thespring-sensors-producerworkload to thespring-sensors-consumer-webworkload using theRabbitmqClusterservice instance.
Learn more
To learn more about working with services on Tanzu Application Platform, see the Services Toolkit component documentation:
Next steps
Now that you completed the Getting started guides, learn about: