


You can view and manage apps and service instances with Apps Manager.
You can use Apps Manager to manage apps, service instances, service keys, and route services. This includes tasks such as scaling apps, binding apps to services, generating services keys, and more.
For information about managing orgs and spaces, see Managing Orgs and Spaces Using Apps Manager.
You can manage apps and service instances across multiple foundations. For more information, see [Configuring Multi-Foundation Support in Apps Manager](https://docs.vmware.com/en/VMware-Tanzu-Application-Service/2.11/tas-for-vms/configure-multi-foundation.html).Prerequisite
To view and manage apps and service instances with Apps Manager, you must log in to Apps Manager with an account that has adequate permissions.
For more information, see About Permissions in Getting Started with Apps Manager.
Manage an App
This section describes how to manage an app in Apps Manager.
You can do the following tasks to manage apps in Apps Manager:
- View app summary information
- Start and stop apps
- Scale apps
- View sidecar processes
- View key app metrics
- Bind apps to services
- Manage environment variables and routes
- View logs and usage information
- View app revisions
- Re-deploy app revisions
- Delete apps
- Terminate specific instances of apps
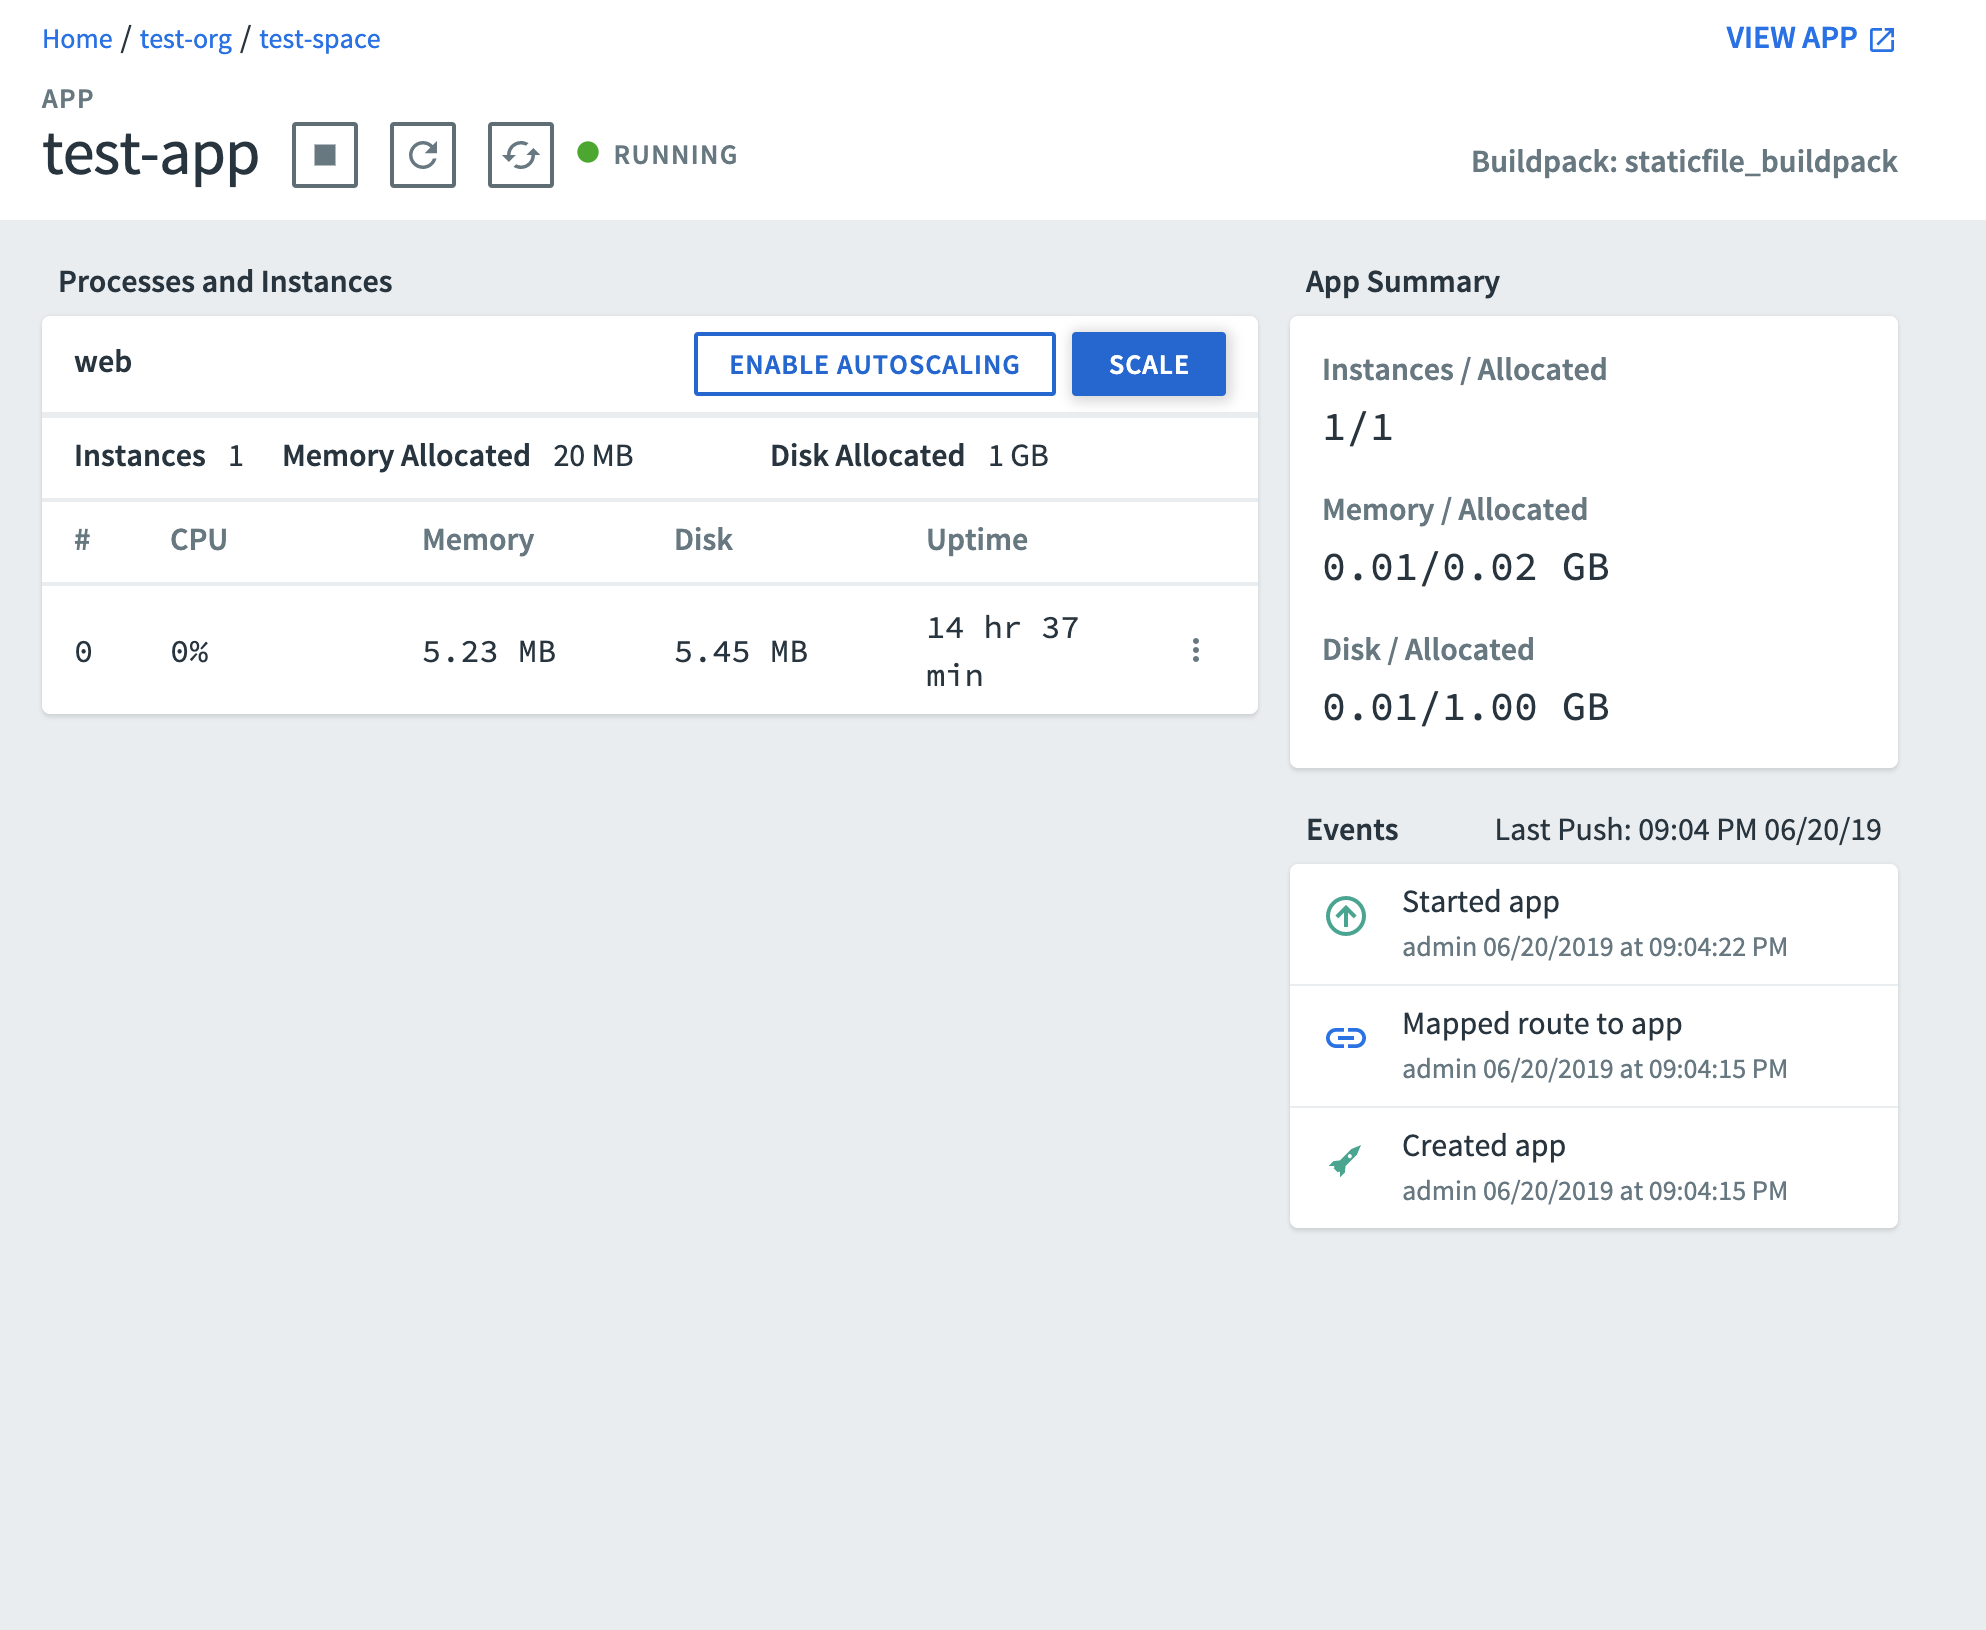
View App Overview
The Overview page for an app includes app summary information, such as app processes and instances, app memory and disk space, and app events.
These are the ways to go to the app Overview page:
- On the space page, click the app you want to manage.
- Search for an app by entering its name in the search bar.
The following image shows an example of an app Overview page.
Start, Stop, or Restage an App
You can start, stop, and restage from the Overview page of the app. The start, stop, and restage buttons are located on the app Overview page next to the name of the app.
The following image shows the location of the start, stop, and restage buttons.
To edit the following diagram, go to https://drive.google.com/file/d/1X4GPXIaf9gPIjkHiDHDxTZWWVY4Wt0qn/view?usp=sharing. You must be in the Pivotal org to edit the diagram.

For more information about starting, stopping, and restaging apps with the Cloud Foundry Command Line Interface (cf CLI), see Starting, Restarting, and Restaging Apps.
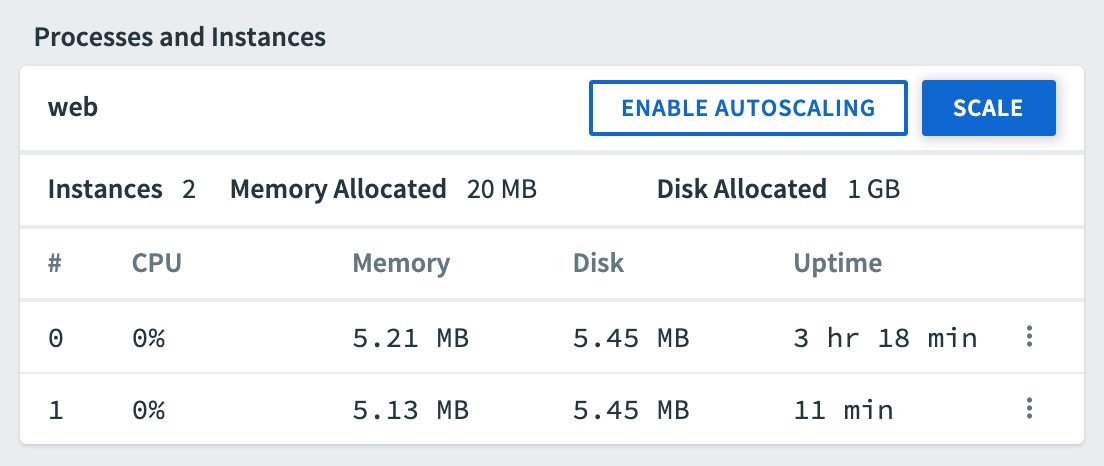
Scale an App
From the app Overview page, you can scale an app manually or configure App Autoscaler to scale it automatically.
Scale an App Manually
To manually scale an app:
-
Go to the app Overview page.
-
Under Processes and Instances, click Scale to open the Scale app dialog.
-
Edit the number of Instances, the Memory Limit, and the Disk Limit as desired.
-
Click Apply Changes.
Enable App Autoscaler
You can enable App Autoscaler to automatically scale your apps. For information about how to configure App Autoscaler to scale an app automatically, see Configure Autoscaling for an App in Scaling an App Using App Autoscaler.
To enable App Autoscaler for an app:
-
Go to the app Overview page.
-
Under Processes and Instances, click Enable Autoscaling to enable App Autoscaler.

-
Click Manage Autoscaling to open App Autoscaler.
View Sidecar Processes
You can view the sidecar processes associated with your app from the app Overview page.
To view sidecar processes associated with your apps:
-
Go to the app Overview page.
-
Under Processes and Instances, see Sidecars. This section only appears if your app has any sidecar processes.
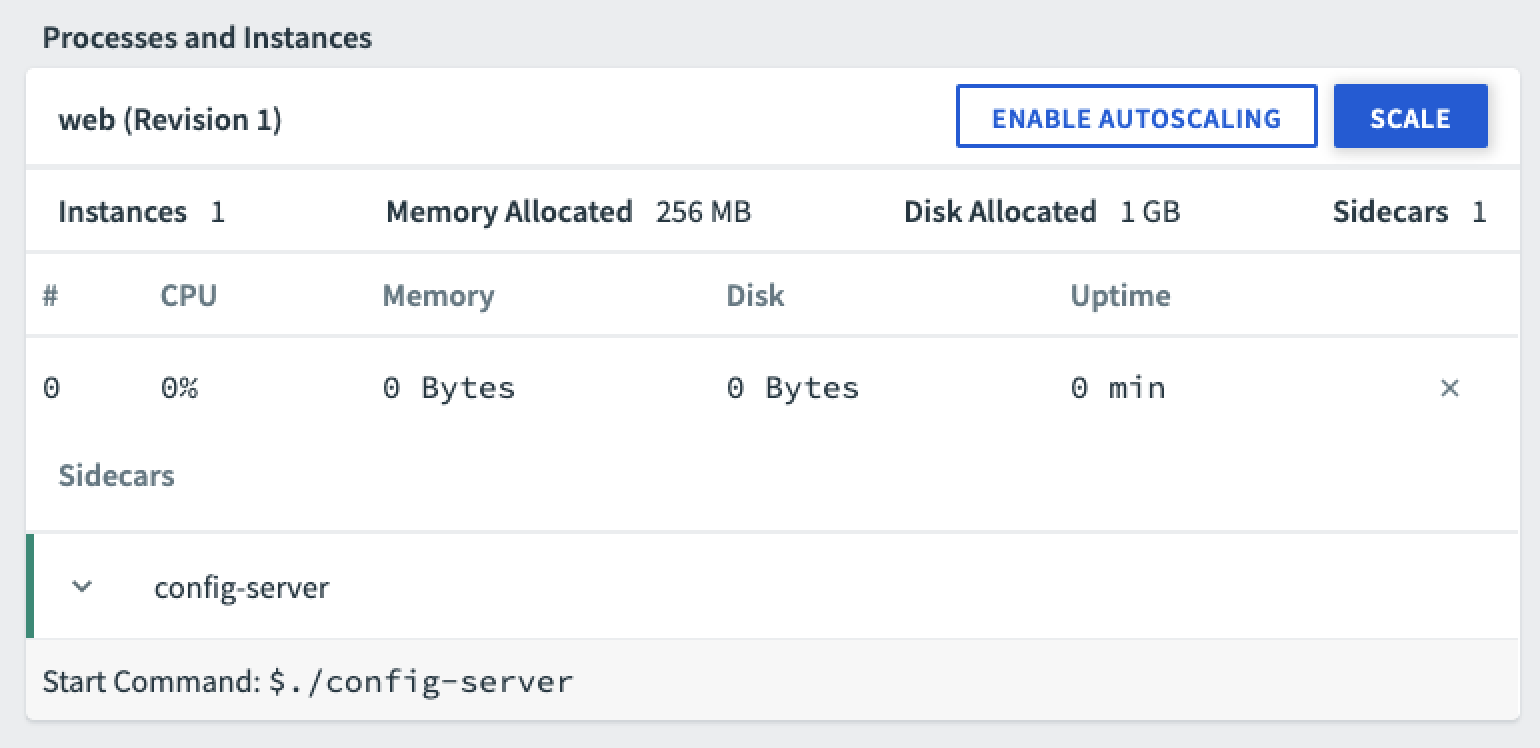
For more information about sidecar processes, see Pushing Apps with Sidecar Processes.
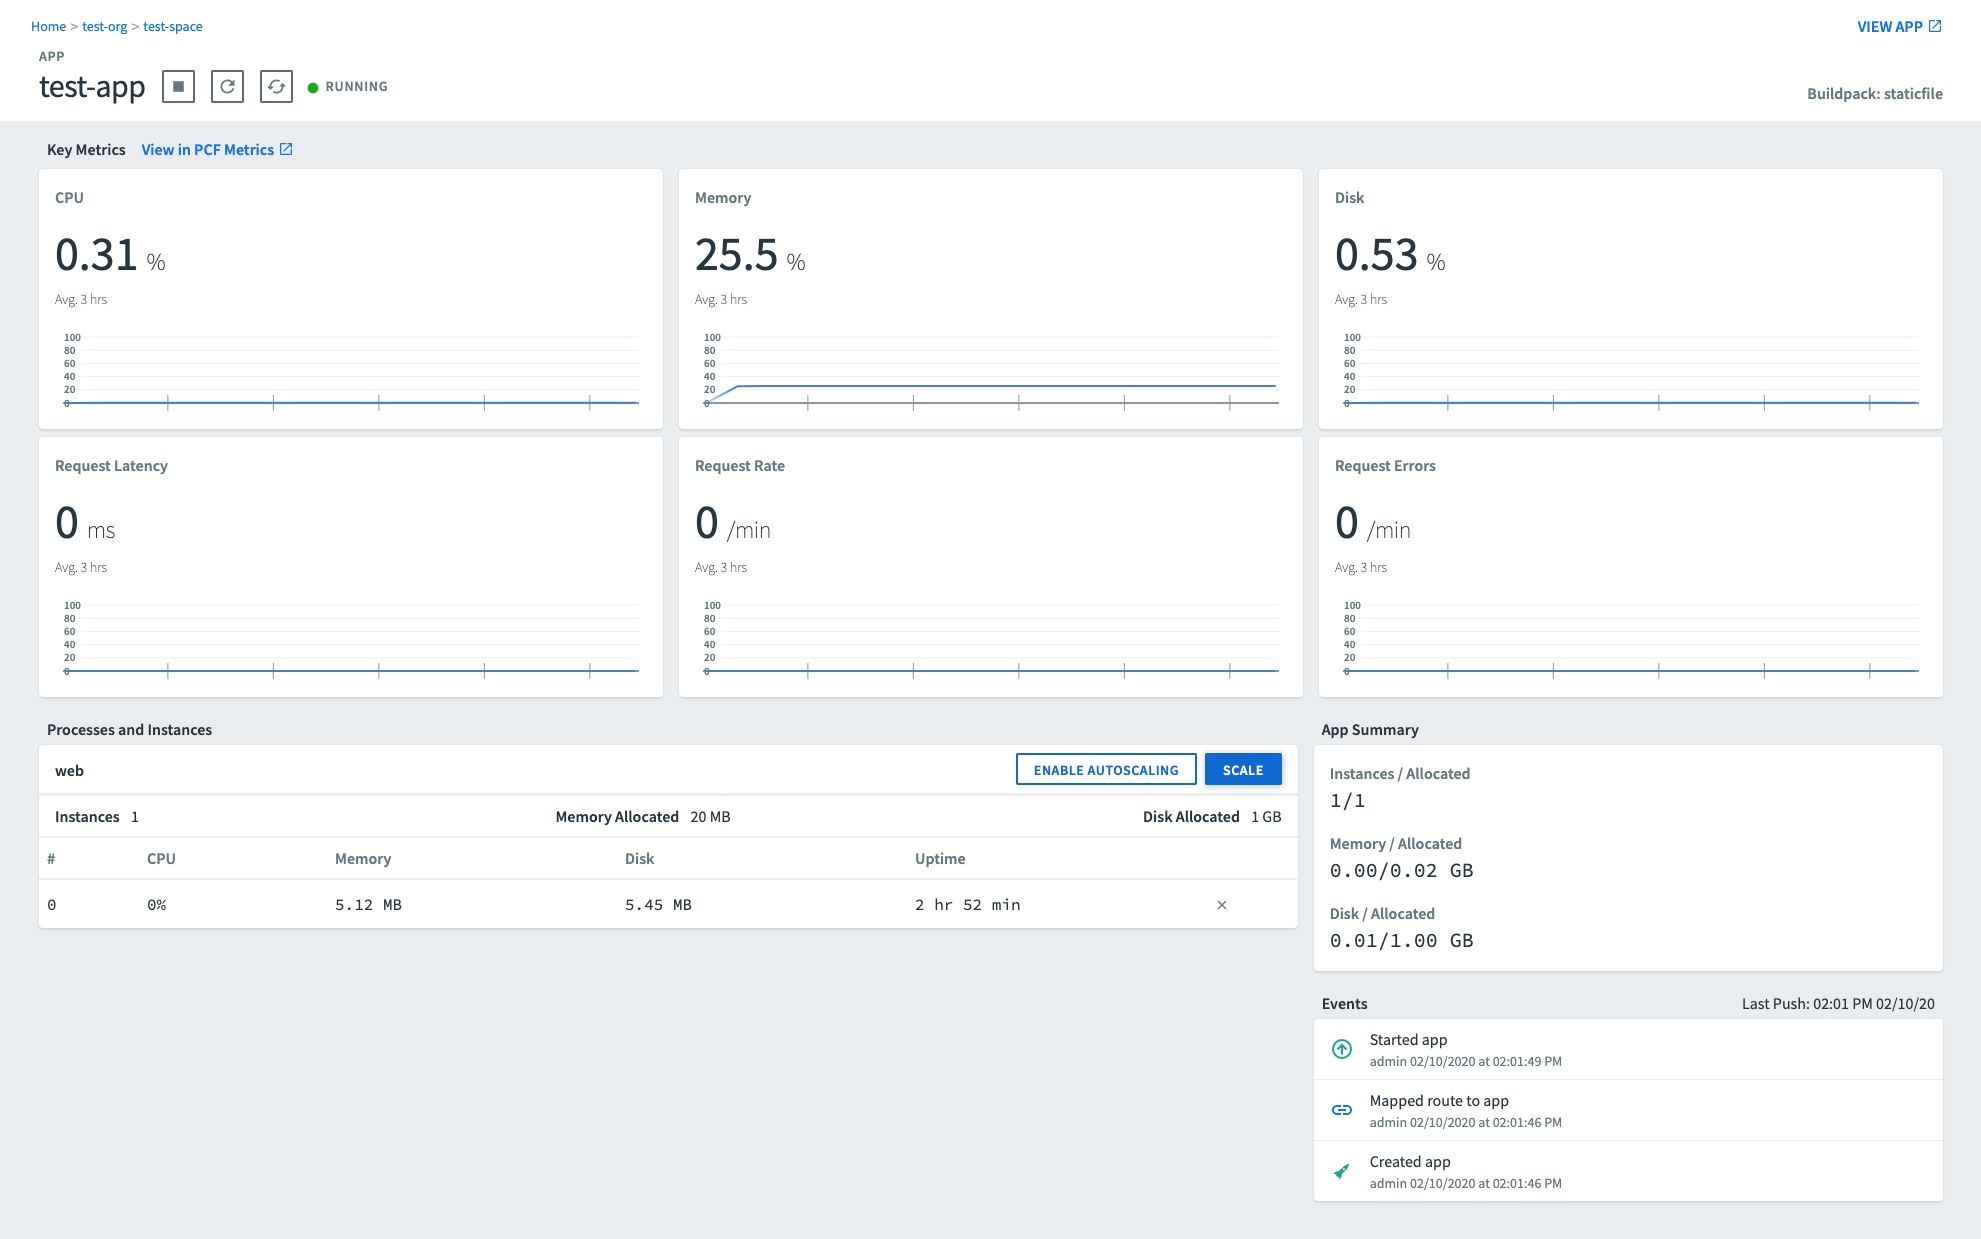
View Key Metrics (Beta)
If Metric Store is installed, you can view the following key metrics for an app in the Key Metrics section of the app Overview page:
- CPU
- Memory
- Disk
- Request Latency
- Request Rate
- Request Errors
For more information about each metric, see Interpreting metrics in Monitoring and troubleshooting apps with Metrics.
For each metric, the app Overview page includes a graph that shows metric behavior over the past three hours. You can hover over the data points on the graph to view the value of the metric. The page also includes the average value for the metric over the past three hours.
Metric Store is required for Apps Manager to display the Key Metrics section. For information about installing and configuring Metric Store, see Metric Store.
The following image is an example of an app Overview page, showing key metrics for the app.
Bind or Unbind Services
You can bind your app to new or existing service instances. You can also unbind your app from service instances.
Bind an App to an Existing Service
Note For services that use asynchronous bindings, Apps Manager displays the status of the service while the bind is still pending. Asynchronous bindings provide more flexibility for services that require additional time before returning a successful bind response.
To bind your app to an existing service:
-
Go to the app Overview page.
-
In the panel on the left side of the screen, under Application, click Services.

-
Click Bind Service.
-
For Service to Bind, select the service instance from the drop-down menu.
-
(Optional) For Binding Name, enter a binding name in all lowercase letters. For example,
bind-usr-serv. -
(Optional) For Add Parameters, specify additional parameters.
-
Click Bind.
Bind an App to a New Service
To bind your app to a new service instance:
-
Go to the app Overview page.
-
In the panel, under Application, click Services.
-
Click New Service.
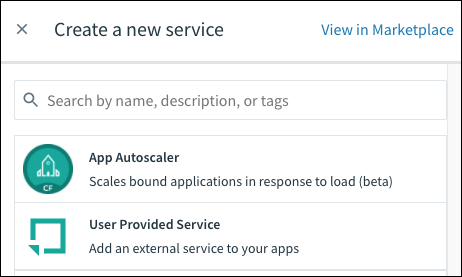
Note If you prefer to create the new service instance in the Marketplace, you can click View in Marketplace at any time.
-
Click the service.
-
Select a plan and click Select Plan.
-
Under Instance Name, enter a name for the instance.
-
(Optional) For Binding Name, enter a binding name in all lowercase letters. For example,
bind-usr-serv. -
(Optional) For Add Parameters, specify additional parameters. For a list of supported configuration parameters, consult the documentation for the service.
-
Click Create.
Unbind a Service
To unbind your app from a service instance:
-
Go to the app Overview page.
-
Go to Application and click Services.
-
Locate the service instance in the Bound Services list.
-
Click the three-dot icon.
-
Select Unbind from the drop-down menu.
Map or Unmap Routes
The Routes page shows the routes associated with your app. You can use this page to map and unmap routes for your app.
Map Routes
To map routes to your app:
-
Go to the app Overview page.
-
Go to Networking, and click Routes.
-
To add a new route, click Map a Route.

-
Enter the route and click Map.
-
Under Choose Protocol, select either HTTP1 or HTTP2.
Unmap Routes
To unmap a route from your app:
-
Go to the app Overview page.
-
Go to Networking, and click Routes.
-
Locate the route from the list and click the x.
-
Click Unmap in the pop-up window to confirm.
Change the Destination Protocol for a Route
To change the destination app protocol for a route:
-
Go to the app Overview page.
-
In the panel on the left side of the screen, under Networking, click Routes.
-
To change the destination protocol for a route, under App Protocol, select either HTTP1 or HTTP2.
-
Click Save.
Create Container-to-Container Networking Policies
Container networking policies enable app instances to communicate with each other directly. You can create container networking policies in the Networking tab.
For more information about container-to-container networking in Ops Manager, see Container-to-Container Networking.
Important To view and use the Networking tab, you must have either the network.write or network.admin UAA scope. If you do not see the Networking tab, request one of the previous scopes from your Ops Manager administrator.
To create container-to-container networking policies:
-
Go to the app Overview page.
-
Go to Networking, and click Container Networking. The page displays any container networking policies associated with the app.
-
To add a new network policy, click Create Policy or Add a network policy.
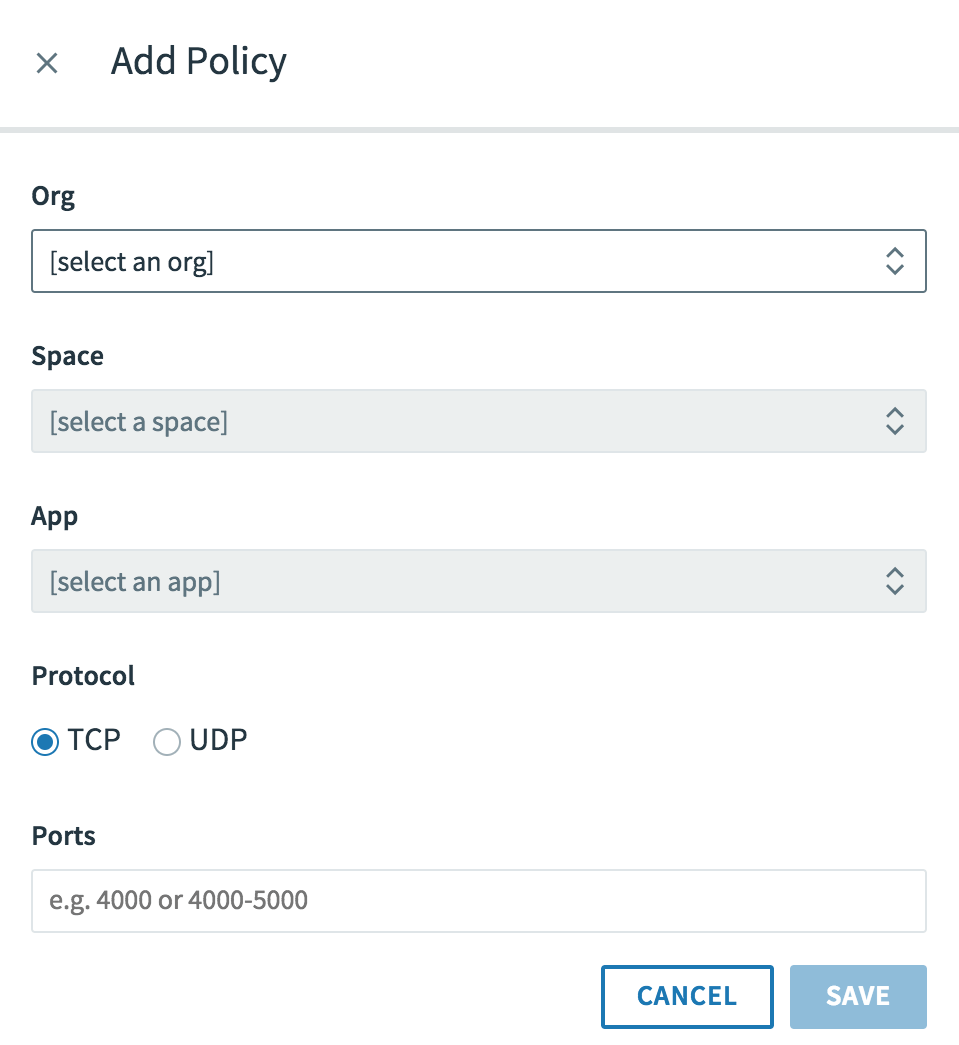
-
In the Add Policy window, configure the following:
- For Org, select the org of the destination app.
- For Space, select the space of the destination app.
- For App, select the destination app.
- For Protocol, select TCP or UDP.
- For Ports, enter the ports at which to connect to the destination app. The allowed range is from
1to65535. You can specify a single port, such as8080, or a range of ports, such as8080-8090.
-
Click Save.
Manage App Revisions
A revision represents code and configuration used by an app at a specific time. It is a Cloud Foundry API (CAPI) object that can contain references to a droplet, custom start command, and environment variables. The most recent revision for a running app represents code and configuration currently running in Ops Manager.
You can view revisions, list environment variables associated with revisions, and re-deploy previous revisions in the Revisions tab.
For more information about app revisions in Ops Manager, see App Revisions.
View App Revisions
To list revisions for an app:
-
Go to the app Overview page.
-
Go to Application, and click Revisions.
-
View app revisions in the Revisions table.
List Environment Variables for an App Revision
To list environment variables associated with an app revision:
-
Go to the app Overview page.
-
Go to Application, and click Revisions.
-
In the Revisions table, select the row that contains the revision. The row expands to reveal metadata and environment variables associated with the revision.
Roll Back to a Previous App Revision
To roll back an app to a previous revision:
-
Go to the app Overview page.
-
Go to Application, and click Revisions.
-
In the Revisions table, select the row that contains the revision you want to roll back to. The row expands to reveal metadata.
-
Click Redeploy.
View Logs
You can view logs for an app in Apps Manager. You can also use Apps Manager to view a live stream of app logs.
To view logs for an app:
-
Go to the app Overview page.
-
Go to Observability, and click Logs.
-
Click the Play button to view a live version of the logs.
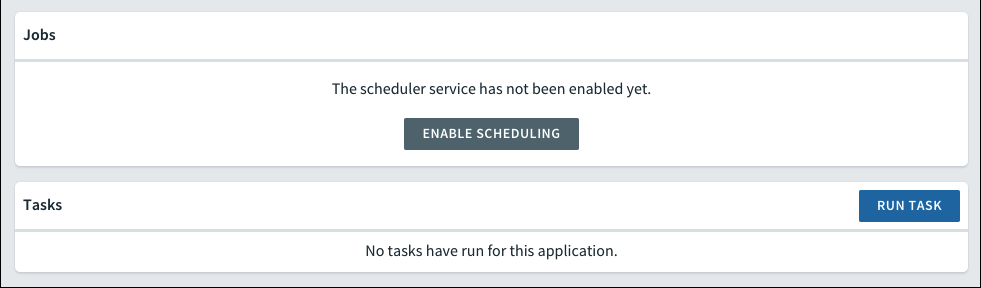
Manage Tasks
The Tasks page includes jobs and tasks associated with an app. It displays a table containing Task ID, State, Start Time, Task Name, and Command.
From the Tasks page, you can view tasks, run tasks, and enable task scheduling.
View Tasks
You can view tasks for an app on the Tasks page in Apps Manager.
To access the Tasks page:
-
Go to the app Overview page.
-
Go to Application, and click Tasks.
Run a Task
To run a task for an app:
-
Go to the app Overview page.
-
Go to Application, and click Tasks.
-
Click Run Task to create a task.
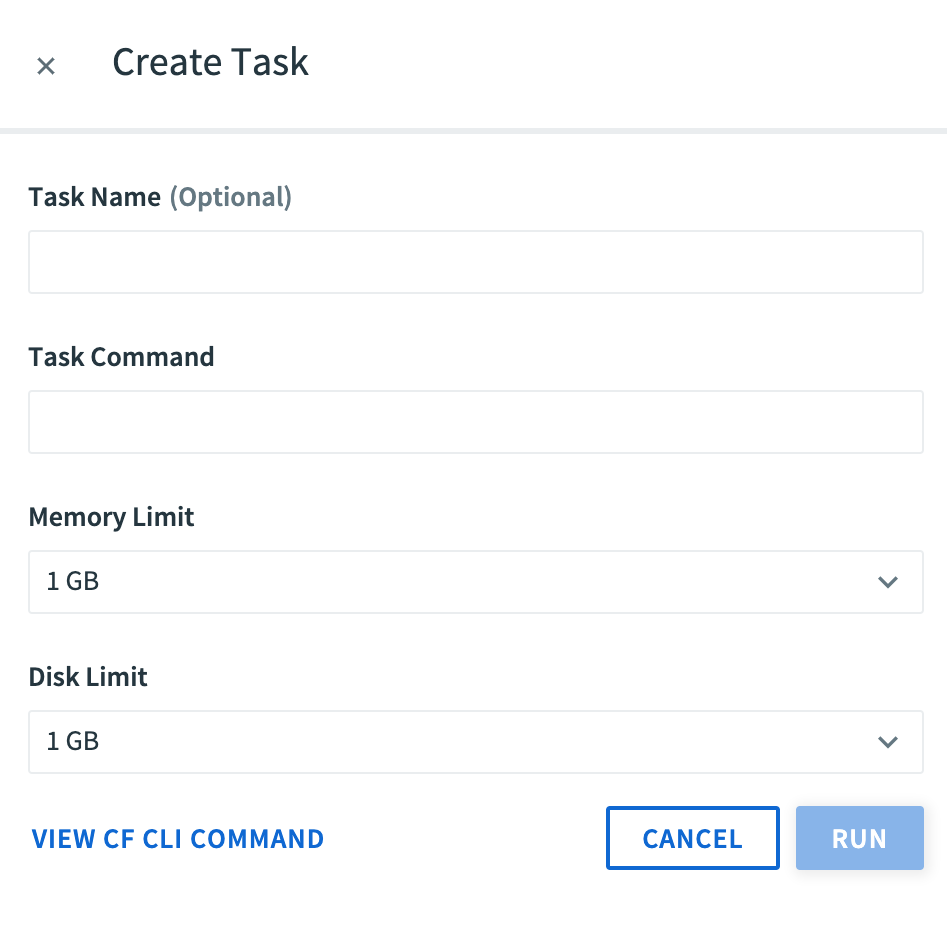
-
(Optional) Enter a Task Name.
-
Enter the Task Command.
-
Select a Memory Limit and a Disk Limit for the task.
-
Click Run.
Enable Task Scheduling
In the Tasks tab, click Enable Scheduling to bind the Scheduler service to your app. For more about Scheduler, see Scheduling jobs in the Scheduler documentation.
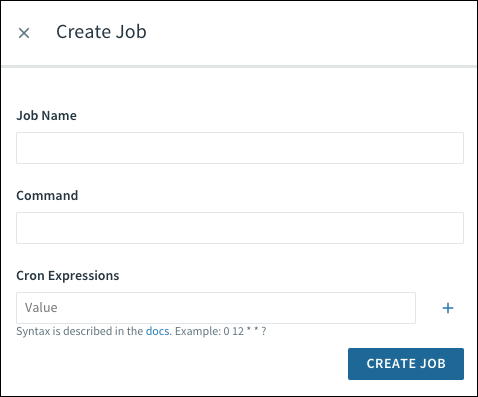
Schedule a Task
To schedule a task:
-
Go to the app Overview page.
-
Go to Application, and click Tasks.
-
Click Create Job to schedule a task.
-
Enter a Job Name.
-
Enter a Command.
-
Enter one or more Cron Expressions for the task schedule or schedules you want. For more information about cron expression syntax, see Scheduling jobs in the Scheduler documentation.
-
Click Create Job.
View and Manage Settings
To view settings for an app, in the panel on the left side of the screen, under Application, click Settings.
You can do the following from the Settings page:
- Rename the app.
- View information about the buildpacks, start command, and stack.
- Configure health checks.
- View or add Environment Variables associated with the app.
- Add metadata to the app.
- View the App Security Groups (ASGs) associated with the app.
- Delete the app. When you click Delete App, you also have the option to delete the app’s routes.
Configure Health Checks
To configure health checks for your app:
-
Go to the app Overview page.
-
Go to Application, and click Settings.
-
In the Health Check section, click the Type drop down menu and select port, http, or process. Depending on which option you select, additional fields might appear.
-
For Type, select port, http, or process.
-
Complete the fields that appear based on your selection.
-
Click Update.
For more information, see Using App Health Checks.
View Environment Variables
To view all environment variables for an app:
-
Go to the app Overview page.
-
Go to Application, and click Settings.
-
Under User Provided Environment Variables, click Reveal Env Vars.
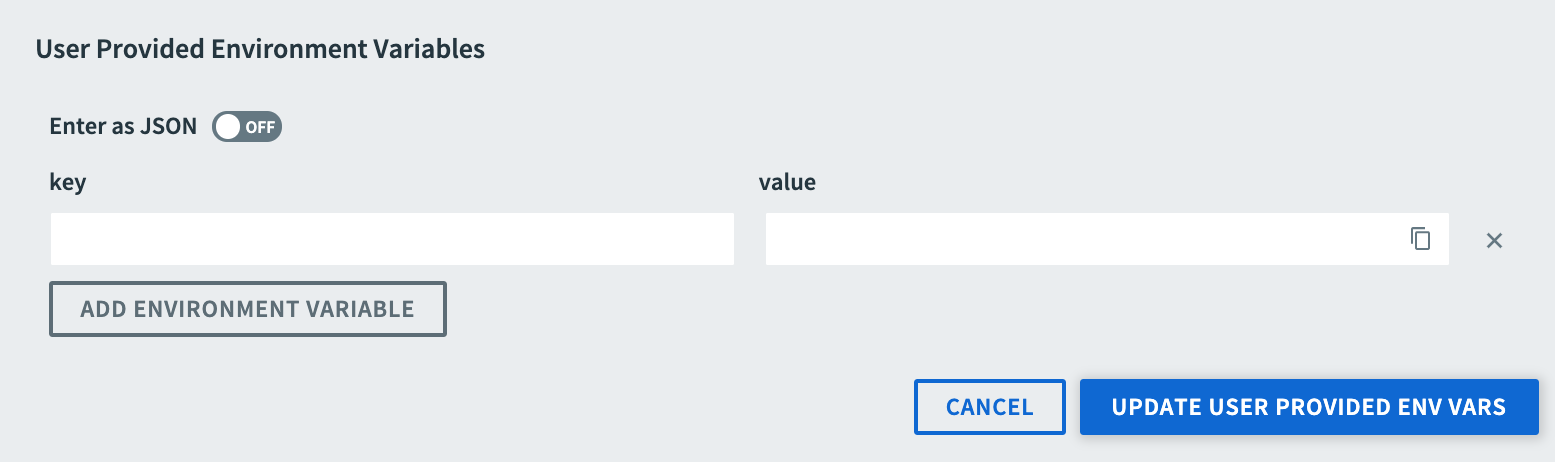
Add Environment Variables
To add a user-provided environment variable:
-
Go to the app Overview page.
-
Go to Application, and click Settings.
-
Click Reveal User Provided Env Vars.
-
Click Add Environment Variable.
-
Enter the key and value of the variable. Alternatively, toggle Enter as JSON to enter the variable in JSON.
-
Click Save.
class=“note important”> Important Changes to environment variables, service bindings, and service unbindings require restarting the app to take effect. You can restart the app from the Apps Manager or with the Cloud Foundry Command Line Interface cf restage command.
Add Metadata
You can add metadata, including labels and annotations, to apps and spaces using Apps Manager.
For more information about adding metadata to objects in VMware Tanzu Application Service for VMs (TAS for VMs), see Using metadata.
To add labels or annotations to an app using Apps Manager:
-
Go to the app Overview page.
-
Go to Application, and click Settings.
-
For Labels, provide a name and value pair. Or, select Enter JSON to enter the label in JSON.
-
For Annotations, provide a name and value pair. Or, select Enter JSON to enter the annotation in JSON.
-
To add more labels or annotations, click + next to the Labels or Annotations field.
-
Click Update Metadata.
Manage a Service Instance
This section describes how to manage service instances in Apps Manager.
You can do the following tasks to manage service instances in Apps Manager:
- Bind or unbind apps.
- Bind or unbind routes.
- View or change your service plan.
- Manage service keys.
- Rename or delete your service instance.
Note For services that use on-demand brokers, the service broker creates, updates, or deletes the service instance in the background and notifies you when it finishes.
View Service Overview
The Overview page for a service instance includes information about bound apps, bound routes, and service key credentials for the service.
To go to the service instance Overview page:
-
Go to the landing page for the space of the service instance.
-
Go to Space, and click Services.
-
On the Services page, click the name of the service instance.
The following image shows an example of a service instance Overview page.

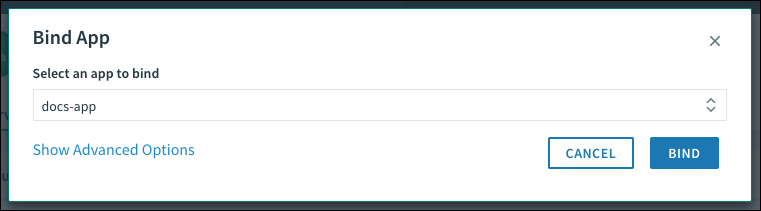
Bind an App
Note For services that use asynchronous bindings, Apps Manager displays the status of the service while the bind is still pending. Asynchronous bindings provide more flexibility for services that require additional time before returning a successful bind response.
To bind an app to a service:
-
On the service Overview page, click Bind App.
-
In the Bind App pop-up window, select the app to bind to the service instance.
-
(Optional) To attach parameters to the binding, click Show Advanced Options. Under Arbitrary Parameters, enter any additional service-specific configuration.
-
Click Bind.
Unbind an App
To unbind an app from a service instance:
-
On the service Overview page, go to Bound Apps, and click the × to the right of the app name. An Unbind App popup appears.
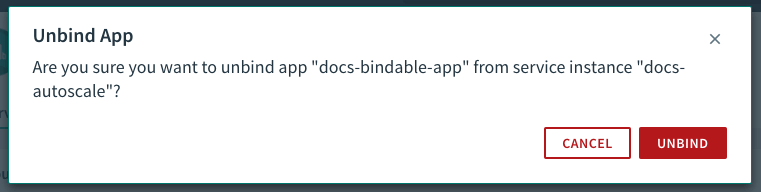
- Click Unbind to confirm.
Share Service Instance
From the service Overview page, you can share your service instance across spaces.
To share a service instance:
-
On the service Overview page, click Share Service Instance.

-
Select the spaces with which you want to share your service instance.
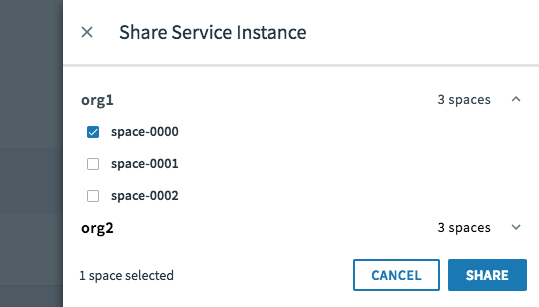
- Click Share.
View or Change Your Service Plan
To view or change your service plan:
-
Go to the service Overview page.
-
Go to Service, and click Plan.
-
Review your current plan information.
-
To change your plan, select a new plan from the list and click Select This Plan or Upgrade Your Account.
Note Not all services support upgrading. If your service does not support upgrading, the service plan page only displays the selected plan.
Rename or Delete Your Service Instance
To rename or delete your service instance:
-
Go to the service Overview page.
-
Go to Service, and click Settings.

-
Do one of these steps:
- To change the service instance name, enter the new name and click Update.
- To add configuration parameters to the service instance, enter the parameters in the Name and Value fields and then click Update. Alternatively, enter your configuration parameters using the Enter JSON toggle and then click Update.
- To delete the service instance, click Delete Service Instance.
The service broker supports creating, updating, and deleting service instances asynchronously. When the service broker completes one of these operations, a status banner appears in Apps Manager.
View and Update Spring Cloud Services Configurations
For Spring Cloud Services (SCS) Config Server instances, Apps Manager lets you:
-
See the Git repos that the SCS Config Server uses to configure the client apps that it serves. For more information, see Configuring with Git in the Spring Cloud Services documentation.
-
Update client app configurations, by updating the local mirrors of their configuration repos.
-
See the current status and configuration of the SCS Config Server itself.
To see and update this configuration and status information for an SCS Config Server instance:
-
Go to the service Overview page.
-
In the panel on the left side of the page, under Service, click Config. The Configuration pane appears only for Spring Cloud Services instances.
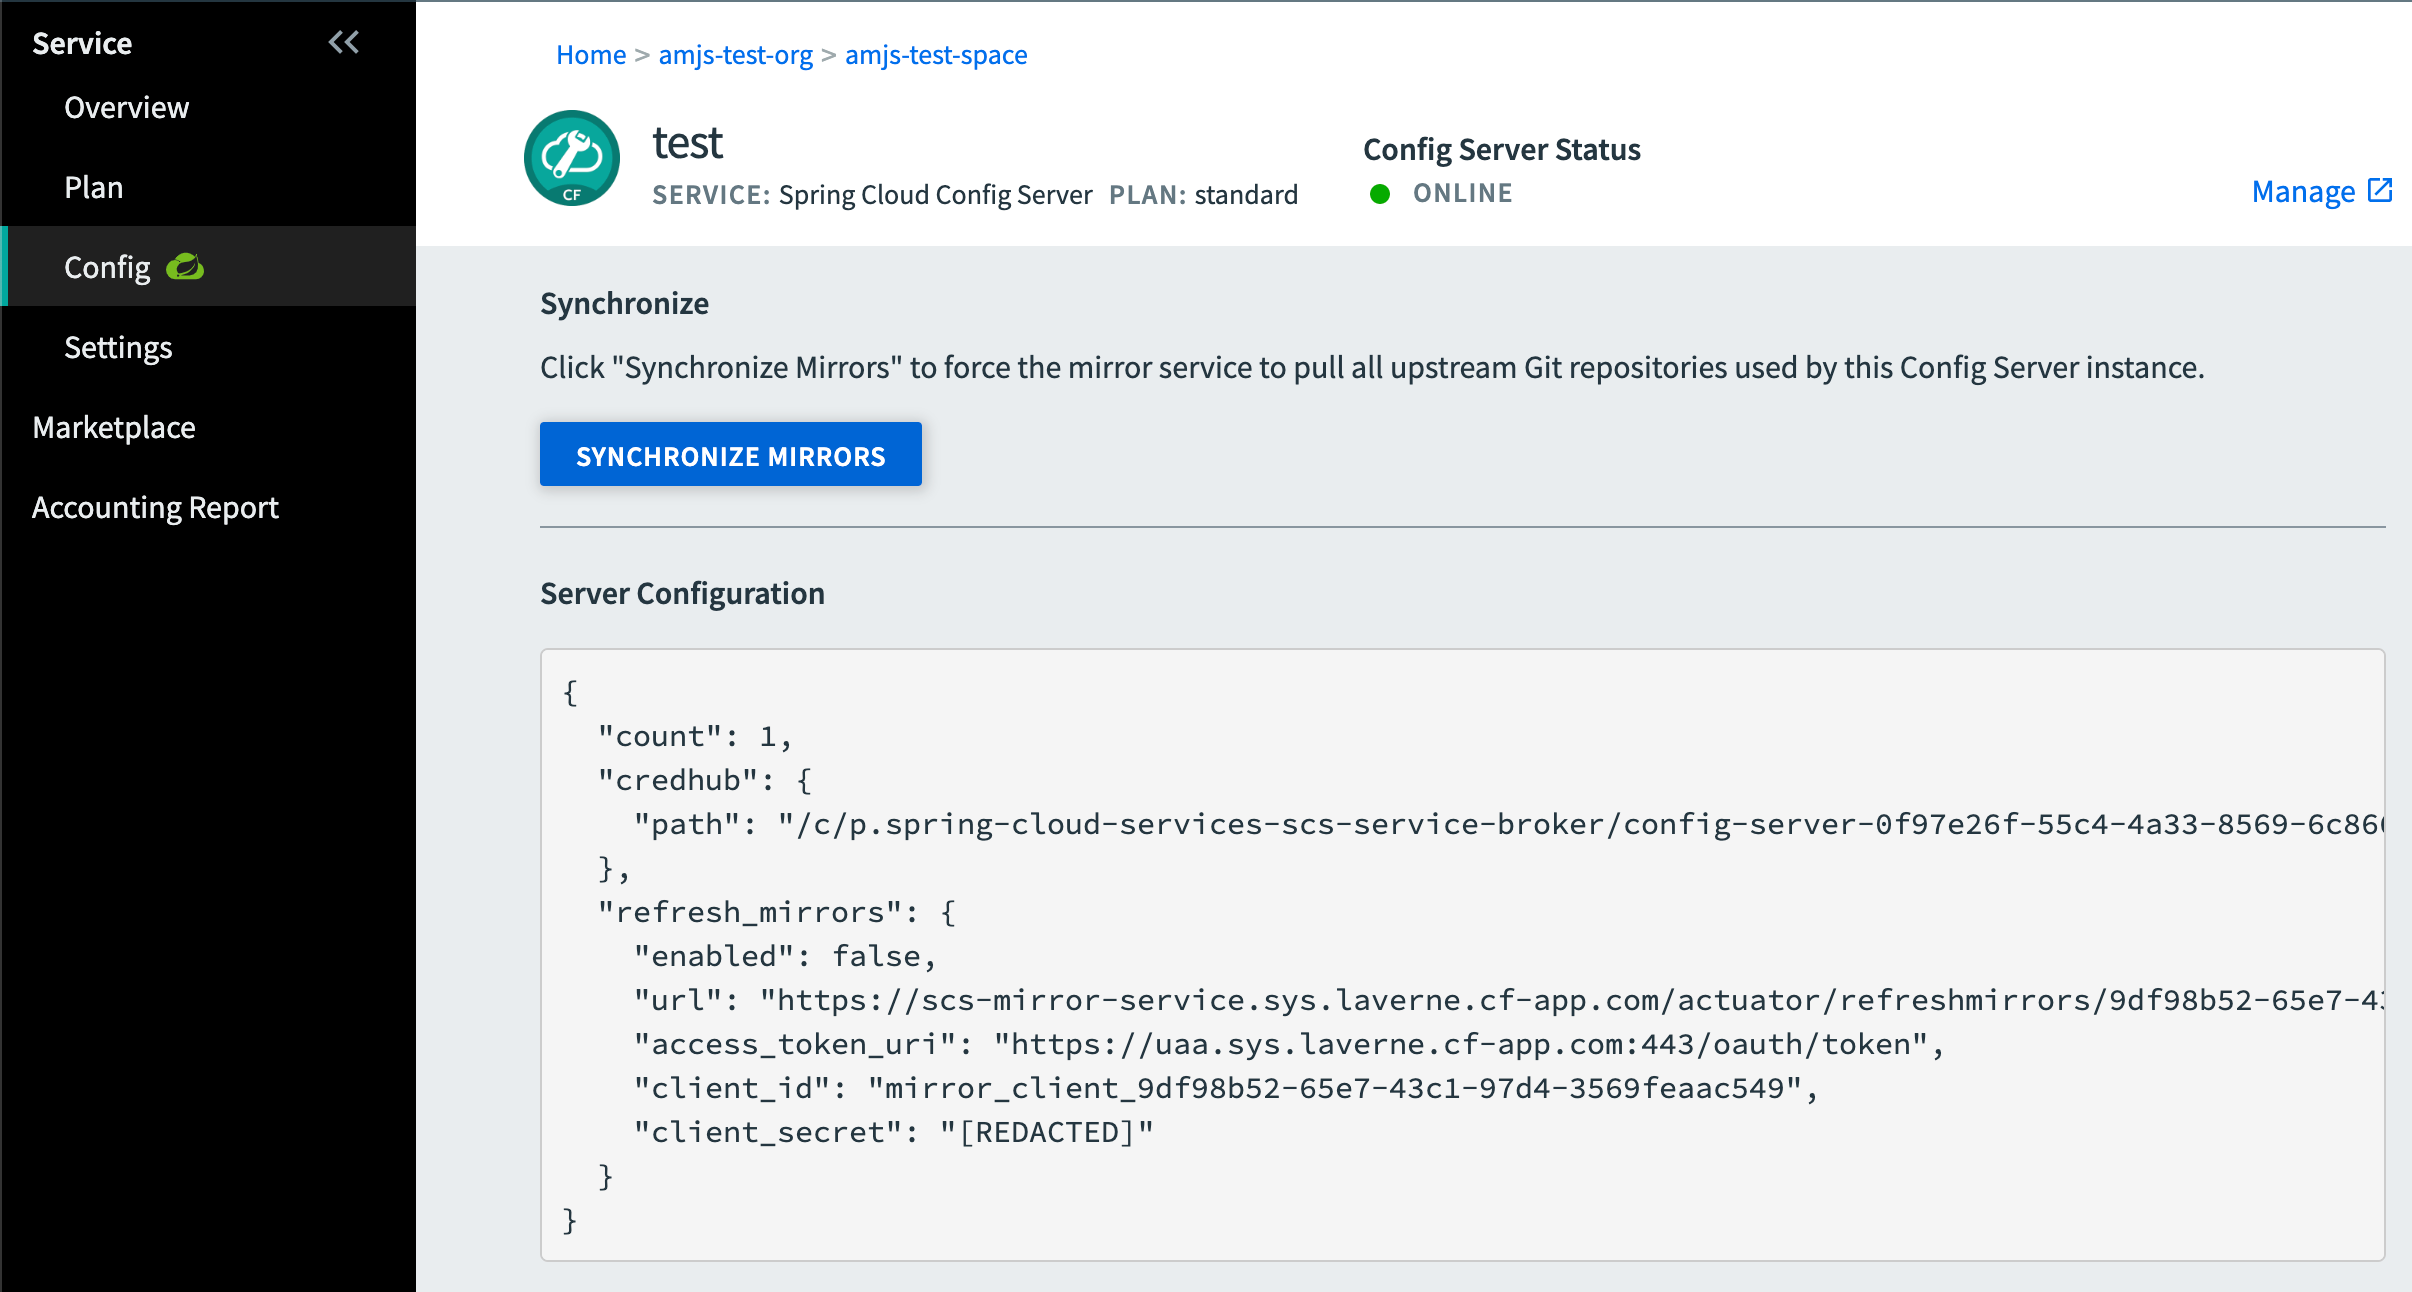
The Config pane includes:
-
The current status of the SCS Config Server.
-
The JSON object that configures settings for the SCS Config Server itself.
- Passed in with
-cflag tocf create-serviceandcf update-service.
- Passed in with
-
A Synchronize Mirrors button for the app configurations that the SCS Config Server serves.
- Click this button to refresh the local Git repository mirrors. Refreshing the mirrors updates client app configuration settings, as described in Mirror Service in the Spring Cloud Services documentation.
-
A Manage link to the SCS Config Server dashboard, at the
/dashboardURL endpoint of the SCS service instance.- Click this link to see the Git repos that the SCS Config Server uses to configure its apps.
- For more information about the Spring Cloud Services Config Server dashboard, see Using the dashboard in the Spring Cloud Services documentation.
Configure User-Provided Service Instance
You can create a user-provided service instance from the Marketplace. For more information, see User-Provided Service Instances.
To configure settings for a user-provided service instance:
-
Go to the service Overview page.
-
In the panel on the left side of the page, under Service, click Configuration. The Configuration pane only appears for user-provided service instances.
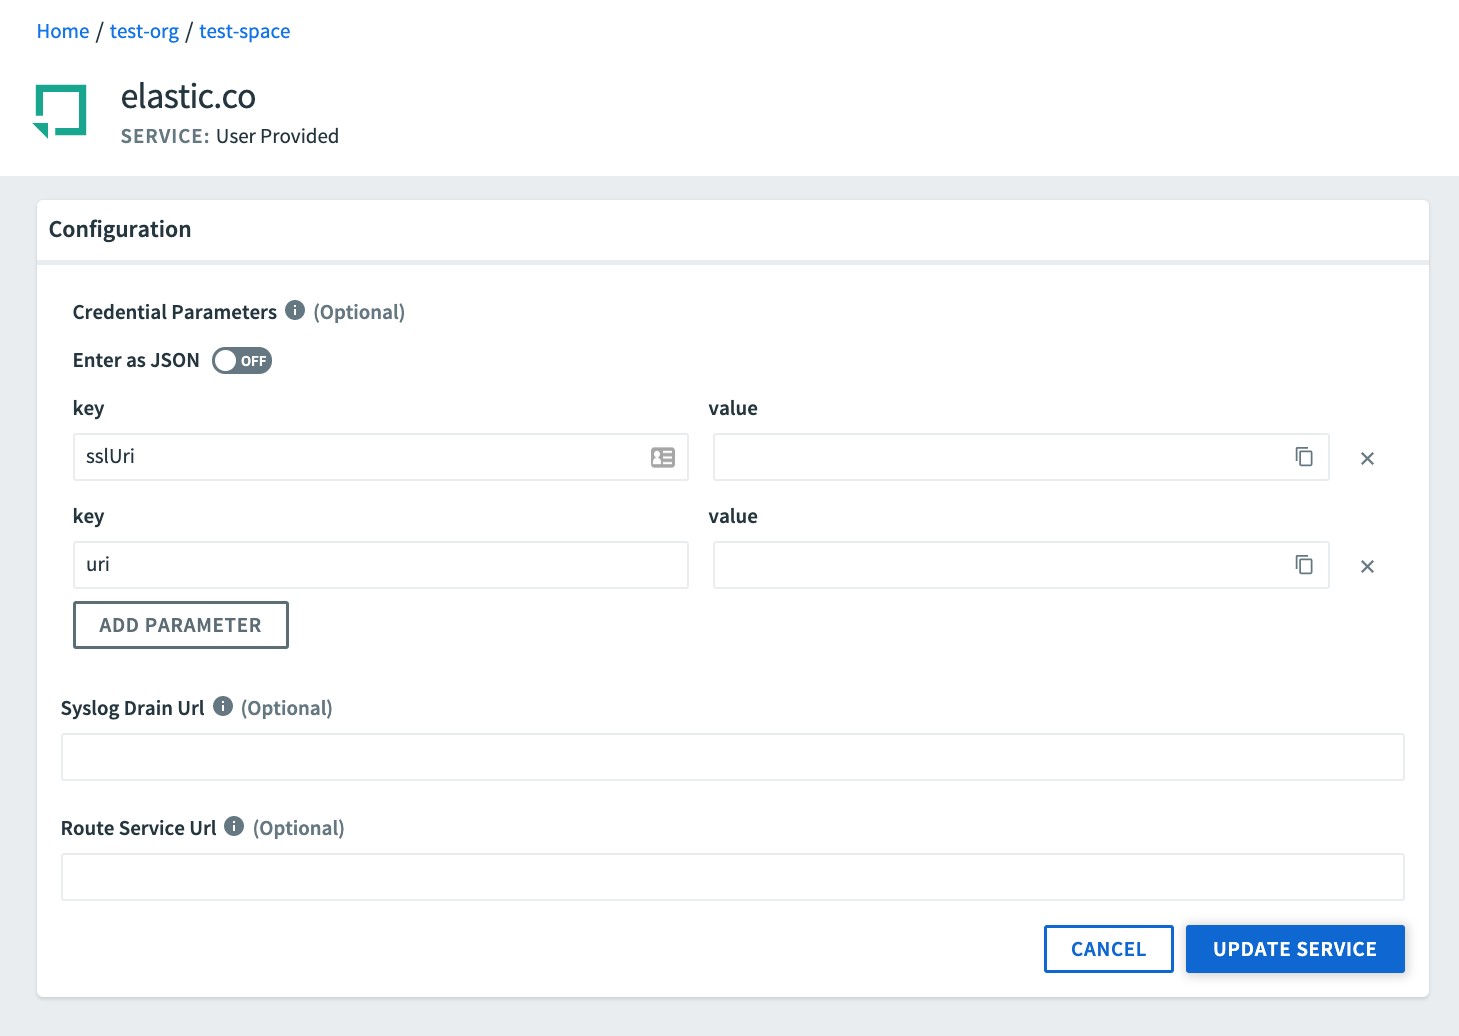
-
Enter the Credential Parameters, Syslog Drain Url, and Route Service Url.
-
Click Update Service.
Manage Service Keys
To manage service keys:
-
Go to the service Overview page.
-
Go to Service Key Credentials, generate a new service key, get the credentials for a service key, or delete a service key.
Generate a Service Key
To generate a new service key:
-
Go to the service Overview page.
-
Go to Service Key Credentials, and click Create Service Key.
-
Enter a Service Key Name.
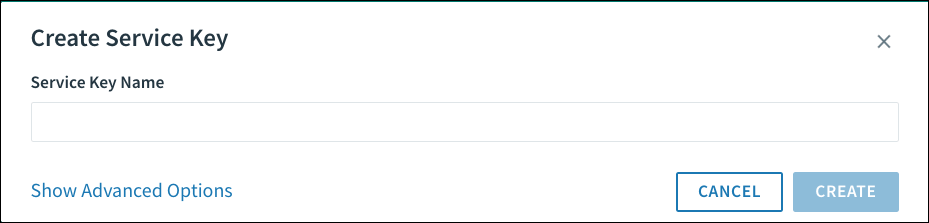
-
(Optional) Click Show Advanced Options. Under Arbitrary Parameters, enter any additional service-specific configuration in the Name and Value fields.
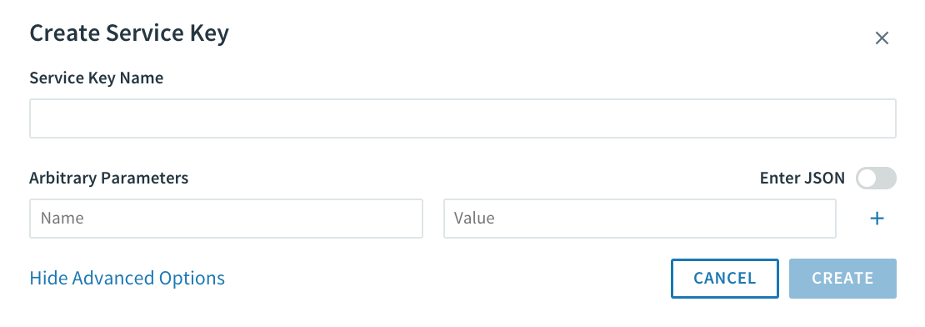
-
Click Create to generate the service key.
View Credentials for a Service Key
To view the credentials for a service key:
-
Go to the service Overview page.
-
Go to Service Key Credentials, and click the service instance name. The JSON object containing the credentials appears.
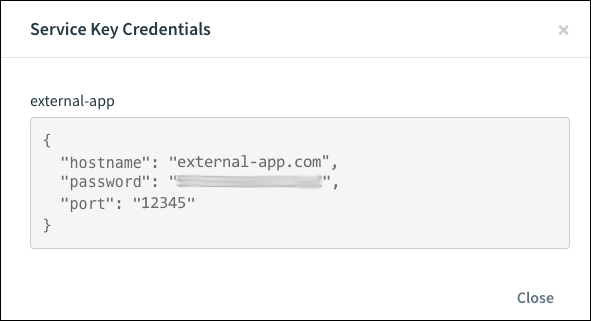
-
Click Close.
Delete Service Key
To delete a service key:
-
Go to the service Overview page.
-
Go to Service Key Credentials, and click the x next to the service instance name.

Manage Route Services
You can bind a new service instance to a route when you create the instance in the Marketplace, or you can manage route services for an existing service instance on the service instance page.
For more information about route services, see Route Services.
Bind a New Service Instance to a Route
To bind a new service instance to a route:
-
Select the service from the Marketplace.
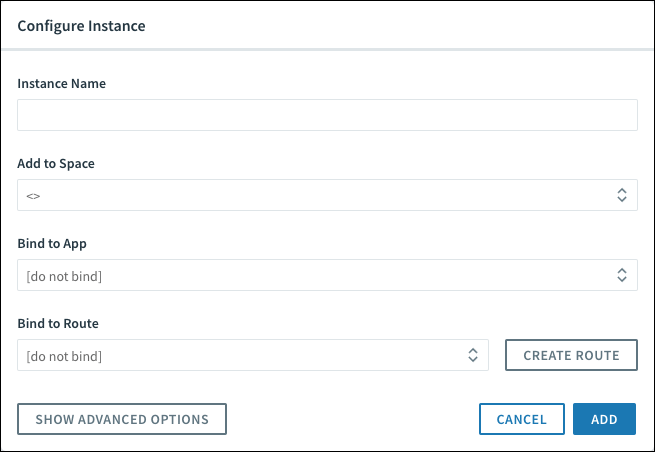
-
Under Bind to Route, either bind the service instance to an existing route or click Create Route to create a new custom route. You must choose a Marketplace service compatible with route services for the Bind to Route field to appear.
-
Complete the remaining fields and click Add to create the service instance.
Bind an Existing Service Instance to a Route
To bind an existing service instance to a route:
-
Go to the service Overview page.
-
Go to Bound Routes, and click Bind Route. If the service is not compatible with route services, the text “This service does not support route binding” appears under Bound Routes.
![alt-text=""][./images/bind-route-old.png]
-
Do one of the following steps:
- For Select a route to bind, select an existing route.
- For Create Custom Route, enter a new route.
-
Click Bind.
Unbind a Route from a Service Instance
To unbind a route from a service instance:
-
Go to the service Overview page.
-
Go to Bound Routes, and click the x next to the name of the route.
