


You can manage additional buildpacks in TAS for VMs by using the Cloud Foundry Command Line Interface tool (cf CLI).
If your app uses a language or framework that the VMware Tanzu Application Service for VMs (TAS for VMs) system buildpacks do not support, you can take one of the following actions:
-
Write your own buildpack. For more information, see Creating custom buildpacks.
-
Customize an existing buildpack.
-
Use a Heroku Third-Party Buildpack.
Add a buildpack
You must be a TAS for VMs admin user to run the commands discussed in this section.
To add a buildpack:
-
Run:
cf create-buildpack BUILDPACK PATH POSITIONWhere:
BUILDPACKspecifies the buildpack name.PATHspecifies the location of the buildpack.PATHcan point to a ZIP file, the URL of a ZIP file, or a local directory.POSITIONspecifies where to place the buildpack in the detection priority list.
For more information, see create-buildpack in the Cloud Foundry CLI Reference Guide.
-
To confirm that you have successfully added a buildpack, run:
cf buildpacks
Rename a buildpack
To rename a buildpack:
Using cf CLI v7+ run:
cf update-buildpack --rename BUILDPACK-NAME NEW-BUILDPACK-NAME
Where:
BUILDPACK-NAMEis the original buildpack name.NEW-BUILDPACK-NAMEis the new buildpack name.
For more information about renaming buildpacks, see rename-buildpack in the Cloud Foundry CLI Reference Guide.
Update a buildpack
To update a buildpack, run:
cf update-buildpack BUILDPACK [-p PATH] [-i POSITION] [-s STACK][--enable|--disable] [--lock|--unlock] [--rename NEW_NAME]
Where:
BUILDPACKis the buildpack name.PATHis the location of the buildpack.POSITIONis where the buildpack is in the detection priority list.STACKis the stack that the buildpack uses.
If you are using cf CLI v6, use the cf rename-buildpack command instead of the –rename flag.
For more information about updating buildpacks, see update buildpack in the Cloud Foundry CLI Reference Guide.
Delete a buildpack
To delete a buildpack, run:
cf delete-buildpack BUILDPACK [-s STACK] [-f]
Where:
BUILDPACKis the buildpack name.STACKis the stack that the buildpack uses.
For more information about deleting buildpacks, see delete-buildpack in the Cloud Foundry CLI Reference Guide.
Lock and unlock a buildpack
Every new version of Operations Manager ships with an updated buildpack. By default, your deployment applies to the most recent buildpack when you upgrade. In some cases, however, you might want to preserve an existing buildpack, rather than upgrade to the latest version. For example, if an app you deploy depends on a specific component in Buildpack A that is not available in Buildpack B, you might want to continue using Buildpack A.
The –lock flag lets you continue to use your existing buildpack even after you upgrade. Locked buildpacks are not updated when Operations Manager updates. You must manually unlock them to update them.
If you elect to use the –unlock flag, your deployment applies to the most recent buildpack when you upgrade Operations Manager.
cf update-buildpack BUILDPACK [-p PATH] [-i POSITION] [-s STACK] [--enable|--disable] [--lock|--unlock] [--rename NEW_NAME]
Important If you are using cf CLI v6, the --rename flag is not supported. Use the cf rename-buildpack instead.
This feature is also available through the API. See the locked flag under Update a Buildpack in the Cloud Foundry API documentation.
Deactivate custom buildpacks
You can deactivate custom buildpacks using the TAS for VMs tile. In the App Containers pane, deselect the Enable custom buildpacks check box, as shown in the following image.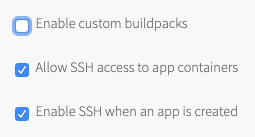
By default, the cf CLI gives developers the option of using a custom buildpack when they deploy apps to TAS for VMs. To do so, they use the -b option to provide a custom buildpack URL with the cf push command. Deselecting the Enable custom buildpacks check box prevents the -b option from being used with external buildpack URLs.
For more information about custom buildpacks, see Creating custom buildpacks.
