


This topic tells you how to use the Tanzu Java Buildpack.
The Tanzu Java Buildpack allows users to create an image containing a JVM application from a precompiled artifact or directly from source.
The Java Buildpack is a composite buildpack and each step in a build is handled by one of it's components. The following docs describe common build configurations. For a full set of configuration options and capabilities see the homepages for the component buildpacks.
About the Examples
All Java Buildpack examples will use the Paketo sample applications.
Examples assume that the root of this repository is the working directory:
git clone https://github.com/paketo-buildpacks/samples
cd samples
The pack CLI is used throughout the examples. pack is just one of several Cloud Native Buildpack platforms than can execute builds with the Java Buildpacks. For example, Spring Boot developers may want to explore the Spring Boot Maven Plugin or Spring Boot Gradle Plugin .
Examples assume that the Paketo Base builder is the default builder:
pack config default-builder paketobuildpacks/builder:base
All java example images should return {"status":"UP"} from the actuator health endpoint.
docker run --rm --tty --publish 8080:8080 samples/java
curl -s http://localhost:8080/actuator/health | jq .
Building from Source
The Java Buildpack can build from source using any of the following build tools:
- Gradle - Support provided by the Gradle Buildpack
- Leiningen - Support provided by the Leiningen Buildpack
- Maven - Support provided by the Maven Buildpack
- SBT - Support provided by the SBT Buildpack
The correct build tool to use will be detected based on the contents of the application directory.
The build should produce one the of supported artifact formats. After building, the buildpack will replace provided application source code with the exploded archive. The build will proceed as described in Building from a Compiled Artifact.
Example: Build with Maven
The following command creates an image from source with maven.
pack build samples/java \
  --path java/maven
How to use in Tanzu Application Platform
Create a
workload.yaml.A typical
workload.yamlfor building the Paketo maven sample app in themy-appsnamespace looks like this:--- apiVersion: carto.run/v1alpha1 kind: Workload metadata: labels: app.kubernetes.io/part-of: maven-sample apps.tanzu.vmware.com/has-tests: "true" apps.tanzu.vmware.com/workload-type: web name: maven-sample namespace: my-apps spec: build: env: - name: BP_JVM_VERSION value: 17 source: git: ref: branch: main url: https://github.com/paketo-buildpacks/samples subPath: java/mavenWhere
metadata.nameis the application name the workload is a part of, andspec.source.gitpoints to the remote source code.Trigger an image build by running:
tanzu apps workload apply --file workload.yaml
You're done! The resulting app container will serve your Maven app.
Configuring the Build Tool
The following set of configuration options are not comprehensive, see the homepage for the relevant component buildpacks for a full-set of configuration options.
Selecting a Module or Artifact
For a given build <TOOL>, where <TOOL> is one of MAVEN, GRADLE, LEIN or SBT, the selected artifact can be configured with one of the following environment variable at build-time:
BP_<TOOL>_BUILT_MODULE:- Defaults to the root module.
- Configures the module in a multi-module build from which the buildpack selects the application artifact.
- Example: Given
BP_MAVEN_BUILT_MODULE=api, Tanzu Maven Buildpack will look for the application artifact with the file patterntarget/api/*.[jw]ar.
BP_<TOOL>_BUILT_ARTIFACT:- Defaults to a tool-specific pattern (e.g.
target/*.[jw]arfor Maven,build/libs/*.[jw]arfor gradle). See component buildpack homepage for details. - Configures the built application artifact path, using Bash Pattern Matching.
- Supersedes
BP_<TOOL>_BUILT_MODULEif set to a non-default value. - Example: Given
BP_MAVEN_BUILT_ARTIFACT=out/api-*.jar, the Tanzu Maven Buildpack will select a file with nameout/api-1.0.0.jar.
- Defaults to a tool-specific pattern (e.g.
Specifying the Build Command
For a given build <TOOL>, where <TOOL> is one of MAVEN, GRADLE, LEIN or SBT, the build command can be configured with the following environment variable at build-time:
BP_<TOOL>_BUILD_ARGUMENTS:- Defaults to a tool-specific value (e.g.
-Dmaven.test.skip=true packagefor Maven,--no-daemon assemblefor Gradle). See component buildpack homepage for details. - Configures the arguments to pass to the build tool.
- Example: Given
BP_GRADLE_BUILD_ARGUMENTS=war, the Tanzu Gradle Buildpack will execute./gradlew warorgradle war(depending on the presence of the gradle wrapper).
- Defaults to a tool-specific value (e.g.
For a given build <TOOL>, where <TOOL> is one of MAVEN, GRADLE, the build command can be additionally configured with the following environment variable at build-time:
BP_<TOOL>_ADDITIONAL_BUILD_ARGUMENTS:- Defaults to an empty string
- Configures the additional arguments to pass to the build tool.
- Example: Given
BP_ADDITIONAL_BUILD_ARGUMENTS=war, the Tanzu Gradle Buildpack will execute./gradlew --no-daemon assemble warorgradle --no-daemon assemble war(depending on the presence of the gradle wrapper), appendingwarto the default command line arguments.
Specifically for Maven:
BP_MAVEN_ACTIVE_PROFILES:- Defaults to an empty string
- Configures one or several maven profiles to pass to the build tool.
- Example: Given
BP_MAVEN_ACTIVE_PROFILES=p1,!p2,?p3, the Tanzu Maven Buildpack will execute./mvnw -Dmaven.test.skip=true --no-transfer-progress package. --batch-mode -Pp1,!p2,?p3, appending-Pp1,!p2,?p3to the default command line arguments, activating thep1andp3profiles, deactivating thep2profile.
Connecting to a Private Maven Repository
A binding with type maven and key settings.xml can be used to provide custom Maven settings.
<binding-name>
├── settings.xml
└── type
The value of settings.xml file may contain the credentials needed to connect to a private Maven repository.
Example: Providing Maven Settings
The following steps demonstrate how to use a settings.xml file from your workstation with pack.
Create a directory to contain the binding.
mkdir java/maven/bindingIndicate that the binding is of type
mavenwith a file calledtypeinside the binding, containing the valuemaven.echo -n "maven" > java/maven/binding/typeCopy the
settings.xmlfile from the workstation to the binding.cp ~/.m2/settings.xml java/maven/binding/settings.xmlProvide the binding to
pack build.pack build samples/java \ --path java/maven \ --volume $(pwd)/java/maven/binding:/platform/bindings/my-maven-settings
How to use in Tanzu Application Platform
Tanzu Application Platform supports build service bindings, so after creating and applying the settings.xml as a Kubernetes Secret, named settings-xml.yaml.
apiVersion: v1
kind: Secret
metadata:
  name: settings-xml
  namespace: my-apps
type: service.binding/maven
stringData:
  type: maven
  settings.xml: |
    <settings xmlns="http://maven.apache.org/SETTINGS/1.0.0" xmlns:xsi="http://www.w3.org/2001/XMLSchema-instance"
      xsi:schemaLocation="http://maven.apache.org/SETTINGS/1.0.0 https://maven.apache.org/xsd/settings-1.0.0.xsd">
      <servers>
        <server>
          <id>myrepo</id>
          <username>admin</username>
          <password>changeme</password>
        </server>
      </servers>

      <mirrors>
        <mirror>
          <id>myrepo</id>
          <name>myrepo</name>
          <url>http://myrepo/</url>
          <mirrorOf>*</mirrorOf>
        </mirror>
      </mirrors>
    </settings>
You can next consume this secret from your Workload:
tanzu apps workload apply maven-sample-with-settings \
  -n my-apps\
  --git-repo https://github.com/paketo-buildpacks/samples \
  --git-branch main \
  --sub-path java/maven \
  --type web \
  --label apps.tanzu.vmware.com/has-tests=true  \
  --app maven-sample-with-settings \
  --param-yaml buildServiceBindings='[{"name": "settings-xml", "kind": "Secret"}]' \
  --build-env BP_JVM_VERSION=17 \
  -y
Share Local Maven or Gradle Cache
If you have been developing your code on your computer, it's very likely that Maven or Gradle have already downloaded all the dependency JARs required to build your application. However, if you perform a pack build of your application this runs in a new container and does not by default have access to your existing Maven or Gradle cache. This means Maven and Gradle will helpfully download all the dependencies they require again, slowing down your builds.
You can speed up builds by sharing your local Maven or Gradle cache with the container.
To do this with pack, you need to add the flag --volume $HOME/.m2:/home/cnb/.m2:rw to your pack build command. This flag will volume mount your local Maven directory into the build container, so it can be used there. This command makes the volume mount read-write, which allows Maven running inside the container to download and persist additional dependencies. If you do not want this, you can make the mount read-only by changing :rw to :ro. If read-only and Maven requires a dependency not present, the build will fail.
You can do the same thing with Gradle, the flag to add is --volume $HOME/.gradle:/home/cnb/.gradle:rw. Again, you make change :rw to :ro if you prefer the mount to be read-only.
For example:
pack build samples/java \
--path java/maven \
--volume $HOME/.m2:/home/cnb/.m2:rw
or
pack build samples/java \
--path java/gradle \
--volume $HOME/.gradle:/home/cnb/.gradle:rw
CautionDo not use this option if including a Maven or Gradle binding. If you do this, it will overwrite your actual local config file with the binding file which could cause data loss. It is also unnecessary because we are volume mounting the entire Maven or Gradle directory into the container which includes your Maven and Gradle settings.
Include or Exclude Custom Files
When building your application from source code, the Java buildpacks will capture the output artifact from your build process, typically a JAR/WAR file, and include that in the image that is generated. If you need to include/exclude additional files you may do so by setting the BP_INCLUDE_FILES or BP_EXCLUDE_FILES environment variables. Each can be set with a colon separated list of glob patterns. If a file or directory matches then it'll be included or excluded. If both include and exclude patterns are specified then the include patterns are applied first, followed by the exclude patterns second. By default, no additional files are included or excluded.
Any files added to the image through this process are rooted at the application directory, which is /workspace in the generated image. Files will reside under the same sub directories there as under the application source code root. If you have files under src/main/resources/foo and you use an include pattern of src/main/resources/foo/* then those files will be in the image at /workspace/src/main/resources/foo. There is not presently any way to transform the file locations, so if you require files at a specific location in the generated image you will need to use the same sub directory structure in your application source code.
pack build samples/java \
--path java/maven
-e BP_INCLUDE_FILES='foo/*'
NoteIt is important to properly quote values for
BP_INCLUDE_FILESandBP_EXCLUDE_FILESas they may contain wild card characters like*which the shell may interpret. Proper quoting ensures the actual characters are passed through to the buildpack.
Building from a Compiled Artifact
An application developer may build an image from following archive formats:
- Executable JAR - Support provided by the Executable Jar Buildpack
- WAR - Support provided by the Apache Tomcat Buildpack
- Distribution ZIP - Support provided by the DistZip Buildpack
The Java Buildpack expects the application directory to contain the extracted contents of the archive, such as an exploded JAR. Most platforms automatically extract any provided archives.
If a WAR is detect the Java Buildpack will install Apache Tomcat. For exact set of supported Tomcat versions can be found in the Java Buildpack releases notes. For tomcat configuration options see the Apache Tomcat Buildpack.
The component buildpack for the provided artifact format will contribute a start command to the image.
NoteAll three of the Apache Tomcat Buildpack, Executable Jar Buildpack, and DistZip Buildpack might opt-in during detection. However, only one of these buildpacks will actually contribute to the final image. This happens because the artifact type may be unknown during detection, if for example a previous buildpack compiles the artifact.
Example: Building from an Executable JAR
The following command uses Maven to compile an executable JAR and then uses pack to build an image from the JAR.
cd java/maven
./mvnw package
pack build samples/java \
   --path /target/demo-0.0.1-SNAPSHOT.jar
The resulting application image will be identical to that built in the Building with Maven example.
Building from a Function
The Tanzu Java Function Buildpack provides a Spring Boot application for executing functions.
Behavior
This buildpack will participate if any of the following conditions are met:
- A buildpack configuration variable
BP_FUNCTIONis explicitly set. - A file with the name
func.yamlis detected.
The buildpack does the following if detection is passed:
- Request for a JRE to be installed.
- Contributes the function invoker to a layer marked launch with the layer's path prepended to
$CLASSPATH. - Contributes environment variables defined in
func.yamlto the launch layer. - Contributes environment variables to configure the invoker if any configuration variables are defined. Overrides anything from
func.yaml.
Configuration
| Environment Variable | Description |
|---|---|
$BP_FUNCTION |
Configure the function to load. If the function lives in the default package: <class>. If the function lives in their own package: <package>.<class>. Defaults to functions.Handler |
Getting Started
To get started you'll need to create a directory where your function will be defined.
From within this directory we require a few files to properly detect this as a Java function:
(Optional)
func.yaml: We use this to configure the runtime environment variables. See the Knative Func CLI documentation for more information.pom.xmlor build.gradle: These are used by the other Java buildpacks to compile your function.Java package in folder
src/main/java/functions: This is the default location your function will be detected. If you do choose to use another package to store your functions, you will need to define where your function is located with theBP_FUNCTIONconfiguration for the buildpack.
Liveness / Readiness Endpoints
The Java invoker contains a readiness/liveness endpoint that can be hit at localhost:8080/actuator/health by default. For more information, read about the Spring Boot Actuator's Kubernetes Probes.
Templates
If you want to quickly start writing your functions, take a look at the functions samples in the application accelerators samples repo.
About the JVM
The Java Buildpack uses the BellSoft Liberica implementations of the JRE and JDK. JVM installation is handled by the BellSoft Liberica Buildpack. By default, the JDK will be installed in the build container but only the JRE will be contributed to the application image. You can configure a JDK to be installed at runtime, see Configuring the JVM Type.
See the homepage for the Bellsoft Liberica Buildpack for a full set of configuration options.
The JVM Version
The Bellsoft Liberica Buildpack provides support for the latest patch release of all version lines supported at the time of buildpack release. The exact set of JDK/JRE versions support by a given buildpack version can be found in the Java Buildpack release notes.
Inspecting the JVM Version
The exact JRE version that was contributed to a given image can be read from the Bill-of-Materials.
Example: Inspect the JRE Version
Given an image named samples/java built from one of examples above, the following command prints the exact version of the installed JRE.
pack inspect-image samples/app --bom | jq '.local[] | select(.name=="jre") | .metadata.version'
Configuring the JVM Version
The following environment variable configures the JVM version at build-time.
BP_JVM_VERSION:- Defaults to the latest LTS version at the time of release.
- Configures a specific JDK or JRE version.
- Example: Given
BP_JVM_VERSION=8orBP_JVM_VERSION=8.*the buildpack will install the latest patch releases of the Java 8 JDK and JRE.
Configuring the JVM Type
The following environment variable configures whether a JDK or a JRE is installed at runtime.
BP_JVM_TYPE:- Defaults to
JRE- a JDK will be used at build-time and a JRE will be used at runtime. If no JRE dependency is found, aJDKwill be installed for use as the JRE. - If
JDKis specified, the buildpack will attempt to install a JDK for use at runtime. The security implications of using a JDK at runtime should be considered.
- Defaults to
Runtime JVM Configuration
The Java Buildpack configures the JVM by setting JAVA_TOOL_OPTIONS in the JVM environment.
Memory Calculator
The Java Buildpack installs a component called the Memory Calculator which will configure JVM memory based on the resources available to the container at runtime. The calculated flags will be appended to JAVA_TOOL_OPTIONS.
Configuring JVM at Runtime
The runtime JVM can be configured in two ways:
Buildpack-provided runtime components including the Memory Calculator accept semantically named environment variables which are then used to derive
JAVA_TOOL_OPTIONSflags. Examples include:BPL_JVM_HEAD_ROOMBPL_JVM_LOADED_CLASS_COUNTBPL_JVM_THREAD_COUNT
Flags can be set directly at runtime with the
JAVA_TOOL_OPTIONSenvironment variable. User-provided flags will be appended to buildpack-provided flags. If the user and a buildpack set the same flag, user-provided flags take precedence.
See the homepage for the Bellsoft Liberica Buildpack for a full set of configuration options.
Use an Alternative JVM
By default, the Paketo Java buildpack will use the Liberica JVM. The following Paketo JVM buildpacks may be used to substitute alternate JVM implementations in place of Liberica's JVM.
| JVM | Buildpack |
|---|---|
| Adoptium (only provides JRE and JDK releases for Java 8 and 11, Java 16+ is JDK only) | Paketo Adoptium Buildpack |
| Alibaba Dragonwell (only provides JDK releases) | Paketo Alibaba Dragonwell Buildpack |
| Amazon Corretto (only provides JDK releases) | Paketo Amazon Corretto Buildpack |
| Azul Zulu | Paketo Azul Zulu Buildpack |
| BellSoft Liberica | Paketo BellSoft Liberica Buildpack - Default |
| Eclipse OpenJ9 | Paketo Eclipse OpenJ9 Buildpack |
| GraalVM (only provides JDK releases) | Paketo GraalVM Buildpack |
| Oracle JDK (only provides JDK releases and only provides Java 17) | Paketo Oracle Buildpack |
| Microsoft OpenJDK (only provides JDK releases) | Paketo Microsoft OpenJDK Buildpack |
| SapMachine | Paketo SapMachine Buildpack |
To use an alternative JVM, you will need to set two --buildpack arguments to pack build, one for the alternative JVM buildpack you'd like to use and one for the Paketo Java buildpack (in that order). This works because while you end up with two JVM buildpacks, the first one, the one you're specifying will claim the build plan entries so the second one will end up being a no-op and doing nothing.
This example will switch in the Azul Zulu buildpack:
pack build samples/jar --buildpack paketo-buildpacks/azul-zulu --buildpack paketo-buildpacks/java`
There is one drawback to this approach. When using the method above to specify an alternative JVM vendor buildpack, this alternate buildpack ends up running before the CA certs buildpack and therefore traffic from the alternate JVM vendor buildpack won’t trust any additional CA certs. This is not expected to impact many users because JVM buildpacks should reach out to URLs that have a cert signed by a known authority with a CA in the default system truststore.
If you have customized your JVM buildpack to download the JVM from a URL that uses a certificate not signed by a well-known CA, you can workaround this by specifying the CA certs buildpack to run first. This works because while you will end up with the CA certificates buildpack specified twice, the life cycle is smart enough to drop the second one.
For example:
pack build samples/jar --buildpack paketo-buildpacks/ca-certificates --buildpack paketo-buildpacks/azul-zulu --buildpack paketo-buildpacks/java`
It does not hurt to use this command for all situations, it is just more verbose and most users can get away without specifying the CA certificates buildpack to be first.
How to use in Tanzu Application Platform
By default, Tanzu Application Platform makes available the following buildpacks:
kubectl get clusterbuildpacks
NAME                           READY
dotnet-core-lite-2.6.2         True
go-lite-2.1.4                  True
java-lite-9.0.4                True
java-native-image-lite-7.0.4   True
nodejs-lite-2.2.3              True
python-lite-2.3.8              True
ruby-lite-2.5.2                True
web-servers-lite-0.13.1        True
NoteVersions might be different.
Tanzu Application Platform supports using alternate buildpacks than the ones provided by default, but first you must define a ClusterStore and ClusterBuilder that use the Azul Zulu buildpack rather than the default Liberica buildpack to compile your Java app:
apiVersion: kpack.io/v1alpha2
kind: ClusterStore
metadata:
  name: default
spec:
  sources:
    - image: paketobuildpacks/ca-certificates:3.6.3
    - image: paketobuildpacks/azul-zulu:10.1.5
    - image: paketobuildpacks/syft:1.32.1
    - image: paketobuildpacks/maven:6.15.5
    - image: paketobuildpacks/executable-jar:6.7.4
---

apiVersion: kpack.io/v1alpha2
kind: ClusterBuilder
metadata:
  name: my-cluster-builder
spec:
  tag: tapacr.azurecr.io/anthonyd2-test/my-cluster-builder
  stack:
    name: base-jammy
    kind: ClusterStack
  store:
    name: default
    kind: ClusterStore
  serviceAccountRef:
    name: default
    namespace: default
  order:
    - group:
        - id: paketo-buildpacks/ca-certificates
        - id: paketo-buildpacks/azul-zulu
        - id: paketo-buildpacks/syft
        - id: paketo-buildpacks/maven
        - id: paketo-buildpacks/executable-jar
using kubectl apply for example.
Then, you can refer this new ClusterBuilder from your Workload:
apiVersion: carto.run/v1alpha1
kind: Workload
metadata:
  labels:
    app.kubernetes.io/part-of: maven-sample
    apps.tanzu.vmware.com/has-tests: "true"
    apps.tanzu.vmware.com/workload-type: web
  name: maven-sample
  namespace: my-apps
spec:
  params:
    - name: clusterBuilder
      value: my-cluster-builder
  build:
    env:
    - name: BP_JVM_VERSION
      value: 17
  source:
    git:
      ref:
        branch: main
      url: https://github.com/paketo-buildpacks/samples
    subPath: java/maven
Installing a Minimal JRE with JLink
JLink is a tool included with the JDK that allows for the generation of a customized JRE. This is supported for Java versions 9 and above, where the Java Module system is available. To run the JLink tool and install a minimal JRE for runtime, simply use the following environment variable:
BP_JVM_JLINK_ENABLED- this defaults tofalse, set totrueto enable JLink.
This runs JLink with the following default arguments:
--no-man-pages: This excludes man pages from the generated JRE--no-header-files: This excludes header files from the generated JRE--strip-debug: This strips debug information from the generated JRE--compress=1: This enables "Constant string sharing" level compression
The JRE generated by default will include only Java modules prefixed with java.*. If you want to fully customize all arguments passed to JLink including which modules should be added to the generated JRE, you can use the following environment variable:
BP_JVM_JLINK_ARGS: Not set by default. If any values are specified here, none of the defaults listed above are set. The variable must contain the arguments you want to pass to the JLink tool, including the list of required modules with the argument--add-modules <comma-separated-list>.
Example: Generating a minimal JRE via JLink, with custom arguments
pack build samples/java --env BP_JVM_JLINK_ENABLED=true --env BP_JVM_JLINK_ARGS="--no-header-files --compress=1 --add-modules java.base,java.se"
Generating a minimal JRE can be particularly useful when specifying a JVM Provider which does not supply its own JRE, for example, Amazon Corretto. A full JDK would normally be supplied at runtime when using such providers, as it is the only option, resulting in an unnecessarily large runtime image. Enabling JLink in this case will generate a slimmed-down JRE from the supplied JDK, and ensure a significantly smaller runtime image.
Java Application Servers
When deploying your Java application to an application server, the default application server installed by the Paketo Java buildpack is Apache Tomcat. If you require a different application server, possibly one that supports JavaEE or JakartaEE, you may select an alternative Java application server by setting BP_JAVA_APP_SERVER when building your application.
| Application Server | BP_JAVA_APP_SERVER | Buildpack |
|---|---|---|
| Apache Tomcat | tomcat |
Paketo Apache Tomcat - Default |
| Apache Tomee | tomee |
Paketo Apache Tomee |
| Open Liberty | liberty |
Paketo Liberty |
This example will switch to using Open Liberty:
pack build samples/war -e BP_JAVA_APP_SERVER=liberty`
Spring Boot Applications
If the application uses Spring Boot the Spring Boot Buildpack will enhance the resulting image by adding additional metadata to the image config, applying Boot-specific performance optimizations, and enabling runtime auto-configuration.
Additional Metadata
The Spring Boot Buildpack adds the following additional image labels:
org.opencontainers.image.title: Set to the value ofImplementation-TitlefromMANIFEST.MF.org.opencontainers.image.version: Set to the values ofImplementation-VersionfromMANIFEST.MF.org.springframework.boot.version: Set to the value ofSpring-Boot-VersionfromMANIFEST.MF.org.springframework.cloud.dataflow.spring-configuration-metadata.json: Containing configuration metadata.org.springframework.cloud.dataflow.spring-configuration-metadata.json: Containingdataflow-configuration-metadata.properties, if present.
In addition, the buildpack will add an entry with name dependencies to the Bill-of-Materials listing the application dependencies.
Example: Inspecting Application Dependencies
The following command uses pack to list every dependency of a sample application.
pack inspect-image samples/java --bom | jq '.local[] | select(.name=="dependencies") | .metadata.dependencies[].name'
Runtime Auto-Configuration
The Spring Boot Buildpack adds Spring Cloud Bindings to the application class path. Spring Cloud Bindings auto-configures the application to connect to an external service when a binding of a supported type provides credentials and connection information at runtime.
Runtime auto-configuration is active by default. You can deactivate Runtime auto-configuration by using the BPL_SPRING_CLOUD_BINDINGS_ENABLED environment variable.
Optimizations
The Spring Boot Buildpack can apply domain-specific knowledge to optimize the performance of Spring Boot applications. For example, if the buildpack detects that the application is a reactive web application the thread count will be reduced to 50 from a default of 250.
Spring Boot CDS integration - Spring Boot v3.3 and later only
A great optimization that does not require any rewriting of the app, is Spring CDS integration if your app is built with Spring Boot v3.3 or later. Expect approximately 20% less memory usage, and a startup time around 1.5x faster.
Due to the Tanzu Java Buildpack included in Tanzu Application Platform v1.10 and later, you don't have to create the optimized layout or do the training run yourself: just set this environment variable BP_JVM_CDS_ENABLED to true in your workload.yaml build section, and you'll automatically benefit from this optimization.
NoteThere is an additional environment variable,
CDS_TRAINING_JAVA_TOOL_OPTIONS, that allows you to override the defaultJAVA_TOOL_OPTIONSfor the CDS training run. This is useful, for example, to configure your app not to reach external services during a training run.
Spring Boot AOT integration
Another great optimization is Ahead of Time (AOT).
Your app needs to be built using AOT though, for the Tanzu Java Buildpack to apply runtime configuration when you set BP_SPRING_AOT_ENABLED to true in your workload.yaml build section.
To make sure your Spring Boot application is built using AOT, follow those instructions:
NoteWhile AOT optimization is famous for Native Image pre-processing, it's also a very good optimization for JVM based apps.
Spring Boot AOT and CDS example
While each optimization can be added individually, here's an example with both of them enabled. For AOT, make sure the app was built properly.
---
apiVersion: carto.run/v1alpha1
kind: Workload
metadata:
 labels:
   app.kubernetes.io/part-of: petclinic
   apps.tanzu.vmware.com/has-tests: "true"
   apps.tanzu.vmware.com/workload-type: web
 name: petclinic
 namespace: apps
spec:
 build:
   env:
   - name: BP_JVM_VERSION
     value: "21" #optional, could be 17 too
   - name: BP_JVM_CDS_ENABLED
     value: "true"
   - name: BP_SPRING_AOT_ENABLED
     value: "true"
 params:
 - name: annotations
   value:
     autoscaling.knative.dev/minScale: "1"
 source:
   git:
     ref:
       branch: main
     url: https://github.com/sdeleuze/petclinic-efficient-container #application based on Spring Boot 3.3 or greater
You will notice in the logs such output:
Spring AOT Enabled, contributing -Dspring.aot.enabled=true to JAVA_TOOL_OPTIONS
[...]
Picked up JAVA_TOOL_OPTIONS: [...] -XX:SharedArchiveFile=application.jsa [...]
[...]
Starting AOT-processed PetClinicApplication v1.0.0-SNAPSHOT using Java
Connecting to an APM
APM integration are enabled with bindings or with environment variables. For buildpacks that require a binding, when a binding of the correct type is provided at build-time the corresponding Java agent will be contributed to the application image. For buildpacks that require an environment variable, when the environment variable is provided at build-time the corresponding Java agent will be contribute to the application image.
Connection credentials, if required, will always be read from a binding at runtime, as these are considered confidential information and sensitive information should always be specified through a binding, not environment variables.
The Tanzu Java Buildpack supports APM integrations listed on the Partner Integration Buildpacks page
Debugging
If BPL_DEBUG_ENABLED is set to true at runtime the application will be configured to accept debugger connections. The debug port defaults to 8000 and can be configured with BPL_DEBUG_PORT at runtime. If BPL_DEBUG_SUSPEND is set at runtime, the JVM will suspend execution until a debugger has attached.
Example: Remote Debugging
The following commands builds a debug-enabled image.
pack build samples/java \
  --path java/jar \
To run the image with the debug port published:
docker run --env BPL_DEBUG_ENABLED=true --publish 8000:8000 samples/java
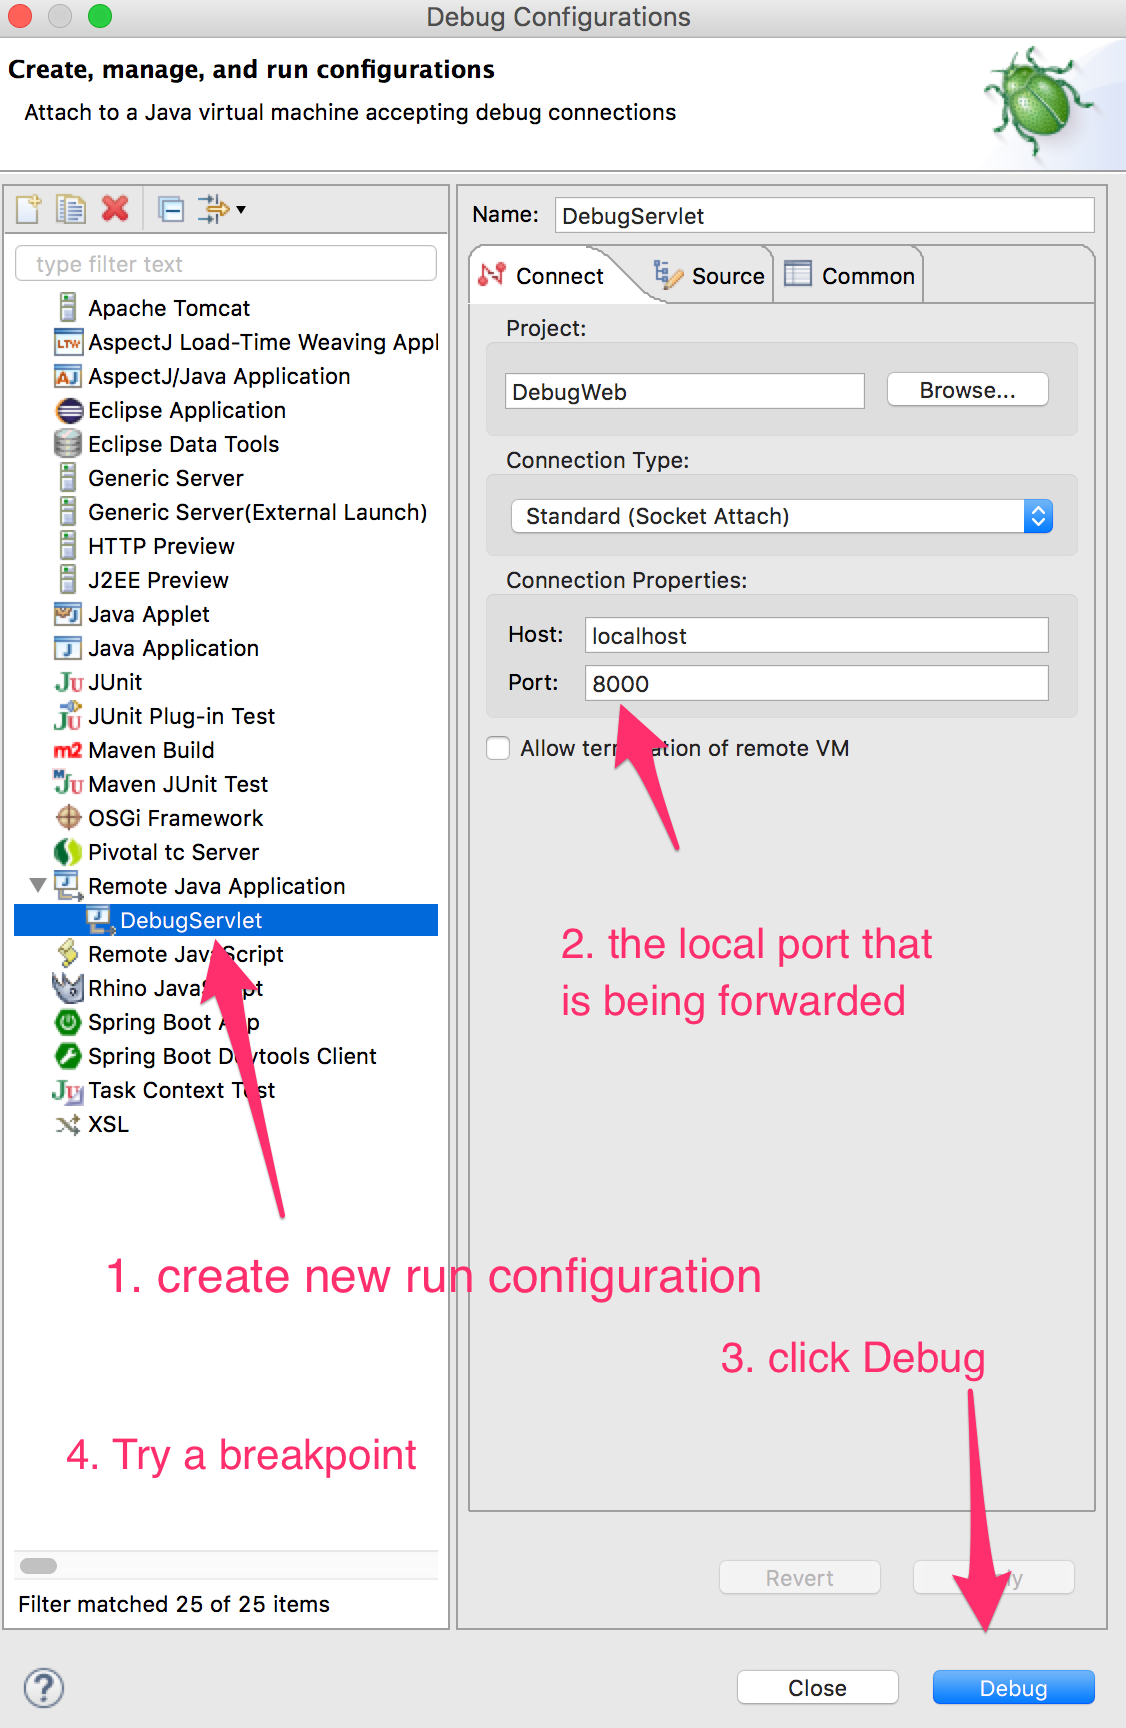
Connect your IDE debugger to connect to the published port as follows:
Under Remote Java Application in the list in the left hand pane, create a new run configuration.
In the Connect tab, fill in the Connection Properties fields. Add
localhostin the Host field and add the local port that is being forwarded in the Port field.Click Debug.
Try a breakpoint.
Enabling JMX
If BPL_JMX_ENABLED is set at runtime, the application will be configured to accept JMX connections. The JMX connector will listen on port 5000 by default. The port can be configured with the BPL_JMX_PORT environment variable at runtime.
Example: Enabling JMX
The following commands builds a JMX-enabled image.
pack build samples/java \
  --path java/jar \
To run the image with the JMX port published:
docker run --env BPL_JMX_ENABLED=true --publish 5000:5000 samples/java
Connect JConsole to the published port.

Enabling Java Native Memory Tracking (NMT)
By default, the JVM is configured to track internal memory usage. The JVM prints its last memory usage data when it exits. You can configure the level of detail at runtime by setting the environment variable BPL_JAVA_NMT_LEVEL, which supports both summary (default) and detail. Because there is a small amount of overhead required to support NMT, you can deactivate it by setting the environment variable BPL_JAVA_NMT_ENABLED to false.
Example: Capturing NMT output
To capture NMT data using the JDK tool jcmd, first ensure that you have a JDK installed at runtime. For more information, see Install a Specific JVM Type.
Then run the following to start a bash session on a running container, with jcmd available on the $PATH variable:
docker exec -it <container-id> /cnb/lifecycle/launcher /bin/bash
From inside the new bash session, you can run the following to view the NMT data:
jcmd 1 VM.native_memory summary
The first argument should be the JVM PID, in the case of the Tanzu Java buildpack, this will be 1.
Enabling Java Flight Recorder (JFR)
If BPL_JFR_ENABLED is set to true at runtime, Java Flight Recording features will be enabled by the JVM. To configure JFR via its supported arguments, add them to the optional environment variable BPL_JFR_ARGS at runtime.
Two default arguments are configured for JFR as follows:
dumponexit: This is set totrueto write the recording data to a file when the JVM exitsfilename: This is set to<system-temp-dir>/recording.jfr, for example,/tmp/recording.jfr, and is the location where the recording data will be written on JVM exit
If any args are provided via BPL_JFR_ARGS, these defaults will not be configured.
Example: Enabling & configuring JFR
The following command builds a JFR-enabled image.
pack build samples/java \
--path java/jar
To run an image with JFR enabled and optionally configure it with custom arguments:
docker run --env BPL_JFR_ENABLED=true --env BPL_JFR_ARGS=filename=/tmp/my-recording.jfr,duration=60s samples/java
Selecting a Process
The Java buildpack contributes a default process type that starts the application.
Example: Running the default process
Execute the following commands to start the default process type using a samples/java image built from any previous example command.
docker run  --rm --publish 8080:8080 samples/java
curl -s http://localhost:8080/actuator/health
Providing Additional Arguments
Additional arguments can be provided to the application using the container CMD. In Kubernetes set CMD using the args field on the container resource.
Example: Setting the Server Port
Execute the following command passes an additional argument to application start command, setting the port to 8081.
docker run --rm --publish 8081:8081 samples/java --server.port=8081
curl -s http://localhost:8081/actuator/health
Executing a Custom Command
To override the buildpack-provided start command with a custom command, set the container ENTRYPOINT
Example: Start an Interactive Shell
The following command runs Bash interactively:
docker run --rm --entrypoint bash samples/java
Executing a Custom Command in the Buildpack-Provided Environment
Every buildpack-generated image contains an executable called the launcher which can be used to execute a custom command in an environment containing buildpack-provided environment variables. Before running the provided command, the launcher executes buildpack provided profile scripts to set environment variables with values that must be calculated dynamically at runtime.
To run a custom start command in the buildpack-provided environment set the ENTRYPOINT to launcher and provide the command using the container CMD.
Example: Inspect the Buildpack-Provided JAVA_TOOL_OPTIONS
The following command will print value of $JAVA_TOOL_OPTIONS set by the buildpack:
docker run --rm --entrypoint launcher samples/java echo 'JAVA_TOOL_OPTIONS: $JAVA_TOOL_OPTIONS'
Each argument provided to the launcher will be evaluated by the shell prior to execution and the original tokenization will be preserved. Note that, in the example above 'JAVA_TOOL_OPTIONS: $JAVA_TOOL_OPTIONS' is single quoted so that $JAVA_TOOL_OPTIONS is evaluated in the container, rather than by the host shell.
Components
The following component buildpacks compose the Java Buildpack. Buildpacks are listed in the order they are executed.
| Buildpack | Required/Optional | Responsibility |
|---|---|---|
| Paketo CA Certificates Buildpack | Optional | Adds CA certificates to the system truststore at build and runtime. |
| Tanzu Snyk Buildpack | Optional | Provides Snyk scanning |
| Paketo BellSoft Liberica Buildpack | Required | Provides the JDK and/or JRE. |
| Paketo Syft | Optional | Provides the Syft CLI which can be used to generate SBoM information. |
| Paketo Leiningen Buildpack | Optional | Builds Leiningen-based applications from source. |
| Paketo Clojure Tools Buildpack | Optional | Builds Clojure applications from source. |
| Paketo Gradle Buildpack | Optional | Builds Gradle-based applications from source. |
| Paketo Maven Buildpack | Optional | Builds Maven-based applications from source. |
| Paketo SBT Buildpack | Optional | Builds SBT-based applications from source. |
| Paketo Watchexec Buildpack | Optional | Contributes the watchexec binary for process reloading. |
| Paketo Executable JAR Buildpack | Optional | Contributes a process Type that launches an executable JAR. |
| Paketo Apache Tomcat Buildpack | Optional | Contributes Apache Tomcat and a process type that launches a WAR with Tomcat. |
| Paketo Apache Tomee Buildpack | Optional | Contributes Apache Tomee and a process type that launches a WAR with Tomee. |
| Paketo Liberty Buildpack | Optional | Contributes Open Liberty and a process type that launches a WAR with Open Liberty. |
| Paketo DistZip Buildpack | Optional | Contributes a process type that launches a DistZip-style application. |
| Paketo Spring Boot Buildpack | Optional | Contributes configuration and metadata to Spring Boot applications. |
| Paketo Procfile Buildpack | Optional | Allows the application to define or redefine process types with a Procfile |
| Paketo Jattach | Optional | Provides the JAttach binary to send commands to a remote JVM via Dynamic Attach mechanism |
| Paketo Azure Application Insights Buildpack | Optional | Contributes the Application Insights Agent and configures it to connect to the service. |
| Paketo Google Stackdriver Buildpack | Optional | Contributes Stackdriver agents and configures them to connect to the service. |
| Paketo Datadog Buildpack | Optional | Contributes Datadog trace agent and configures it to connect to the service. |
| Paketo Java Memory Assistant Buildpack | Optional | Contributes and configures the SAP Java Memory Assistant (JMA) Agent for Java applications. |
| Tanzu Apache Skywalking Buildpack | Optional | Contributes the Apache Skywalking agent. |
| Tanzu AppDynamics Buildpack | Optional | Contributes the AppDynamics agent. |
| Tanzu AspectJ Buildpack | Optional | Contributes the AspectJ Weaver agent. |
| Tanzu Checkmarx Buildpack | Optional | Contributes the Checkmarx agent. |
| Tanzu Contrast Security Buildpack | Optional | Contributes the Contrast Security agent. |
| Tanzu Dynatrace Buildpack | Optional | Contributes the Dynatrace OneAgent. |
| Tanzu Elastic APM Buildpack | Optional | Contributes the Elastic APM agent. |
| Tanzu Jacoco Buildpack | Optional | Contributes the Jacoco agent. |
| Tanzu Java Function Buildpack | Optional | Contributes appropriate dependencies to build a function |
| Tanzu JProfiler Buildpack | Optional | Contributes the JProfiler agent. |
| Tanzu JRebel Buildpack | Optional | Contributes the JRebel agent. |
| Tanzu Luna Security Provider Buildpack | Optional | Contributes the Luna Security provider. |
| Tanzu NewRelic Buildpack | Optional | Contributes the NewRelic agent. |
| Tanzu OverOps Buildpack | Optional | Contributes the OverOps agent. |
| Tanzu Aternity Buildpack | Optional | Contributes the Aternity agent. |
| Tanzu Synopsys Buildpack | Optional | Contributes the Synopsys agent. |
| Tanzu YourKit Buildpack | Optional | Contributes the YourKit agent. |
| Paketo Encrypt At Rest Buildpack | Optional | Encrypts an application layer and contributes a profile script that decrypts it at launch time. |
| Paketo Environment Variables Buildpack | Optional | Contributes arbitrary user-provided environment variables to the image. |
| Paketo Image Labels Buildpack | Optional | Contributes OCI-specific and arbitrary user-provided labels to the image. |
Additional Configuration
Install a Custom CA Certificate
Java buildpack users can provide their own CA certificates and have them included in the container root truststore at build-time and runtime by following the instructions outlined in the CA Certificates section of the configuration documentation.
Override the Start Process Set by the Buildpack
Java buildpack users can set custom start processes for their app image by following the instructions in the Procfiles section of the configuration documentation.
Set Environment Variables for App Launch Time
Java buildpack users can embed launch-time environment variables in their app image by following the documentation for the Environment Variables Buildpack.
Add Custom Labels to the App Image
Java buildpack users can add labels to their app image by following the instructions in the Applying Custom Labels section of our configuration docs.
