


Setting up Data Center Account
VMware Tanzu CloudHealth Hybrid
Tanzu CloudHealth Hybrid provides a single platform with visibility into cost, usage, and performance of all hybrid cloud resources (Data Center and VMware Cloud). In addition to standard Tanzu CloudHealth Platform capabilities, Tanzu CloudHealth Hybrid allows you to:
- Optimize hybrid cloud investments: Tanzu CloudHealth provides benchmark cost data and gives you the ability to customize your cost drivers so you have an accurate picture of their overall spend.
- Gain visibility into hybrid cloud cost, usage, and performance: Tanzu CloudHealth provides a single platform to manage hybrid cloud resources, providing a consolidated view of cost, usage and performance for hybrid cloud resources. View historic resource usage across teams.
- Plan for successful migrations: Plan for migrations from your private cloud to AWS, Azure, and GCP. Compare the cost of moving workloads to any of the various public clouds in different regions/area zones.
- Establish and enforce governance and compliance: Tanzu CloudHealth policies help you enforce proper usage of cloud resources by flagging policy violations or unexpected cost increases and create custom notifications so you can quickly take remediation actions.
If you only use hybrid cloud resources, Tanzu CloudHealth Hybrid allows you to utilize the Tanzu CloudHealth Platform without interacting with public cloud features.
If you are currently enrolled in Tanzu CloudHealth Hybrid and want to upgrade to public cloud access, contact your account manager.
Get Started
To begin setting up your hybrid cloud with Tanzu CloudHealth, refer to the following topics:
- Enable Data Center Account
- Configure Tanzu CloudHealth Aggregator for VMware Environment
- Allocate and Analyze Data Center Costs
- Allocate and Analyze VMware Costs
- Generate Migration Recommendations
Enable Data Center Account
You can enable a VMware Data Center environment in the Tanzu CloudHealth platform by -
- Using Aggregator - Once you configure the aggregator machine, add the Data Center account to your Data Center environment. For more information, see Configure Tanzu CloudHealth Aggregator for VMware Environment.
- Integrating with vROPs - Configure the MP adapter in vROPs to push already configured Data Center accounts in the vROps environment to the Tanzu CloudHealth platform. For more information, see Integrate with vRealize Operations
Step 1 - Setup Data Center Account
- Log in to the Tanzu CloudHealth platform and from the left menu select Setup > Accounts > Other Accounts and click Add Account.

- Enter a Name and Description for the account.
 Use descriptions that will help you identify this account later. For example, include the data center location. Be as specific as possible so that you can group servers logically once they are setup in the Tanzu CloudHealth platform.
 - Click Save Account.
The account appears in the list of Data Center Accounts in the Tanzu CloudHealth platform.
Step 2 - Install Tanzu CloudHealth Agent on Data Center Servers
The Tanzu CloudHealth Agent collects metrics from your data center servers every hour and transmits that information to the Tanzu CloudHealth platform.
For instruction, see Integrate with Tanzu CloudHealth Agent.
Integrate with vRealize Operations
What is vRealize Operations Integration for Tanzu CloudHealth
The vRealize Operations Integration for Tanzu CloudHealth collects cost and usage data from vRealize Operations and ingests it into Tanzu CloudHealth. In this integration, an adapter instance is deployed on the vRealize Operations platform to monitor vCenter resources and publish information to Tanzu CloudHealth. The Tanzu CloudHealth platform consolidates your multi-cloud data on a single view, providing visibility into your vSphere-based private cloud data using vRealize Operations and the public cloud data through Tanzu CloudHealth.
Install and Configure vRealize Operations Integration for Tanzu CloudHealth Adapter
Complete the following steps to set up the vRealize Operations Integration for Tanzu CloudHealth.
Step 1 - Define Role and Permissions for vRealize Operations
Follow the steps below to create a new role and assign the permissions.
- In the Tanzu CloudHealth platform, from the left menu, navigate to Setup > Admin > Role Documents.
- Click New Role Document. You can also copy one of the built-in role documents (Standard User, Administrator, or Power User) and modify the copy to create your own.
- Add user Name and Description.
- Select whether to Share the user with sub-organizations.
- From the left scrolling pane, select Data Center, and select the necessary permissions as given in the following table.
| Data Center | Required Permissions |
|---|---|
| Dashboard | Read Datacenter Dashboard, Change Datacenter Dashboard |
| Reports > Cost > Machine | Read Data Center Server Cost Report, Export Data Center Server Cost Report, Save Data Center Server Cost Report, Share Data Center Server Cost Report, Subscribe Data Center Server Cost Report |
| Reports > Cost > Current | Read Data Center Cost Current Report, Export Data Center Cost Current Report, Save Data Center Cost Current Report, Share Data Center Cost Current Report, Subscribe Data Center Cost Current Report |
| Reports > Cost > Cost Driver | Read Data Center Cost Driver Report, Export Data Center Cost Driver Report, Save Data Center Cost Driver Report, Share Data Center Cost Driver Report, Subscribe Data Center Cost Driver Report |
| Reports > Usage > Machine | Read Data Center Server Usage Report, Export Data Center Server Usage Report, Save Data Center Server Usage Report, Share Data Center Server Usage Report,Subscribe Data Center Server Usage Report |
| Reports > Performance > Machine | Read Data Center Server Performance Report, Export Data Center Server Performance Report, Save Data Center Server Performance Report, Share Data Center Server Performance Report,Subscribe Data Center Server Performance Report |
| Reports > Performance > Memory | Read Data Center Memory Performance Report, Export Data Center Memory Performance Report, Save Data Center Memory Performance Report, Share Data Center Memory Performance Report, Subscribe Data Center Memory Performance Report |
| Assets | Read Data Center Tag, Export Data Center Tag, Save Data Center Tag, Subscribe Data Center Tag, Read Data Center Server File System, Export Data Center Server File System, Save Data Center Server File System, Subscribe Data Center Server File System, Read Data Center Server Network Interface, Export Data Center Server Network Interface, Save Data Center Server Network Interface, Subscribe Data Center Server Network Interface, Read Data Center Server Block Device, Export Data Center Server Block Device, Save Data Center Server Block Device, Subscribe Data Center Server Block Device, Read Data Center Server CPU, Export Data Center Server CPU, Save Data Center Server CPU, Subscribe Data Center Server CPU, Read Data Center Server Usage Daily |
| Accounts | Create Data Center Account, Read Data Center Account, Update Data Center Account, Delete Data Center Account, Export Data Center Account, Save Data Center Account, Subscribe Data Center Account, Tag Data Center Account |
| Machine | Update Data Center Server, Read Data Center Server, Export Data Center Server, Save Data Center Server, Subscribe Data Center Server, Tag Data Center Server |
| Hosts / DataStores / Clusters / Datacenters | Read Data Center Host, Export Data Center Host, Save Data Center Host, Subscribe Data Center Host, Tag Data Center Host |
| Agents | Read Datacenter Agent Configuration, Update Datacenter Agent Configuration, Disable Autoupdate Datacenter Agent Status, Enable Autoupdate Datacenter Agent Status, Read Datacenter Agent Status, Export Datacenter Agent Status, Save Datacenter Agent Status, Subscribe Datacenter Agent Status |
From the left scrolling pane, select Setup, and select the necessary permissions as given in the following table.
| Setup | Required Permissions |
|---|---|
| Profile | Read Profile, Update Profile, Generate API Key Profile |
- The user API access key must be associated with a user having either a default Power User role or an Administrator role.
- If you want to associate the user API access key with a user having a custom role, then create a new role, and add the necessary permissions.
Step 2 - Download vRealize Operations Integration for Tanzu CloudHealth Adapter
Download the PAK file for vRealize Operations Integration for Tanzu CloudHealth from VMware Marketplace, and save the PAK file to a temporary folder on your local system.
- Note - The vRealize Operations Integration for Tanzu CloudHealth version 1.0.4 includes an updated Log4j version 2.17.0 to resolve the Log4j vulnerability.
Step 3 - Install the vRealize Operations Integration for Tanzu CloudHealth Adapter
Prerequisites
- Ensure that the vRealize Operations version is 8.2 and above.
- Disable the FIPS mode for vRealize Operations Manager.
- Ensure that the vRealize Operations instance can reach Tanzu CloudHealth Graphql endpoint - https://apps.cloudhealthtech.com/graphql
- Set the Currency in vRealize Operations to USD. To change the currency settings,
- For vRealize Operations On-premises setup- Click the Administration tab. From the left pane, go to Management > Global Settings > Currency.
- For vRealize Operations Cloud setup- From the left navigation pane, click Administration. Select Global currency. On the Global Settings page, select Cost/Price > Currency.
Follow these steps to install the adapter instance:
- Login to the vRealize Operations Manager platform with administrative privileges.
- In vRealize Operations Manager On-prem setup- Click the Administration tab. From the left pane, select Solutions > Repository. At the bottom of the Repository page, click Add/Upgrade. In the vRealize Operations Manager Cloud setup – From the left navigation pane, go to Data Sources > Integrations, and click the Repository tab. Click Add.
- Click the Administration tab. From the left pane, select Solutions > Repository. At the bottom of the Repository page click Add/Upgrade.
- In Select Solution, click Browse and select the downloaded PAK file
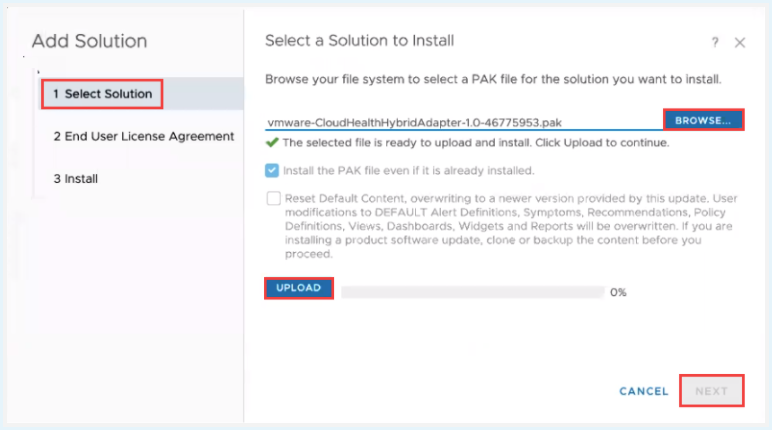
- Read and accept the Install the PAK file even if it is already installed checkbox and click Upload. Installation details appear with a success message,
The PAK file signature is valid.
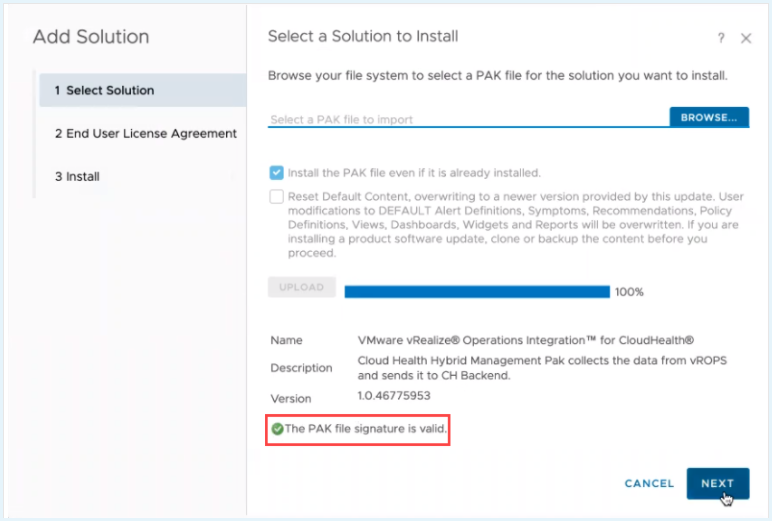
The upload might take several minutes to complete. - Click Next.
- Accept the End User License Agreement by clicking the
I accept the terms of this agreementcheckbox and click Next. - Finally, check the Installation Details and click Finish.
Step 4 - Configure an Adapter Instance for the vRealize Operations Integration for Tanzu CloudHealth
Best Practices:
- Do not add the vRealize Operations Integration for Tanzu CloudHealth adapter, if the Cluster already has more than 80% CPU usage,
- Do not configure vRealize Operations Integration for Tanzu CloudHealth adapter at the same time when the Cost Engine job is scheduled, as these processes are also huge CPU consumers.
Prerequisite
If you use vRealize Operations cloud setup and collector as a cloud proxy for this integration, upgrade the HAProxy buffer size. The default HAProxy configuration will not support the Virtual Machines collection. Therefore you need to upgrade the HAProxy buffer size using the following instructions.
- Update HAProxy configuration to set bufsize:
vim /etc/haproxy/haproxy.cfg - Add the following line under the “global” section:
global log localhost local0 info log localhost local1 info chroot /etc/haproxy ca-base /etc/ssl/certs crt-base /etc/ssl/private maxconn 32768 tune.bufsize 65536 - Restart the HAProxy service
service haproxy restart
This prerequisite is applicable only for vRealize Operations cloud setup and not required for on-premises.
Follow these steps to configure the Adapter instance (on-prem) :
- In the vRealize Operations Manager console, click the Administration tab, and from the left navigation, select Repository.
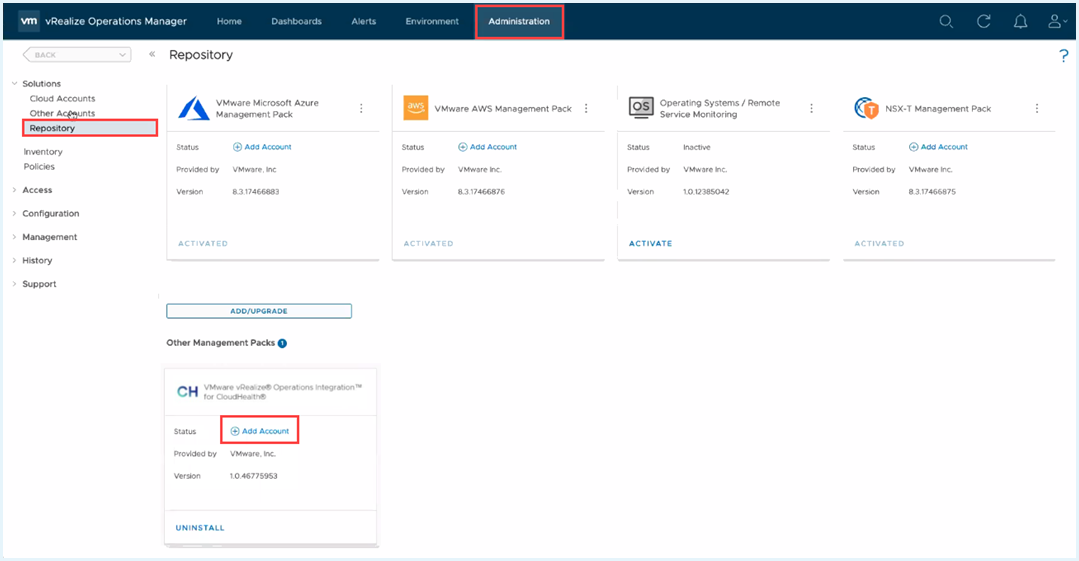
- Scroll down to the Other Management Packs section, locate the vRealize Operations Integration for Tanzu CloudHealth, and click Add Account, or from the left navigation pane, go to Other Accounts and click Add Account.
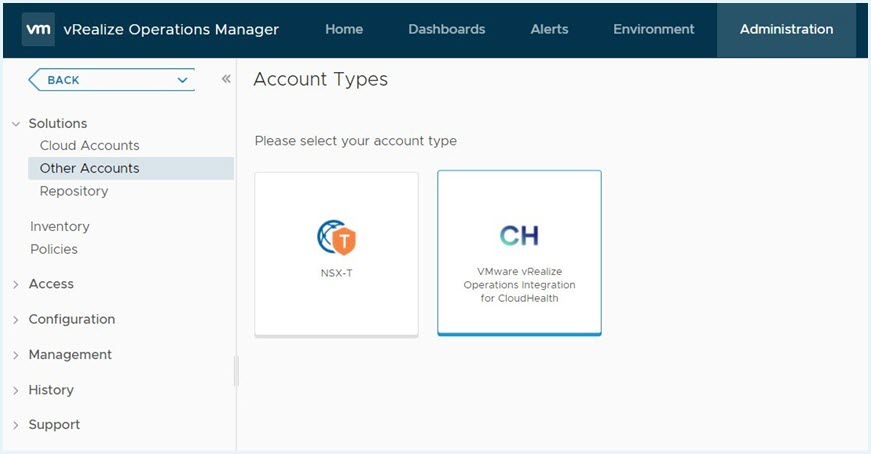
- On the Account Types page, select VMware vRealize Operations Integration for Tanzu CloudHealth.
- On the New Account page, give a Name to your account and add a Description.
- Click + to add a new credential.
- In the Manage Credential dialog box, enter the friendly Credential name to identify the configured credentials and the Tanzu CloudHealth API key. The user API access key must be associated with either a default Power user or an Administrator role.
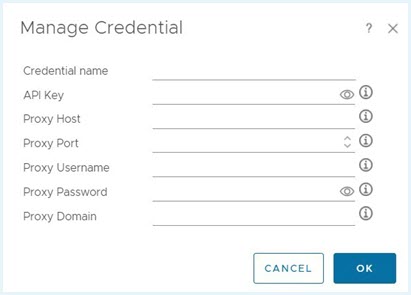
For more information on how to generate a Tanzu CloudHealth API key, see the Authentication article. - (Optional) Enter the following proxy details to set up the adapter instance with no internet access:
- Proxy Host
- Proxy Port
- Proxy Username
- Proxy Password
- Proxy Domain
- Click Ok.
- On the New Account page, select Collector/Group upon which you want to run the adapter instance. A collector gathers objects into its inventory for monitoring. By default, it is set to the Default collector group for optimal data collection.
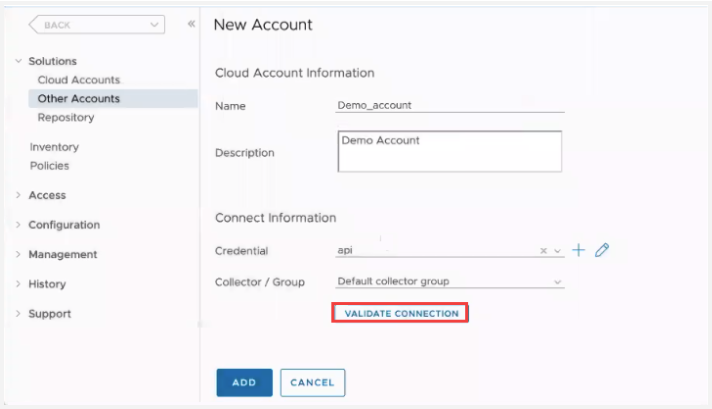
- Click Validate Connection to initiate the authentication request. After validation is successful, a success message appears on the screen. Click OK.
- Click Add. The newly created account appears on the Other Accounts page.


Manage the vRealize Operations Integration for Tanzu CloudHealth
- Do not create more than one account in vRealize Operations Manager. There should be only one instance configured in the vRealize Operations Manager console.
- If the adapter instance has stopped collecting data for more than 7 days, change the default collection cycle to N days, where N is the number of days the collection was stopped. Update the
config.propertyfile before the first collection begins. - To update the account information, click the account name on the Other Accounts page.
- To delete the account, go to the Repository page, select the vRealize Operations Integration for Tanzu CloudHealth pack, and click Uninstall.
View vRealize Operations within the Tanzu CloudHealth Platform
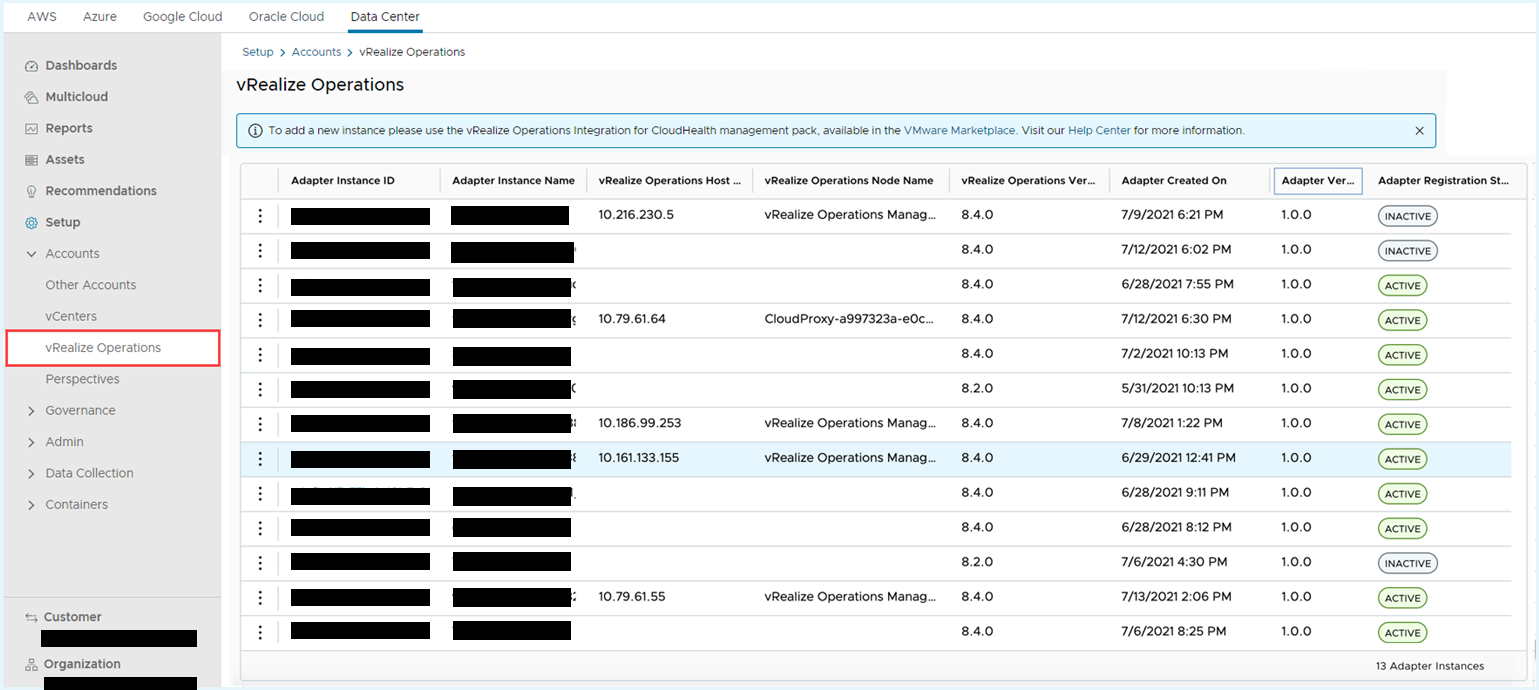
You can deploy the vRealize Operations Integration for Tanzu CloudHealth adapter in one or more existing on-prem vRealize Operations instances. In the Tanzu CloudHealth platform, you can view all the adapter instance details that you installed on the vRealize Operations Manager console.
- Login to the Tanzu CloudHealth platform and click the Data Center tab.
- From the left pane, select Setup > Accounts > vRealize Operations. Details of all the configured vRealize Operations instances will appear on the page.
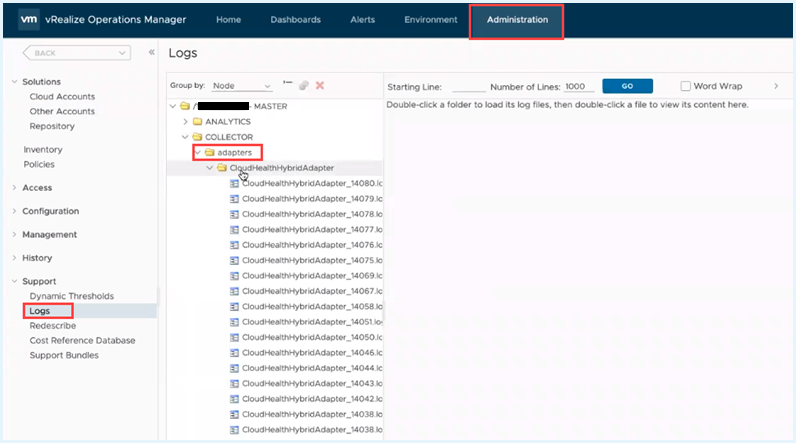
View Tanzu CloudHealth logs in the vRealize Operations Manager console
- In the vRealize Operations Manager console, from the left navigation pane, click Support, and select Logs.
- In the Logs pane, click the MASTER file, and go to Collector > Adapter > Tanzu CloudHealth HybridAdapter.
For FAQs on the vRealize Operations Integration, see Tanzu CloudHealth Knowledge Base Article.
Troubleshoot the vRealize Operations Integration for Tanzu CloudHealth
Buffer Size Overflow Error
If you get a Bad Request or Invalid Request error, you can now update the number of resource IDs you provide while calling the GET /api/resources/properties API.
- Log in to the vRealize Operations Manager instance platform using root credentials:
ssh root@vrops-instance-address - Enter the root password:
vmware - Navigate to the adapter config properties folder:
cd /usr/lib/vmware-vcops/user/plugins/inbound/CloudHealthHybridAdapter/conf/ - Open
config.propertiesfile. - Update the
max.resourcesvalue. Ensure that the value should be less than 500.
Configure Tanzu CloudHealth Aggregator for VMware Environment
Prerequisites
- Proxy address and credentials (the proxy address should be prefaced by
http://) - TCP access to:
api.cloudhealthtech.comat port443- vCenter server at port
443 - Credentials for a read-only account that can access the vSphere API. The read-only user account should have vCenter Global root level permissions. For more details, see How to create a vCenter Read-only User Account.
Step 1 - Configure and Download Tanzu CloudHealth Aggregator
The Tanzu CloudHealth Aggregator provides the Tanzu CloudHealth platform visibility into your data center assets. Configure and download a Virtual Appliance for the Tanzu CloudHealth Aggregator.
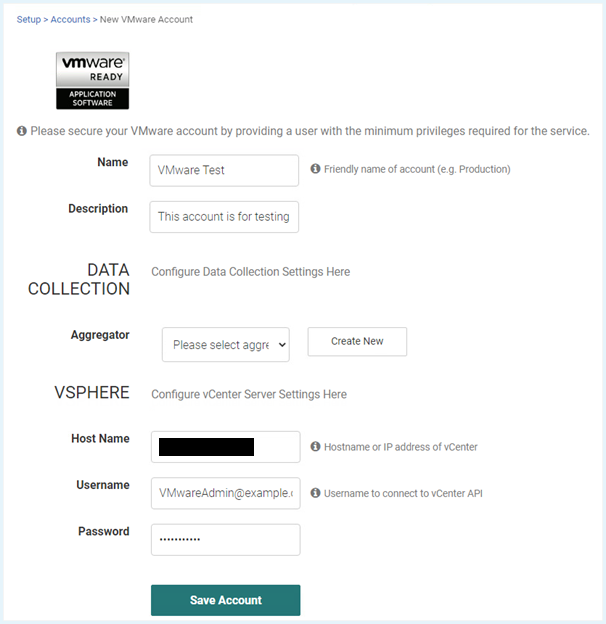
- Login to the Tanzu CloudHealth platform and select the Data Center tab.
- From the left menu, select Setup > Accounts > VMware. Then click Add Account.

The New VMware Account configuration page appears. Enter the following information in the setup form.- Name: Friendly name for the account.
- Description: Description for the account.
- Host Name: Hostname or IP address of the vCenter server.
- Username: Name of read-only user to connect to the vSphere API.
- Password: Password for read-only user.
-
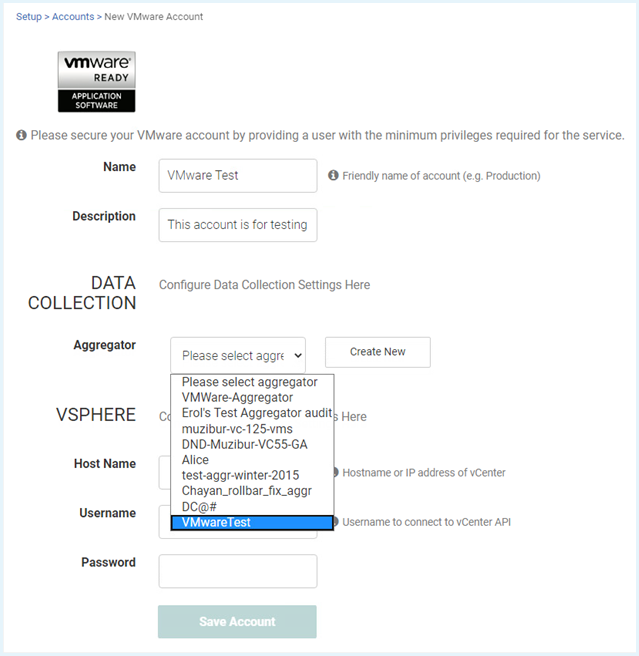
If you have already configured an aggregator, select it from the Aggregator dropdown. Otherwise, click Create New. To select an aggregator or to create a new aggregator, you must have created and configured at least one aggregator already. To configure an aggregator, see the Tanzu CloudHealth Aggregator topic.
Tanzu CloudHealth performs the following actions.- Populates the database and generates an aggregator using the name you provided for the VMware account.
- Generates and displays an installer token.
- Provides a download link for the OVA.
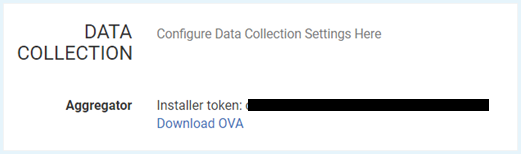
- Click the Download OVA link. The Save Account button is disabled until you install the OVA in your VMware environment. A single aggregator instance can manage a maximum of 5k VMs. See Tanzu CloudHealth Aggregator topic for more information. Tanzu CloudHealth recommends creating policies in the Tanzu CloudHealth platform to monitor the status of an aggregator that is not running or dead.
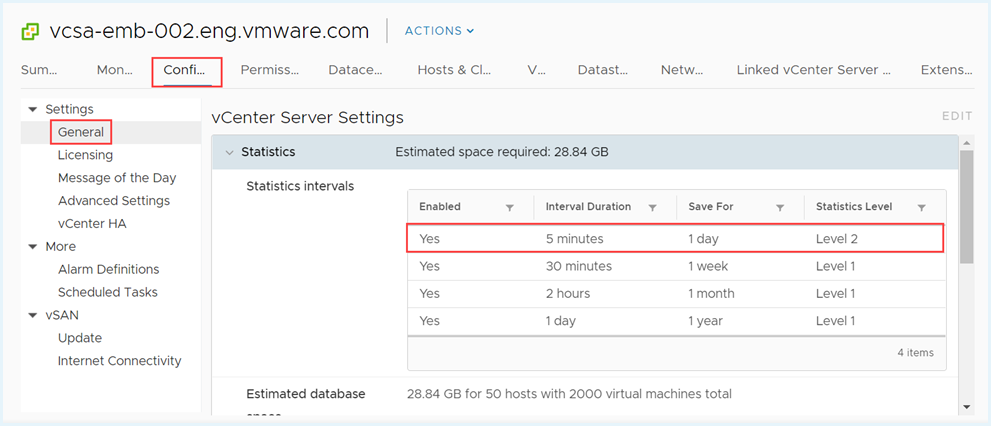
Step 2 - Deploy Virtual Appliance on vSphere Client
- Navigate to your vSphere Web Client. In the Configuration tab, select Settings > General. In the Statistics section, set Statistics collection level for the 5 minute interval to Level 2.
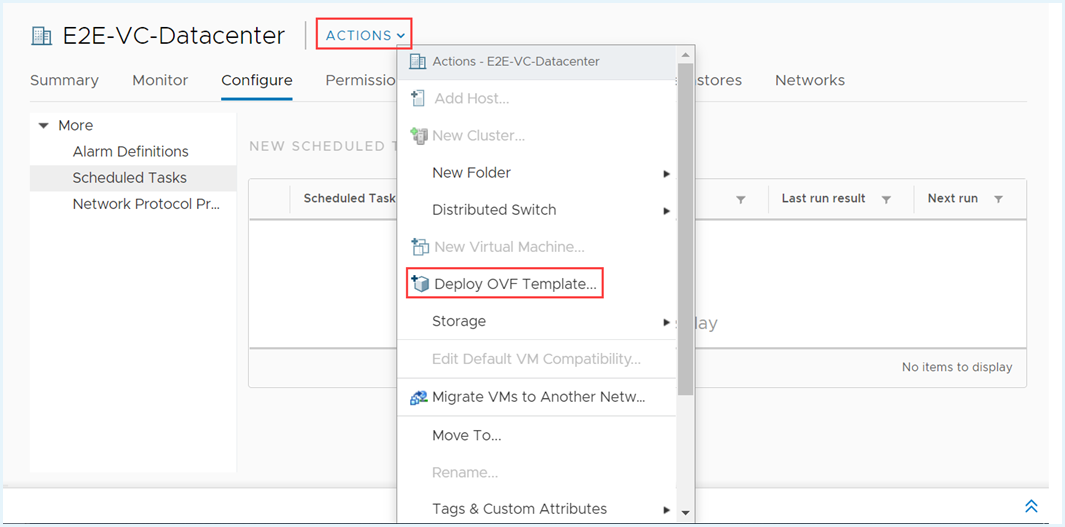
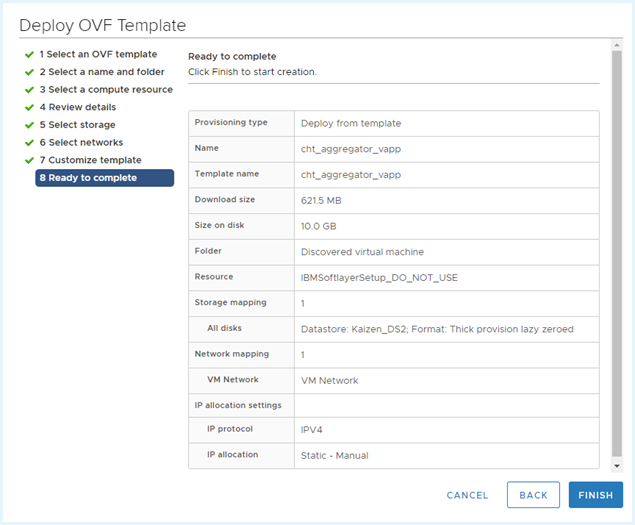
- From the left menu, select the Datacenter where you want to deploy the aggregator OVA. Click the Actions dropdown and select Deploy OVF Template.
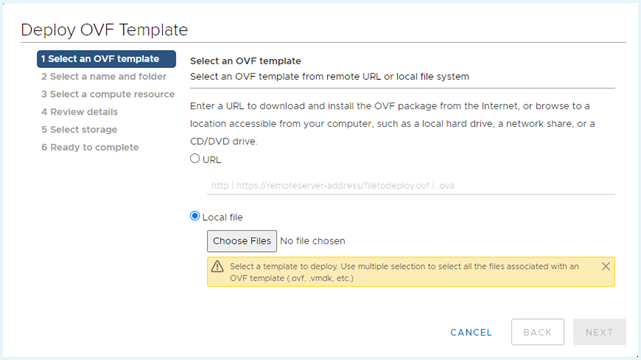
- In the Select an OVF template section, select Local file. Browse to the location where you downloaded the OVA. Then click Next.
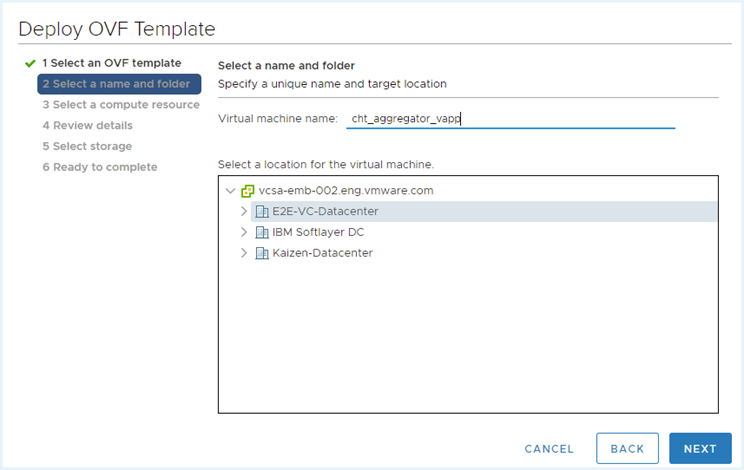
- In the Select a name and folder section, enter a name for the OVF, select a deployment location, and click Next.
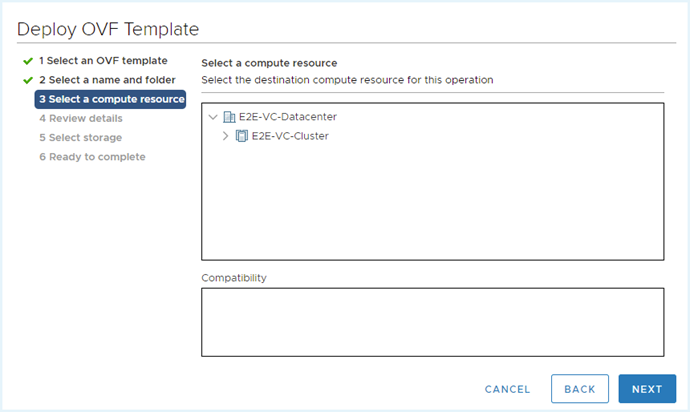
- In the Select a compute resource section, select where to run the deployed template, and click Next.
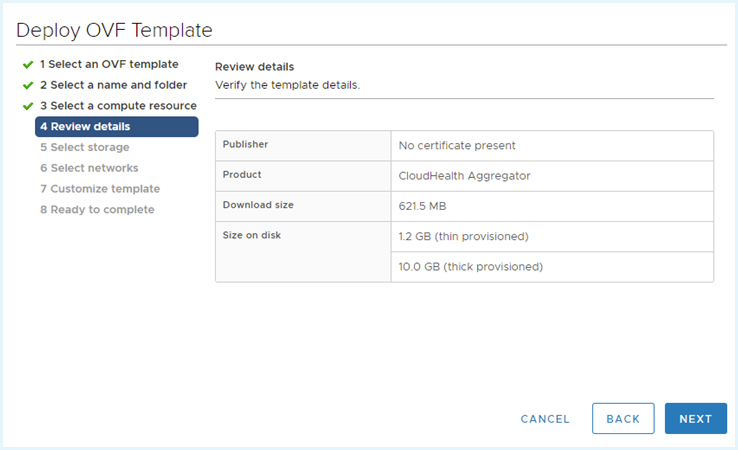
- In the Review details section, review the template details and click Next.
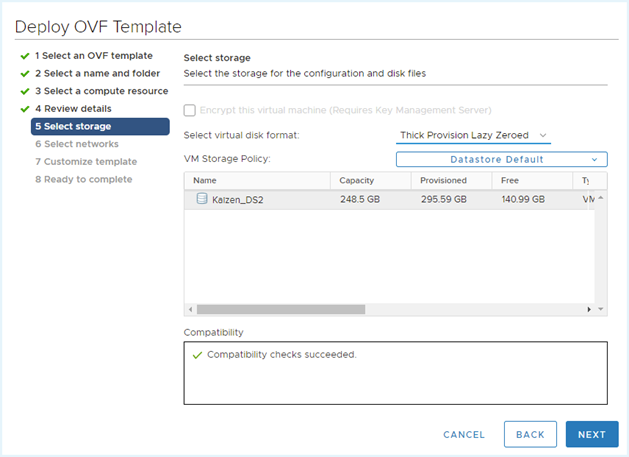
- In the Select storage section, select location to store files for the deployed template and click Next. Set virtual disk format to Thin provision.
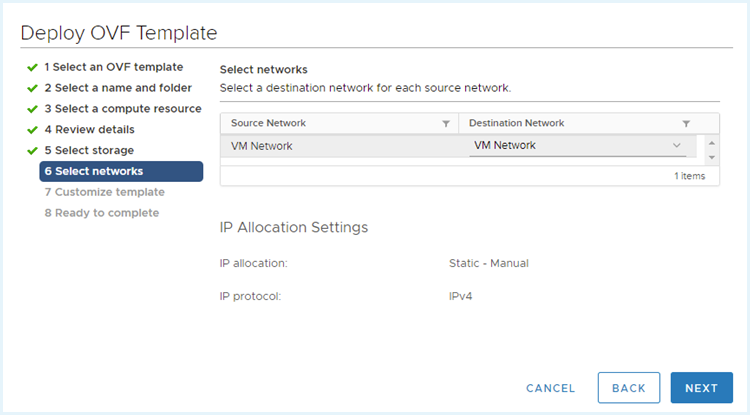
- In the Select networks section, select a destination network for each source network and click Next.
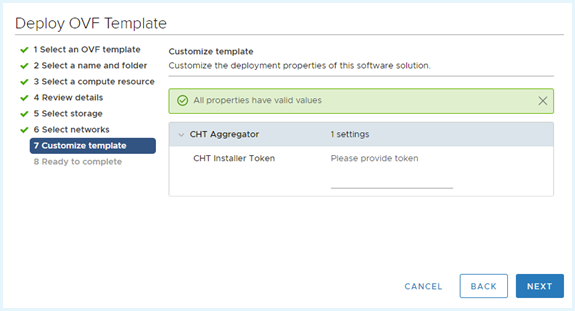
- In the Customize template section, customize the template by entering the CHT Installer Token that appeared in the Tanzu CloudHealth platform when you created the OVA. Click Next.
- Finally, review the configuration and click Finish.
Step 3 - Enable Virtual Appliance
NOTE - Do not power on the VM before completing this step.
- From the left menu, click the virtual appliance, and verify that the vApps options are enabled and the CHT Installer Token is accurate.
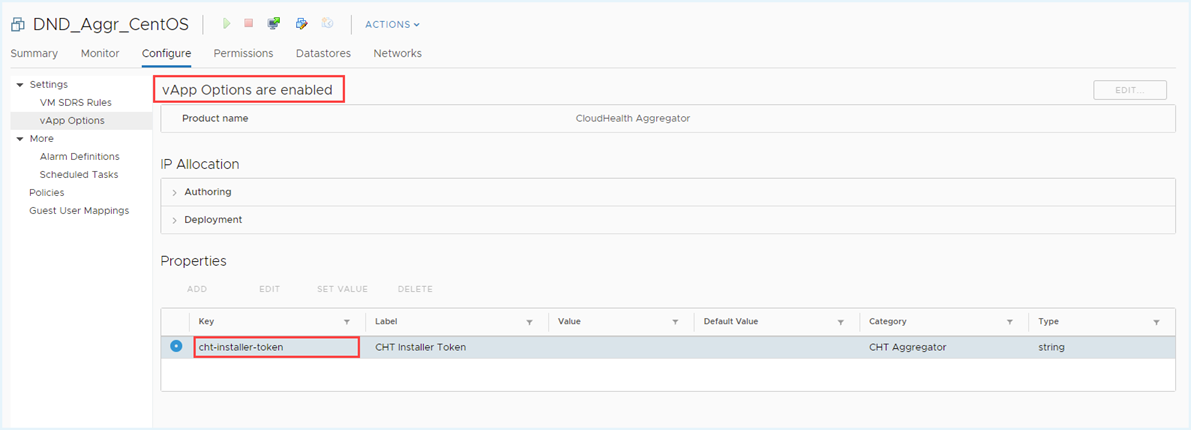
- To power on the deployed VM, from the left menu, right-click the virtual appliance, select Power and click Power On.
Step 4 - Configure Deployed Instance
- Click the Summary tab, and click Launch Web Console to connect to the instance.
- After the VM starts, login with the username
cloudhealth. No password is required at first login, but you must change your password immediately after. Tanzu CloudHealth adheres to the CentOS Password Policy for password criteria. - Run the network configuration script to verify the status of network controllers. Active controllers are indicated in green.
 Enter Y to edit the network configuration, for example, to set up for static IP addresses.
 -
Run
cht_installerscript to install the Tanzu CloudHealth Aggregator. The installer token is extracted from vApp parameters and consumed as a part of the installation process. The installer token can only be used once. To create another installer token, return to the Tanzu CloudHealth platform.
If the installer token fails to extract from vApp configured or deployed using OVA, you can manually pass it using
./cht_installer TOKEN. Replace \TOKEN\ with the actual token value.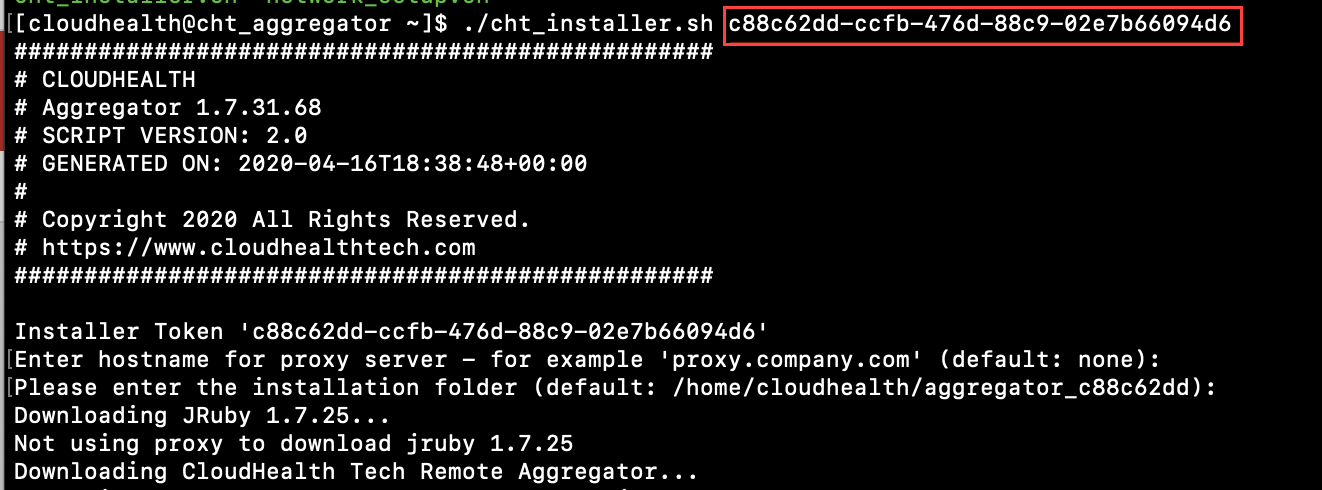
- Enter the proxy server address, username, and password for the aggregator.

Step 5 - SSL Certificate Verification
Depending on which Secure Sockets Layer (SSL) certificate you have in your vCenter server, you might need to take additional steps to enable SSL certificate verification.
You have the following options to validate SSL certificate verification:
- Trusted Third-Party Verification (Default): Use trusted third-party certificates (Recommended to use VMware trusted root CA certificate.)
- No SSL Certificate Verification: Disable all SSL certificate verification
- Self-signed Certificate: Use a CA certificate bundle that you install
By default, the aggregator working directory doesn’t have a cert.pem file and assumes that the vCenter server has a trusted CA certificate. If you are using a Self-Signed or alternative Trusted Third-Party certificate, you must enable the validation of the SSL certificate by placing a file called cert.pem in the working directory of the aggregator. If you are skipping SSL certificate verification, you must still place an empty cert.pem file in the working directory of the aggregator. The aggregator searches for cert.pem in the working directory and performs one of these actions:
- If
cert.pemdoes not exist (and the vCenter server doesn’t have a trusted CA certificate), then collection fails. - If
cert.pemexists and is not empty, then the contents ofcert.pemare used for SSL certificate verification of a Self-Signed Certificate or Trusted Third-party Certificate. - If
cert.pemexists and is empty (size = 0), then the aggregator runs with no SSL certificate verification.
In order for self-signed or Trusted Third-Party certificates to work correctly, DNS should be able to translate a vSphere IP address to its hostname. Typically, the hostname is embedded in the certificate. If the certificate is unable to resolve the hostname to an IP, the certificate rejects the hostname. Add the translation from IP to hostname to the /etc/host file.
Trusted Third-Party Verification (Using VMware’s Root CA Certificates)
Use the following steps to create a cert.pem file that uses the root CA Certificates made available by VMware.
If you have the Trusted Certificate in the aggregator VM working directory, your server is enabled for SSL certificate verification. You do not need to take additional steps and can proceed to Step 6: Configure Static IP Address.
Step 1 - Download the vCenter Server Root Certificate:
If you are using Linux CLI (Command Line Interface), CentOs, for example,
- Install wget using
sudo yum install wgetcommand. -
Download the certificates using the following
wgetcommand.wget https:///certs/download.zipOn Linux/Windows GUI (Graphical User Interface), you can download the certificates using a Web browser. Go to the vCenter home page and click Download trusted root CA certificates. On clicking Download trusted root CA certificates, a ZIP file with a set of certificates is downloaded to your machine. The unzipped file has the following directory structure:
certs
├── lin // Copy all certificate files (ends with .0 ext, other than .r0/.r1) from this folder to the directory where you installed the Aggregator
│   ├── a9d962ee.0
│   └── a9d962ee.r1
├── mac
│   ├── a9d962ee.0
│   └── a9d962ee.r1
└── win
├── a9d962ee.0.crt
└── a9d962ee.r1.crl
Step 2 - Copy the certificates to the cert.pem file: Create the cert.pem file. Once the VMware-provided CA certificates file is downloaded, copy the certificate bundle to cert.pem in the aggregator VM working directory where you installed the Tanzu CloudHealth Aggregator. You can use scp or copy and paste to add the contents of the downloaded file into cert.pem. For some vCenters .0 file can be single or multiple. In the case of multiple .0 ext files, copy the content of all the files to cert.pem file one after another, separated by a new line. 
Step 6 - Configure Static IP Address (Optional)
This step is optional. Skip it if you do not want to specify a static IP address.
- Run
./network_setup.shand in the Network Manager, select Edit a connection.
- Select the connection that you want to edit. Then select Edit.


- To set a static IP, select Manual and expand the row by selecting Show. Then select Add and enter the IP address that you want to use. Select Require IPv4 addressing for this connection.
- Return to the main menu of the Network Manager and select Activate a connection to view active connections.

- Exit the Network Manager and restart the network service by running
sudo service network restart. Then runip addrto view the static IP.
Step 7 - Complete VMware Account Creation
Once you have downloaded and installed the Tanzu CloudHealth Aggregator, the Save Account button becomes active. Click the button to create the VMware account in the Tanzu CloudHealth platform. 
