Migrating to AuthHub Authentication
NoteEffective October 31, 2024, Tanzu CloudHealth will migrate to a new service provider. To ensure uninterrupted access, please update your Single Sign On configuration as soon as possible
Migration Overview
Tanzu CloudHealth is upgrading the authentication tools and migrating to a new federation broker in October 2024. This upgrade requires some action on your part. SSO Administrators need to update their existing SSO configuration by October 31, 2024, to retain access to the Tanzu CloudHealth account.
The following sections guide you through the necessary steps to update your existing SSO Configuration.
How to Migrate to AuthHub SAML
Prerequisites
- SSO Admin access is required to perform the following migration steps.
- Before transitioning to the AuthHub SAML option, make sure to copy the current Sign In Endpoint and Signing Certificate.
STEP 1 - Configure AuthHub SAML SSO in Tanzu CloudHealth Platform
- In the Tanzu CloudHealth platform, navigate to Setup > Admin> Single Sign-On.
- In the Configuration tab, from the Provider dropdown, select AuthHub SAML.
- In the Sign In Endpoint field, enter the Sign In Endpoint that was previously copied.
- In the Issuer field, enter your company’s SAML Entity ID. This data is necessary for migration to AuthHub. For instructions on finding your Entity ID, see Finding your Entity ID for AuthHub SAML Migration.
- In the Signing Certificate field, paste the previously copied contents of the SAML Signing certificate.
- Click Update SSO Configuration to save your changes.
Note that
- Domain validation is not required for this migration process.
- The values in the User-Organization-Association and Default Organization remain the same.
STEP 2 - Configure AuthHub SAML Settings in IDP
- Update the existing Single Sign On URL or SSO/ACS callback URL within your SAML app for Tanzu CloudHealth. The callback URL must be set to
https://access.broadcom.com/default/saml/v1/sp/acs?sp=53359bda-9a9c-4264-a114-9a246544c372 - Update the existing Audience URI within your SAML app for Tanzu CloudHealth to
https://access.broadcom.com/default
Additional Steps Required for the Azure AD SAML Setup
- Log in to the Azure portal, navigate to Entra ID (formerly Azure Active Directory), or enter Entra ID in the search bar.
- From the left navigation bar, select Manage > Enterprise applications.
- Locate the Enterprise Application associated with Single Sign On for Tanzu CloudHealth and select the application.
- On the Set up Single Sign-On with SAML page, click the edit icon within the Attributes and Claims section.
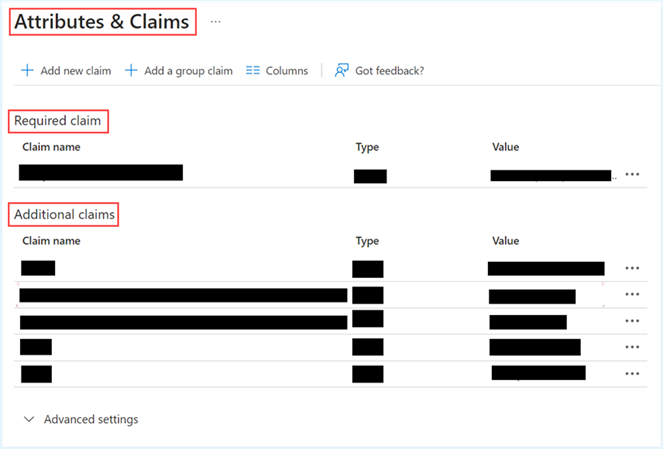
- To edit the existing claim rules, navigate to the Additional claims section and click on the Claim name you want to update.
- On the Manage claim page, remove the existing entry in the Namespace field, and click Save.
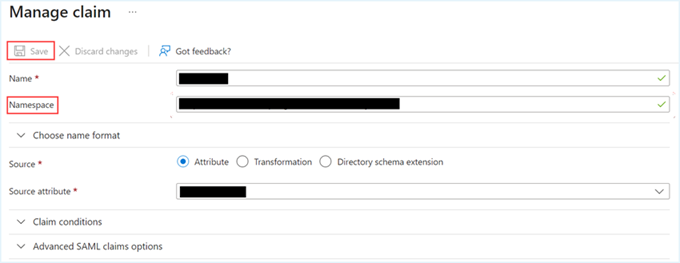
- Repeat steps 5 and 6 for each Claim rule within the Additional claims section. Claim rule in the Required Claim section remains unchanged.
- You will also need to update the email address claim rule if it already exists. Click on the Claim name you want to update. Ensure the Name field displays email, remove the existing entry in the Namespace field, and then click Save.

Once completed, this will enable the new AuthHub connection to successfully complete the sign-in process via Single Sign-On.
Additional Steps Required for the OneLogin Identity Provider
After completing the migration from SAML to AuthHub SAML using OneLogin as your identity provider (IdP), you may encounter an error message saying - Your user has not been assigned a role. Please contact your CloudHealth administrator. This issue occurs due to differences in how the old and new Service Providers for SSO handle attributes passed in the SAML assertion. To resolve the issue, you must update the existing roles claim rule within your OneLogin SAML application.
To update the roles claim,
- Log in to your OneLogin account as an admin user, and click Administration at the top-right corner.
- From the top navigation, click Applications > Applications.
- Select the SAML application, and from the left menu, select Parameters.
- To delete the existing roles claim. Click the roles claim. The Edit Field roles popup appears on the screen. Click Delete.
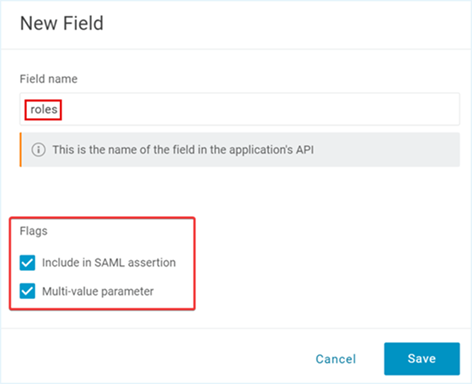
- To add a new roles claim that enables the new SSO service provider to correctly parse multiple values in the claims, click the + icon. The New Field popup appears on the screen.

- Enter roles as the Field name, select
Include in SAML assertionandMulti-value parameterFlags, and then click Save.
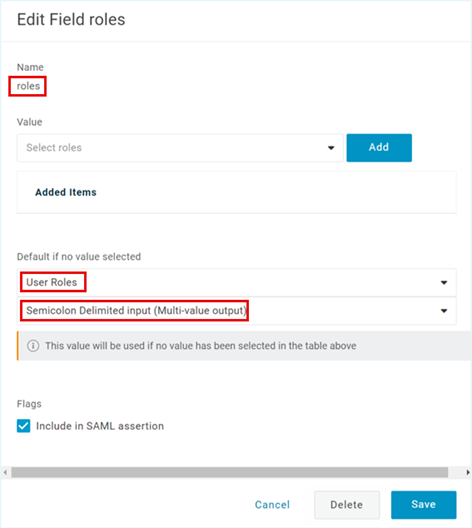
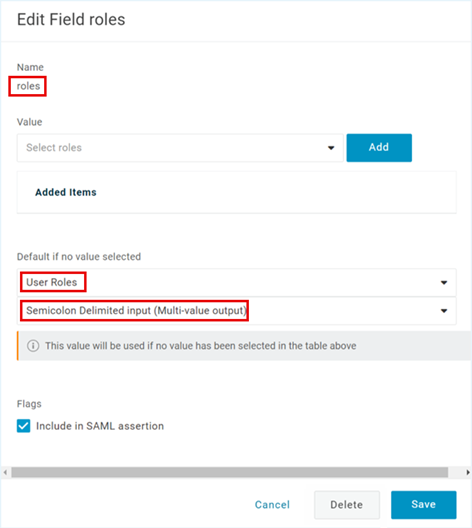
- Select the newly created roles claim, and the Edit Field roles popup appears.
- In the Edit Field roles popup, select User Roles from the first dropdown, select Semicolon Delimited Input (Multi-value output) from the second dropdown, and then click Save.
- Click Save at the top-right corner to save the changes you have made to your SAML application.
How to Migrate to AuthHub Azure AD
Prerequisite
You are assigned a Global Administrator role in the Active Directory that you want to use for authenticating your users.
Note
- For Partners, a Global Administrator configured under Tanzu CloudHealth > Setup > Admin > Users should perform the setup within the channel customer tenant.
- If your tenant currently has multiple domains claimed and is using Azure AD, please refer to the instructions provided in our knowledge base article and open a support ticket before proceeding with the migration to the AuthHub Azure AD. Our support team will help you claim additional domains.
- In the Tanzu CloudHealth platform, navigate to Setup > Admin > Single Sign-On.
- Click UNCONFIGURE SSO, and click UNCONFIGURE in the confirmation dialog box.
- From the Provider dropdown, select AuthHub Azure AD, and click UPDATE SSO CONFIGURATION. In the confirmation dialog box, click APPLY.
- Click Complete SSO Configuration. You will be redirected to the Azure portal.
- Enter your Global Administrator credentials to log in to the Azure portal.
- After a successful login, the Permissions requested dialog box will appear on the screen. Review the description of the permissions that the Tanzu CloudHealth application is requesting in your Azure AD tenant, and click Accept to grant consent.
- A success message You have successfully registered Tanzu CloudHealth as an application in your Azure AD directory appears on the screen. If you receive a message that the Domain already exists, you will need to UNCONFIGURE your SSO setting and reconfigure.
- To confirm the SSO configuration, navigate to the Tanzu CloudHealth Single Sign On page and click the Domains tab. Ensure the domain associated with the email of the user that consented is listed. If a partner, acting as a Global Administrator, configures the SSO connection for their tenant, they inadvertently claim the tenant domain.
Note - You can also migrate to AuthHub SAML and continue to use your Azure AD IdP by following the AuthHub SAML instructions.
How to Migrate to AuthHub Google Workspace
STEP 1 - Configure Google Workspace SAML App
- Log into
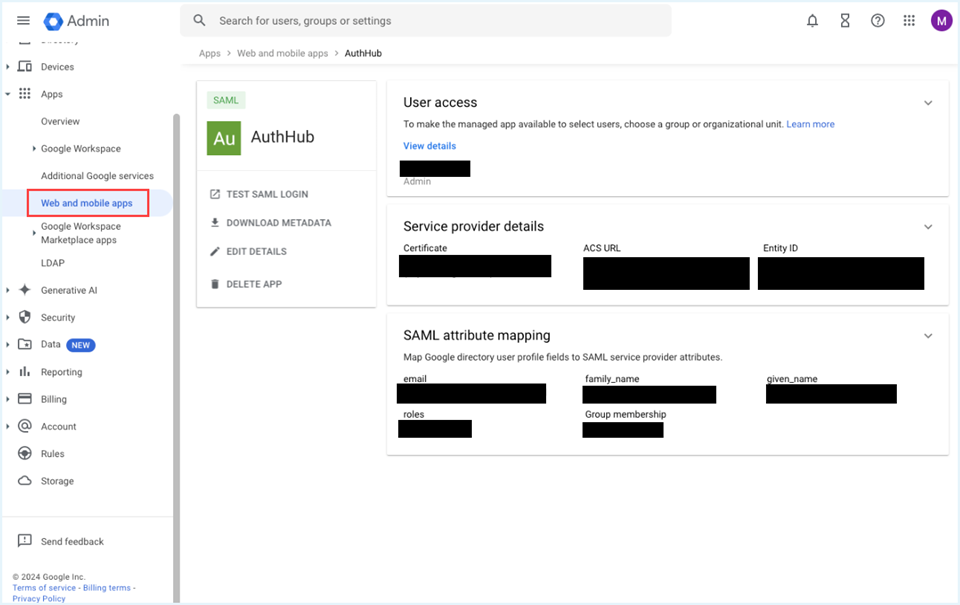
https://admin.google.comas a workspace administrator. - Select Apps > Web and mobile apps from the left navigation pane.
- From the toolbar, select Add App > Add custom SAML app.
-
Enter App Details.
a. Enter an App name and, optionally, a description.
b. Click Continue. -
Enter Google Identity Provider Details.
a. Download the IDP metadata or copy the SSO URL, Entity ID, and Certificate in a text editor. You will need these details when configuring AuthHub SAML in the Tanzu CloudHealth platform.
b. Click Continue. -
Enter Service Provider Details.
a. Enter ACS URL:
https://access.broadcom.com/default/saml/v1/sp/acsb. Enter Entity ID:
https://access.broadcom.com/defaultc. Select the certificate you would like to use. Proceed with caution, as existing applications may be using the existing certificate. If none exists, generate a new one using the Manage Certificates button.
d. Enter Name ID format: EMAIL.
e. Enter Name ID: Basic Information > Primary email.
f. Click Continue. -
Mapping Google Directory Attributes to SAML Service Provider Attributes.
a. Enter the following Basic Information:
- Primary email : email
- Last name : family_name
- First name : given_name
b. Add the necessary entries for any other custom attribute you may have used in the past.
c. Enter Group Membership details- For each Google group you specify, if the user is a member of that group, it will be included in the SAML response (i.e cloudhealth-standard, cloudhealth-power for CloudHeath classic roles, or another group etc)
- Use roles as the App attribute for Classic Roles.
d. Click Finish.
-
Configure User Access Setting. Configure user access on the App Details page, as the app is initially created with OFF for everyone service status. Note that anyone you want to be able to log into the Tanzu CloudHealth platform will need access to this app. You can provide segment access to existing working groups or org units, or you can create a new group or org unit.
STEP 2 - Configure Tanzu CloudHealth Tenant
On the Single Sign-On page, select AuthHub SAML and click Update SSO Configuration. This step is required to switch to AuthHub to broker authentication to Google Workspace authentication. Note that the SSO administrator performing these steps need Domain Administrator privileges and will be prompted to approve the connection.
Finding your Entity ID for AuthHub SAML Migration
To migrate to AuthHub SAML, you will need to get the Entity ID from your identity provider. The following sections will help you find the entity ID within your specific Identity Provider.
In Azure AD/ Entra AD
- Log in to the Azure portal, navigate to Entra ID (formerly Azure Active Directory), or enter Entra ID in the search bar.
- From the left navigation bar, select Manage > Enterprise applications.
- Locate the Enterprise Application associated with Single Sign On for Tanzu CloudHealth and select the application.
- From the left menu, select Single Sign On. Scroll down to the SAML Certificate section and copy the App Federation Metadata Url.
- Open the URL in a web browser. The URL opens an XML document that contains the Entity ID.
- Copy the Entity ID from the XML document and paste it in the Issuer field of the Tanzu CloudHealth platform.
In Okta
- Log in to the Okta portal and navigate to the Admin.
- From the left menu, go to Application > Applications.
- Locate the Application associated with Single Sign On for Tanzu CloudHealth and select the application.
- Click the Single Sign on tab, and copy the Metadata URL.
- Open the URL in a web browser. The URL opens an XML document that contains the Entity ID.
- Copy the Entity ID from the XML document and paste it in the Issuer field of the Tanzu CloudHealth platform.
OneLogin
- Log in to the OneLogin tenant, and in the upper-right corner, click Administration to navigate to the administration console.
- Click the Applications tab and select Applications.
- Select the Application associated with Single Sign On for Tanzu CloudHealth.
- From the left navigation, select SSO.
- Copy the Issuer URL, and open it in a web browser.The URL opens an XML document that contains the Entity ID.
- Copy the Entity ID from the XML document and paste it in the Issuer field of the Tanzu CloudHealth platform.
What to Expect After Migrating to AuthHub
After you migrate your SSO to AuthHub SAML, you may see a temporary interstitial page in AuthHub during your login to the Tanzu CloudHealth platform. This page indicates that you will be redirected to your IDP provider to authenticate. This interstitial page appears briefly only when you establish a new session with your IDP provider. It does not appear on subsequent logins with an existing session.
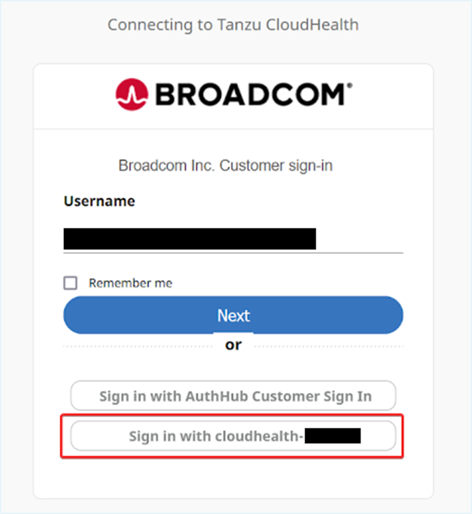
After migrating, if you see the following Sign-in page, please choose the CloudHealth-<id> option to continue signing in to the Tanzu CloudHealth platform.
Reverting to the Previous Single Sign-On Configuration
After migrating to AuthHub, you will have the option to switch back to your previous configuration for a limited period. In case the AuthHub configuration fails, the existing SAML SSO Configurations will be accessible as a backup for some time to ensure uninterrupted authentication. Since the domains previously validated will remain valid, and the exact Auth0 configuration will be used when you switch back to the previous configuration.
NoteAfter October 31, 2024, the option to revert to your previous Auth0 based configuration will no longer be available.
How to Revert to Previous SAML SSO Configuration
You can use the Retrieve SSO configuration API to revert to the previous SSO configuration. Alternatively, you can manually update the configuration in the Tanzu CloudHealth platform and in your SAML application.
To revert to your previous connection setting,
- In the Tanzu CloudHealth platform, navigate to Setup > Admin > Single Sign-On.
- In the Configuration tab, from the Provider dropdown, select SAML.
- Enter previous values in the Sign In Endpoint and Signing Certificate fields.
- Click Update SSO Configuration. Note that the Identity Provider Data section will be updated with new values.
- Open your SAML application in a new browser tab.
- Copy the Callback URL from the Tanzu CloudHealth Single Sign On page and paste it into the Single Sign On URL or SSO/ACS callback URL field in your SAML application.
- Copy the Audience URI from the Tanzu CloudHealth Single Sign On page and paste it into the Audience URI field in your SAML application.
This will successfully revert your previous SSO settings.
Configuration Assistance
If you need help migrating to new AuthHub authentication or reverting to your previous Auth- 0 configuration, please contact the Tanzu CloudHealth Support team or Technical Account Manager directly. You can also email us at [email protected].